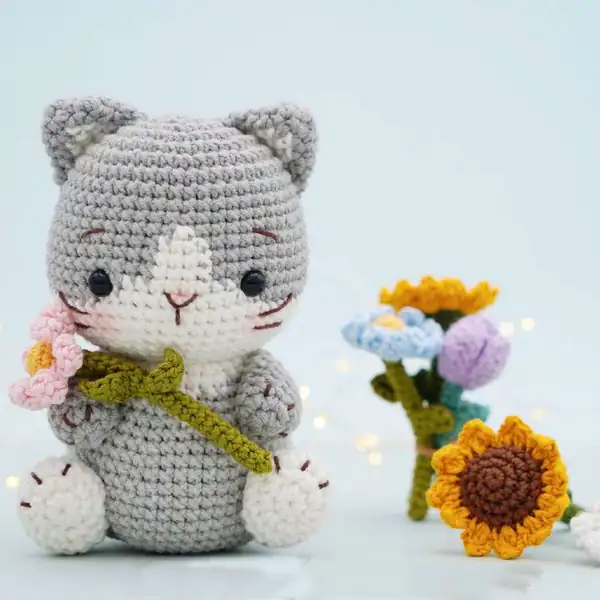
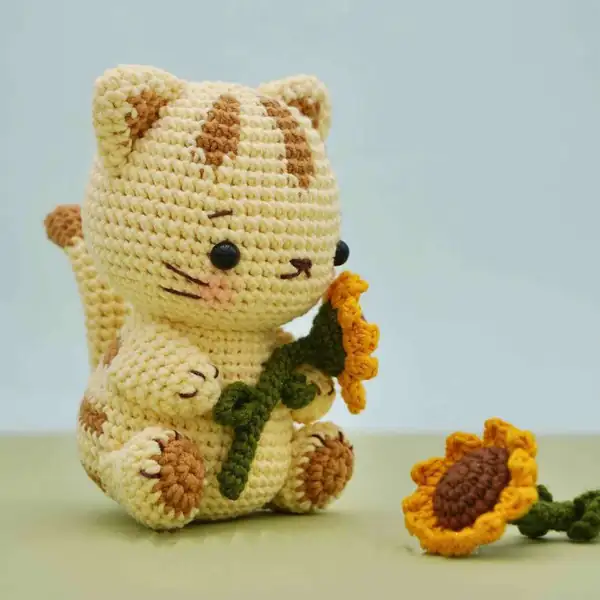
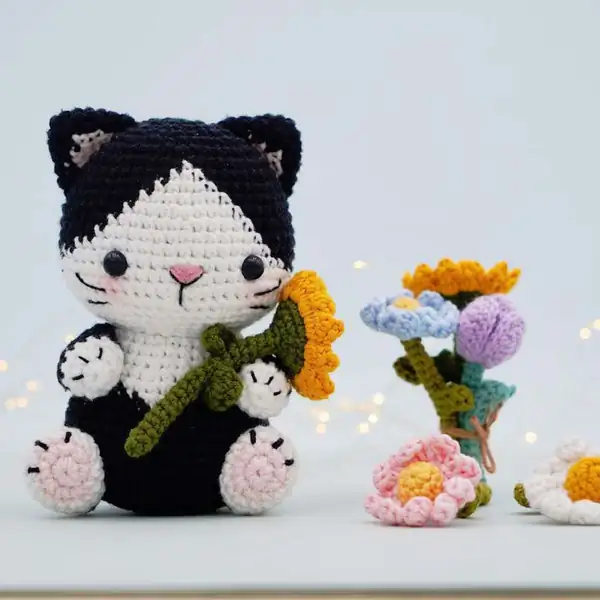
From the moment you start a magic ring and slip into the first round of brown for Sunny Kitty’s head, you can feel the pattern guiding your hands toward a pair of charming companions. The Cats and Flowers Amigurumi Pattern uses a classic DK weight base with selective color changes to create the two distinct felines: Sunny Kitty with warm brown tones, a darker brown for shading, and pale grey accents that bring dimension to the ears and cheeks; plus white for eyes highlights and a blush of pink for tiny noses. Each cat’s body is built with simple SC stitches and gentle INC and DEC to shape the neck, rounded belly, and capped tail. The petals, stems, and blossoms are added as separate motifs that join during assembly, so you get a little floral arrangement that stays secure even when the figures are handled. I love how the BLO stitches frame the facial features, while FLO adds subtle texture on the side facing outward. The finished piece stands about 14 cm tall, a comforting size that cushions into a hug or perches on a shelf as a reminder of spring.
— Part 1 :
Round 1: sc 6 into a magic ring [6];
Round 2: inc in each st around [12];
Round 3: (inc in next st, sc in next st) repeat 6 times [16];
Round 4: sc in next st, inc in next st, (sc in next 2 st, inc in;
— Part 2 :
Round 1: sc 5 into a magic ring [5];
Round 20: sc in next 4 st, inc in next st [6];
Round 21: inc in each st around [12];
Round 22: (inc in next st, sc in next st) repeat 6 times [16];
Round 23: sc in next st, inc in next st, (sc in next 2 st, inc in next st) repeat 5 times, sc in;
— Part 3 :
Round 1: sc 8 into a magic ring [8];
Round 2: (inc in next st, sc in next 3 st) repeat 2 times [10];
Round 3: sc in each st around [10];
— Part 4 :
Round 1: sc 5 into a magic ring [5];
Round 21: inc in each st around [10];
— Part 5 :
Round 1: Ch 8, starting the 2nd ch from hook, inc, hdc in next ch, dc in next 3 ch, hdc in;
Round 2: sc in next st, inc in next st, sc in next 6 st, inc in next st, sc in next 6 st, inc in next;
— Part 6 :
Round 1: sc 5 into a magic ring [5];
Round 16: inc in each st around [10];
Round 17: (sc in next st, inc in next st) repeat 5 times [15];
Round 21: (sc in next st, dec) repeat 5 times [10];
Round 22: (sc in next 3 st, dec) repeat 2 times [8];
— Part 7 :
Round 1: sc 8 into a magic ring [8];
Round 2: inc in each st around [16];
Round 3: (sc in next st, inc in next st) repeat 8 times [24];
Round 4: (sc in next 2 st, inc in next st) repeat 3 times, (brown yarn: sc in next 2 st; dark;
Round 5: (sc in next 3 st, inc in next st) repeat 3 times, (brown yarn: sc in next 2 st; dark;
Round 6: sc in next st, inc in next st, (sc in next 4 st, inc in next st) repeat 3 times, (dark;
Round 9: sc in next 22 st; dark brown yarn: sc in next st; brown yarn: sc in next 4 st; dark;
Round 10: sc in next 28 st; dark brown yarn: sc in next st; brown yarn: sc in next 19 st [48];
Round 11: (sc in next 7 st, inc in next st) repeat 6 times [54];
Round 16: (sc in next 8 st, inc in next st) repeat 6 times [60];
Round 17: sc in each st around [60];
Round 18: (sc in next 8 st, dec) repeat 6 times [54];
Round 19: sc in next 3 st, dec, (sc in next 7 st, dec) repeat 5 times, sc in next 4 st [48];
Round 20: (sc in next 6 st, dec) repeat 6 times [42];
Round 21: sc in next 2 st, dec, (sc in next 5 st, dec) repeat 5 times, sc in next 3 st [36];
Round 22: (sc in next 4 st, dec) repeat 6 times [30];
Round 23: sc in next st, dec, (sc in next 3 st, dec) repeat 5 times, sc in next 2 st [24];
Round 24: sl st in each st around [24];
Round 25: (sc in next 2 st, inc in next st) repeat 8 times [32];
Round 26: sc in next 28 st; dark brown yarn: sc in next 4 st [32];
Round 27: sc in next 13 st; brown yarn: sc in next 15 st; dark brown yarn: sc in next 4 st;
Round 28: (sc in next 3 st, inc in next st) repeat 3 times, sc in next st; brown yarn: sc in;
Round 31: (sc in next 4 st, inc in next st) repeat 6 times, sc in next 4 st; dark brown yarn:;
Round 32: sc in next 21 st; brown yarn: sc in next 19 st; dark brown yarn: sc in next 8 st [48];
Round 33: sc in next 21 st; brown yarn: sc in next 27 st [48];
Round 34: (sc in next 11 st, inc in next st) repeat 4 times [52];
Round 35: sc in each st around [52];
Round 36: sc in next 44 st; dark brown yarn: sc in next 8 st [52];
Round 37: sc in next 21 st; brown yarn: sc in next 23 st; dark brown yarn: sc in next 8 st [52];
Round 38: sc in next 21 st; brown yarn: sc in next 31 st [52];
Round 39: (sc in next 11 st, dec) repeat 4 times [48];
Round 40: sc in each st around [48];
Round 41: (sc in next 4 st, dec) repeat 8 times [40];
Round 42: sc in next st, dec, (sc in next 3 st, dec) repeat 7 times, sc in next 2 st [32];
Round 43: (sc in next 2 st, dec) repeat 8 times [24];
Round 44: (sc in next st, dec) repeat 8 times [16];
Round 45: dec 8 times [8];
— Part 8 :
Round 1: sc 8 into a magic ring [8];
Round 2: (inc in next st, sc in next st) repeat 4 times [12];
— Part 9 :
Round 1: sc 8 into a magic ring [8];
Round 2: inc in each st around [16];
Round 3: sc in next st, inc in next st, sc in next 5 st, inc in next 2 st, sc in next 5 st, inc in;
Round 4: sc in each st around [20];
Round 5: sc in next 6 st, dec 4 times, sc in next 6 st [16];
Round 6: [sc in next 4 st, dec] repeat 2 times, sc in next 4 st [14];
Round 7: sc in next 6 st, dec, sc in next 6 st [13];
Round 8: sc in next 6 st, inc in next st, sc in next 6 st [14];
— Part 10 :
Round 1: sc 6 into a magic ring [6];
Round 2: (inc in next st, sc in next st) repeat 3 times [9];
Round 3: inc in next st, sc in next 2 st, inc in next st; dark brown yarn: sc in next st; brown;
Round 4: sc in next 5 st; dark brown yarn: sc in next 3 st; brown yarn: sc in next 4 st [12];
Round 5: sc in next 3 st, inc in next st, sc in next st; dark brown yarn: sc in next 2 st, inc in;
Round 6: sc in next 4 st, inc in next st, sc in next st; dark brown yarn: sc in next 3 st, inc in;
— Part 11 :
Round 1: sc 6 into a magic ring [6];
Round 2: (inc in next st, sc in next st) repeat 3 times [9];
— Part 12 :
Round 1: sc 8 into a magic ring [8];
Round 2: inc in each st around [16];
Round 3: (sc in next st, inc in next st) repeat 8 times [24];
Round 4: (sc in next 2 st, inc in next st) repeat 8 times [32];
Round 5: sc in next st, inc in next st, (sc in next 3 st, inc in next st) repeat 7 times, sc in;
Round 6: (sc in next 4 st, inc in next st) repeat 8 times [48];
Round 11: (sc in next 7 st, inc in next st) repeat 2 times, sc in next 7 st; white yarn: inc in;
Round 15: sc in next 22 st; white yarn: sc in next 8 st; grey yarn: sc in next 24 st [54];
Round 16: (sc in next 8 st, inc in next st) repeat 2 times, sc in next 2 st; white yarn: sc in;
Round 17: sc in each st around [60];
Round 18: (sc in next 8 st, dec) repeat 6 times [54];
Round 19: sc in next 3 st, dec, (sc in next 7 st, dec) repeat 5 times, sc in next 4 st [48];
Round 20: (sc in next 6 st, dec) repeat 6 times [42];
Round 21: sc in next 2 st, dec, (sc in next 5 st, dec) repeat 5 times, sc in next 3 st [36];
Round 22: (sc in next 4 st, dec) repeat 6 times [30];
Round 23: sc in next st, dec, (sc in next 3 st, dec) repeat 5 times, sc in next 2 st [24];
Round 24: sl st in each st around [24];
Round 25: (sc in next 2 st, inc in next st) repeat 8 times [32];
Round 26: white yarn: sc in next 20 st; grey yarn: sc in next 12 st [32];
Round 27: sc in next 14 st; white yarn: sc in next 4 st; grey yarn: sc in next 14 st [32];
Round 28: (sc in next 3 st, inc in next st) repeat 4 times; white yarn: sc in next 2 st; grey;
Round 29: sc in next 21 st; white yarn: sc in next st; grey yarn: sc in next 18 st [40];
Round 30: sc in each st around [40];
Round 31: (sc in next 4 st, inc in next st) repeat 8 times [48];
Round 34: (sc in next 11 st, inc in next st) repeat 4 times [52];
Round 39: (sc in next 11 st, dec) repeat 4 times [48];
Round 40: sc in each st around [48];
Round 41: (sc in next 4 st, dec) repeat 8 times [40];
Round 42: sc in next st, dec, (sc in next 3 st, dec) repeat 7 times, sc in next 2 st [32];
Round 43: (sc in next 2 st, dec) repeat 8 times [24];
Round 44: (sc in next st, dec) repeat 8 times [16];
Round 45: dec 8 times [8];
— Part 13 :
Round 1: sc 8 into a magic ring [8];
Round 2: (inc in next st, sc in next st) repeat 4 times [12];
— Part 14 :
Round 1: sc 8 into a magic ring [8];
Round 2: inc in each st around [16];
Round 3: sc in next st, inc in next st, sc in next 5 st, inc in next 2 st, sc in next 5 st, inc in;
Round 4: sc in each st around [20];
Round 5: sc in next 6 st, dec 4 times, sc in next 6 st [16];
Round 6: [sc in next 4 st, dec] repeat 2 times, sc in next 4 st [14];
Round 7: sc in next 6 st, dec, sc in next 6 st [13];
Round 8: sc in next 6 st, inc in next st, sc in next 6 st [14];
— Part 15 :
Round 1: sc 6 into a magic ring [6];
Round 2: (inc in next st, sc in next st) repeat 3 times [9];
Round 3: inc in next st, sc in next 2 st, inc in next st; white yarn: sc in next st; grey yarn: sc;
Round 4: sc in next 5 st; white yarn: sc in next 3 st; grey yarn: sc in next 4 st [12];
Round 5: sc in next 3 st, inc in next st, sc in next st; white yarn: sc in next 2 st, inc in next st;
Round 6: sc in next 4 st, inc in next st, sc in next st; white yarn: sc in next 3 st, inc in next st;
— Part 16 :
Round 1: sc 6 into a magic ring [6];
Round 2: (inc in next st, sc in next st) repeat 3 times [9];
— Part 17 :
Round 1: sc 8 into a magic ring [8];
Round 2: inc in each st around [16];
Round 3: (sc in next st, inc in next st) repeat 8 times [24];
Round 4: (sc in next 2 st, inc in next st) repeat 8 times [32];
Round 5: sc in next st, inc in next st, (sc in next 3 st, inc in next st) repeat 7 times, sc in;
Round 6: (sc in next 4 st, inc in next st) repeat 8 times [48];
Round 7: sc in next 23 st, white yarn: sc in next st; black yarn: sc in next 24 st [48];
Round 8: sc in next 22 st; white yarn: sc in next 3 st; black yarn: sc in next 23 st [48];
Round 9: sc in next 21 st; white yarn: sc in next 5 st; black yarn: sc in next 22 st [48];
Round 10: sc in next 20 st; white yarn: sc in next 7 st; black yarn: sc in next 21 st [48];
Round 11: (sc in next 7 st, inc in next st) repeat 2 times, sc in next 3 st; white yarn: sc in;
Round 12: sc in next 20 st; white yarn: sc in next 12 st; black yarn: sc in next 22 st [54];
Round 13: sc in next 19 st; white yarn: sc in next 14 st; black yarn: sc in next 21 st [54];
Round 14: sc in next 17 st; white yarn: sc in next 17 st; black yarn: sc in next 20 st [54];
Round 15: sc in next 15 st; white yarn: sc in next 21 st; black yarn: sc in next 18 st [54];
Round 16: sc in next 8 st, inc in next st, sc in next 4 st; white yarn: sc in next 4 st, inc in;
Round 17: sc in next 12 st; white yarn: sc in next 48 st [60];
Round 18: (sc in next 8 st, dec) repeat 6 times [54];
Round 19: sc in next 3 st, dec, (sc in next 7 st, dec) repeat 5 times, sc in next 4 st [48];
Round 20: (sc in next 6 st, dec) repeat 6 times [42];
Round 21: sc in next 2 st, dec, (sc in next 5 st, dec) repeat 5 times, sc in next 3 st [36];
Round 22: (sc in next 4 st, dec) repeat 6 times [30];
Round 23: sc in next st, dec, (sc in next 3 st, dec) repeat 5 times, sc in next 2 st [24];
Round 24: sl st in each st around [24];
Round 25: (sc in next 2 st, inc in next st) repeat 8 times [32];
Round 26: white yarn: sc in next 24 st; black yarn: sc in next 8 st [32];
Round 27: sc in next 11 st; white yarn: sc in next 11 st; black yarn: sc in next 10 st [32];
Round 28: (sc in next 3 st, inc in next st) repeat 3 times; white yarn: (sc in next 3 st, inc in;
Round 29: sc in next 17 st; white yarn: sc in next 6 st; black yarn: sc in next 17 st [40];
Round 30: sc in next 19 st; white yarn: sc in next 2 st; black yarn: sc in next 19 st [40];
Round 31: (sc in next 4 st, inc in next st) repeat 4 times; white yarn: sc in next st; black;
Round 34: (sc in next 11 st, inc in next st) repeat 4 times [52];
Round 39: (sc in next 11 st, dec) repeat 4 times [48];
Round 40: sc in each st around [48];
Round 41: (sc in next 4 st, dec) repeat 8 times [40];
Round 42: sc in next st, dec, (sc in next 3 st, dec) repeat 7 times, sc in next 2 st [32];
Round 43: (sc in next 2 st, dec) repeat 8 times [24];
Round 44: (sc in next st, dec) repeat 8 times [16];
Round 45: dec 8 times [8];
— Part 18 :
Round 1: sc 8 into a magic ring [8];
Round 2: (inc in next st, sc in next st) repeat 4 times [12];
Round 3: sc in each st around [12];
— Part 19 :
Round 1: sc 8 into a magic ring [8];
Round 2: inc in each st around [16];
Round 3: sc in next st, inc in next st, sc in next 5 st, inc in next 2 st, sc in next 5 st, inc in;
Round 4: sc in each st around [20];
Round 5: sc in next 6 st, dec 4 times, sc in next 6 st [16];
Round 6: [sc in next 4 st, dec] repeat 2 times, sc in next 4 st [14];
Round 7: sc in next 6 st, dec, sc in next 6 st [13];
Round 8: sc in next 6 st, inc in next st, sc in next 6 st [14];
— Part 20 :
Round 1: sc 6 into a magic ring [6];
Round 2: (inc in next st, sc in next st) repeat 3 times [9];
Round 3: inc in next st, sc in next 2 st, inc in next st; pink yarn: sc in next st; black yarn: sc;
Round 4: sc in next 5 st; pink yarn: sc in next 3 st; black yarn: sc in next 4 st [12];
Round 5: sc in next 3 st, inc in next st, sc in next st; pink yarn: sc in next 2 st, inc in next st;
Round 6: sc in next 4 st, inc in next st, sc in next st; pink yarn: sc in next 3 st, inc in next st;
— Part 21 :
Round 1: sc 6 into a magic ring [6];
Round 2: (inc in next st, sc in next st) repeat 3 times [9];
As you finish The Cats and Flowers Amigurumi Pattern, you’ll find yourself smiling at the way two little kitties hold a bouquet like a promise of spring. The design combines classic amigurumi technique with a playful floral theme, resulting in a pair that is both decorative and tactile. The 14 cm tall figures balance adorableness with practicality, making them ideal as gifts, desk companions, or nursery décor. I hope you savor each ring of the hook, each color change, and every tiny face that comes to life as you stitch. When you finally attach the safety eyes and tuck in the final ends, you’ll know this is more than a project; it’s a small celebration of patience, craft, and a garden’s worth of charm translated into yarn.