An adorable friend to cherish, handcrafted with love to bring comfort and joy for years to come.
All-Day Adventure
Requires an 8-12 hour journey, perfect for dedicated crafters who enjoy detailed shaping, color changes, and precise assembly to bring Knit Grit to life.
Intermediate Level
This pattern is ideal for an intermediate maker who enjoys seamless rounds, precise increases and decreases, magic rings, color changes, and careful seaming to bring Knit Grit to life with character.
About This Knit Grit Amigurumi Pattern
Meet Knit Grit, a quirky little amigurumi friend with a bone-inspired twist. This pattern blends whimsy and whimsy with soft yarn and a dash of personality, making it perfect for gift-giving or a special treat for yourself. The design breaks into clearly defined parts: a head with a playful expression, a colored body, bone-top elements, and connected limbs that yield a poseable, cuddly companion. It’s equally fun to customize with color changes and simple accessories, so you can tailor Knit Grit to any mood or season.
<p>This amigurumi pattern builds a playful little character with a white head and bone accents, a colored body, and separate leg pieces that connect to create a quirky, poseable toy. The design relies on classic crochet techniques like the magic ring, seamless rounds, and basic increases and decreases, then adds personality with color-changing sections and careful assembly.</p>
<p>Each piece is crocheted separately and then joined with precise seaming to form the final character. Color changes are used to highlight the bone accents and the body’s bold contrast, giving Knit Grit a distinctive, playful look. The instructions include tips for stuffing and finishing so the toy remains soft and durable.</p>
Why You'll Love This Knit Grit Amigurumi Pattern
<p>I absolutely love this pattern because it challenges me to think in 3D as I assemble the head, limbs, and bone top pieces. The combination of bones and vibrant body colors makes a character that is both eerie and endearing, which always brings smiles. I enjoy the rhythmic, almost meditative process of stitching around the rounds and watching the character come to life layer by layer. It’s a perfect project for an afternoon of focused crochet that ends with a tangible, charming masterpiece.</p>
Switch Things Up
I love how versatile this pattern is for customization! You can easily adjust the colors to create your own unique character - try pastel shades for a softer look, or bold brights for maximum impact.
Want to make it bigger or smaller? Simply change your yarn weight and hook size. Using bulky yarn with a larger hook will give you a chunky, cuddly version, while thin yarn creates an adorable mini version perfect for keychains.
I often add my own creative touches like embroidered details, felt accessories, or even tiny crocheted props. These personal additions make each piece truly one-of-a-kind and special.
Don't be afraid to experiment with different facial expressions too! The placement of eyes and mouth can completely change the personality of your creation. Try different positions before securing them permanently.
For an extra special touch, consider adding wire to the limbs for posability, or create a whole set of outfits and accessories. The possibilities are endless, and that's what makes this pattern so much fun!
Common Mistakes & How to Fix Them
Not marking rounds during color changes can throw off alignment; place a stitch marker at the start of every round to stay on track.Overstuffing limbs creates stiff joints and a less natural pose; stuff gradually in small amounts and shape as you go.Skipping stitch counts during increases/decreases leads to odd shaping; count after each round, especially in the early rounds.Wasting yarn ends by aggressive weaving; weave in ends as you go and leave minimal tails for sewing.
Maker's Notes
I used I Love This Cotton! Worsted in White, Aubergine, Red, and Teal with a 3.0 mm hook. The project took about 9 hours across three evenings. The head shaping and eye placement were the trickiest parts for beginners. I found the limb attachment easiest when I left tails long and used a firm whipstitch and small amounts of stuffing to preserve pose.
I tried a substitution: I tried a DK weight yarn with a 3.25 mm hook and the finished height reduced to about 6-7 cm; I had to significantly adjust the pattern and add extra rounds to reach the intended scale.
Knit Grit Amigurumi Pattern
Meet Knit Grit, a quirky little amigurumi friend with a bone-inspired twist. This pattern blends whimsy and whimsy with soft yarn and a dash of personality, making it perfect for gift-giving or a special treat for yourself. The design breaks into clearly defined parts: a head with a playful expression, a colored body, bone-top elements, and connected limbs that yield a poseable, cuddly companion. It’s equally fun to customize with color changes and simple accessories, so you can tailor Knit Grit to any mood or season.
Intermediate8-12 Hours
Pattern at a glance
Skill level
Intermediate
Time to make
8-12 Hours
Hook size
3.0 mm (C/2)
Yarn weight
Worsted / #4
Finished size
Approx. 9 cm tall / 3.5 in
Gauge
4 SC x 4 ROWS = 1 inch (2.54 cm) approximately
Yarn used
Total yarn: ~120 g main colors; White 40 g, Red 40 g, Teal 40 g, Accent 5-10 g
Materials Needed
Main Fabric
01
Worsted weight yarn (#4), approximately 120 g total (colors: White for head/neck, Red for body, Teal for limbs, Purple accent).
02
White: main head and neck color - ~40 g
03
Red: body color - ~40 g
04
Teal: limb color - ~40 g
05
Purple accent: optional details - ~5-10 g
Tools Required
01
Crochet hook 3.0 mm (D) or 3.25 mm (D/3)
02
Yarn needle for weaving and joining
03
Scissors
04
Polyester stuffing
05
Stitch markers
06
Safety eyes (optional) or embroider eyes
07
Pins for positioning parts
08
Wire for posable limbs (optional)
— Head :
Round 1 :
6 SC in magic ring (6)
Round 2 :
6 INC (12)
Round 3 :
(1 SC, 1 INC) x6 (18)
Round 4 :
(2 SC, 1 INC) x6 (24)
Round 5 :
(3 SC, 1 INC) x6 (30)
Round 6 :
(4 SC, 1 INC) x6 (36)
Round 7-11 :
1 SC in each stitch (36)
Round 12 :
(4 SC, 1 DEC) x6 (30)
Info :
Place safety eyes between rounds 8-9, separated by 6 SC
Round 13 :
(3 SC, 1 DEC) x6 (24)
Info :
Stuff the head firmly before continuing
Round 14 :
(2 SC, 1 DEC) x6 (18)
Round 15 :
(1 SC, 1 DEC) x6 (12)
Round 16 :
6 DEC (6)
Info :
Fasten off, leaving long tail for sewing
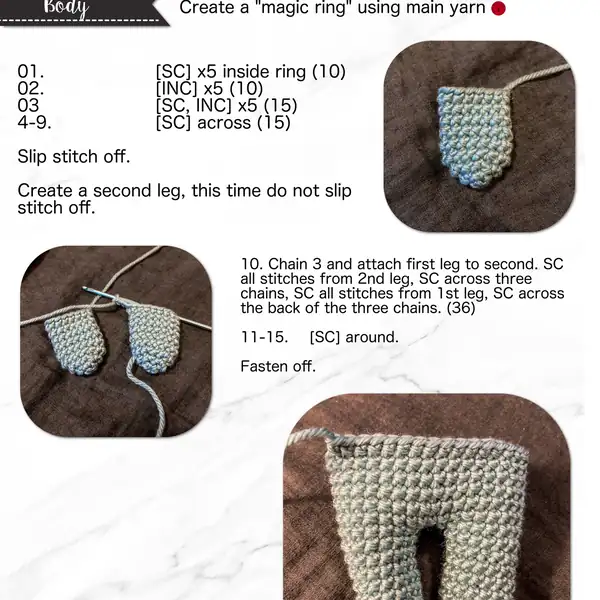
— Body :
Round 1 :
6 SC in magic ring (6)
Round 2 :
6 INC (12)
Round 3 :
(1 SC, 1 INC) x6 (18)
Round 4 :
(2 SC, 1 INC) x6 (24)
Round 5 :
(3 SC, 1 INC) x6 (30)
Round 6 :
(4 SC, 1 INC) x6 (36)
Round 7-11 :
1 SC in each stitch (36)
Round 12 :
(4 SC, 1 DEC) x6 (30)
Round 13 :
(3 SC, 1 DEC) x6 (24)
Round 14 :
(2 SC, 1 DEC) x6 (18)
Round 15 :
(1 SC, 1 DEC) x6 (12)
Round 16 :
6 DEC (6)
Info :
Fasten off, leaving tail for sewing
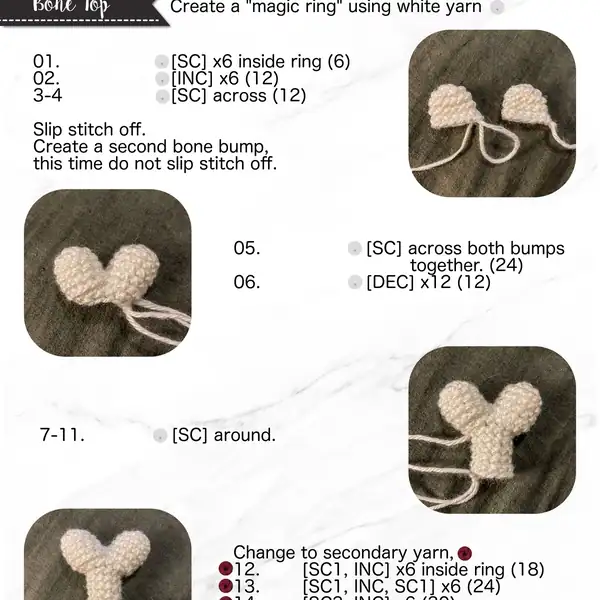
— Bone Top :
Round 1 :
[SC] x6 inside ring (6)
Round 2 :
[INC] x6 (12)
Round 3-4 :
[SC] across (12)
Round 5 :
[SC] across both bumps together (24)
Round 6 :
[DEC] x12 (12)
Round 7-11 :
[SC] around (36)
Round 12 :
[SC], INC x6 inside ring (18)
Rounds 13-15 :
[SC], INC, SC11 x6 (24)
Round 16 :
[SC] across (36)
Info :
Fasten off, leaving tail for sewing
— Leg :
Round 1 :
[SC] x6 inside ring (6)
Round 2 :
[INC] x6 (12)
Round 3-4 :
[SC] across (12)
Round 5-9 :
[SC] around (15)
Round 10-15 :
Chain 3 and attach first leg to second. SC all stitches from 2nd leg, SC across three chains, SC all stitches from 1st leg, SC across the back of the three chains. (36)
Round 16 :
[SC] around
Info :
Fasten off
— Tail :
Round 1 :
[SC] x6 inside ring (6)
Round 2 :
[INC] x6 (12)
Round 3-4 :
[SC] across (12)
Round 5-7 :
[SC] around (18)
Info :
Fasten off
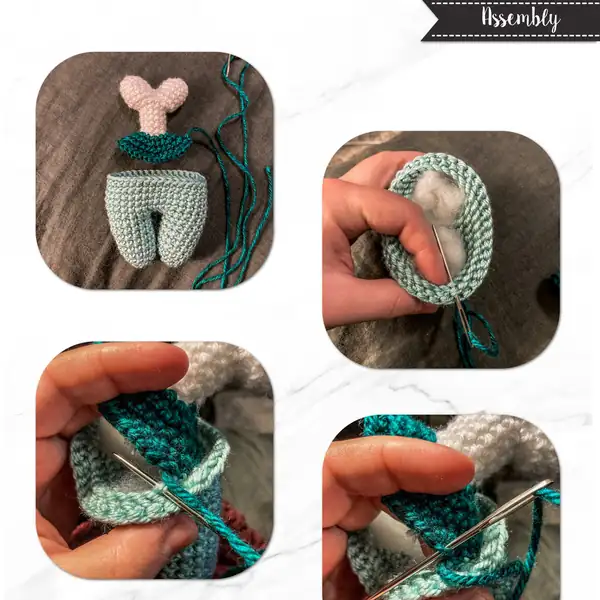
— Assembly :
Step 1 :
Sew head to body at the neck opening with a firm whipstitch, ensuring alignment for a natural look.
Step 2 :
Attach legs to bottom of body between rounds 7-9, spacing evenly for balance.
Step 3 :
Position arms on either side of the body between rounds 4-8, angling slightly forward for a natural pose.
Step 4 :
Place ears toward the top of the head, evenly spaced, and sew in place securely.
Step 5 :
Attach tail to the back lower area and blend seams for a smooth transition with the body color.
Step 6 :
Weave in all ends and check symmetry; lightly stuff to preserve poseability.
Important Notes
Use stitch markers to keep track of rounds, especially during color changes and shaping sections.
Stuff firmly but not too tightly for the best shape and structure - overstuffing can distort your work.
Pin all parts in place before sewing to ensure correct positioning and symmetry.
Weave in ends as you go to avoid a tedious finishing session at the end.
Work with consistent tension throughout for even, professional-looking results.
<p>This little Knit Grit amigurumi is a quirky friend that loves to cuddle. The bones and colorful body make it unique and fun to crochet. Gift it to a friend or keep it as a desk companion—either way, this character is sure to spark joy. </p>
Good to know
You ask, we answer
The finished amigurumi measures approximately 9 cm tall when using the recommended yarn and hook size.
Yes, you can use different yarn weights, but this will affect the final size. Make sure to use an appropriate hook size for your chosen yarn.
This pattern is rated intermediate, so basic knowledge of crochet stitches and techniques is recommended for best results.
Most crocheters complete this project in 8-12 hours, though time may vary based on experience level and working pace.
Join 100k+ crocheters
Stay in the loop
Get new free patterns, stitch tips and exclusive content in your inbox.