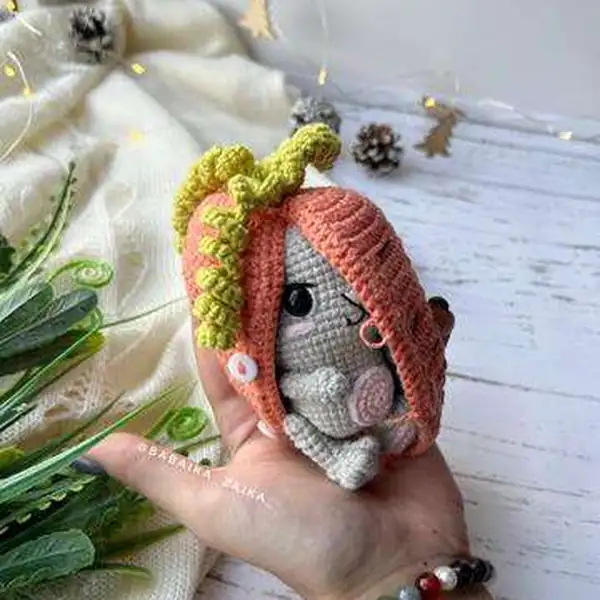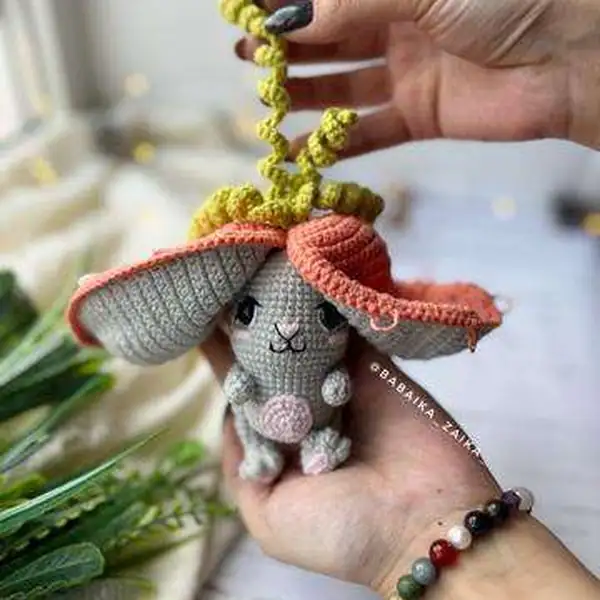
About This Bunny-Carrot Amigurumi Pattern
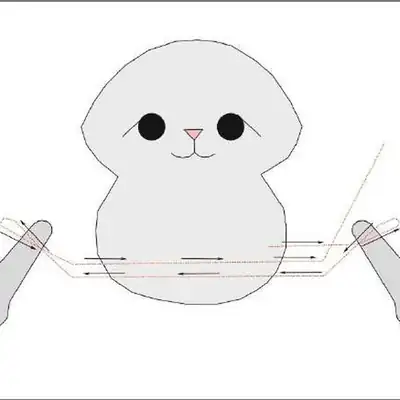
The Bunny-Carrot Amigurumi Pattern creates a charming 14-16 cm tall friend formed from a continuous head-and-body silhouette and two perky ears. The main body uses Gray sport weight, with careful colorwork for pink cheeks and white eye highlights; the carrot is worked in Orange with a bright Light Green leafy crown to frame the head like a tiny garden in miniature. The pattern starts with a Magic Ring to shape a round head, then builds into a plump torso that curves naturally into a soft shoulder line. Ears are crocheted separately and sewn on with discreet joins so the overall silhouette remains clean and cuddly. You’ll notice the eyes are set with Safety Eyes 10 mm for a friendly gaze, while a few carefully placed color changes create a gentle facial expression that stays charming even after years of love. The greens for the carrot leaves are worked in light green, giving a vivid, spring-like finish that contrasts nicely against the gray body. The finished size stays within the 14-16 cm tall range, though your tension and stuffing density can nudge it slightly taller or shorter. Overall, this pattern balances the smooth curvature of amigurumi with the playful whimsy of a little bunny carrying a carrot stake, ready for display or a soft, huggable companion for a child or adult crafter alike.
This guide walks you through every rounded stitch and color shift that makes the Bunny-Carrot Amigurumi unmistakable. You’ll start with a Magic Ring for the head, then move through a few short rounds of single crochet, increases, and decreases to craft a perfectly curvy silhouette. The ears are shaped separately and attached after the head and body settle into their cozy lines, while the carrot uses a simple color split to create a striped accent that still keeps the carrot’s growth look intact. Throughout, the pattern emphasizes a clean seam line and invisible joins so the toy remains smooth to touch. The color plan uses a gray main body, orange for the carrot, pink for cheeks and tiny nose, white for eye highlights, black for outline accents, and light green for leafy tops, all coordinated to keep the overall form balanced and friendly. Techniques highlighted include BLO and FLO to introduce subtle shaping in the head, MR to anchor the starting rounds, and the 4-dc Bobble stitch for a tactile highlight that catches the eye without overwhelming the soft silhouette.
The construction blends classic amigurumi techniques with a playful carrot garnish and a careful approach to shaping the head, ears, and leaves. I walk you through stitch placement so the ears stand upright and the greens peek just above the carrot’s crown, not flopping or twisting during stuffing. Color changes are described in small, repeatable steps, making it easy to stay organized even if you’re new to colorwork in small rounds. The pattern also details how to insert safety eyes securely and how to position them for the most appealing expression, while the nose and cheeks are added with tiny pink and white accents that maximize cuteness without crowding the face. Finally, you’ll learn how to stuff just enough to keep a rounded, cuddly feel while preserving the bunny’s delicate curves.
If you’re new to crochet, you’ll find the MR, BLO, FLO, and 4-dc Bobble st explained clearly and gently, and I’ll point out how to keep color changes tidy, ends secure, and stuffing even. The rounds are laid out so you can count confidently, and there are tips for aligning the ears symmetrically and for finishing with a clean, professional look. This Bunny-Carrot is designed to be forgiving for beginners yet robust enough to become a favorite project for a weekend, with opportunities to embellish later as you gain confidence with invisible decreases and precise color transitions.

Beyond the basics, this pattern invites you to imagine alternate character ideas that ride the same framework. The Bunny-Carrot Amigurumi is designed so you can swap the main color for a taupe, cream, or even a pale blue, while reimagining the carrot stripe and greens to suit a woodland, nursery, or seasonal theme. Keep the head round by adjusting stuffing density and using the same MR foundation, then tailor the ears’ height and curve to the new character. The leaves can be long and slender or short and fluffy, depending on how you shape and crochet the top. For a single gender-neutral friend, you can soften the cheeks, keep the eyes mid-sized, and add a small embroidered smile in place of some of the black detailing to create a different personality without changing the core pattern. The same color-block strategy helps you keep the proportions consistent across any variation, which means you can publish a small family of bunnies with only a few color swaps.
Care and practical tips for finishing, washing and storage are included, so your Bunny-Carrot stays delightful after playtime or display. I outline a gentle spot-clean approach for the gray body or a light hand wash for the carrot and greens, with air-drying laid flat to hold the rounded shape. The pattern also covers safe storage ideas—low-odor cedar blocks to deter moths, a breathable fabric bag, and a place to keep the stuffing contained so the toy maintains its plump, friendly form. If you plan to gift, I suggest pairing the bunny with a small felt carrot tag or a handmade crochet carrot collar that echoes the leaves, turning your project into a complete gift set that’s ready for gifting or showcasing.