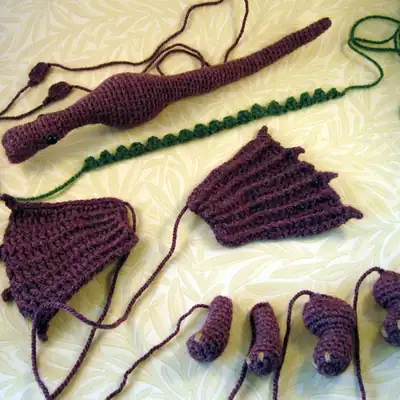
Meet the Fierce Little Dragon Amigurumi Pattern—an ambitious make that finishes at about 28 cm long with a 20 cm wingspan when stuffed and posed. You’ll need about 35 g of DK weight yarn in the main dragon color, a cream or beige for the claws, polyester stuffing, safety eyes 7.5 mm (or beads or yarn eyes), and a tapestry needle. The pattern uses a 3.5 mm hook (US E), plus the usual crochet notions: stitch markers, scissors, pins for assembly, and plenty of patience. It begins with a magic ring and tight rounds to sculpt a rounded head, then follows with a linked body, two sturdy legs, a curved tail, and a compact set of wings. The wings are shaped to balance the body so the dragon can perch, a little dragon-king of your desk. Invisible decreases and precise shaping keep seams neat, while a few front post stitches add shallow ridges that evoke scales without bulk. This is a durable amigurumi, designed to delight for years.
— Body (continue from nose) :
Round 1: Sc in each st around - 16 st.
Round 2: [Sc2tog, sc in next 6 st] 2 times - 14 st.
Round 3: Sc in each st around - 14 st.
Round 4: [Sc2tog, sc in next 5 st] 2 times - 12 st.
Round 5: (2 rounds) Sc in each st around - 12 st.
Round 6: (2 rounds) Sc in each st around - 12 st.
Round 7: Sc in next 5 st, 2 sc in next st, sc in next st, 2 sc in next;
Round 8: (3 rounds) Sc in each st around - 14 st.
Round 9: (3 rounds) Sc in each st around - 14 st.
Round 10: (3 rounds) Sc in each st around - 14 st.
Round 11: Sc in next 6 st, sc2tog, sc in next st, sc2tog, sc in next;
Round 12: Sc in next st, sc2tog, sc in next 4 st, sc2tog, sc in next;
Round 13: (5 rounds) Sc in each st around - 10 st.
Round 14: (5 rounds) Sc in each st around - 10 st.
Round 15: (5 rounds) Sc in each st around - 10 st.
Round 16: (5 rounds) Sc in each st around - 10 st.
Round 17: (5 rounds) Sc in each st around - 10 st.
Round 18: [2 sc in next st, sc in next 4 st] 2 times - 12 st.
Round 19: (2 rounds) Sc in each st around - 12 st.
Round 20: (2 rounds) Sc in each st around - 12 st.
Round 21: Sc in next 3 st, [2 sc in next st, sc in next st] 3 times,;
Round 22: Sc in next 3 st, [2 sc in next st, sc in next 2 st] 3 times,;
Round 23: Sc in each st around - 18 st.
Round 24: [2 sc in next st, sc in next 2 st] 6 times - 24 st.
Round 25: (2 rounds) Sc in each st around - 24 st.
Round 26: (2 rounds) Sc in each st around - 24 st.
Round 27: [2 sc in next st, sc in next 5 st] 4 times - 28 st.
Round 28: (4 rounds) Sc in each st around - 28 st.
Round 29: (4 rounds) Sc in each st around - 28 st.
Round 30: (4 rounds) Sc in each st around - 28 st.
Round 31: (4 rounds) Sc in each st around - 28 st.
Round 32: [Sc2tog, sc in next 5 st] 4 times - 24 st.
Round 33: Sc in each st around - 24 st.
Round 34: [Sc2tog, sc in next 4 st] 4 times - 20 st.
Round 35: Sc in each st around - 20 st.
Round 36: [Sc2tog, sc in next 3 st] 4 times - 16 st.
Round 37: Sc in each st around - 16 st.
Round 38: [Sc2tog, sc in next 6 st] 2 times - 14 st.
Round 39: Sc in each st around - 14 st.
Round 40: [Sc2tog, sc in next 5 st] 2 times - 12 st.
Round 41: (10 rounds) Sc in each st around - 12 st.
Round 42: (10 rounds) Sc in each st around - 12 st.
Round 43: (10 rounds) Sc in each st around - 12 st.
Round 44: (10 rounds) Sc in each st around - 12 st.
Round 45: (10 rounds) Sc in each st around - 12 st.
Round 46: (10 rounds) Sc in each st around - 12 st.
Round 47: (10 rounds) Sc in each st around - 12 st.
Round 48: (10 rounds) Sc in each st around - 12 st.
Round 49: (10 rounds) Sc in each st around - 12 st.
Round 50: (10 rounds) Sc in each st around - 12 st.
Round 51: Sc2tog, sc in next 10 st - 11 st.
Round 52: (2 rounds) Sc in each st around - 11 st.
Round 53: (2 rounds) Sc in each st around - 11 st.
Round 54: Sc2tog, sc in next 9 st - 10 st.
Round 55: (2 rounds) Sc in each st around - 10 st.
Round 56: (2 rounds) Sc in each st around - 10 st.
Round 57: Sc2tog, sc in next 8 st - 9 st.
Round 58: (2 rounds) Sc in each st around - 9 st.
Round 59: (2 rounds) Sc in each st around - 9 st.
Round 60: Sc2tog, sc in next 7 st - 8 st.
Round 61: (3 rounds) Sc in each st around - 8 st.
Round 62: (3 rounds) Sc in each st around - 8 st.
Round 63: (3 rounds) Sc in each st around - 8 st.
Round 64: Sc2tog, sc in next 6 st - 7 st.
Round 65: (9 rounds) Sc in each st around - 7 st.
Round 66: (9 rounds) Sc in each st around - 7 st.
Round 67: (9 rounds) Sc in each st around - 7 st.
Round 68: (9 rounds) Sc in each st around - 7 st.
Round 69: (9 rounds) Sc in each st around - 7 st.
Round 70: (9 rounds) Sc in each st around - 7 st.
Round 71: (9 rounds) Sc in each st around - 7 st.
Round 72: (9 rounds) Sc in each st around - 7 st.
Round 73: (9 rounds) Sc in each st around - 7 st.
Round 74: Sc2tog, sc in next 5 st - 6 st.
Round 75: (2 rounds) Sc in each st around - 6 st.
Round 76: (2 rounds) Sc in each st around - 6 st.
— Back Legs (make 2) :
Round 1: Ch 2, work 6 sc into 1st ch - 6 st.
Round 2: 2 sc in each st around - 12 st.
Round 3: (3 rounds) Sc in each st around – 12 st.
Round 4: (3 rounds) Sc in each st around – 12 st.
Round 5: (3 rounds) Sc in each st around – 12 st.
Round 6: Sc in next 6 st, [sc2tog] 3 times – 9 st.
Round 7: (2 rounds) Sc in each st around – 9 st.
Round 8: (2 rounds) Sc in each st around – 9 st.
Round 9: Sc in next 6 st, [2 sc in next st] 3 times – 12 st.
Round 10: [2 sc in next st, sc in next st] 6 times - 18 st.
Round 11: (2 rounds) Sc in each st around – 18 st.
Round 12: (2 rounds) Sc in each st around – 18 st.
Round 13: Sc in next 3 st, [sc2tog] 2 times, sc in next 5 st,;
Round 14: Sc in next 2 st, [sc2tog] 2 times, sc in next 3 st,;
Round 15: [Sc2tog] 5 times – 5 st.
— Front Legs (make 2) :
Round 1: Ch 2, work 5 sc into 1st ch - 5 st.
Round 2: 2 sc in each st around - 10 st.
Round 3: (3 rounds) Sc in each st around – 10 st.
Round 4: (3 rounds) Sc in each st around – 10 st.
Round 5: (3 rounds) Sc in each st around – 10 st.
Round 6: Sc in next 6 st, [sc2tog] 2 times – 8 st.
Round 7: (6 rounds) Sc in each st around – 8 st.
Round 8: (6 rounds) Sc in each st around – 8 st.
Round 9: (6 rounds) Sc in each st around – 8 st.
Round 10: (6 rounds) Sc in each st around – 8 st.
Round 11: (6 rounds) Sc in each st around – 8 st.
Round 12: (6 rounds) Sc in each st around – 8 st.
Round 13: [Sc2tog, sc in next 2 st] 2 times – 6 st.
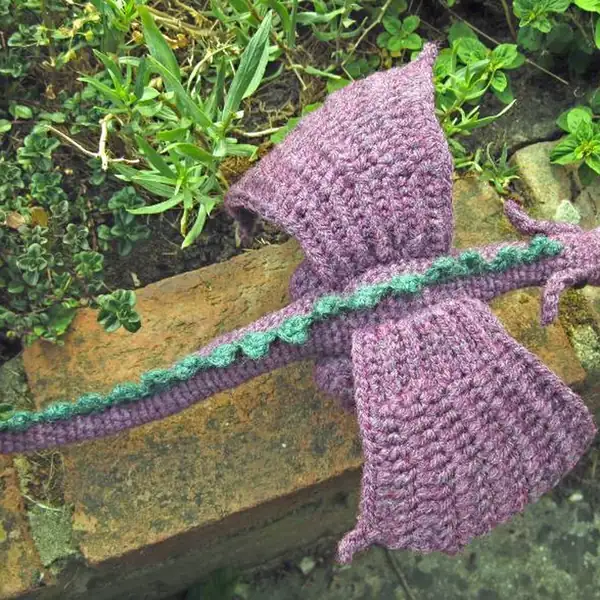
— Wings (make 2) :
Round 1: Miss 1st ch, sc in next 7 ch, hdc in next 6 ch, dc in next 6;
Round 2: Fpdc in next 6 st, fphdc in next 6 st, fpsc in next 7 st, ch 1,;
Round 3: Fpsc in next 7 st, hdc in next 6 st, dc in next 6 st, ch 3,;
Round 4: Miss 1st ch, ss in next ch, sc in next ch (to make claws),;
Round 5: Fpsc in next 7 st, hdc in next 6 st, dc in next 6 st, ch 2,;
Round 6: Fpdc in next 6 st, fphdc in next 6 st, fpsc in next 7 st, ch 1,;
Round 7: Fpsc in next 7 st, hdc in next 6 st, dc in next 6 st, ch 3,;
Round 8: Miss 1st ch, ss in next ch, sc in next ch, fpdc in next 6 st,;
Round 9: Fpsc in next 7 st, hdc in next 6 st, dc in next 6 st, ch 2,;
Round 10: Fpdc in next 6 st, fphdc in next 6 st, fpsc in next 7 st, ch;
Round 11: Fpsc in next 7 st, hdc in next 6 st, dc in next 6 st, ch 3,;
Round 12: Miss 1st ch, ss in next ch, sc in next ch, fpdc in next 6 st,;
— Part 13 :
Round 7: (6 Runden) Sc in jede M - 8 M.
Round 8: (6 Runden) Sc in jede M - 8 M.
Round 9: (6 Runden) Sc in jede M - 8 M.
Round 10: (6 Runden) Sc in jede M - 8 M.
Round 11: (6 Runden) Sc in jede M - 8 M.
Round 12: (6 Runden) Sc in jede M - 8 M.
— Part 15 :
Round 2: *1 mindering, 6 V* 2X ( 14 st)
Round 4: *1 mindering 5, V* 2X ( 12 st)
Round 7: 5 V, 1 meerd, 1 v, 1 meerd, 4 V ( 14 st)
Round 8: 14 V;
Round 9: 14V ( als je veiligheidsogen gebruikt, zet deze dan vast tussen rij 8 en9)
Round 10: 14V;
Round 11: 6 V, 1 mind, 1V, 1 mind, 3 V (12 st)
Round 12: 1V, 1 mind, 4 V, 1 mind, 3 V ( 10 st)
Round 13: 10 V;
Round 14: 10 V;
Round 15: 10 V;
Round 16: 10 V;
Round 17: 10 V;
Round 18: 1 meerd, 4V, 1 meerd, 4V ( 12 st)
Round 19: 12 V;
Round 20: 12 V;
Round 21: 3V * 1 meerd, 1V* 3X, 3 V ( 15st)
Round 22: 3v *1 meerd, 2 V* 3X, 3 V (18st)
Round 23: 18 V;
Round 24: *1 meerd, 2 V* 6X ( 24 st)
Round 25: 24 V;
Round 26: 24 V;
Round 27: *1meerd, 5 V*4X ( 28st)
Round 28: 28 V;
Round 29: 28 V;
Round 30: 28 V;
Round 31: 28 V;
Round 32: *1 mind, 5 V*4X ( 24st)
Round 33: 24 V;
Round 34: *1 mind, 4 V* 4X (20st)
Round 35: 20 V;
Round 36: *1 mind, 3 V* 4X ( 16 st)
Round 37: 16 V;
Round 38: *1 mind, 6 V* 2X (14 st)
Round 39: 14 V;
Round 40: *1 mind, 5 V*2X (12 st)
Round 41: t/ m 50: 12 V;
— Part 16 :
Round 51: 1 mind, 10 V (11 st)
Round 52: +53: 11 V;
Round 54: 1mind, 9 V (10 st)
Round 57: 1 mind, 8 V (9st)
Round 60: 1 mind, 7 V (8st)
Round 64: 1 mind, 6 V (7 st)
— Part 17 :
Round 74: 1 mind, 5 V ( 6 st)
— Part 18 :
Round 1: 2 L, 6 V in de 1e losse ( 6st)
Round 2: 2 V in elke vaste ( 12 st)
Round 3: 12 V;
Round 4: 12 V;
Round 5: 12 V;
Round 6: 6 V, *1 mind*3X (9 st)
Round 7: 9 V;
Round 8: 9 V;
Round 9: 6 V, *1 meerd* 3X (12st)
Round 10: *1meerd, 1 V* 6X (18 st)
Round 11: 18 V;
Round 12: 18 V;
Round 13: 3 V, *1 mind* 2X, 5 V, *1 mind* 2X 2 V (14st)
Round 14: 2 V *1 mind*2X, 3 V, *1 mind*2X, 1 V (10st)
Round 15: *1 mind* 5X (5st)
— Part 19 :
Round 1: 2 L , haak 5 vasten in de 1e losse (5st)
Round 2: 2 V in elke vaste (10st)
Round 3: 10 V;
Round 4: 10 V;
Round 5: 10 V;
Round 6: 6V, *1 mind*2X (8st)
— Part 20 :
Round 3: 7DV, 6HST, 6ST, 3l;
Round 4: Sla de 1e steek over 1 HV in het volgende stokje, 1V in de volgende losse(om;
Round 5: 7 DV, 6 HST, 7 ST, 1l;
Round 7: 7DV, 6 HST, 6 ST, 3l;
Round 8: Sla de 1e steek over, 1 HV in de volgende losse, 1V in de volgende losse, 6 DST, 6;
Round 9: 7 DV, 6 HST, 6 ST, 2l;
Round 11: 7 DV, 6 HST, 6 ST, 3l;
Round 12: Sla de 1e steek over, 1HV in de volgende losse, 1V in de volgende losse, 6 DST, 6;
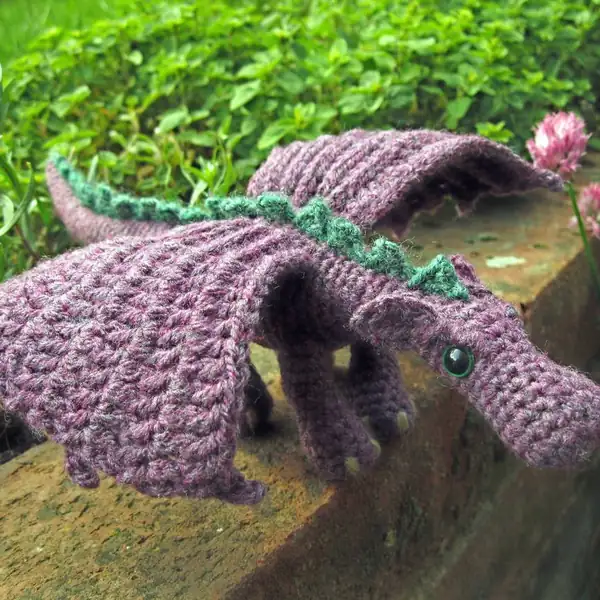
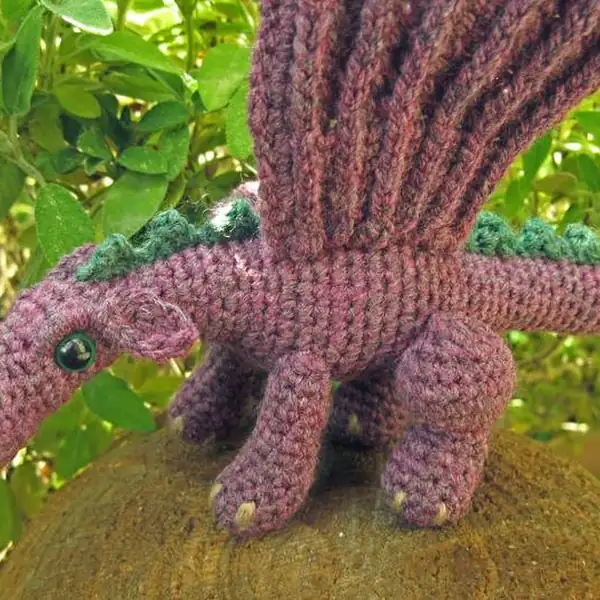
Whether you’re a seasoned amigurumi artist or an enthusiastic beginner aiming for a standout project, this dragon pattern offers a balanced challenge and a highly rewarding finish. The dragon’s features—its rounded head, perching wings, and poised tail—combine into a sculpture you can hold, display, and admire from every angle. My hope is that you’ll feel the same sense of pride I felt when I first stitched the magic ring and watched the little dragon take shape. Share your version with color stories and pose ideas, and invite others to experience the thrill of crafting something both fierce and friendly. Thank you for crocheting along with this free pattern, and may your Fierce Little Dragon guard your creative corner for years to come.If you post photos or write about your dragon on social platforms or pattern blogs, I’d love to see how your color choices and finishing touches come to life. Tag your creations with #FierceLittleDragonPattern so we can celebrate your unique dragons together. May your hook stay busy, your yarn stay soft, and your dragon stay brave—an enduring reminder that handmade treasures have a voice as bold as their stories.