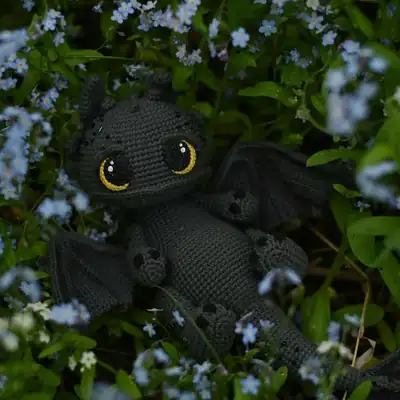
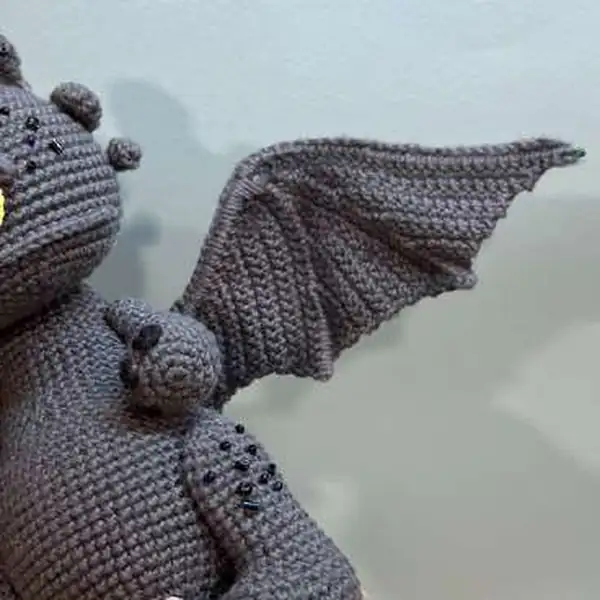
This Dragon Toothless Amigurumi Pattern embodies the classic balance between sculptural form and plush comfort. The body is built from fine/4ply yarns, with a deliberate contrast between dark gray and black, while a deliberate yellow accent breathes personality into the face and crest. The finished toy stands around 30 cm tall, with a sleek head, tapered torso, and wings that sweep in a poised arc. A lightweight wire frame anchors the neck, wings, and tail so you can pose Toothless confidently without compromising stability. Texture is achieved through a careful blend of sc, inc, hdc, BLO, and selective bobble stitches that evoke dragon scales and ridges without creating harsh ridges on the surface. Color decisions are purposeful: the deep base reads as a night dragon, the black adds depth in the creases of the wings, and the yellow highlights act as cheerfully mischievous touches that draw the eye to small details like the crest and snout. A lace-weight yellow accent adds a delicate charm that wouldn’t be possible with a heavier yarn. The assembly leans on a robust yet gentle frame—0.9 mm and 1.6 mm wires keep posture intact while the stuffing remains soft enough for safe cuddling. Seed beads for eyes and a careful gloss of white textile paint create a lively expression that stays safe for gentle play. Whether Toothless sits on a bookshelf or guards a nightstand, the amigurumi maintains a balanced stance and a timeless, story-ready presence.
— Part 1 :
Round 1: 6sc in a MR (6)
Round 2: 6inc (12)
Round 3: (1sc, inc)*6 (18)
Round 4: 1sc, inc, (2sc, inc)*5, 1sc (24)
Round 5: (3sc, inc)*6 (30)
Round 6: 2sc, inc, (4sc, inc)*5, 2sc (36)
Round 7: (5sc, inc)*6 (42)
Round 8: 3sc, inc, (6sc, inc)*5, 3sc (48)
Round 9: (7sc, inc)*6 (54)
Round 10: 4sc, inc, (8sc, inc)*5, 4sc (60)
Round 11: (9sc, inc)*6 (66)
Round 12: 66sc (66)
Round 13: 5sc, inc, (10sc, inc)*5, 5sc (72)
Round 22: 18sc, (BLO 36sc), 18sc (72)
Round 23: 5sc, dec, (10sc, dec)*5, 5sc (66)
Round 24: (9sc, dec)*6 (60)
Round 25: 4sc, dec, (8sc, dec)*5, 4sc (54)
Round 26: (7sc, dec)*6 (48)
Round 27: 2sc, dec, (4sc, dec)*7, ch3;
Round 28: skip 2 stitches before marker and 2 stitches after marker, next crochet 1sc, dec,;
Round 29: 2sc on the chain, dec, (2sc, dec)*7 (24)
Round 30: (2sc, dec)*6 (18)
Round 31: (1sc, dec)*6 (12)
Round 32: 6dec (6)
— Part 2 :
Round 1: 6sc in a MR (6)
Round 2: 6inc (12)
Round 3: (1sc, inc)*6 (18)
Round 4: (inc, 2sc)*6 (24)
— Part 3 :
Round 1: 6sc in a MR (6)
Round 2: (1sc, inc)*3 (9)
Round 3: 4sc, inc, 4sc (10)
Round 4: 4sc, inc, 5sc (11)
Round 5: 5sc, inc, 5sc (12)
Round 6: (inc, 5sc)*2 (14)
Round 9: 6sc, dec, 6sc (13)
Round 10: 5sc, dec, 6sc (12)
— Part 4 :
Round 1: 6sc in a MR (6)
Round 2: 6sc (6)
— Part 5 :
Round 1: 6sc in a MR (6)
Round 2: (2sc, inc)*2 (8)
Round 3: 8sc (8)
— For cotter pins legs fastening :
Round 1: 6sc, 4sc in the last chain, on the other side of the chain: 5sc, inc (17)
Round 2: inc, 5sc, 4inc, 5sc, 2inc (24)
Round 3: 1sc, inc, 5sc, (1hdc, hdcinc)*4, 5sc, (1sc, inc)*2 (31)
Round 4: 9sc, (3-dc Bobble st in black, 2sc in dark gray)*4, 9sc –;
Round 5: 31sc (31)
Round 6: (4sc, dec)*2, 7sc, (dec, 4sc)*2 (27)
Round 7: 6sc, dec, 5sc, dec, 4sc, dec, 6sc (24)
Round 8: 6sc, 6dec, 6sc (18)
Round 14: (5sc, inc)*3 (21)
Round 17: 13sc, ch2, skip 2sc, 6sc (21)
Round 18: 13sc, 2sc on the chain, 6sc (21)
Round 19: 21sc (21)
Round 17: 21 sc (3 rounds)
Round 18: 21 sc (3 rounds)
Round 19: 21 sc (3 rounds)
— Part 7 :
Round 1: 6sc in a MR (6)
Round 2: 6sc (6)
Round 3: (1sc, dec)*2 (4)
Round 17: 6sc, ch2, skip 2sc, 13sc (21)
Round 18: 6sc, 2sc on the chain, 13sc (21)
Round 19: 21sc (21)
Round 20: (5sc, dec)*3 (18)
Round 21: (1sc, dec)*6 (12)
Round 22: 6dec (6)
— For cotter pins legs fastening :
Round 1: 6sc in a MR (6)
Round 2: 6inc (12)
Round 3: (1sc, inc)*6 (18)
Round 4: 5sc, (3-dc Bobble st in black, 2sc in dark gray)*3, 4sc;
Round 8: 8sc, dec, 8sc (17)
Round 9: 17sc (17)
Round 10: 5sc, dec, 3sc, dec, 5sc (15)
Round 11: 15sc (15)
Round 12: 6sc, dec, 7sc (14)
Round 13: 6sc, 2inc, 6sc (16)
Round 14: dec, 12sc, dec (14)
Round 15: 6sc, 2inc, 6sc (16)
Round 16: dec, 12sc, dec (14)
Round 17: 6sc, 2inc, 1sc, ch2, skip 2sc, 3sc (16)
Round 18: dec, 9sc, 2sc on the chain, 1sc, dec (14)
Round 17: 6sc, 2inc, 6sc (16)
Round 18: dec, 12sc, dec (14)
Round 17: 3sc, ch2, skip 2sc, 1sc, 2inc, 6sc (16)
Round 18: dec, 1sc, 2sc on the chain, 9sc, dec (14)
Round 17: 6sc, 2inc, 6sc (16)
Round 18: dec, 12sc, dec (14)
— Part 9 :
Round 1: 27sc (27), turn. After that do not work with the wire.
Round 2: from the 2nd stitch: 8sc, dec, 12sc, dec (22), turn.
Round 3: from the 2nd stitch: 11sc, dec, 6sc (18), turn.
Round 4: from the 2nd stitch: 16sc (16), turn.
Round 5: from the 2nd stitch: 13sc (13), turn.
Round 6: from the 2nd stitch: 12sc (12), turn.
Round 7: from the 2nd stitch: 9sc (9), turn.
Round 8: from the 2nd stitch: 8sc (8), turn.
Round 9: from the 2nd stitch: 4sc (4), turn.
Round 10: from the 2nd stitch: 3sc (3), ch3, turn.
Round 19: (5sc, dec)*2 (12)
Round 20: 6dec (6)
Round 11: from the 2nd chain: 2sc, 3sc, +1sc into the corner, 3sc along stitches of the previous;
Round 12: from the 2nd stitch: 15sc, dec (16), turn.
Round 13: from the 2nd stitch: 7sc (7), turn.
Round 14: from the 2nd stitch: 6sc (6), turn.
Round 15: from the 2nd stitch: 5sc, +1sc into the corner, 4sc along stitches of the previous row;
Round 16: from the 2nd stitch: 9sc (9), t-ch, turn.
Round 17: from the 2nd stitch: 9sc, +1sc into the corner, 3sc along stitches of the previous row;
Round 18: from the 2nd stitch: 12sc (12), t-ch, turn.
Round 19: from the 2nd stitch: 9sc (9), turn.
Round 20: from the 2nd stitch: 8sc (8), t-ch, turn.
Round 21: from the 2nd stitch: 5sc (5), turn.
Round 22: from the 2nd stitch: 3sc, inc (5), 3ch, turn.
Round 23: from the 2nd chain: 2sc, 5sc, +1sc;
Round 24: from the 2nd stitch: 18sc (18), turn.
Round 25: from the 2nd stitch: 17sc (17), turn.
Round 26: from the 2nd stitch: 16sc (16), turn.
Round 27: from the 2nd stitch: 14sc (14), turn.
Round 28: from the 2nd stitch: 13sc (13), t-ch, turn.
Round 29: from the 2nd stitch: 11sc (11), turn.
Round 30: from the 2nd stitch: 9sc, inc (11), t-ch, turn.
Round 31: from the 2nd stitch: 9sc (9), turn.
Round 32: from the 2nd stitch: 7sc, inc (9), 3ch, turn.
Round 33: from the 2nd chain: 2sc, 8sc (8), turn.
Round 34: from the 2nd stitch: 4sc (4), turn.
Round 35: from the 2nd stitch: 3sc (3), turn.
Round 36: from the 2nd stitch: 2sc, +1sc into the corner,;
Round 37: from the 2nd stitch: 4sc, dec (5), t-ch, turn.
Round 38: from the 2nd stitch: 5sc (5), t-ch, turn.
Round 39: from the 2nd stitch: 5sc (5)
— Part 10 :
Round 1: 4sc in a MR (6)
Round 5: (1sc, inc)*2 (6)
Round 9: (2sc, inc)*2 (8)
Round 12: (3sc, inc)*2 (10)
Round 13: 10sc (10)
Round 14: 2sc, inc, 4sc, inc, 2sc (12)
Round 15: 12sc (12)
Round 16: (5sc, inc)*2 (14)
Round 17: 14sc (14)
Round 18: 3sc, inc, 6sc, inc, 3sc (16)
Round 19: 16sc (16)
Round 20: (7sc, inc)*2 (18)
Round 23: 4sc, inc, 8sc, inc, 4sc (20)
Round 27: (9sc, inc)*2 (22)
Round 31: 5sc, inc, 10sc, inc, 5sc (24)
Round 34: (11sc, inc)*2 (26)
Round 37: 6sc, inc, 12sc, inc, 6sc (28)
Round 39: (13sc, inc)*2 (30)
— Part 11 :
Round 1: 11sc, inc, 1sc, 4inc, 1sc, inc, 11sc (36)
Round 2: 6sc, inc, 22sc, inc, 6sc (38)
Round 3: 14sc, inc, 8sc, inc, 14sc (40)
Round 4: 10sc, inc, 18sc, inc, 10sc (42)
Round 5: 3sc, inc, (6sc, inc)*5, 3sc (48)
Round 6: 48sc (48)
Round 7: (7sc, inc)*6 (54)
Round 10: 13sc, ch2, skip 2sc, 24sc, ch2, skip 2sc, 13sc (54)
Round 11: 13sc, 2sc on the chain, 24sc, 2sc on the chain, 13sc (54)
Round 11: 54sc (54)
Round 17: 8sc, dec, (16sc, dec)*2, 8sc (51)
Round 18: 20sc, dec, 7sc, dec, 20sc (49)
Round 19: 49sc (49)
Round 20: 20sc, dec, 5sc, dec, 20sc (47)
Round 21: 47sc (47)
Round 22: 21sc, dec, 1sc, dec, 21sc (45)
Round 23: (13sc, dec)*3 (42)
Round 24: 42sc (42)
Round 25: 6sc, dec, (12sc, dec)*2, 6sc (39)
Round 26: 39sc (39)
Round 27: (11sc, dec)*3 (36)
Round 28: 3sc, ch1, skip 1sc, 4sc, ch2, skip 2sc, 16sc, ch2, skip 2sc, 4sc, ch1, skip 1sc, 3sc (36) -;
Round 29: 3sc, 1sc on the chain, 4sc, 2sc on the chain, 16sc, 2sc on the chain, 4sc, 1sc on the;
Round 28: 3sc, ch1, skip 1sc, 28sc, ch1, skip 1sc, 3sc (36) (mark space between stitches 9 and;
Round 29: 3sc, 1sc on the chain, 28sc, 1sc on the chain, 3sc (36)
Round 30: 8sc, dec, 16sc, dec, 8sc (34)
Round 31: 34sc (34)
Round 32: (15sc, dec)*2 (32)
Round 33: 32sc (32)
Round 34: 7sc, dec, 14sc, dec, 7sc (30)
Round 35: 4sc, dec, (8sc, dec)*2, 4sc (27)
Round 36: (7sc, dec)*3 (24)
Round 37: 24sc (24)
— Part 12 :
Round 1: 12sc (12), ch3, turn;
Round 2: from the 2nd chain: 2sc, 11sc (13), turn.
Round 3: from the 2nd stitch: 12sc (12), ch3, turn;
Round 4: from the 2nd chain: 2sc, 11sc (13), turn.
Round 5: from the 2nd stitch: 12sc (12), ch3, turn;
Round 6: from the 2nd chain: 2sc, 11sc (13)
To close, this Dragon Toothless Amigurumi Pattern offers a complete, expressive dragon ready to set off on grand adventures or cozy evenings. Its 30 cm height, poseable wire framework, and careful blend of textures deliver a character that feels both cinematic and approachable. The color scheme—Dark Gray, Black, and Yellow—reads as a familiar hero who can brighten any room with whimsy and warmth. Through MR, BLO, and a touch of bobble stitching, Toothless gains depth and personality that invite you to tell stories with your fingers just as you would in a book. May this finished dragon bring countless hugs, imaginative play, and a sense of accomplishment that lasts long after the last stitch is secure.Whether you’re gifting him or keeping him for yourself, I hope Toothless becomes a treasured companion in your crafty world, a reminder that skilled hands can translate a beloved character into a lovingly crafted toy. Thank you for crocheting along with this free pattern and for adding your voice to a timeless dragon’s journey. Here’s to many more hours of patient stitching, colorful threads, and the magic of creating something truly memorable with your own two hands.