An adorable friend to cherish, handcrafted with love to bring comfort and joy for years to come.
Multi-Day Project
A rewarding 12+ hour journey—perfect for dedicated crafters who love detailed work.
Intermediate Level
This pattern is ideal for crafters who enjoy colour changes, working in the round, and the finishing touches like embroidery and seaming, all brought together to create a charismatic amigurumi lion.
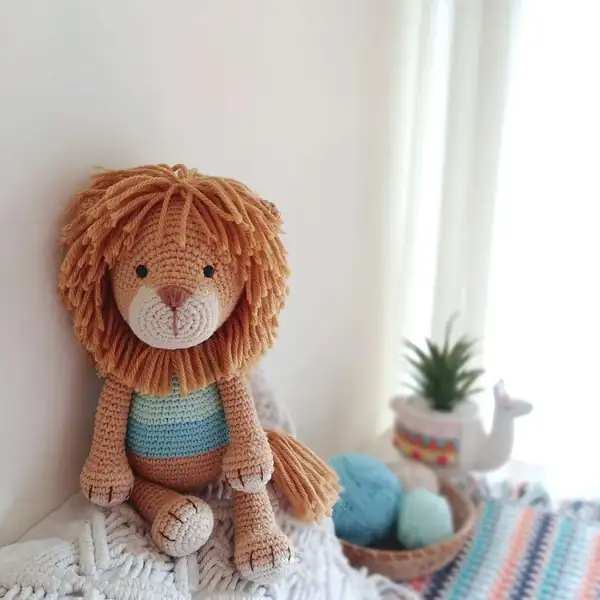
Alan the Lion is your next crochet adventure—an amigurumi with a soft body, fluffy mane and a playful striped shirt. This introduction will guide you into the world of shaping, colorwork, and careful finishing to bring Alan to life.
Whether you're gifting a friend or adding a new character to your collection, Alan wants to be cuddled and cherished. Gather your camel and natural yarns, grab a pair of scissors, and let the magic begin.
About This Alan the Lion Amigurumi Pattern
Meet Alan, a cuddly amigurumi lion with a fluffy mane and a playful striped shirt. This pattern guides you through every round with clear instructions, color changes, and careful finishing techniques. You’ll learn invisible joins, seam placement, and eye embroidery to bring Alan to life. Perfect for gift-giving or adding a lovable character to your crochet collection. You’ll finish with a soft, squeezable plush that’s sure to charm anyone who meets him.
<p>Alan the Lion is a charming amigurumi that blends classic crochet stitches with a fluffy mane and a friendly face. It’s designed for crocheters who enjoy color changes, shaping, and careful assembly to bring this lion to life.</p><p>It’s a fun, detailed project that rewards patience with a cuddly, display-worthy toy that can be gifted or treasured in a collection.</p><p>The pattern walks you through each section from head to tail, with tips on stuffing, eye placement, and finishing touches for a polished result.</p>
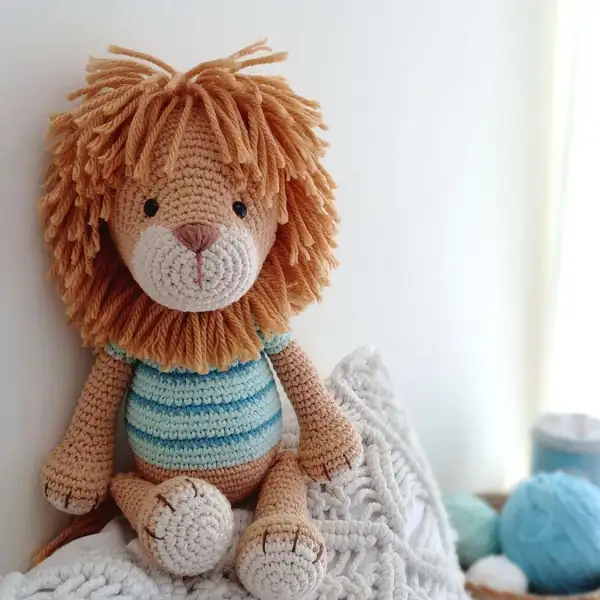
<p>With his striped turquoise shirt and camel-toned fur, Alan becomes a character you’ll love making stitch by stitch. The instructions emphasize pacing, tension, and precise color placement to keep the lion balanced and expressive.</p>
Stitches & Skills You'll Use
Stitches you’ll use include magic ring, single crochet, increases and decreases, and careful color changes for the mane and shirt. You’ll learn about invisible decreases for smooth facial shaping, seaming for limbs, and embroidery techniques for the nose and eyes. The project also emphasizes mounting eyes and consistent tension to keep the head rounded and friendly.
Don’t worry—this pattern includes step-by-step color-change rounds so you can practice seamless transitions while keeping the mane centered and balanced.
Why You'll Love This Alan the Lion Amigurumi Pattern
<p>I absolutely love this pattern because it combines classic amigurumi techniques with expressive finishing details that bring Alan to life. The mane, nose embroidery, and color-changing rounds give me a sense of accomplishment when the pieces finally fit together.</p><p>Working in rounds helps me see progress quickly, and the color changes add a playful dimensionality that makes Alan feel like a real little friend. It’s incredibly satisfying to see the arms, legs, and tail come together after carefully stitching each part.</p><p>What I love most is how forgiving the pattern can be for color tweaks and technique refinements, so you can personalize Alan while still following the core rounds. It’s a pattern you can come back to again and again for new looks.</p><p>Overall, Alan is a joyful project that blends technique, patience, and creativity into a plush that’s perfect for gifting or display, and I hope you fall in love with the process as much as I did.</p><p>Happy crocheting and may Alan bring warmth and smiles to your workspace and home.</p>
Colour & Yarn Inspiration
Start with camel for the main body and natural for the muzzle to create a gentle contrast. Swap the turquoise shirt for pastel blues or mint greens to create a softer look, or switch to bold reds and yellows for a bright, playful vibe. You can also experiment with chrome-dyed colors for a more modern palette while preserving the lion’s friendly look.
Try a two-tone mane by using two shades of brown for dimension, or keep a solid color for a classic look. Substituting acrylic blends can affect stiffness; adjust stuffing to maintain a plush feel.
Switch Things Up
I love how flexible this pattern is for customization. You can switch colors for the mane and shirt to create a completely different look—pastels for a softer version or bright primaries for a bold character.
Want to make Alan bigger or smaller? Adjust your yarn weight and hook size. Using bulkier yarn and a larger hook will give you a chunkier, cuddle-ready version, while thinner yarn and a smaller hook will yield a petite lion perfect for display or keychains.
Try adding little embroidered details like eyebrows, freckles, or a tiny bow in the mane for a unique personality. A tiny crochet prop (like a mini crown or scarf) can turn Alan into a playful scenario ready for photos.
You can experiment with different facial expressions by adjusting eye placement and mouth shaping. A wider mouth or a smaller nose completely changes his character in seconds.
For an extra touch, consider inserting a flexible wire in the limbs for poseability. Create a mini family set and stage funny poses for mission-based photography.
Ways to Use & Gift It
Alan makes a wonderful gift for birthdays, baby showers, or someone who loves cuddly handmade toys. You can customize the mane colors or the shirt stripes to tailor him for the recipient's tastes. Consider pairing him with a tiny crochet heart or a little blanket as a coordinating gift set.
The Lion’s soft texture also makes him a comforting bedtime friend—a thoughtful keepsake that can be tucked into a child’s arms for years to come.
Common Mistakes & How to Fix Them
Skipping stitch markers during color changes can lead to misaligned rounds; place a marker at the start of every round to stay on track.Not stuffing evenly causes a lumpy head or limbs; stuff gradually and check the shape as you go, adding small amounts at a time.Pulling yarn too tight creates stiff pieces; maintain a steady tension for a flexible, plush finish.Forgetting to count stitches leads to uneven rounds; count after each round, especially during increases and decreases.Carrying yarn across the back of the work can show through; when changing colors, either cut and rejoin or carry the unused strand neatly along the back.Sewing parts without matching seams can throw off balance; pin first and sew slowly for symmetry.
Maker's Notes
When I made Alan, I used Worsted yarn in camel and natural tones with a 2.5 mm hook for tighter stitches. The rounds took around 14-16 hours total, with the biggest learning curve in securing the mane and stuffing evenly for a balanced head and body. Beginners typically stumble on placing the eyes and achieving symmetric ear placement; take your time with alignment and mark rounds where changes occur. The color-change sections require careful tension control to prevent visible joins, especially around the neck area. Overall, the Lion pattern rewards patience and meticulous finishing.
I tried a substitution: I tried substituting DK weight yarn with a 3.0 mm hook and the final toy was a bit smaller (roughly 22-24 cm tall) but still cute; tightening the tension slightly helped restore proportions.
Alan the Lion Amigurumi Pattern
Meet Alan, a cuddly amigurumi lion with a fluffy mane and a playful striped shirt. This pattern guides you through every round with clear instructions, color changes, and careful finishing techniques. You’ll learn invisible joins, seam placement, and eye embroidery to bring Alan to life. Perfect for gift-giving or adding a lovable character to your crochet collection. You’ll finish with a soft, squeezable plush that’s sure to charm anyone who meets him.
Intermediate12-15 Hours
Pattern at a glance
Skill level
Intermediate
Time to make
12-15 Hours
Hook size
3.0 mm (C) / 2.5 mm (B) for details
Yarn weight
Worsted / #4
Finished size
Approx. 30 cm tall
Gauge
4 cm square = 12 SC x 12 R
Yarn used
Camel main color: ~250-300 g; Natural/cream: ~50-70 g; Turquoise/blue: ~60-90 g; Accent/brown: ~20-40 g
Materials Needed
Main Fabric
01
Worsted weight yarn (#4), camel color for main body (approx. 150-180g total)
02
Cream/white yarn for muzzle and paw detailing (10-20g)
03
Turquoise and light blue yarn for the t-shirt (60-80g total)
04
Camel color yarn for mane and limbs (20-40g)
05
Brown or black for nose and eye details (10g)
06
Polyester stuffing for plush toy
Tools Required
01
Crochet hook size 2.5mm (B) or 3.0mm (D)
02
Safety eyes size 8mm or 10mm
03
Polyester fiberfill stuffing
04
Yarn needle for sewing
05
Stitch markers
06
Scissors
— Head :
Round 1 :
6 SC in magic ring (6)
Round 2 :
6 INC (12)
Round 3 :
(1 SC, 1 INC) x6 (18)
Round 4 :
(3 INC, 6 SC) x2 (24)
Round 5 :
(1 INC, 1 SC) x3, 6 SC (30)
Round 6 :
(1 INC, 2 SC) x3, 6 SC (36)
Round 7-11 :
1 SC in each stitch (36)
Round 12 :
(4 SC, 1 DEC) x 6 (30)
Info :
Place safety eyes between rounds 8-9, separated by 6 SC
Round 13 :
(3 SC, 1 DEC) x 6 (24)
Info :
Stuff the head firmly before continuing
Round 14 :
(2 SC, 1 DEC) x 6 (18)
Round 15 :
(1 SC, 1 DEC) x 6 (12)
Round 16 :
6 DEC (6)
Info :
Fasten off, leaving long tail for sewing
— Body :
Round 1 :
6 SC in magic ring (6)
Round 2 :
6 INC (12)
Round 3 :
(1 INC, 1 SC) x6 (18)
Round 4 :
(1 INC, 2 SC) x6 (24)
Round 5 :
(1 INC, 3 SC) x6 (30)
Round 6 :
(1 INC, 4 SC) x6 (36)
Round 7-11 :
1 SC in each stitch (36)
Round 12 :
(4 SC, 1 DEC) x 6 (30)
Round 13 :
(3 SC, 1 DEC) x 6 (24)
Round 14 :
(2 SC, 1 DEC) x 6 (18)
Round 15 :
(1 SC, 1 DEC) x 6 (12)
Round 16 :
6 DEC (6)
Info :
Fasten off, leaving long tail for sewing
— Arms x2 :
Round 1 :
6 SC in magic ring (6)
Round 2 :
6 INC (12)
Round 3 :
(1 INC, 1 SC) x6 (18)
Round 4 :
(1 INC, 2 SC) x6 (24)
Round 5-8 :
24 SC (24)
Round 9 :
6 SC, 6 DEC, 6 SC (18)
Round 10 :
6 SC, 3 DEC, 6 SC (15)
Round 11 :
15 SC
Round 12 :
(1 DEC, 3 SC) x3 (12)
Round 13-21 :
12 SC (12) 9 rounds
Round 22-25 :
12 SC (12) 4 rounds
Round 26-31 :
6 DEC (6) 6 rounds
Round 32-34 :
6 DEC (6) 3 rounds
Info :
Fasten off, leave a long tail for sewing
— Legs x2 :
Round 1 :
6 SC in magic ring (6)
Round 2 :
6 INC (12)
Round 3 :
(1 INC, 1 SC) x6 (18)
Round 4 :
(1 INC, 2 SC) x6 (24)
Round 5 :
(1 INC, 3 SC) x6 (30)
Round 6-9 :
30 SC (30) 4 rounds
Round 10 :
9 SC, 6 DEC, 9 SC (24)
Round 11 :
8 SC, 4 DEC, 8 SC (20)
Round 12-13 :
8 SC, 2 DEC, 8 SC (18) 2 rounds
Round 14-19 :
18 SC (18) 6 rounds
Round 20-21 :
12 SC (12) 2 rounds
Round 22-25 :
12 SC (12) 4 rounds
Round 26-31 :
12 SC (12) 6 rounds
Info :
Close by flattening both sides the knit and unite every pair of stitches with 1 sc. You should have 6 sc.
— Ears x2 :
Round 1 :
6 sc in a magic ring (6)
Round 2 :
6 inc (12)
Round 3 :
(1 inc, 1sc) x6 (18)
Round 4-6 :
18 sc (18) 3 rounds
Round 7 :
(1 dec, 7 sc) x2 (16)
Info :
Close with 1 single stitch and leave a thread to sew. Ears don’t get filled. Sew the ears onto the head approx on round 11, counting from the eyes location and with 12 stitches of separation.
— Tail :
Round 1 :
6 sc in a magic ring (6)
Round 2 :
6 inc (12)
Round 3-4 :
12 sc (12) 2 rounds
Round 5 :
(1 dec, 2 sc) x3 (9)
Round 6-19 :
9 sc (9) 14 rounds
Round 20 :
Flatten and knit 4 sc taking together the opposites.
Info :
Fill the base of the tail and then just a bit until half. It must be light. Do not put any polyfiber at the superior part.
— Assembly :
Attach head to body
Attach the neck opening of the head to the body opening and sew in place. Use pins to position the eyes and muzzle before sewing.
Attach limbs
Sew arms to the sides of the body at roughly the same height as the head; sew legs to the bottom evenly for balance.
Attach ears and tail
Place ears near the top of the head with even spacing; attach tail at rear of body and align with central axis.
Finish facial features
Embroider the nose and mouth, then push the eyes slightly to refine expression before final stitching.
Final assembly
Weave in yarn tails, trim excess, and ensure all parts are secure before presenting Alan.
Assembly Instructions
Attach head to body by inserting the neck portion (rounds 21-25) into the opening at the top of the body, then sew securely using whipstitch.
Position arms on either side of the body between rounds 12-14, angling slightly forward for a natural pose, and sew in place.
Sew legs to the bottom of the body, spacing them evenly and ensuring they're firmly attached for stability.
Attach ears to the top of the head at rounds 6-8, spacing them about 8-10 stitches apart for symmetry.
Add any facial features or accessories according to the pattern, using photos as reference for accurate placement.
Important Notes
Use stitch markers to track rounds and color changes for consistent shaping.
Stuff firmly but not overly tight to maintain smooth curves and avoid gaps.
Pin all parts before sewing to ensure correct placement and symmetry.
Weave in ends as you go to reduce finishing work and keep ends tidy.
To avoid gaps at joins, sew with small, evenly spaced stitches and keep tension even.
This is your closing note for Alan's journey. Alan's lion-size and the mane detailing are meant to inspire pride in your handiwork. Keep going, you did amazing work crafting this friend. You’ve created something truly special and plush—enjoy the moment when Alan is finally complete.
Good to know
You ask, we answer
The finished amigurumi lion stands approximately 30 cm tall when using the recommended yarn and hook size.
Yes, you can use different yarn weights, but this will affect the final size. Make sure to select an appropriate hook size for your chosen yarn.
This pattern is rated intermediate, so basic knowledge of crochet stitches and techniques is recommended for best results.
Most crocheters complete this project in 12-15 hours, though time may vary based on experience and working pace.
Color changes are a normal part of the pattern; follow rounds 7–10 for camel vs natural color placements and keep stitches tight at color joins.
Yes, you can substitute yarns, but adjust your hook size and tension to avoid gaps and to maintain the lion’s shape.
Join 100k+ crocheters
Stay in the loop
Get new free patterns, stitch tips and exclusive content in your inbox.