HowTo Amigurumi
Free Crochet Pattern
Beautiful Detailed Adorable

Tyrannosaurus Oliver Amigurumi Pattern

Close-up of Oliver's bright yellow-green head amigurumi with black eyes
4.4Rating
8-10 HoursTime
AdvancedSkill
Highlights

What makes it special

Cute Companion

An adorable friend to cherish, handcrafted with love to bring comfort and joy for years to come.

All-Day Adventure

An 8- to 10-hour journey, perfect for a weekend crochet session that yields a fully posable amigurumi.

Advanced Level

This project suits experienced crocheters who enjoy color-changing jacquard work, multi-piece assembly, precise shaping and careful finishing to bring a tiny, poseable tyrannosaurus to life.

I fell in love with Tyrannosaurus Oliver the moment I started stitching his tiny frame. Every curve of his head, the squat body, and those curious little limbs invite storytelling, almost like he’s winking from a desk as I work. I chose Yarn A in color 29 for the main shell and paired it with Yarn B in color 62 to bring a hint of speckled texture to the crest and cheeks, all while keeping the scale small enough to fit in a single hand. The magic ring start, invisible decrease lines, and carefully placed safety eyes give him a friendly, approachable expression that reads perfectly in photographs or morning light on a shelf. I keep the stitches tight—SC, INC, DEC—with careful BLO and FLO shaping—so Oliver stays cuddly, not floppy—yet remains precise enough for a display piece to hold its shape over time.

If you’re planning to gift him or simply want a toy that doubles as a desk companion, Oliver delivers. He’s designed to be sturdy under play but delicate in appearance, the kind of amigurumi that begs to be photographed in close-up and then perched in a small diorama. I write the pattern with two markers to track rounds and a 10 mm safety eye to anchor his gaze. It’s a project that rewards patience, calm counting, and a love of tiny details—the perfect weekend joy that leaves you with a character you’ll remember long after the last stitch is woven.

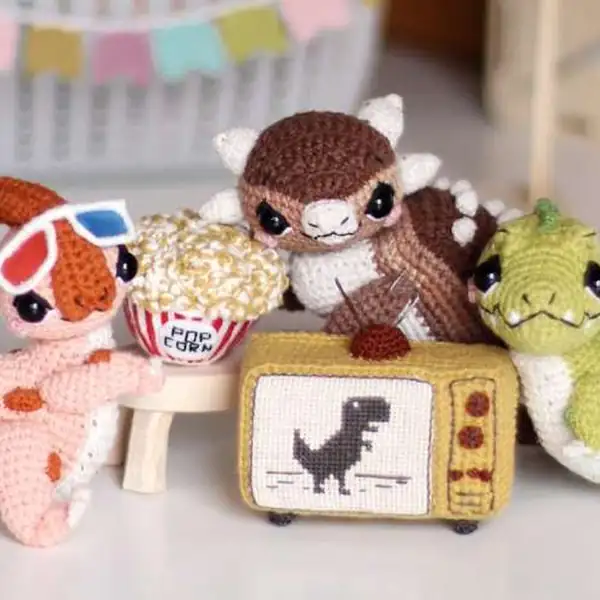
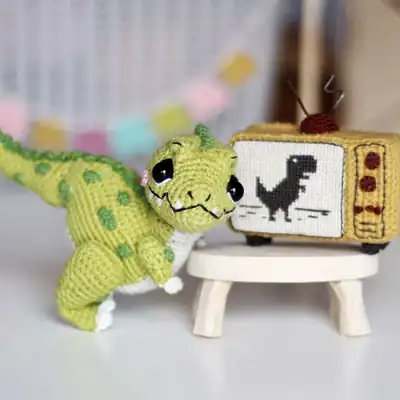
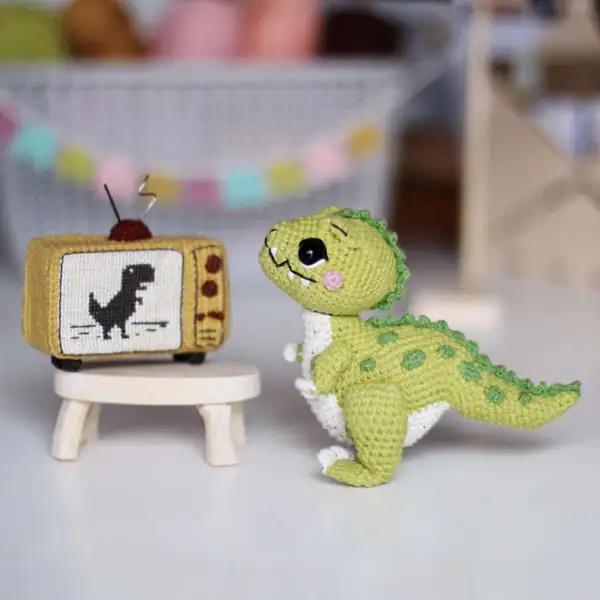
About This Tyrannosaurus Oliver Amigurumi Pattern

Oliver stands at approximately 10.5 cm tall, a pocket-sized tyrannosaur with a grin and a heart. The body is worked in Sport-weight yarns, alternating Yarn A for the main shell with Color A 29 and Yarn B for subtle speckled accents along the crest and cheeks. His head is gently arced, with a tiny jawline and a pair of bright 10 mm safety eyes that sit evenly on either side of a simple black mouth stitched with mouline thread.

The limbs are short but expressive, and the tail balances the silhouette with a playful tilt. Construction relies on a classic MR start, tight SC rounds, a few INC and DEC rows, and careful invisible decreases to keep edges soft and smooth. I use tiny BLO and FLO techniques to shape the crests and cheeks, and I mark rounds with two markers to keep color changes neat across the body.

The result is an amigurumi dinosaur that sits happily on a shelf or in your hand, sturdy enough to pose but delicate enough to photograph up close.

The Tyrannosaurus Oliver amigurumi pattern begins with a compact, characterful silhouette that fits in one palm and invites storytelling from the very first stitch. I start with a MR in Color A, switch to a tight SC rhythm, and keep the body at a tidy height so Oliver can stand on a shelf or perch in front of a camera. The two-color approach uses Yarn A for the main shell and Yarn B for subtle speckles along the crest, echoing prehistoric texture without adding bulk. Every round is counted and marked, the safety eyes are anchored at a careful distance, and the design relies on BLO and FLO shaping to achieve gentle curves rather than flat planes. The cheeks receive a tiny 1.5 mm hook to preserve their roundness, while the muzzle and mouth use mouline threads in black and pink for expression.

As you work toward the head, legs, and tail, you’ll notice how steady tension and clear round progression reward patience. The head is built first, then the torso, followed by the short legs and a balancing tail. I keep the hands flexible by assigning a couple of small color changes only where needed, and I remind you to use two markers so you don’t lose track of where rounds begin and end. The finishing sequence includes a secure tail join, a neatly sewn underside, and a final pass to weave in tails without creating bulky joins. The result is a figure you can customize with different facial expressions and a few extra crested details to suit your display space.

Final care and display are part of the pattern’s charm. Oliver loves a gentle wipe with a damp cloth if dust collects, and he holds his pose well on a tiny stand or a simple dish of display shelves. The instruction notes keep the build faithful to the scale—about 4.1 inches tall when completed—while allowing you to adjust surface texture with BLO or FLO. This isn’t just about making a toy; it’s about shaping a character you’ll photograph, chat with during late-night crochet sessions, and pass on as a small heirloom that carries your personal touch.

Oliver's head with crest and safety eyes close-up

In practical terms, this pattern assumes sport-weight yarn and yields about a 10–11 cm finished height, depending on tension and the exact yarns you choose. The pattern is written for a 1.75 mm hook for the body and a 1.5 mm hook for cheeks, crests, and spots to keep the small features crisp and proportional. I’ve included clear color-change guidance, a MR start, and a concise row-count so you can pace yourself over an evening or stretch the build into a weekend project. The piece uses safety eyes (10 mm) and mouline threads for a precise mouth and tiny facial details, with two pins or markers to help you track rounds and color changes throughout the build.

Because Oliver is built in rounds with subtle increases and decreases, I recommend testing gauge with a quick swatch before you begin. This helps ensure the finished height remains consistent with the pattern’s approx. 10.5 cm target, and it makes it easier to adjust if your yarn is thicker or thinner than Sport weight. The pattern also calls for BLO and FLO shaping to create dimensional crests, cheeks, and a gentle torso curve, so keep that in mind when you choose your yarn brand. With these notes in mind, you’ll be able to replicate Oliver’s proportions reliably across different fiber types while preserving that adorable, poseable stance.

Stitches & Skills You'll Use

First, I start with a magic ring (MR) and then build a compact torso using tight SC rounds. The round-by-round approach keeps the body from warping and ensures Oliver stands up with a slight forward tilt that reads as confident, not top-heavy. I place a safety eye in a fixed, symmetrical position and anchor the eye with a small amount of extra backing to prevent wobble during play. The muzzle is formed with simple black mouline stitches and a pink mouth line, a small but expressive addition that makes his face instantly readable at a glance.

Next, I use BLO along the crest and cheeks to sculpt curved surfaces, then FLO to emphasize the top edge and give Oliver a subtle, dinosaur-like ridge without creating harsh edges. Where texture matters, I insert tiny BOBBLE stitches to suggest scales along the crest and give the silhouette a playful, tactile quality. The limbs are attached with secure joins and reinforced with a touch of extra stuffing to preserve pose, while the tail is shaped with careful increases and decreases to balance the body’s tiny frame and prevent flop during handling.

Finally, assembly is the quiet magic: I stitch the pieces together with invisible joins, loom in the small facial details with Mouline threads, and ensure the color changes are crisp and neat by weaving in the tails. Oliver’s proportions—slender neck, chunky head, compact limbs—are designed for photography and display as much as for gentle play. A few minutes of priming with a round of tightening stitches around the joints goes a long way toward a finished piece that feels like a tiny, living character rather than a stuffed toy.

Why You'll Love This Tyrannosaurus Oliver Amigurumi Pattern

From the first stitch of Tyrannosaurus Oliver, I knew he would be a cherished little character to hug and admire. This amigurumi is built on a compact, sculpted silhouette—a round head, stubby limbs, and a tail that curves playfully—finished at about 10.5 cm tall when perched on a bookshelf or tucked into a palm. The color story uses Yarn A: Yarnart Jeans in color 29 as the base and Yarn B: Alize Cotton Gold Tweed in color 62 for peppered texture, so Oliver reads as friendly and a touch vintage. Working in sport-weight yarn keeps the amigurumi light for safe play, while the fine stitch work preserves the crisp shapes that an Advanced pattern demands.

Crafted with a measured plan, the head, body, arms, and tail take shape from a magic ring foundation and a patient series of stitches that stay tight and even. I use a 1.75 mm hook for the main pieces and a 1.5 mm hook for cheeks, crests, and small spots to keep the scale delicate. Throughout the construction I lean on invisible decreases and BLO vs FLO placement to sculpt the snout and underbelly smoothly, with a tiny 10 mm safety eye set securely for character instead of a flat dollface.

I love Oliver because the colorwork and facial details give him personality without losing the cuddly charm that makes amigurumi so appealing. He wears a soft two-tone coat that shifts with every light, and the snout is defined by a careful line of black mouline while the cheeks glow with a hint of pink. The little arms and legs are rounded and sturdy thanks to careful increases and a secure stuffing technique, and his tail curls invitingly as you support him with your thumbnail for a poseable, ready-to-display toy.

Colour & Yarn Inspiration

Color exploration is where this tiny tyrant truly shines. Start with Yarn A color 29 for your main shell to preserve the familiar look, then use Yarn B color 62 as the contrasting speckle on the crest and cheeks. If you want a cooler vibe, try a teal main for the body and a gray-blue speckle; for warmth, substitute creamy beige with a coppery accent on the crest. The proportions stay the same, but the mood shifts dramatically with each pairing, letting you craft Oliver to suit a room’s palette or a recipient’s favorite colors.

When you’re building a display ensemble, consider coordinating Oliver with a tiny mossy green backdrop or a pale pink backdrop to highlight the eyes and mouth. You can also tame or emphasize the crest by using a slightly lighter or darker shade of the same color family, which preserves the silhouette while giving you more dimension. If you’re making a seasonal version, swap to red-green combos for a festive look, or lemon-yellow with olive for a sunny prehistoric vibe. The important thing is to keep the two-color concept intact so Oliver maintains his recognizable shape while becoming a flexible, color-rich sculpture you’re excited to photograph.

Color experiments like these don’t just alter appearance; they affect texture perception and how light plays on the surface. With careful stitching and proper tension, your Oliver will keep his neat edges and crisp curves, no matter the hues you choose. Have fun testing combinations, then trust the timeless silhouette to carry your chosen palette with charm and character.

Oliver with TV prop posed on a small stool

Switch Things Up

Want to tailor Tyrannosaurus Oliver to your own color story? Start by swapping the two yarn colors or adding tiny speckles with pink and green mouline threads to give him a different mood. This pattern uses Yarn A: Yarnart Jeans color 29 as the base and Yarn B: Alize Cotton Gold Tweed color 62 for texture, but you could invert those choices for a bolder look or mix in a few extra stitches for scale variation. The finished figure stays around 10.5 cm tall, making him perfect for a shelf, a desk, or a small gift.

Another way to switch things up is to play with poses and display options. With a light hand on stuffing, Oliver can sit upright, tilt his head, or swagger a bit by curling the tail into a gentle arc. The same two-color strategy remains, but you’ll notice how stitch tension affects depth in photos and display. If you want him perched, the optional foam stand, a small disk, and a cotter pin setup give you a neat, invisible mounting that stays secure without changing his shape.

For gifting or teaching, consider small facial changes that alter personality. A brighter mouth, a different eye stitch, or a tiny white mouline highlight can swing him from curious to cheeky while keeping proportions intact. You can also experiment with spot placement or crests using a 1.5 mm hook to carve subtle texture. The core techniques—magic ring foundations, invisible decreases, BLO and FLO shaping, and careful stuffing—remain the backbone, so Oliver stays sturdy and kid-safe while still looking delightfully expressive.

Finally, you can expand Oliver’s world by building a tiny scene or pairing him with another friend amigurumi in the same scale. A small shelf diorama, a clay hill, or a little TV stand can be created using the optional foam or Styrofoam and the stand hardware listed in the pattern—shim, disk, and cotter pin—to hold him steady without distracting from his crocheted texture. Photograph him with natural light to highlight the Yarnart Jeans base and the Tweed texture, and share your variations with the crochet community so Oliver continues to inspire new color stories and smiles.

Ways to Use & Gift It

Oliver makes a thoughtful, pocket-sized gift for crocheters who love tiny characters and playful storytelling. He’s small enough to tuck into a gift bag with a little note about your favorite moments from stitching together his two-color shell, yet substantial enough to feel like a meaningful handmade treasure. Consider pairing him with a tiny diorama or a display stand so the recipient can instantly stage photos or stories, transforming Oliver into a centerpiece for a desk, bookshelf, or classroom corner.

Pair Oliver with a mini “fossil dig” scene: a small tray, printable prehistoric cards, and a few toy rocks to create an imaginative setup that invites kids to narrate adventures. If you’re gifting to a teacher or caregiver, include a note about his poseable limbs and wipe-clean surface—he’s easy to clean after a day of art projects and chalk dust. For baby gift occasions, emphasize safety: the 10 mm eyes are securely anchored and the stuffing is compact but forgiving, keeping him cuddly yet safe for supervised play.

Finally, create a small set by crocheting Oliver along with a companion dinosaur or two in coordinating colors. The three-of-a-kind display makes a charming curated gift, perfect for a new home, a birthday, or a holiday stash. A handwritten card detailing the care tips and your stitching journey adds a personal touch that elevates your handmade present from charming to cherished.

Common Mistakes & How to Fix Them

Not marking rounds at color changes can lead to misaligned sections; place a stitch marker at the start of each round to stay on track. Stuffing too firmly makes the toy stiff and less poseable; add stuffing gradually and test the pose before finishing. Forgetting to weave in ends as you go creates a finishing bottleneck; weave ends after each segment to keep seams clean. Inconsistent tension causes gaps at color changes; maintain even tension throughout and pull the nonworking color through slowly. Skipping safety eyes placement leads to misaligned facial features; insert eyes between rounds as indicated and double-check symmetry.

Maker's Notes

In testing this pattern, I paid close attention to tension consistency, stitch placement, and the effect of small color changes on the final silhouette. I found that keeping a steady, even tension in SC rounds helps prevent slight bulges that can distort Oliver’s compact proportions. The MR start is sensitive to loop size, so I recommend securing the magic ring with a tight slip knot before you begin the first round, ensuring your first stitch sits neatly and the head remains perfectly circular.

The 10 mm safety eyes must be anchored securely; I use a small amount of fabric glue on the backing for added safety when the piece is planned for older children or display purposes. When working the crests and cheeks with a 1.5 mm hook, test two or three passes to ensure the stitches stay tight enough to hold shape but not so tight that the surface becomes stiff. I also tested the color-change technique by leaving long tails to weave in instead of cutting after every color switch, which reduces finishing time and minimizes visible joins.

Finally, I recommend stuffing in layers, checking for symmetry after each major segment—head, torso, limbs, and tail—so Oliver sits evenly and poses well when photographed or displayed. If you encounter a wobble when Oliver stands, re-tighten the tail join and add a fraction more stuffing at the base of the legs to restore balance. Throughout testing, I kept a log of row counts and marker positions to ensure reproducibility across copies.

This isn’t just a toy; it’s a small sculpture that rewards careful technique and patient execution, especially when you want to translate the same pattern into different colorways while preserving the iconic silhouette.

I tried a substitution: If you don’t have Yarnart Jeans 160 m/50 g in Color A 29, you can substitute a sport-weight (12 wpi) yarn with a similar feel and a comparable fiber content. Look for a yarn that settles into a tight fabric with a modest stretch, so the final figure stays sturdy yet squeezable. For Yarn B in Color 62, a tweed or speckled sport-weight option works well if it shares a similar tonal range. When substituting yarns, expect a slight change in finished height; to compensate, adjust your hook size by ±0.25 mm or tweak the stuffing density a touch to preserve Oliver’s proportions. If you can’t find 10 mm safety eyes, you can embroider the eyes with white mouline for highlights and ensure the pupils are small and evenly spaced to maintain the same friendly expression. In a pinch, you can also use smaller safety eyes with a proportionally adjusted head size, but be mindful of the impact on balance and display stability. The key is to maintain the two-color plan and the same round-count rhythm so Oliver’s silhouette remains recognizable, even when substitutions are necessary.

Tyrannosaurus Oliver Amigurumi Pattern

Oliver stands at approximately 10.5 cm tall, a pocket-sized tyrannosaur with a grin and a heart. The body is worked in Sport-weight yarns, alternating Yarn A for the main shell with Color A 29 and Yarn B for subtle speckled accents along the crest and cheeks. His head is gently arced, with a tiny jawline and a pair of bright 10 mm safety eyes that sit evenly on either side of a simple black mouth stitched with mouline thread. The limbs are short but expressive, and the tail balances the silhouette with a playful tilt. Construction relies on a classic MR start, tight SC rounds, a few INC and DEC rows, and careful invisible decreases to keep edges soft and smooth. I use tiny BLO and FLO techniques to shape the crests and cheeks, and I mark rounds with two markers to keep color changes neat across the body. The result is an amigurumi dinosaur that sits happily on a shelf or in your hand, sturdy enough to pose but delicate enough to photograph up close.

Advanced 8-10 Hours
Pattern at a glance
Skill level
Advanced
Time to make
8-10 Hours
Hook size
1.75 mm for main, 1.5 mm for cheeks/crest/spots
Yarn weight
Sport / #2-3, depending on brand
Finished size
Approx. 10.5 cm / 4.1 in tall
Gauge
Not specified; approximate gauge: 6-7 sc x 6-7 rows per 1 inch with 1.75 mm hook using sport weight yarn
Yarn used
Main color (Yarn A): ~50 g; Secondary color (Yarn B): ~100 g; TV set/yarn accents: ~25 g; plus small amounts for personalization

Materials Needed

Main Fabric
  • 01
    Yarn A: Yarnart Jeans 160 m/50 g Sport (12 wpi)
  • 02
    Color A: 29
  • 03
    Brand A: Yarnart Jeans
  • 04
    Weight A: Sport (12 wpi)
  • 05
    Yarn B: Alize Cotton Gold Tweed 330 m/100 g Sport (12 wpi)
  • 06
    Color B: 62
  • 07
    Brand B: Alize Cotton Gold Tweed
  • 08
    Weight B: Sport (12 wpi)
  • 09
    Hook 1,75 mm (for crochet dinosaur) yHook for cheeks 1,5 mm
  • 10
    Safety Eyes 10 mm
  • 11
    Black, white, pink and green mouline threads
  • 12
    2 pins or markers
Tools Required
  • 01
    Hook 1.75 mm (for the dinosaur body)
  • 02
    Hook 1.5 mm (for cheeks, crests and spots)
  • 03
    10 mm safety eyes
  • 04
    Black, white, pink and green mouline threads
  • 05
    2 pins or 2 markers
  • 06
    Needles for cutting - with bead on the end
  • 07
    Synthepus for filling
  • 08
    Yarn needle (thick needle with blunt end)
  • 09
    Scissors
  • 10
    Needle
  • 11
    Round-nosepliers
  • 12
    Cotter pin T-shaped 25 x 2.0 mm
  • 13
    Shim 3x20 mm
  • 14
    Disk, diameter 20 mm
  • 15
    Optional: Foam/Styrofoam for TV stand

— Part 1 :

Round 1: 7 loops, turning, 6sc (starting from the 2nd loop from the hook), 6sc (from the back;
Round 2: [sc, inc]х6 (18l)
Round 5: [2sc, inc]х6 (24l)
Round 8: 3sc, [inc]х18, 3sc (42l)
Round 9: 18sc, 4dc in the next loop, [dec]х4, 4dc in the next loop, 14sc (44l)
Round 10: 19sc, [2dc in the next loop]x2, sc, 4 sl st, sc, [2dc in the next loop]x2, 15sc (48l)
Round 11: 24sc, 4 sl st, 20sc (48l)
Round 12: 24sc, 4 sl st, 20sc (48l)
Round 13: 24sc, 4 sl st, 20sc (48l)
Round 14: 18sc, [dec]х3, 4sc, [dec]х3, 14sc (42l)
Round 16: [5sc, dec]х6 (36l)
Round 17: [4sc, dec]х6 (30l)
Round 18: [3sc, dec]х6 (24l)

— Part 2 :

Round 1: 2 loops, 6sc in 2nd loop from hook (amigurumi ring), sl st in 1st sc (6l)
Round 21: [2sc, dec]х6 (18l)
Round 22: [sc, dec]х6 (12l)
Round 23: [dec]х6 (6l)

— Part 3 :

Round 1: 27 loops, turning, sl st (starting from the 2nd loop from the hook), [sl st; crochet in;
Round 2: [inc]х8 (16l)
Round 3: [3sc, inc]х2 (Yarn B); [3sc, inc]х2 (Yarn A) (20l)
Round 5: [4sc, inc]х2 (Yarn B); [4sc, inc]х2 (Yarn A) (24l)
Round 6: 12sc, (Yarn B); 6sc, 4 loops, turning, 3sc starting from the 2nd loop from the hook, sl;
Round 7: 12sc, (Yarn B); 9sc, 4 loops, turning, 3sc starting from the 2nd loop from the hook, sl;
Round 8: [5sc, inc]х2 (Yarn B); [5sc, inc]х4 (Yarn А) (42l)
Round 9: 14sc, (Yarn B); [6sc, inc]х2, 4 loops, turning, 3sc starting from the 2nd loop from the;
Round 10: 14sc (Yarn B); [7sc, inc]х2, 6sc, [7sc, inc]х2 (Yarn A) (56l)
Round 11: 14sc, (Yarn B); 21sc, 4 loops, turning, 3sc starting from the 2nd loop from the hook,;
Round 12: 14sc, (Yarn B); 24sc, 4 loops, turning, 3sc starting from the 2nd loop from the hook,;
Round 2: [inc]х2, dec (5l)
Round 3: sc, [inc]х2, dec (6l)
Round 4: sc, [inc]х2, sc, dec (7l)
Round 5: sc, [inc]х3, sc, dec (9l)
Round 6: 2sc, inc, sc, inc, 2sc, dec (10l)
Round 8: 3sc, [inc]х3, 2sc, dec (12l)
Round 10: 3sc, [inc]х5, 2sc, dec (16l)
Round 12: dec, 4sc, [inc]х4, 4sc, dec (18l)
Round 14: dec, 5sc, [inc]х4, 5sc, dec (20l)
Round 15: 15sc (Yarn B); 19sc, [dec]х3, 18sc, [dec]х3, 20sc (Yarn A) (78l)
Round 16: 16sc (Yarn B); 15sc, [dec]х3, 18sc, [dec]х3, 17sc (Yarn A) (72l)
Round 17: 16sc (Yarn B); 12sc, [dec]х3, 18sc, [dec]х3, 14sc (Yarn A) (66l)
Round 18: 17sc (Yarn B); 14sc, [sc, dec]х6, 17sc (Yarn A) (60l)
Round 19: 17sc (Yarn B); 14sc, [dec]х6, 17sc (Yarn A) (54l)
Round 20: [7sc, dec]х6 (48l)
Round 21: [6sc, dec]х6 (42l)
Round 22: [5sc, dec]х6 (36l)
Round 23: [4sc, dec]х6 (30l)
Round 24: [3sc, dec]х6 (24l)
Round 25: [2sc, dec]х6 (18l)
Round 26: [sc, dec]х6 (12l)
Round 27: [dec]х6 (6l)

— Part 4 :

Round 1: 9 loops, turning, 8 sl st (starting from the 2nd loop from the hook), 8 sl st (from the;
Round 2: [7sc, inc]х2 (18l)
Round 7: 3sc, dec, 8sc, dec, 3sc (16l)
Round 8: 3sc, dec, 6sc, dec, 3sc (14l)
Round 9: 2sc, dec, 6sc, dec, 2sc (12l)
Round 12: sc, [dec]х2, 2sc, [dec]х2, sc (8l)
Round 13: sc, dec, 2sc, dec, sc (6l)
Round 15: 4sc, [inc]х2 (8l)
Round 16: 4sc, [inc]х4 (12l)
Round 18: 7sc, [inc]х4, sc (16l)
Round 20: 1 loop, turning, 8 sl st (8l) (see photos 79-84)
Round 21: 1 loop, turning, [booble*, sl st]x2, bobble (see photo 94)

— Part 5 :

Round 1: 2 loops, 6sc in 2nd loop from hook (amigurumi ring) (6l)
Round 2: [inc, sc]х3 (9l)
Round 4: [inc]х3, [dec]х3 (9l)
Round 6: [dec]х3, [inc]х3 (9l)
Round 7: [sc, dec]х3 (6l)
Round 8: 1 loop, turning, 3 sl st (3l) (see photos 97, 98)
Round 9: 1 loop, turning, crochet in 1 loop - {sc, 2 loops, sl st}; sl st; crochet in 1 loop - {sc, 2;

— Part 6 :

Round 1: 45 loops, turning, sl st (starting from the 2nd loop from the hook), [sl st; crochet in;

— Part 7 :

Round 1: 3 loops, turning, 2sc (starting from the 2nd loop from the hook), 2sc (from the back;

— Part 8 :

Round 1: 4 loops, turning, 3sc (starting from the 2nd loop from the hook), 3sc (from the back;

— Part 9 :

Round 1: 5 loops, turning, 4sc (starting from the 2nd loop from the hook), 4sc (from the back;

— Part 10 :

Round 1: 15 loops, turning, 14sc (starting from the 2nd loop from the hook) (14l)
Round 2: 1 loop, turning, 14sc (14l)
Round 3: 1 loop, turning, 14sc (14l)
Round 4: 1 loop, turning, 14sc (14l)
Round 5: 1 loop, turning, 14sc (14l)
Round 6: 1 loop, turning, 14sc (14l)

— Part 11 :

Round 1: 2 loops, 6sc in 2nd loop from hook (amigurumi ring), sl st in 1st sc (6l)

— Part 12 :

Round 1: 15 loops, turning, 14sc (starting from the 2nd loop from the hook) (14l)
Round 2: 1 loop, turning, 14sc (14l)
Round 3: 1 loop, turning, 14sc (14l)
Round 4: 1 loop, turning, 14sc (14l)
Round 5: 1 loop, turning, 14sc (14l)
Round 6: 1 loop, turning, 14sc (14l)
Round 7: 1 loop, turning, 14sc (14l)
Round 8: 1 loop, turning, 14sc (14l)
Round 9: 1 loop, turning, 14sc (14l)
Round 10: 1 loop, turning, 14sc (14l)
Round 11: 1 loop, turning, 14sc (14l)
Round 12: 1 loop, turning, 14sc (14l)
Round 13: 1 loop, turning, 14sc (14l)
Round 14: 1 loop, turning, 14sc (14l)
Round 15: 1 loop, turning, 14sc (14l)
Round 16: 1 loop, turning, 14sc (14l)
Round 17: 1 loop, turning, 14sc (14l)
Round 18: 1 loop, turning, 14sc (14l)
Round 19: 1 loop, turning, 14sc (14l)
Round 20: 1 loop, turning, 14sc (14l)
Round 21: 1 loop, turning, 14sc (14l)
Round 22: 1 loop, turning, 14sc (14l)
Round 23: 1 loop, turning, 14sc (14l)
Round 24: 1 loop, turning, 14sc (14l)
Round 25: 1 loop, turning, 14sc (14l)

— Part 13 :

Round 1: 2 loops, 6sc in 2nd loop from hook (amigurumi ring) (6l)
Round 2: [inc]х6 (12l)
Round 3: [sc, inc]х6 (18l)

— Part 14 :

Round 1: 2 loops, 6sc in 2nd loop from hook (amigurumi ring) (6l)

Important Notes

  • Use stitch markers to keep track of rounds, especially during color changes and shaping sections.
  • Stuff firmly but not too tightly for the best shape and structure - overstuffing can distort your work.
  • Pin all parts in place before sewing to ensure correct positioning and symmetry.
  • Weave in ends as you go to avoid a tedious finishing session at the end.
  • Work with consistent tension throughout for even, professional-looking results.

Oliver the Tyrannosaurus Amigurumi is a tiny icon of character, crafted with a careful two-color plan, small, precise stitches, and a smile that invites storytelling. He’s designed to be photographed and displayed, yet sturdy enough for gentle play. With the MR start, careful color changes, and the subtle BLO/FLO shaping that defines his crest and cheeks, he captures attention in a single glance. This is a pattern that rewards patience and a love of technique, and it yields a finished piece you’ll be proud to keep on a shelf, gift to a friend, or include in a handmade display that sparks conversations about crochet, creatures, and tiny works of art.

Good to know

You ask, we answer

The finished amigurumi measures approximately 10.5 cm tall when using the recommended yarn and hook size.

Yes, you can use different yarn weights, but this will affect the final size. Make sure to use an appropriate hook size for your chosen yarn.

This pattern is advanced due to colorwork and multi-part assembly, so some experience with amigurumi stitches and color changes is recommended.

Most crocheters finish this project in 8-10 hours, though time may vary based on experience level and working pace.

Retro TV set prop with yellow body and printed screen
Join 100k+ crocheters

Get new free patterns, stitch tips and exclusive content in your inbox.