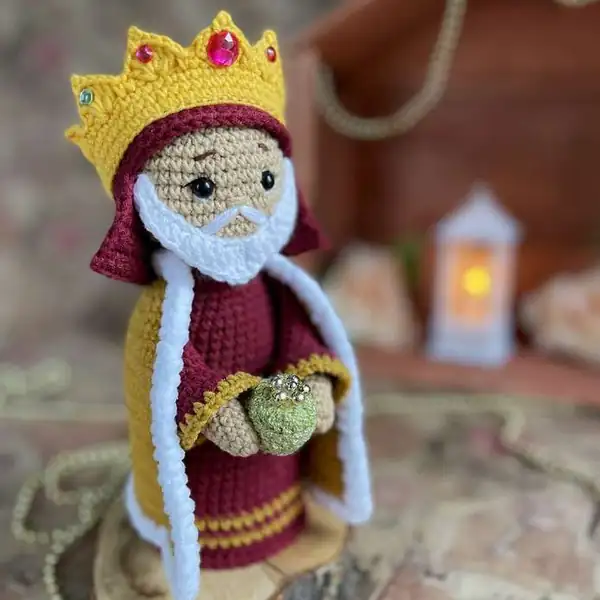
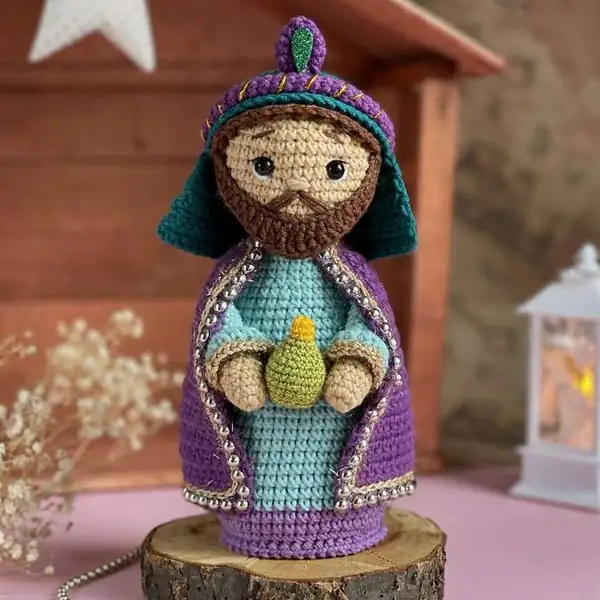
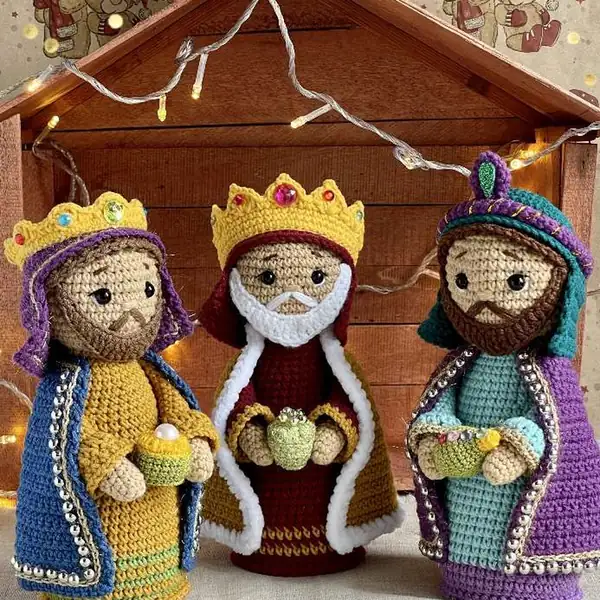
Three Wise Men Amigurumi Pattern brings together three individual characters who share a common technique core and a celebration of color. Each figure begins with a magic ring to anchor a small head, then a plump torso and gently curved arms that emerge from the sides. The robes are worked in sport weight yarn to create soft folds that hold their shape without bulk, while diminutive crowns or headwear are accented with YarnArt Christmas / Etamin threads for a hint of shimmer. The pattern relies on a careful sequence of stitches SC, INC, DEC, SC2TOG, HDC, DC, TR plus FLO and BLO to shape edges and seams. You’ll switch colors in controlled carries, work in rounds rather than a flat panel, and use invisible decreases to keep neck lines smooth. Final assembly is straightforward: I stuff each piece just enough to hold its personality, attach heads to torsos with small neck seams, and place arms so they balance like three travelers at a doorway. Safety eyes size 7 mm anchor the faces, while black and brown threads sketch tiny noses, mouths, and eyebrows. The finishing touch crowns or head adornments and a scattering of rhinestones or beads makes each wise man feel unique. The finished trio stands about 19 cm tall and can be posed on mantles, in place settings, or as a thoughtful gift that travels well in a small gift bag.
Round 2: Black safety eyes 7 mm (2 pcs) for each wise man;
Round 7: Scissors, stitch marker;
— Part 2 :
Round 1: 5 sc in MR (5)
Round 2: 5 inc (10)
Round 3: 10 sc;
Round 4: 10 sc;
Round 5: 10 sc;
Round 6: 10 sc;
Round 7: 10 sc;
Round 8: 10 sc;
Round 9: 10 sc;
Round 10: BLO - 10 sc;
Round 11: 10 sc;
Round 12: 10 sc;
Round 13: 10 sc;
Round 14: 10 sc;
Round 15: 10 sc;
Round 16: 10 sc;
Round 17: 10 sc;
Round 18: 10 sc;
Round 19: 10 sc;
Round 20: 10 sc;
— Sleeves decoration :
Round 1: (1 sc, inc)*5 (15)
Round 2: (2 sc, inc)*5 (20)
Round 3: 20 sc;
Round 4: (1 sc, ch 1)*20, slst;
— Part 4 :
Round 1: 8 sc in MR (8)
Round 2: 8 inc (16)
Round 3: (1 sc, inc)*8 (24)
Round 4: (3 sc, inc)*6 (30)
Round 5: 2 sc, inc, (4 sc, inc)*5, 2 sc (36)
Round 6: (5 sc, inc)*6 (42)
Round 7: (13 sc, inc)*3 (45)
Round 8: BLO - 45 sc;
Round 9: 45 sc;
Round 10: 45 sc;
Round 11: 45 sc;
Round 12: 45 sc;
Round 13: 45 sc;
Round 14: 45 sc;
Round 15: 45 sc;
Round 16: (13 sc, dec)*3 (42)
Round 17: 42 sc;
Round 18: 42 sc;
Round 19: 6 sc, dec, (12 sc, dec)*2, 6 sc (39)
Round 20: 39 sc;
Round 21: 39 sc;
Round 22: (11 sc, dec)*3 (36)
Round 23: 36 sc;
Round 24: 36 sc;
Round 25: 5 sc, dec, (10 sc, dec)*2, 5 sc (33)
Round 26: 33 sc;
Round 27: 33 sc;
Round 28: (9 sc, dec)*3 (30)
Round 29: 30 sc;
Round 30: 30 sc;
Round 31: 4 sc, dec, (8 sc, dec)*2, 4 sc (27)
Round 32: 27 sc;
Round 33: 4 sc on the body, through both stitches of the 1st arm;
Round 34: (7 sc, dec)*3 (24)
Round 35: (6 sc, dec)*3 (21)
Round 36: (5 sc, dec)*3 (18)
Round 37: 18 sc;
Round 38: 18 inc (36)
Round 39: (5 sc, inc)*6 (42)
Round 40: (13 sc, inc)*3 (45)
Round 41: 45 sc;
Round 42: 45 sc;
Round 43: 45 sc;
Round 44: 45 sc;
Round 45: 45 sc;
Round 46: 45 sc;
Round 47: 45 sc;
Round 48: (7 sc, dec)*5 (40)
Round 49: 3 sc, dec, (6 sc, dec)*4, 3 sc (35)
Round 50: (5 sc, dec)*5 (30)
Round 51: (4 sc, dec)*5 (25)
Round 52: (3 sc, dec)*5 (20)
Round 53: (2 sc, dec)*5 (15)
Round 54: (1 sc, dec)*5 (10)
— Part 5 :
Round 1: FLO - (1 sc, ch1)*45, slst (fig.13)
— Part 6 :
Round 1: ch 24. Start in the second chain from the hook: 3 sc, 3 hdc, 4 dc, 3 tr, 4 dc, 3 hdc, 3 sc. (fig.25)
— Part 7 :
Round 1: 6 sc in MR (6)
Round 2: 6 inc (12)
Round 3: (1 sc, inc)*6 (18)
Round 4: (2 sc, inc)*6 (24)
Round 5: (3 sc, inc)*6 (30)
Round 6: 2 sc, inc, (4 sc, inc)*5, 2 sc (36)
Round 7: (5 sc, inc)*6 (42)
Round 8: 3 sc, inc, (6 sc, inc)*5, 3 sc (48)
Round 9: 48 sc;
Round 10: 48 sc;
Round 11: 48 sc;
Round 12: 48 sc;
Round 13: FLO - 48 sc;
Round 14: 28 sc, ch 1, turn (28)
Round 15: 1 sc, inc, 24 sc, inc, 1 sc, ch 1, turn (30)
Round 16: 30 sc, ch 1, turn;
Round 17: 30 sc, ch 1, turn;
Round 18: 30 sc, ch 1, turn;
Round 19: 30 sc, ch 1, turn;
Round 20: 30 sc, ch 1, turn;
Round 21: 30 sc;
— Part 8 :
Round 1: ch 54, crochet sl st to connect the round. (fig.31)
Round 2: 54 sc;
Round 3: 54 sc;
Round 4: 54 sc;
Round 5: 10 sc, (skip 1 sc, into the next sc: (3 dc, ch 3 and work sl st into the first ch, 3 dc), skip 1;
— Part 9 :
Round 1: ch 17, start in the second chain from the hook: 16 sc (16)
Round 2: (1 sc, inc)*8 (24)
Round 3: (1 sc, inc)*2, 16 sc, (1 sc, inc)*2 (28)
Round 4: (2 sc, inc)*2, 16 sc, (2 sc, inc)*2 (32)
Round 5: inc, 4 sc, inc, 20 sc, inc, 4 sc, inc (36)
Round 6: 36 sc;
Round 7: 36 sc;
Round 8: inc, 6 sc, inc, 20 sc, inc, 6 sc, inc (40)
Round 9: 40 sc;
Round 10: 40 sc;
Round 11: inc, 38 sc, inc (42)
Round 12: 42 sc;
Round 13: 42 sc;
Round 14: inc, 40 sc, inc (44)
Round 15: 44 sc;
Round 16: 44 sc;
Round 17: inc, 42 sc, inc (46)
Round 18: 46 sc;
Round 19: 46 sc;
Round 20: inc, 44 sc, inc (48)
Round 21: 48 sc;
Round 22: 48 sc;
Round 23: 48 sc;
Round 24: 48 sc;
Round 25: 48 sc. In the corner sc 3 in same stitch and continue crocheting sc around the mantle. In;
— Part 10 :
Round 1: 6 sc in MR (6)
Round 2: 6 inc (12)
Round 3: BLO - 12;
Round 4: (3 sc, inc)*3 (15)
Round 5: (4 sc, inc)*3 (18)
Round 6: 18 sc;
Round 7: BLO - (1 hdc, dec-hdc)*6 (12), stuff lightly;
Round 8: 6 dec (6)
— Part 11 :
Round 1: 5 sc in MR (5)
Round 2: 5 inc (10)
Round 3: 10 sc;
Round 4: 10 sc;
Round 5: 10 sc;
Round 6: 10 sc;
Round 7: 10 sc;
Round 8: 10 sc;
Round 9: 10 sc;
Round 10: BLO - 10 sc;
Round 11: 10 sc;
Round 12: 10 sc;
Round 13: 10 sc;
Round 14: 10 sc;
Round 15: 10 sc;
Round 16: 10 sc;
Round 17: 10 sc;
Round 18: 10 sc;
Round 19: 10 sc;
Round 20: 10 sc;
— Sleeves decoration :
Round 1: ch 3, (inc-dc, dc)*4, inc-dc (15)
Round 2: (1 sc, ch 1)*20, slst;
— Part 13 :
Round 1: 8 sc in MR (8)
Round 2: 8 inc (16)
Round 3: (1 sc, inc)*8 (24)
Round 4: (3 sc, inc)*6 (30)
Round 5: 2 sc, inc, (4 sc, inc)*5, 2 sc (36)
Round 6: (5 sc, inc)*6 (42)
Round 7: (13 sc, inc)*3 (45)
Round 8: BLO - 45 sc;
Round 9: 45 sc;
Round 10: 45 sc;
Round 11: 45 sc;
Round 12: 45 sc;
Round 13: 45 sc;
Round 14: 45 sc;
Round 15: 45 sc;
Round 16: (13 sc, dec)*3 (42)
Round 17: 42 sc;
Round 18: 42 sc;
Round 19: 6 sc, dec, (12 sc, dec)*2, 6 sc (39)
Round 20: 39 sc;
Round 21: 39 sc;
Round 22: (11 sc, dec)*3 (36)
Round 23: 36 sc;
Round 24: 36 sc;
Round 25: 5 sc, dec, (10 sc, dec)*2, 5 sc (33)
Round 26: 33 sc;
Round 27: 33 sc;
Round 28: (9 sc, dec)*3 (30)
Round 29: 30 sc;
Round 30: 30 sc;
Round 31: 4 sc, dec, (8 sc, dec)*2, 4 sc (27)
Round 32: 27 sc;
Round 33: 4 sc on the body, through both;
Round 34: (7 sc, dec)*3 (24)
Round 35: (6 sc, dec)*3 (21)
Round 36: (5 sc, dec)*3 (18)
Round 37: 18 sc;
Round 38: 18 inc (36)
Round 39: (5 sc, inc)*6 (42)
Round 40: (13 sc, inc)*3 (45)
Round 41: 45 sc;
Round 42: 45 sc;
Round 43: 45 sc;
Round 44: 45 sc;
Round 45: 45 sc;
Round 46: 45 sc;
Round 47: 45 sc;
Round 48: (7 sc, dec)*5 (40)
Round 49: 3 sc, dec, (6 sc, dec)*4, 3 sc (35)
Round 50: (5 sc, dec)*5 (30)
Round 51: (4 sc, dec)*5 (25)
Round 52: (3 sc, dec)*5 (20)
Round 53: (2 sc, dec)*5 (15)
Round 54: (1 sc, dec)*5 (10)
— Part 14 :
Round 1: FLO - (1 sc, ch1)*45, slst (fig.5)
— Part 15 :
Round 1: ch 24. Start in the second chain from the hook: 3 sc, 3 hdc, 4 dc, 1 tr, 1 inc-tr, 1 tr, 4 dc,;
— Part 16 :
Round 1: 6 sc in MR (6)
Round 2: 6 inc (12)
Round 3: (1 sc, inc)*6 (18)
Round 4: (2 sc, inc)*6 (24)
Round 5: (3 sc, inc)*6 (30)
Round 6: 2 sc, inc, (4 sc, inc)*5, 2 sc (36)
Round 7: (5 sc, inc)*6 (42)
Round 8: 3 sc, inc, (6 sc, inc)*5, 3 sc (48)
Round 9: 48 sc;
Round 10: 48 sc;
Round 11: 48 sc;
Round 12: 48 sc;
Round 13: FLO - 48 sc;
Round 14: 26 sc, turn (26)
Round 15: ch 1, 1 sc, inc, 22 sc, inc, 1 sc, turn (28)
Round 16: ch 1, 1 sc, inc, 24 sc, inc, 1 sc, turn (30)
Round 17: 30 sc, ch 1, turn;
Round 18: 30 sc, ch 1, turn;
Round 19: 30 sc, ch 1, turn;
Round 20: 30 sc, ch 1, turn;
Round 21: 30 sc, ch 1, turn;
Round 22: 30 sc (fig.9)
— Part 17 :
Round 1: BLO - 48 sc;
Round 2: (sl st, 1 hdc)*24 (48) (fig.11)
— Part 18 :
Round 1: 6 sc in MR;
— Part 19 :
Round 1: 4 sc in MR (4)
Round 2: 4 inc (8)
Round 3: (3 sc, inc)*2 (10)
Round 4: 10 sc;
Round 5: 10 sc;
Round 6: (3 sc, dec)*2 (8)
Round 7: 8 sc;
— Part 20 :
Round 1: ch 17, start in the second chain from the hook: 16 sc (16)
Round 2: 16 inc (32)
Round 3: 32 sc;
Round 4: 32 sc;
Round 5: 5 sc, inc, 20 sc, inc, 5 sc (34)
Round 6: 34 sc;
Round 7: 34 sc;
Round 8: 1 sc, inc, 4 sc, inc, 20 sc, inc, 4 sc, inc, 1 sc (38)
Round 9: 38 sc;
Round 10: 38 sc;
Round 11: 1 sc, inc, 6 sc, inc, 20 sc, inc, 6 sc, inc, 1 sc (42)
Round 12: 42 sc;
Round 13: 42 sc;
Round 14: 42 sc;
Round 15: 1 sc, inc, 8 sc, inc, 20 sc, inc, 8 sc, inc, 1 sc (46)
Round 16: 46 sc;
Round 17: 46 sc;
Round 18: 46 sc;
Round 19: 1 sc, inc, 42 sc, inc, 1 sc (48)
Round 20: 48 sc;
Round 21: 48 sc;
Round 22: 48 sc;
Round 23: 1 sc, inc, 44 sc, inc, 1 sc (50)
Round 24: 50 sc;
Round 25: 50 sc;
Round 26: 50 sc;
— Part 21 :
Round 1: 6 sc in MR (6)
Round 2: 6 inc (12)
Round 3: (sc, inc)*6 (18)
Round 4: BLO - 18 sc;
Round 5: 18 sc;
Round 6: (2 sc, inc)*6 (24)
Round 7: 24 sc;
Round 8: 24 sc;
Round 9: (2 sc, dec)*6 (18)
Round 10: (4 sc, dec)*3 (15)
Round 11: (3 sc, dec)*3 (12), lightly stuff;
Round 12: (2 sc, dec)*3 (9)
Round 13: 9 sc;
Round 14: 9 sc;
Round 15: (1 sc, dec)*3 (6) (fig.26)
— Part 22 :
Round 1: 5 sc in MR (5)
Round 2: 5 inc (10)
Round 3: 10 sc;
Round 4: 10 sc;
Round 5: 10 sc;
Round 6: 10 sc;
Round 7: 10 sc;
Round 8: 10 sc;
Round 9: 10 sc;
Round 10: 10 sc;
Round 11: BLO - 10 sc;
Round 12: 10 sc;
Round 13: 10 sc;
Round 14: 10 sc;
Round 15: 10 sc;
Round 16: 10 sc;
Round 17: 10 sc;
Round 18: 10 sc;
Round 19: 10 sc;
Round 20: 10 sc;
— Sleeves decoration :
Round 1: ch 3, (inc-dc, dc)*4, inc-dc (15)
Round 2: 15 sc;
Round 3: (1 sc, ch 1)*15, slst;
— Part 24 :
Round 1: 8 sc in MR (8)
Round 2: 8 inc (16)
Round 3: (1 sc, inc)*8 (24)
Round 4: (3 sc, inc)*6 (30)
Round 5: 2 sc, inc, (4 sc, inc)*5, 2 sc (36)
Round 6: (5 sc, inc)*6 (42)
Round 7: (13 sc, inc)*3 (45)
Round 8: BLO - 45 sc;
Round 9: 45 sc;
Round 10: 45 sc;
Round 11: 45 sc;
Round 12: 45 sc;
Round 13: 45 sc;
Round 14: 45 sc;
Round 15: 45 sc;
Round 16: (13 sc, dec)*3 (42)
Round 17: 42 sc;
Round 18: 42 sc;
Round 19: 6 sc, dec, (12 sc, dec)*2, 6 sc (39)
Round 20: 39 sc;
Round 21: 39 sc;
Round 22: (11 sc, dec)*3 (36)
Round 23: 36 sc;
Round 24: 36 sc;
Round 25: 5 sc, dec, (10 sc, dec)*2, 5 sc (33)
Round 26: 33 sc;
Round 27: 33 sc;
Round 28: (9 sc, dec)*3 (30)
Round 29: 30 sc;
Round 30: 30 sc;
Round 31: 4 sc, dec, (8 sc, dec)*2, 4 sc (27)
Round 32: 27 sc;
Round 33: 4 sc on the body, through both stitches of the 1st;
Round 34: (7 sc, dec)*3 (24)
Round 35: (6 sc, dec)*3 (21)
Round 36: (5 sc, dec)*3 (18)
Round 37: 18 sc;
Round 38: 18 inc (36)
Round 39: (5 sc, inc)*6 (42)
Round 40: (13 sc, inc)*3 (45)
Round 41: 45 sc;
Round 42: 45 sc;
Round 43: 45 sc;
Round 44: 45 sc;
Round 45: 45 sc;
Round 46: 45 sc;
Round 47: 45 sc;
Round 48: (7 sc, dec)*5 (40)
Round 49: 3 sc, dec, (6 sc, dec)*4, 3 sc (35)
Round 50: (5 sc, dec)*5 (30)
Round 51: (4 sc, dec)*5 (25)
Round 52: (3 sc, dec)*5 (20)
Round 53: (2 sc, dec)*5 (15)
Round 54: (1 sc, dec)*5 (10)
— Part 25 :
Round 1: FLO - (1 sc, ch1)*45, slst (fig.5)
— Part 26 :
Round 1: ch 24. Start in the second chain from the hook: 3 sc, 3 hdc, 3 dc, 2 tr, 1 inc-tr, 2 tr, 3 dc,;
— Part 27 :
Round 1: 6 sc in MR (6)
Round 2: 6 inc (12)
Round 3: (1 sc, inc)*6 (18)
Round 4: (2 sc, inc)*6 (24)
Round 5: (3 sc, inc)*6 (30)
Round 6: 2 sc, inc, (4 sc, inc)*5, 2 sc (36)
Round 7: (5 sc, inc)*6 (42)
Round 8: 3 sc, inc, (6 sc, inc)*5, 3 sc (48)
Round 9: 48 sc;
Round 10: 48 sc;
Round 11: 48 sc;
Round 12: 48 sc;
Round 13: FLO - 48 sc;
Round 14: 28 sc, ch 1, turn (28)
Round 15: 1 sc, inc, 24 sc, inc, 1 sc, ch 1, turn (30)
Round 16: 30 sc, ch 1, turn;
Round 17: 30 sc, ch 1, turn;
Round 18: 30 sc, ch 1, turn;
Round 19: 30 sc, ch 1, turn;
Round 20: 30 sc, ch 1, turn;
Round 21: 30 sc;
— Part 28 :
Round 1: BLO - 48 sc;
Round 2: (sl st, 1 hdc)*24 (48)
— Part 29 :
Round 1: ch 56, crochet sl st to connect the round. (fig.13)
Round 2: 56 sc;
Round 3: (1 sc, skip 1 sc, into the next sc: (dc, ch, dc, ch, dc), skip 1 sc, 1 sc, sc2tog)*8 . (fig.14-15)
— Part 30 :
Round 1: ch 17, start in the second chain from the hook: 16 sc (16)
Round 2: 16 inc (32)
Round 3: 32 sc;
Round 4: 32 sc;
Round 5: 1 sc, inc, 2 sc, inc, 22 sc, inc, 2 sc, inc, 1 sc (36)
Round 6: 36 sc;
Round 7: 36 sc;
Round 8: 1 sc, inc, 4 sc, inc, 22 sc, inc, 4 sc, inc, 1 sc (40)
Round 9: 40 sc;
Round 10: 40 sc;
Round 11: 1 sc, inc, 6 sc, inc, 22 sc, inc, 6 sc, inc, 1 sc (44)
Round 12: 44 sc;
Round 13: 44 sc;
Round 14: 44 sc;
Round 15: 1 sc, inc, 8 sc, inc, 22 sc, inc, 8 sc, inc, 1 sc (48)
Round 16: 48 sc;
Round 17: 48 sc;
Round 18: 48 sc;
Round 19: 48 sc;
Round 20: 48 sc;
Round 21: 1 sc, inc, 44 sc, inc, 1 sc (50)
Round 22: 50 sc;
Round 23: 50 sc;
Round 24: 50 sc;
Round 25: 50 sc;
Round 26: 50 sc;
— Part 31 :
Round 1: 8 sc in MR (8)
Round 2: 8 inc (16)
Round 3: 2 sc, inc, (3 sc, inc)*3, 1 sc (20)
Round 4: BLO - 20 sc;
Round 5: 20 sc;
Round 6: 20 sc;
Round 7: 20 sc;
Round 8: BLO - 20 sc;
Round 9: 2 hdc, dec-hdc, (3 hdc, dec-hdc)*3, 1 hdc (16)
Round 10: 8 dec, lightly stuff;
— Part 32 :
Round 1: FLO - 20 slst (fig.24)
— Part 33 :
Round 1: FLO - 20 slst (fig.25)
In closing, I invite you to fold these three Wise Men Amigurumi into your holiday traditions with the same care you’d place on any handmade heirloom. They are designed to be sturdy, with clean seams and subtle facial features that convey personality without complexity. The colorwork invites experimentation, while the finishing touches crown beads and a touch of white thread for the beards add sparkle. I hope you’ll enjoy the patient rhythm of the MR, CH, SC, INC, DEC, and SC2TOG steps, and that the final trio brings warmth to your home for many seasons to come.