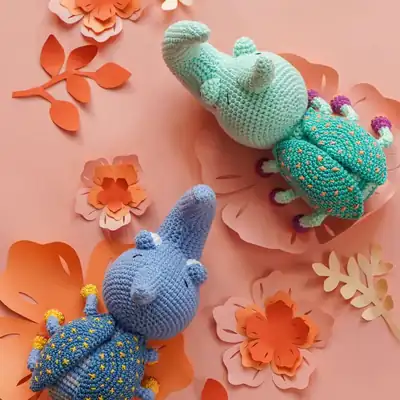
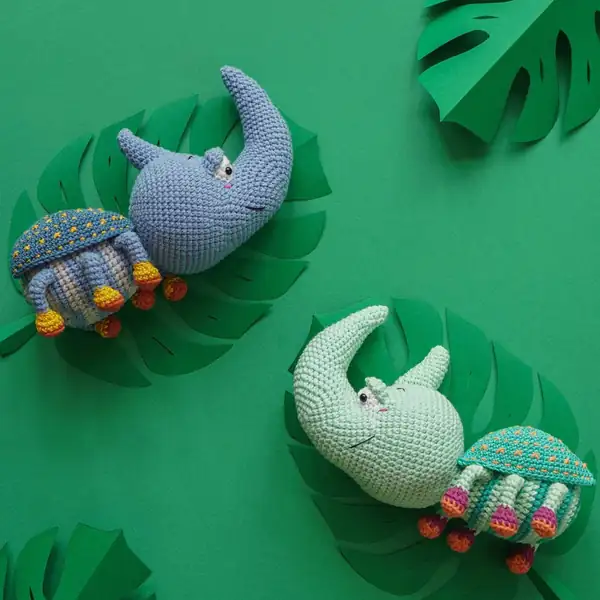
Spinderella The Spider Amigurumi is a compact, characterful arachnid whose charm comes from careful shaping, a tidy magic ring start, and a quiet, even texture you achieve with a worsted weight yarn. Designed as an Advanced level project, it comes to life in Color A purple, Color E green, Color B yellow, Color F turquoise, Color C white, Color G fuchsia, and Color D coral on a 2.5 mm hook, creating a compact figure that fits nicely in the hand. The pattern walks you through each round, focusing on invisible decreases to close the body, BLO stitches to keep leg seams neat, and slip stitches to anchor limbs without adding bulk. Its eight legs grow from a round core, with limbs shaped by simple incs and decs, so the final silhouette reads as a playful, friendly spider rather than a scary one. I adore how the colors contrast against the white eyes, and how the tiny size fits easily into a hand, a shelf, or a child’s backpack, making Spinderella a perfect tiny companion for storytelling.
— Part 1 :
Round 7: (blo) sc 36 (2 rnds) (36)
Round 8: (blo) sc 36 (2 rnds) (36)
Round 10: (blo) sc 36 (2 rnds) (36)
Round 11: (blo) sc 36 (2 rnds) (36)
— Part 2 :
Round 20: sc 30 (5 rnds) (30)
Round 21: sc 30 (5 rnds) (30)
Round 22: sc 30 (5 rnds) (30)
Round 23: sc 30 (5 rnds) (30)
Round 24: sc 30 (5 rnds) (30)
— Part 3 :
Round 2: sc 5 (3 rnds) (5)
Round 3: sc 5 (3 rnds) (5)
Round 4: sc 5 (3 rnds) (5)
Round 7: sc 6 (2 rnds) (pic 1) (6)
Round 8: sc 6 (2 rnds) (pic 1) (6)
Round 12: sc 6 (2 rnds) (pic 5) (6)
Round 13: sc 6 (2 rnds) (pic 5) (6)
— Part 4 :
Round 1: Repeat 1-6 of the Leg 1 (6)
Round 2: Repeat 1-6 of the Leg 1 (6)
Round 3: Repeat 1-6 of the Leg 1 (6)
Round 4: Repeat 1-6 of the Leg 1 (6)
Round 5: Repeat 1-6 of the Leg 1 (6)
Round 6: Repeat 1-6 of the Leg 1 (6)
Round 7: sc 6 (3 rnds) (6)
Round 8: sc 6 (3 rnds) (6)
Round 9: sc 6 (3 rnds) (6)
Round 13: sc 6 (3 rnds) (6)
Round 14: sc 6 (3 rnds) (6)
Round 15: sc 6 (3 rnds) (6)
— Part 5 :
Round 1: Repeat 1-6 of the Leg 1 (6)
Round 2: Repeat 1-6 of the Leg 1 (6)
Round 3: Repeat 1-6 of the Leg 1 (6)
Round 4: Repeat 1-6 of the Leg 1 (6)
Round 5: Repeat 1-6 of the Leg 1 (6)
Round 6: Repeat 1-6 of the Leg 1 (6)
Round 7: sc 6 (4 rnds) (6)
Round 8: sc 6 (4 rnds) (6)
Round 9: sc 6 (4 rnds) (6)
Round 10: sc 6 (4 rnds) (6)
Round 14: sc 6 (4 rnds) (6)
Round 15: sc 6 (4 rnds) (6)
Round 16: sc 6 (4 rnds) (6)
Round 17: sc 6 (4 rnds) (6)
— Part 6 :
Round 1: Repeat 1-6 of the Leg 1 (6)
Round 2: Repeat 1-6 of the Leg 1 (6)
Round 3: Repeat 1-6 of the Leg 1 (6)
Round 4: Repeat 1-6 of the Leg 1 (6)
Round 5: Repeat 1-6 of the Leg 1 (6)
Round 6: Repeat 1-6 of the Leg 1 (6)
Round 7: sc 6 (5 rnds) (6)
Round 8: sc 6 (5 rnds) (6)
Round 9: sc 6 (5 rnds) (6)
Round 10: sc 6 (5 rnds) (6)
Round 11: sc 6 (5 rnds) (6)
Round 15: sc 6 (5 rnds) (6)
Round 16: sc 6 (5 rnds) (6)
Round 17: sc 6 (5 rnds) (6)
Round 18: sc 6 (5 rnds) (6)
Round 19: sc 6 (5 rnds) (6)
— Part 7 :
Round 10: sc 54 (10 rnds) (54)
Round 11: sc 54 (10 rnds) (54)
Round 12: sc 54 (10 rnds) (54)
Round 13: sc 54 (10 rnds) (54)
Round 14: sc 54 (10 rnds) (54)
Round 15: sc 54 (10 rnds) (54)
Round 16: sc 54 (10 rnds) (54)
Round 17: sc 54 (10 rnds) (54)
Round 18: sc 54 (10 rnds) (54)
Round 19: sc 54 (10 rnds) (54)
— Part 8 :
Round 1: Repeat rnd 1-19 of the Head (54)
Round 2: Repeat rnd 1-19 of the Head (54)
Round 3: Repeat rnd 1-19 of the Head (54)
Round 4: Repeat rnd 1-19 of the Head (54)
Round 5: Repeat rnd 1-19 of the Head (54)
Round 6: Repeat rnd 1-19 of the Head (54)
Round 7: Repeat rnd 1-19 of the Head (54)
Round 8: Repeat rnd 1-19 of the Head (54)
Round 9: Repeat rnd 1-19 of the Head (54)
Round 10: Repeat rnd 1-19 of the Head (54)
Round 11: Repeat rnd 1-19 of the Head (54)
Round 12: Repeat rnd 1-19 of the Head (54)
Round 13: Repeat rnd 1-19 of the Head (54)
Round 14: Repeat rnd 1-19 of the Head (54)
Round 15: Repeat rnd 1-19 of the Head (54)
Round 16: Repeat rnd 1-19 of the Head (54)
Round 17: Repeat rnd 1-19 of the Head (54)
Round 18: Repeat rnd 1-19 of the Head (54)
Round 19: Repeat rnd 1-19 of the Head (54)
— Part 9 :
Round 5: sc 6 (6 rnds) (6)
Round 6: sc 6 (6 rnds) (6)
Round 7: sc 6 (6 rnds) (6)
Round 8: sc 6 (6 rnds) (6)
Round 9: sc 6 (6 rnds) (6)
Round 10: sc 6 (6 rnds) (6)
— Part 10 :
Round 8: sc 42 (3 rnds) (42)
Round 9: sc 42 (3 rnds) (42)
Round 10: sc 42 (3 rnds) (42)
— Part 11 :
Round 9: sc 22 (6 rnds) (22)
Round 10: sc 22 (6 rnds) (22)
Round 11: sc 22 (6 rnds) (22)
Round 12: sc 22 (6 rnds) (22)
Round 13: sc 22 (6 rnds) (22)
Round 14: sc 22 (6 rnds) (22)
— Part 12 :
Round 11: sc 6 (2 rnds) (6)
Round 12: sc 6 (2 rnds) (6)
— Part 13 :
Round 30: Repeat rnd 25-29 (5 rnds) (48)
Round 31: Repeat rnd 25-29 (5 rnds) (48)
Round 32: Repeat rnd 25-29 (5 rnds) (48)
Round 33: Repeat rnd 25-29 (5 rnds) (48)
Round 34: Repeat rnd 25-29 (5 rnds) (48)
Round 35: Repeat rnd 26-29 (4 rnds) (48)
Round 36: Repeat rnd 26-29 (4 rnds) (48)
Round 37: Repeat rnd 26-29 (4 rnds) (48)
Round 38: Repeat rnd 26-29 (4 rnds) (48)
Round 39: sc 48 (2 rnds) (48)
Round 40: sc 48 (2 rnds) (48)
— Part 14 :
Round 3: sc 12 (2 rnds) (12)
Round 4: sc 12 (2 rnds) (12)
— Part 15 :
Round 1: Repeat rnd 1-2 of Boy’s Eyes (6)
Round 2: Repeat rnd 1-2 of Boy’s Eyes (6)
Round 5: sc 6 (4 rnds) (6)
Round 6: sc 6 (4 rnds) (6)
Round 7: sc 6 (4 rnds) (6)
Round 8: sc 6 (4 rnds) (6)
— Part 16 :
Round 2: [sc 1, double treble 1] 25x, slst on the 1st sc (pic 14)
Round 3: [sc 1, double treble 1] 25x, slst on the 1st sc (pic 14)
— Part 17 :
Round 1: Repeat the Bee’s Legs (6)
Round 2: Repeat the Bee’s Legs (6)
Round 3: Repeat the Bee’s Legs (6)
Round 4: Repeat the Bee’s Legs (6)
Round 5: Repeat the Bee’s Legs (6)
Round 6: Repeat the Bee’s Legs (6)
Round 7: Repeat the Bee’s Legs (6)
Round 8: Repeat the Bee’s Legs (6)
Round 9: Repeat the Bee’s Legs (6)
Round 10: Repeat the Bee’s Legs (6)
Round 11: Repeat the Bee’s Legs (6)
— Part 18 :
Round 1: Repeat the Bee’s Wings (52)
Round 2: Repeat the Bee’s Wings (52)
— Part 19 :
Round 1: Repeat the Bee’s Scarf (50)
Round 2: Repeat the Bee’s Scarf (50)
Round 6: sc 28 (3 rnds) (28)
Round 7: sc 28 (3 rnds) (28)
Round 8: sc 28 (3 rnds) (28)
— Part 20 :
Round 2: sc 6 (2 rnds) (6)
Round 3: sc 6 (2 rnds) (6)
Round 10: sc 54 (2 rnds) (54)
Round 11: sc 54 (2 rnds) (54)
— Part 21 :
Round 54: 15 (FLO) ch 2, *(hdc 2) in the next st,;
— Part 22 :
Round 2: ] 2x, slst in the ch 1, cut yarn E,;
— Part 23 :
Round 11: sc 60 (2 rnds) (60)
Round 12: sc 60 (2 rnds) (60)
Round 16: sc 18 (2 rnds) (18)
Round 17: sc 18 (2 rnds) (18)
Round 19: sc 15 (2 rnds) (15)
Round 20: sc 15 (2 rnds) (15)
Round 22: sc 12 (2 rnds), start stuffing firmly;
Round 23: sc 12 (2 rnds), start stuffing firmly;
Round 25: sc 9 (2 rnds) (9)
Round 26: sc 9 (2 rnds) (9)
— Part 24 :
Round 6: sc 60 (9 rnds) (60)
Round 7: sc 60 (9 rnds) (60)
Round 8: sc 60 (9 rnds) (60)
Round 9: sc 60 (9 rnds) (60)
Round 10: sc 60 (9 rnds) (60)
Round 11: sc 60 (9 rnds) (60)
Round 12: sc 60 (9 rnds) (60)
Round 13: sc 60 (9 rnds) (60)
Round 14: sc 60 (9 rnds) (60)
Round 15: sc 60 (9 rnds) (60)
— Part 25 :
Round 3: sc 12 (2 rnds) (12)
Round 4: sc 12 (2 rnds) (12)
Round 9: sc 48 (2 rnds) (48)
Round 10: sc 48 (2 rnds) (48)
Round 11: sc 48 (2 rnds) (48)
Round 12: sc 48 (2 rnds) (48)
Round 13: sc 48 (2 rnds) (48)
Round 14: sc 48 (2 rnds) (48)
Round 15: sc 48 (2 rnds) (48)
Round 16: sc 48 (2 rnds) (48)
— Part 26 :
Round 7: sc 6 (3 rnds) (6)
Round 8: sc 6 (3 rnds) (6)
Round 9: sc 6 (3 rnds) (6)
Round 10: , sc 3 on the last 3sts of;
Round 11: (6)
Round 13: sc 6 (3 rnds) (6)
Round 14: sc 6 (3 rnds) (6)
Round 15: sc 6 (3 rnds) (6)
— Part 27 :
Round 1: Repeat Rnd 1-9 of the Head (54)
Round 2: Repeat Rnd 1-9 of the Head (54)
Round 3: Repeat Rnd 1-9 of the Head (54)
Round 4: Repeat Rnd 1-9 of the Head (54)
Round 5: Repeat Rnd 1-9 of the Head (54)
Round 6: Repeat Rnd 1-9 of the Head (54)
Round 7: Repeat Rnd 1-9 of the Head (54)
Round 8: Repeat Rnd 1-9 of the Head (54)
Round 9: Repeat Rnd 1-9 of the Head (54)
Round 10: sc 54 (6 rnds) (54)
Round 11: sc 54 (6 rnds) (54)
Round 12: sc 54 (6 rnds) (54)
Round 13: sc 54 (6 rnds) (54)
Round 14: sc 54 (6 rnds) (54)
Round 15: sc 54 (6 rnds) (54)
— Part 28 :
Round 9: sc 48 (5 rnds), change to yarn B (48)
Round 10: sc 48 (5 rnds), change to yarn B (48)
Round 11: sc 48 (5 rnds), change to yarn B (48)
Round 12: sc 48 (5 rnds), change to yarn B (48)
Round 13: sc 48 (5 rnds), change to yarn B (48)
Round 14: sc 48 (3 rnds), change to yarn A (48) 17;
Round 15: sc 48 (3 rnds), change to yarn A (48) 17;
Round 16: sc 48 (3 rnds), change to yarn A (48) 17;
— Part 29 :
Round 26: sc 18 (2 rnds), stuff firmly (18)
Round 27: sc 18 (2 rnds), stuff firmly (18)
Round 30: sc 30 (3 rnds) (30)
Round 31: sc 30 (3 rnds) (30)
Round 32: sc 30 (3 rnds) (30)
— Part 30 :
Round 5: sc 6 (12 rnds) (6)
Round 6: sc 6 (12 rnds) (6)
Round 7: sc 6 (12 rnds) (6)
Round 8: sc 6 (12 rnds) (6)
Round 9: sc 6 (12 rnds) (6)
Round 10: sc 6 (12 rnds) (6)
Round 11: sc 6 (12 rnds) (6)
Round 12: sc 6 (12 rnds) (6)
Round 13: sc 6 (12 rnds) (6)
Round 14: sc 6 (12 rnds) (6)
Round 15: sc 6 (12 rnds) (6)
Round 16: sc 6 (12 rnds) (6)
— Part 31 :
Round 2: sc 6 (4 rnds) (6)
Round 3: sc 6 (4 rnds) (6)
Round 4: sc 6 (4 rnds) (6)
Round 5: sc 6 (4 rnds) (6)
Round 7: sc 6 (2 rnds) (6)
Round 8: sc 6 (2 rnds) (6)
Round 9: , sc 3 on the last 3sts of;
Round 10: (6)
Round 12: sc 6 (4 rnds) (6)
Round 13: sc 6 (4 rnds) (6)
Round 14: sc 6 (4 rnds) (6)
Round 15: sc 6 (4 rnds) (6)
— Part 32 :
Round 1: Repeat 1-6 of the Arms (6)
Round 2: Repeat 1-6 of the Arms (6)
Round 3: Repeat 1-6 of the Arms (6)
Round 4: Repeat 1-6 of the Arms (6)
Round 5: Repeat 1-6 of the Arms (6)
Round 6: Repeat 1-6 of the Arms (6)
Round 7: sc 6 (5 rnds) (6)
Round 8: sc 6 (5 rnds) (6)
Round 9: sc 6 (5 rnds) (6)
Round 10: sc 6 (5 rnds) (6)
Round 11: sc 6 (5 rnds) (6)
Round 12: , sc 3 on the last 3sts of;
Round 13: (6)
Round 15: sc 6 (5 rnds) (6)
Round 16: sc 6 (5 rnds) (6)
Round 17: sc 6 (5 rnds) (6)
Round 18: sc 6 (5 rnds) (6)
Round 19: sc 6 (5 rnds) (6)
— Part 33 :
Round 1: Repeat rnd 1-4 of the Body (24)
Round 2: Repeat rnd 1-4 of the Body (24)
Round 3: Repeat rnd 1-4 of the Body (24)
Round 4: Repeat rnd 1-4 of the Body (24)
Round 5: sc 24 (2 rnds) (24)
Round 6: sc 24 (2 rnds) (24)
Round 9: sc 21 (5 rnds) (21)
Round 10: sc 21 (5 rnds) (21)
Round 11: sc 21 (5 rnds) (21)
Round 12: sc 21 (5 rnds) (21)
Round 13: sc 21 (5 rnds) (21)
Round 17: sc 6 (2 rnds) (6)
Round 18: sc 6 (2 rnds) (6)
— Part 34 :
Round 5: (8) 6;
— Part 35 :
Round 16: , sc 5 in the flo of the last;
— Part 36 :
Round 38: , sc 2 in the flo of the next;
— Part 37 :
Round 36: (56) 41 sc 56;
— Part 38 :
Round 47: , sc 28, sc 3 in the flo of the;
Round 53: , sc 28, sc 3 in the flo of the;
— Part 39 :
Round 18: sc 70 (4 rnds) (70)
Round 19: sc 70 (4 rnds) (70)
Round 20: sc 70 (4 rnds) (70)
Round 21: sc 70 (4 rnds) (70)
— Part 40 :
Round 11: sc 6 (2 rnds) (6)
Round 12: sc 6 (2 rnds) (6)
— Part 41 :
Round 1: Repeat rnd 1-2 of the Eyes (14)
Round 2: Repeat rnd 1-2 of the Eyes (14)
— Part 42 :
Round 2: sc 6 (4 rnds) (6)
Round 3: sc 6 (4 rnds) (6)
Round 4: sc 6 (4 rnds) (6)
Round 5: sc 6 (4 rnds) (6)
— Part 43 :
Round 5: sc 6 (6 rnds) (6)
Round 6: sc 6 (6 rnds) (6)
Round 7: sc 6 (6 rnds) (6)
Round 8: sc 6 (6 rnds) (6)
Round 9: sc 6 (6 rnds) (6)
Round 10: sc 6 (6 rnds) (6)
— Part 44 :
Round 3: sc 9 (2 rnds) (9)
Round 4: sc 9 (2 rnds) (9)
Round 6: sc 12 (2 rnds) (12)
Round 7: sc 12 (2 rnds) (12)
— Part 45 :
Round 21: , sc 2 in the flo of the next;
Round 27: , sc 2 in the flo of the next;
Round 33: , sc 2 in the flo of the next;
— Part 46 :
Round 45: , sc 2 in the flo of the next;
— Part 47 :
Round 57: , sc 2 in the flo of the next;
— Part 48 :
Round 9: sc 56 (6 rnds), place a marker at the 51st of rnd 14 (pic 15)
Round 10: sc 56 (6 rnds), place a marker at the 51st of rnd 14 (pic 15)
Round 11: sc 56 (6 rnds), place a marker at the 51st of rnd 14 (pic 15)
Round 12: sc 56 (6 rnds), place a marker at the 51st of rnd 14 (pic 15)
Round 13: sc 56 (6 rnds), place a marker at the 51st of rnd 14 (pic 15)
Round 14: sc 56 (6 rnds), place a marker at the 51st of rnd 14 (pic 15)
Round 16: , this st will be counted as;
— Part 49 :
Round 16: sc 12 (3 rnds) (pic 17) (12)
Round 17: sc 12 (3 rnds) (pic 17) (12)
Round 18: sc 12 (3 rnds) (pic 17) (12)
Round 20: sc 18 (3 rnds) (18)
Round 21: sc 18 (3 rnds) (18)
Round 22: sc 18 (3 rnds) (18)
Round 24: sc 24 (5 rnds) (24)
Round 25: sc 24 (5 rnds) (24)
Round 26: sc 24 (5 rnds) (24)
Round 27: sc 24 (5 rnds) (24)
Round 28: sc 24 (5 rnds) (24)
— Part 50 :
Round 15: (18) 30;
— Part 51 :
Round 3: sc 12 (2 rnds) (12)
Round 4: sc 12 (2 rnds) (12)
— Part 52 :
Round 2: sc 6 (3 rnds) (6)
Round 3: sc 6 (3 rnds) (6)
Round 4: sc 6 (3 rnds) (6)
— Part 53 :
Round 1: , slst in the flo of all sts from rnd 2-rnd 11 (pic;
Round 6: sc 9 (3 rnds), change to yarn A (9)
Round 7: sc 9 (3 rnds), change to yarn A (9)
Round 8: sc 9 (3 rnds), change to yarn A (9)
Round 9: sc 9 (4 rnds), change to yarn B (9)
Round 10: sc 9 (4 rnds), change to yarn B (9)
Round 11: sc 9 (4 rnds), change to yarn B (9)
Round 12: sc 9 (4 rnds), change to yarn B (9)
Round 13: sc 9 (3 rnds), change to yarn A (9)
Round 14: sc 9 (3 rnds), change to yarn A (9)
Round 15: sc 9 (3 rnds), change to yarn A (9)
Round 16: sc 9 (4 rnds), change to yarn B (9)
Round 17: sc 9 (4 rnds), change to yarn B (9)
Round 18: sc 9 (4 rnds), change to yarn B (9)
Round 19: sc 9 (4 rnds), change to yarn B (9)
Round 20: sc 9 (3 rnds), cut yarn B, change to yarn A;
Round 21: sc 9 (3 rnds), cut yarn B, change to yarn A;
Round 22: sc 9 (3 rnds), cut yarn B, change to yarn A;
Round 23: sc 9 (2 rnds) (9)
Round 24: sc 9 (2 rnds) (9)
Round 29: sc 30 (7 rnds) (30)
Round 30: sc 30 (7 rnds) (30)
Round 31: sc 30 (7 rnds) (30)
Round 32: sc 30 (7 rnds) (30)
Round 33: sc 30 (7 rnds) (30)
Round 34: sc 30 (7 rnds) (30)
Round 35: sc 30 (7 rnds) (30)
— Part 54 :
Round 44: sc 42 (6 rnds) (42)
Round 45: sc 42 (6 rnds) (42)
Round 46: sc 42 (6 rnds) (42)
Round 47: sc 42 (6 rnds) (42)
Round 48: sc 42 (6 rnds) (42)
Round 49: sc 42 (6 rnds) (42)
— Part 55 :
Round 5: sc 24 (3 rnds) (24)
Round 6: sc 24 (3 rnds) (24)
Round 7: sc 24 (3 rnds) (24)
— Part 56 :
Round 5: sc 28 (3 rnds) (28)
Round 6: sc 28 (3 rnds) (28)
Round 7: sc 28 (3 rnds) (28)
Round 11: sc 6 (2 rnds) (6)
Round 12: sc 6 (2 rnds) (6)
— Part 57 :
Round 5: sc 20 (4 rnds) (20)
Round 6: sc 20 (4 rnds) (20)
Round 7: sc 20 (4 rnds) (20)
Round 8: sc 20 (4 rnds) (20)
Round 13: sc 70 (8 rnds) (70)
Round 14: sc 70 (8 rnds) (70)
Round 15: sc 70 (8 rnds) (70)
Round 16: sc 70 (8 rnds) (70)
Round 17: sc 70 (8 rnds) (70)
Round 18: sc 70 (8 rnds) (70)
Round 19: sc 70 (8 rnds) (70)
Round 20: sc 70 (8 rnds) (70)
— Part 58 :
Round 31: sc 42 (10 rnds) (42)
Round 32: sc 42 (10 rnds) (42)
Round 33: sc 42 (10 rnds) (42)
Round 34: sc 42 (10 rnds) (42)
Round 35: sc 42 (10 rnds) (42)
Round 36: sc 42 (10 rnds) (42)
Round 37: sc 42 (10 rnds) (42)
Round 38: sc 42 (10 rnds) (42)
Round 39: sc 42 (10 rnds) (42)
Round 40: sc 42 (10 rnds) (42)
— Part 59 :
Round 4: sc 18 (2 rnds), change to yarn A, turn;
Round 5: sc 18 (2 rnds), change to yarn A, turn;
— Part 60 :
Round 2: sc 6 (13 rnds) (6)
Round 3: sc 6 (13 rnds) (6)
Round 4: sc 6 (13 rnds) (6)
Round 5: sc 6 (13 rnds) (6)
Round 6: sc 6 (13 rnds) (6)
Round 7: sc 6 (13 rnds) (6)
Round 8: sc 6 (13 rnds) (6)
Round 9: sc 6 (13 rnds) (6)
Round 10: sc 6 (13 rnds) (6)
Round 11: sc 6 (13 rnds) (6)
Round 12: sc 6 (13 rnds) (6)
Round 13: sc 6 (13 rnds) (6)
Round 14: sc 6 (13 rnds) (6)
— Part 61 :
Round 2: sc 9 (19 rnds) (9)
Round 3: sc 9 (19 rnds) (9)
Round 4: sc 9 (19 rnds) (9)
Round 5: sc 9 (19 rnds) (9)
Round 6: sc 9 (19 rnds) (9)
Round 7: sc 9 (19 rnds) (9)
Round 8: sc 9 (19 rnds) (9)
Round 9: sc 9 (19 rnds) (9)
Round 10: sc 9 (19 rnds) (9)
Round 11: sc 9 (19 rnds) (9)
Round 12: sc 9 (19 rnds) (9)
Round 13: sc 9 (19 rnds) (9)
Round 14: sc 9 (19 rnds) (9)
Round 15: sc 9 (19 rnds) (9)
Round 16: sc 9 (19 rnds) (9)
Round 17: sc 9 (19 rnds) (9)
Round 18: sc 9 (19 rnds) (9)
Round 19: sc 9 (19 rnds) (9)
Round 20: sc 9 (19 rnds) (9)
— Part 62 :
Round 2: sc 6 (13 rnds) (6)
Round 3: sc 6 (13 rnds) (6)
Round 4: sc 6 (13 rnds) (6)
Round 5: sc 6 (13 rnds) (6)
Round 6: sc 6 (13 rnds) (6)
Round 7: sc 6 (13 rnds) (6)
Round 8: sc 6 (13 rnds) (6)
Round 9: sc 6 (13 rnds) (6)
Round 10: sc 6 (13 rnds) (6)
Round 11: sc 6 (13 rnds) (6)
Round 12: sc 6 (13 rnds) (6)
Round 13: sc 6 (13 rnds) (6)
Round 14: sc 6 (13 rnds) (6)
— Part 63 :
Round 2: sc 6 (19 rnds) (6)
Round 3: sc 6 (19 rnds) (6)
Round 4: sc 6 (19 rnds) (6)
Round 5: sc 6 (19 rnds) (6)
Round 6: sc 6 (19 rnds) (6)
Round 7: sc 6 (19 rnds) (6)
Round 8: sc 6 (19 rnds) (6)
Round 9: sc 6 (19 rnds) (6)
Round 10: sc 6 (19 rnds) (6)
Round 11: sc 6 (19 rnds) (6)
Round 12: sc 6 (19 rnds) (6)
Round 13: sc 6 (19 rnds) (6)
Round 14: sc 6 (19 rnds) (6)
Round 15: sc 6 (19 rnds) (6)
Round 16: sc 6 (19 rnds) (6)
Round 17: sc 6 (19 rnds) (6)
Round 18: sc 6 (19 rnds) (6)
Round 19: sc 6 (19 rnds) (6)
Round 20: sc 6 (19 rnds) (6)
— Part 64 :
Round 2: sc 6 (21 rnds) (6)
Round 3: sc 6 (21 rnds) (6)
Round 4: sc 6 (21 rnds) (6)
Round 5: sc 6 (21 rnds) (6)
Round 6: sc 6 (21 rnds) (6)
Round 7: sc 6 (21 rnds) (6)
Round 8: sc 6 (21 rnds) (6)
Round 9: sc 6 (21 rnds) (6)
Round 10: sc 6 (21 rnds) (6)
Round 11: sc 6 (21 rnds) (6)
Round 12: sc 6 (21 rnds) (6)
Round 13: sc 6 (21 rnds) (6)
Round 14: sc 6 (21 rnds) (6)
Round 15: sc 6 (21 rnds) (6)
Round 16: sc 6 (21 rnds) (6)
Round 17: sc 6 (21 rnds) (6)
Round 18: sc 6 (21 rnds) (6)
Round 19: sc 6 (21 rnds) (6)
Round 20: sc 6 (21 rnds) (6)
Round 21: sc 6 (21 rnds) (6)
Round 22: sc 6 (21 rnds) (6)
— Part 65 :
Round 2: sc 8 (9 rnds), change to yarn F (8)
Round 3: sc 8 (9 rnds), change to yarn F (8)
Round 4: sc 8 (9 rnds), change to yarn F (8)
Round 5: sc 8 (9 rnds), change to yarn F (8)
Round 6: sc 8 (9 rnds), change to yarn F (8)
Round 7: sc 8 (9 rnds), change to yarn F (8)
Round 8: sc 8 (9 rnds), change to yarn F (8)
Round 9: sc 8 (9 rnds), change to yarn F (8)
Round 10: sc 8 (9 rnds), change to yarn F (8)
Round 12: sc 16 (5 rnds), stuff firmly (16)
Round 13: sc 16 (5 rnds), stuff firmly (16)
Round 14: sc 16 (5 rnds), stuff firmly (16)
Round 15: sc 16 (5 rnds), stuff firmly (16)
Round 16: sc 16 (5 rnds), stuff firmly (16)
— Part 66 :
Round 8: sc 36 (5 rnds), change to yarn B (36)
Round 9: sc 36 (5 rnds), change to yarn B (36)
Round 10: sc 36 (5 rnds), change to yarn B (36)
Round 11: sc 36 (5 rnds), change to yarn B (36)
Round 12: sc 36 (5 rnds), change to yarn B (36)
— part) :
Round 1: sc 16 (4 rnds) (16)
Round 2: sc 16 (4 rnds) (16)
Round 3: sc 16 (4 rnds) (16)
Round 4: sc 16 (4 rnds) (16)
Round 6: sc 20 (2 rnds) (20)
Round 7: sc 20 (2 rnds) (20)
— on any st of the remaining 8 sts :
Round 1: sc 8 (14 rnds), change to yarn F (8)
Round 2: sc 8 (14 rnds), change to yarn F (8)
Round 3: sc 8 (14 rnds), change to yarn F (8)
Round 4: sc 8 (14 rnds), change to yarn F (8)
Round 5: sc 8 (14 rnds), change to yarn F (8)
Round 6: sc 8 (14 rnds), change to yarn F (8)
Round 7: sc 8 (14 rnds), change to yarn F (8)
Round 8: sc 8 (14 rnds), change to yarn F (8)
Round 9: sc 8 (14 rnds), change to yarn F (8)
Round 10: sc 8 (14 rnds), change to yarn F (8)
Round 11: sc 8 (14 rnds), change to yarn F (8)
Round 12: sc 8 (14 rnds), change to yarn F (8)
Round 13: sc 8 (14 rnds), change to yarn F (8)
Round 14: sc 8 (14 rnds), change to yarn F (8)
— Part 69 :
Round 12: , sc 2, sc 2 in the flo of the;
Round 17: , sc 2 in the flo of the next;
Round 23: , sc 2 in the flo of the next;
Round 29: , sc 2 in the flo of the next;
Round 35: , sc 2 in the flo of the next;
Round 41: , sc 3 in the flo of the next;
Round 47: , sc 3 in the flo of the next;
Round 53: , sc 3 in the flo of the next;
Round 58: , sc 2 in the flo of the next;
Round 65: , sc 3 in the flo of the next;
— Part 70 :
Round 86: , sc 3 in the flo of the next;
— Part 71 :
Round 17: sc 60 (5 rnds) (60)
Round 18: sc 60 (5 rnds) (60)
Round 19: sc 60 (5 rnds) (60)
Round 20: sc 60 (5 rnds) (60)
Round 21: sc 60 (5 rnds) (60)
— Part 72 :
Round 4: sc 20 (2 rnds) (20)
Round 5: sc 20 (2 rnds) (20)
— Part 73 :
Round 4: sc 21 (2 rnds) (21)
Round 5: sc 21 (2 rnds) (21)
Round 7: sc 6 (3 rnds) (6)
Round 8: sc 6 (3 rnds) (6)
Round 9: sc 6 (3 rnds) (6)
Round 10: , sc 3 on the last 3sts of;
Round 11: (6)
Round 13: sc 6 (3 rnds) (6)
Round 14: sc 6 (3 rnds) (6)
Round 15: sc 6 (3 rnds) (6)
— Part 74 :
Round 2: , hdc 1, sc 1, turn;
Round 4: Repeat rnd *2&3* 3 more times (8)
Round 5: Repeat rnd *2&3* 3 more times (8)
Round 6: Repeat rnd *2&3* 3 more times (8)
Round 7: Repeat rnd *2&3* 3 more times (8)
Round 8: Repeat rnd *2&3* 3 more times (8)
Round 9: Repeat rnd *2&3* 3 more times (8)
— Part 75 :
Round 4: Repeat rnd *2&3* 4 more times (11)
Round 5: Repeat rnd *2&3* 4 more times (11)
Round 6: Repeat rnd *2&3* 4 more times (11)
Round 7: Repeat rnd *2&3* 4 more times (11)
Round 8: Repeat rnd *2&3* 4 more times (11)
Round 9: Repeat rnd *2&3* 4 more times (11)
Round 10: Repeat rnd *2&3* 4 more times (11)
Round 11: Repeat rnd *2&3* 4 more times (11)
— Part 76 :
Round 4: sc 15 (4 rnds) (15)
Round 5: sc 15 (4 rnds) (15)
Round 6: sc 15 (4 rnds) (15)
Round 7: sc 15 (4 rnds) (15)
— Part 77 :
Round 1: What is X-shape stitch/V-shape stitch? Which one is better?;
Round 7: Weave in the remaining 6 sts on the last rnd;
Thank you for reading along with Spinderella’s journey from skein to smile. This single free pattern invites you to slow down, choose a color story you love, and methodically build her eight slender legs, round body, and friendly face. I hope you enjoy the rhythmic crochet of rounds, the satisfaction of an invisible-like finish at the joins, and the moment when the first safety eye catches the light and she seems almost alive. If you share photos or variations, I’d love to see how your Spinderella evolves with your yarn choices and your own creative twists. Sit back, pat the finished piece, and let her be your cozy reminder of how accessible advanced amigurumi can be when you break it into thoughtful steps.