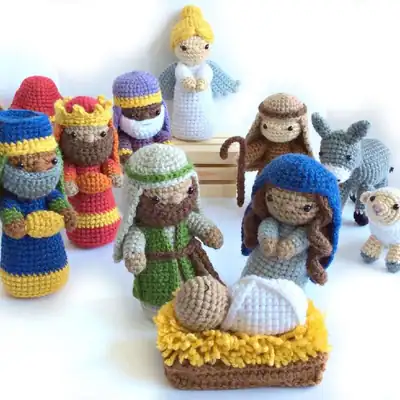
Jumping into the Nativity Crochet Pattern Amigurumi Pattern, you will discover a world of small, story-rich pieces woven from linen and warm browns. The pattern walks you through a complete build—from the compact MR begin, through the eye-placing final touches, to the sturdy stuffing that keeps the figures upright on a mantle or shelf. Using worsted weight yarn in a palette of linen, beige, white, gold, and chocolate, the characters read as timeless and approachable, not fussy. Each character is crocheted separately and then joined with careful seams, with features created in black embroidery thread for delicate detail alongside safety eyes—10 pairs of 6mm—for a friendly gaze. A brown pipe cleaner lends a light armature for posing without sacrificing softness, and a plastic craft screen helps you align eyes and noses with confidence. The construction highlights a mix of stitches: BLO and FLO ribbing in the bodies, subtle HDC and DC shaping to define arms and robes, and invisible decreases that keep the silhouette clean as you close the rounds. The finished height ranges from 4" to 7 1/2" tall, so you can arrange a compact manger scene on a shelf or as a treasured tabletop display. This is a true heirloom project, designed to endure gentle handling, seasonal rotation, and the occasional holiday photo.
— Head :
Round 1: Using light brown, sc 6 into a magic ring. (6)
Round 2: 2 sc in each st around. (12)
Round 3: (Sc, 2 sc) 6x around. (18)
Round 4: (Sc in next 2 sts, 2 sc) 6x around. (24)
Round 5: (Sc in next 3 sts, 2 sc) 6x around. (30)
Round 10: (Sc in next 3 sts, invdec) 6x around. (24)
Round 11: (Sc in next 2 sts, invdec) 6x around. (18)
Round 12: (Sc, invdec) 6x around. (12)
Round 13: Sc2tog around until closed. Fasten off, using yarn tail to pull final stitches completely;
— Part 2 :
Round 1: Using linen, sc 6 into a magic ring. (6)
Round 2: 2 sc in each st around. (12)
Round 3: (Sc, 2 sc) 6x around. (18)
Round 4: (Sc in next 2 sts, 2 sc) 6x around. (24)
Round 5: (Sc in next 3 sts, 2 sc) 6x around. (30)
Round 6: (Sc in next 4 sts, 2 sc) 6x around. (36)
Round 7: In back loops only, sc in each st around.
Round 12: (Sc in next 4 sts, invdec) 6x around. (30)
Round 17: (Sc in next 3 sts, invdec) 6x around. (24)
Round 21: (Sc in next 2 sts, invdec) 6x around. (18)
Round 25: (Sc, invdec) 6x around. (12)
Round 26: Sc in each st around.
— Arms (make two) :
Round 1: Using light brown, sc 6 into a magic ring. (6)
Round 2: (Sc, 2 sc) 3x around. (9)
Round 3: Sc in each st around, switch to linen.
Round 4: In front loops only, sc in each st around.
Round 10: (Sc, invdec) 3x around. (6)
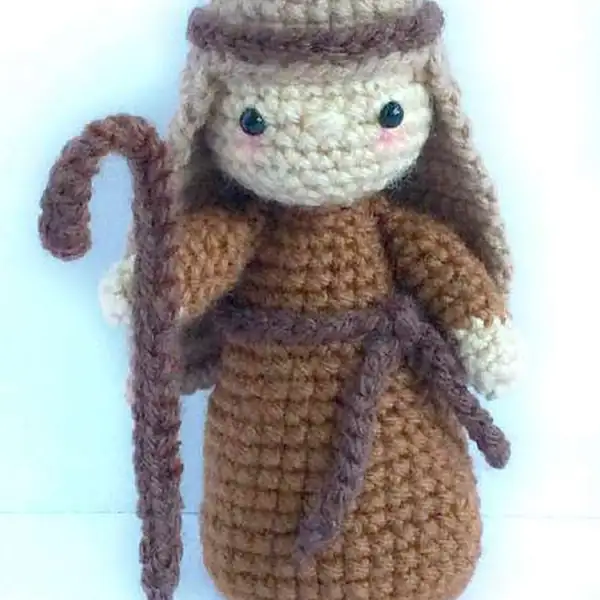
— Beard :
Round 1: Sc in 2nd ch from hook and in each st across. Ch 1. Turn. (15)
Round 2: Sc in first 2 sts, hdc in next 2 sts, dc in next st, tr in next 5 sts,;
Round 3: Sc in each st across. Ch 1. Turn.
Round 4: Sc in first 6 sts, ch 3, skip 3 sts, sc in last 6 sts.
— Tunic :
Round 1: Sc in 2nd st from hook and in each ch across. Ch 1.
Round 5: Sc2tog, sc in next 16 sts, sc2tog. Ch 1. Turn. (18)
Round 9: Sc2tog, sc in next 14 sts, sc2tog. Ch 1. Turn. (16)
Round 13: Sl st in first 3 sts, sc in next 10 sts. Ch 1. Turn;
Round 23: Sc, 2 sc. Ch 1. Turn. (3)
Round 24: 2 sc, sc, 2 sc. Ch 1. Turn. (5)
Round 27: 2 sc, sc in next 3 sts, 2 sc. (7)
— Head covering :
Round 1: Using linen, sc 6 into a magic ring. (6)
Round 2: 2 sc in each st around. (12)
Round 3: (Sc, 2 sc) 6x around. (18)
Round 4: (Sc in next 2 sts, 2 sc) 6x around. (24)
Round 5: (Sc in next 3 sts, 2 sc) 6x around. (30)
Round 9: Sc in each of the next 20 sts across. Ch 1. Turn.
— Head :
Round 1: Using light brown, sc 6 into a magic ring. (6)
Round 2: 2 sc in each st around. (12)
Round 3: (Sc, 2 sc) 6x around. (18)
Round 4: (Sc in next 2 sts, 2 sc) 6x around. (24)
Round 5: (Sc in next 3 sts, 2 sc) 6x around. (30)
Round 10: (Sc in next 3 sts, invdec) 6x around. (24)
Round 11: (Sc in next 2 sts, invdec) 6x around. (18)
Round 12: (Sc, invdec) 6x around. (12)
Round 13: Sc2tog around until closed. Fasten off, using yarn tail to pull final stitches completely;
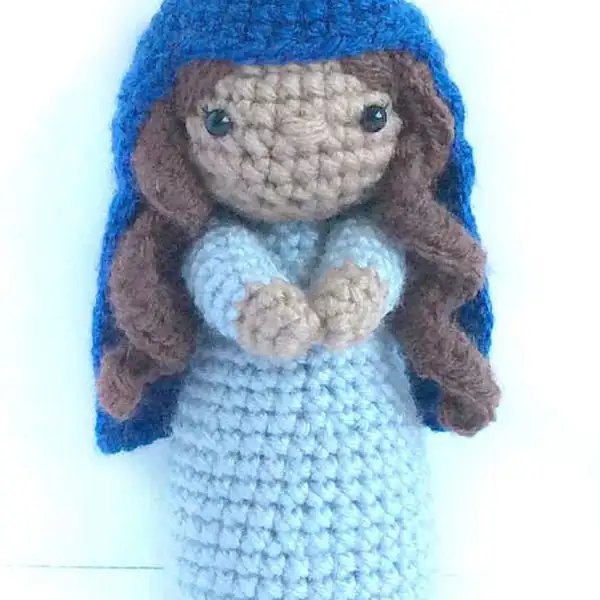
— Body :
Round 1: Using light blue, sc 6 into a magic ring. (6)
Round 2: 2 sc in each st around. (12)
Round 3: (Sc, 2 sc) 6x around. (18)
Round 4: (Sc in next 2 sts, 2 sc) 6x around. (24)
Round 5: (Sc in next 3 sts, 2 sc) 6x around. (30)
Round 6: (Sc in next 4 sts, 2 sc) 6x around. (36)
Round 7: In back loops only, sc in each st around.
Round 8: Sc in each st around, insert mesh screen.
Round 9: Sc in each st around, insert mesh screen.
Round 10: Sc in each st around, insert mesh screen.
Round 11: (Sc in next 4 sts, invdec) 6x around. (30)
Round 16: (Sc in next 3 sts, invdec) 6x around. (24)
Round 20: (Sc in next 2 sts, invdec) 6x around. (18)
Round 24: (Sc, invdec) 6x around. (12)
Round 25: Sc in each st around.
— Arms (make two) :
Round 1: Using light brown, sc 6 into a magic ring. (6)
Round 2: (Sc, 2 sc) 3x around. (9)
Round 3: Sc in each st around, switch to light blue.
Round 4: In front loops only, sc in each st around.
Round 10: (Sc, invdec) 3x around. (6)
— Head covering :
Round 1: Using dark blue, sc 6 into a magic ring. (6)
Round 2: 2 sc in each st around. (12)
Round 3: (Sc, 2 sc) 6x around. (18)
Round 4: (Sc in next 2 sts, 2 sc) 6x around. (24)
Round 5: (Sc in next 3 sts, 2 sc) 6x around. (30)
Round 8: Sc in each of the next 20 sts across. Ch 1. Turn.
— Head :
Round 1: Using light brown, sc 6 into a magic ring. (6)
Round 2: 2 sc in each st around. (12)
Round 3: (Sc, 2 sc) 6x around. (18)
Round 4: (Sc in next 2 sts, 2 sc) 6x around. (24)
Round 9: (Sc in next 2 sts, invdec) 6x around. (18)
Round 10: (Sc, invdec) 6x around. (12)
Round 11: Sc2tog around until closed. Fasten off, using yarn tail to pull final stitches completely;
— Body :
Round 1: Using white, sc 6 into a magic ring. (6)
Round 2: 2 sc in each st around. (12)
Round 3: (Sc, 2 sc) 6x around. (18)
Round 4: Sc in each st around.
Round 5: (Sc in next 2 sts, 2 sc) 6x around. (24)
Round 13: (Sc in next 2 sts, invdec) 6x around. (18)
Round 14: Sc in each st around.
Round 15: In back loops only, (sc, sc2tog) 6x around. (12)
— Manger :
Round 1: Hdc in 3rd chain from hook and in each ch across. Ch 2. Turn. (22)
— Part 14 :
Round 1: Hdc in 3rd chain from hook and in each ch across (20), ch 2, turn;
— Part 15 :
Round 1: Hdc in 3rd chain from hook and in each ch across. Ch 2. Turn. (10)
Round 8: Sc in each st around, switch to gold. (36)
Round 11: Sc in each st around, insert mesh screen.
Round 12: (Sc in next 4 sts, invdec) 6x around, switch to gold. (30)
Round 17: (Sc in next 3 sts, invdec) 6x around. (24)
Round 21: (Sc in next 2 sts, invdec) 6x around. (18)
Round 25: (Sc, invdec) 6x around. (12)
Round 26: Sc in each st around.
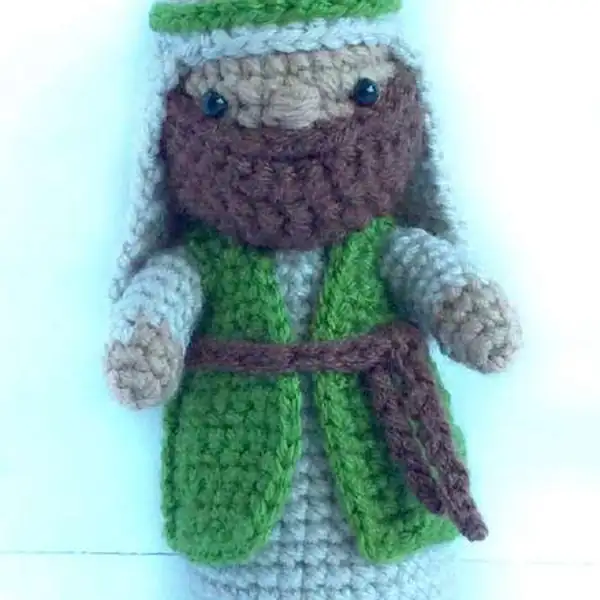
— Arms (make two) :
Round 1: Using dark brown, sc 6 into a magic ring. (6)
Round 2: (Sc, 2 sc) 3x around. (9)
Round 3: Sc in each st around, switch to gold.
Round 4: In front loops only, sc in each st around.
Round 5: Sc in each st around, switch to purple.
Round 10: (Sc, invdec) 3x around. (6)
— Head Covering :
Round 1: Using light purple, sc 6 into a magic ring. (6)
Round 2: 2 sc in each st around. (12)
Round 3: (Sc, 2 sc) 6x around. (18)
Round 4: (Sc in next 2 sts, 2 sc) 6x around. (24)
Round 5: (Sc in next 3 sts, 2 sc) 6x around. (30)
Round 6: (Sc in next 4 sts, 2 sc) 6x around. (36)
Round 7: Sc in each st around.
Round 8: (Sc in next 4 sts, invdec) 6x around, change to gold. (30)
Round 11: Sc in each of the next 20 sts across. Ch 1. Turn.
— Gift :
Round 1: Using gray, sc 6 into a magic ring. (6)
Round 2: 2 sc in each st around. (12)
Round 11: Switch to gold, sc in each st around, insert mesh screen. (36)
Round 12: (Sc in next 4 sts, invdec) 6x around. (30)
Round 13: Sc in each st around, switch back to red.
Round 17: (Sc in next 3 sts, invdec) 6x around. (24)
Round 21: (Sc in next 2 sts, invdec) 6x around. (18)
Round 25: (Sc, invdec) 6x around. (12)
Round 26: Sc in each st around.
— Arms (make two) :
Round 1: Using light brown, sc 6 into a magic ring. (6)
Round 2: (Sc, 2 sc) 3x around. (9)
Round 3: Sc in each st around, switch to orange.
Round 4: In front loops only, sc in each st around.
Round 10: (Sc, invdec) 3x around. (6)
Round 8: Sc in each of the next 20 sts across. Ch 1. Turn.
— Crown :
Round 1: Sc in each ch around. (32)
Round 2: (Sl st, ch 3, then [sc, hdc] back down the ch 3, sk 2 sts, sl st) 8x around.
— Arms :
Round 1: Using medium brown, sc 6 into a magic ring. (6)
Round 2: (Sc, 2 sc) 3x around. (9)
Round 3: Sc in each st around, switch to green.
Round 4: In front loops only, sc in each st around.
Round 10: (Sc, invdec) 3x around. (6)
— Head covering :
Round 1: Using dark blue, sc 6 into a magic ring. (6)
Round 2: 2 sc in each st around. (12)
Round 3: (Sc, 2 sc) 6x around. (18)
Round 4: (Sc in next 2 sts, 2 sc) 6x around. (24)
Round 5: (Sc in next 3 sts, 2 sc) 6x around. (30)
Round 6: In back loops only, sc in each st around.
Round 11: Sc in each of the next 20 sts across. Ch 1. Turn.
— Hair :
Round 1: Sc 6 into a magic ring. (6)
Round 2: 2 sc in each st around. (12)
Round 3: (Sc, 2 sc) 6x around. (18)
Round 4: (Sc in next 2 sts, 2 sc) 6x around. (24)
Round 5: (Sc in next 3 sts, 2 sc) 6x around (30)
— Then make a bun as follows :
Round 1: Sc 6 into a magic ring. (6)
Round 2: 2 sc in each st around. (12)
Round 3: (Sc in next 3 sts, 2 sc) 3x around. (15)
— Wings (make two) :
Round 1: Sc in 2nd ch from hook and in each ch across. Ch 1. Turn. (6)
Round 2: Sc in first 2 sts, 2 sc in next st, sc in next 2 sts. Ch 3. Turn. (9)
Round 3: Sc in 2 ch sts (work into them as you would into a foundation chain), sc in next 3 sts, 2 sc,;
Round 4: Sc in first 3 sts, 2 sc, sc in next 4 sts. Ch 3. Turn. (12)
Round 5: Sc in 2 ch sts, sc in next 5 sts, 2 sc, sc in last 3 sts. Ch 1. Turn.
Round 6: Sc in first 2 sts, 2 sc, sc in next 8 sts. Ch 3. Turn. (15)
Round 7: Sc in 2 ch sts, sc in next 8 sts, 2 sc, sc in last 3 sts. Ch 1. Turn.
Round 8: Sc in first 3 sts, 2 sc in each of next 2 sts, sc in next 9 sts. Ch 2. Turn. (18)
Round 9: Sc in 1 ch st, sc in next 11 sts, 2 sc, sc in last 4 sts.
— Head :
Round 1: Using beige, sc 6 into a magic ring. (6)
Round 2: (Sc, 2 sc) 3x around. (9)
Round 3: 2 sc in each of first 3 sts, sc in next 6 sts. (12)
Round 4: (Sc, 2 sc) 6x around. (18)
Round 5: (Sc in next 2 sts, 2 sc) 6x around. (24)
Round 6: Switch to white. Sc in each st around.
Round 7: Switch to white. Sc in each st around.
Round 8: Switch to white. Sc in each st around.
Round 9: Switch to white. Sc in each st around.
Round 10: (Sc in next 2 sts, invdec) 6x around. (18)
Round 11: (Sc, invdec) 6x around. (12)
— Body :
Round 1: Sc 6 into a magic ring. (6)
Round 2: 2 sc in each st around. (12)
Round 3: (Sc, 2 sc) 6x around. (18)
Round 4: (Sc in next 2 sts, 2 sc) 6x around. (24)
Round 5: (Sc in next 3 sts, 2 sc) 6x around. (30)
Round 14: (Sc in next 3 sts, invdec) 6x around. (24)
Round 15: (Sc in next 2 sts, invdec) 6x around. (18)
Round 16: (Sc, invdec) 6x around. Stuff body. (12)
— Legs (make four) :
Round 1: Using gray, sc 6 into a magic ring. (6)
Round 2: 2 sc in each st around, switch to beige. (12)
Round 3: Sc in each st around.
Round 4: Sc in next 2 sts, invdec) 3x around. (9)
— Tail :
Round 1: Using white, into a magic ring, sc 3, ch 2, sc 3. (8)
Round 2: Sc in next 4 sts, ch 2, sc in last 4 sts. (10)
— Ears (make two) :
Round 1: Using gray, sc 4 into a magic ring. (4)
Round 2: (Sc, 2 sc) 2x around. (6)
Round 3: (Sc, 2 sc) 3x around. (9)
— Head :
Round 1: Using white, sc 6 into a magic ring. (6)
Round 2: 2 sc in each st around. (12)
Round 3: (Sc in next 3 sts, 2 sc) 3x around. (15)
Round 6: (Sc in next 4 sts, 2 sc) 3x around. (18)
Round 7: (Sc in next 2 sts, 2 sc) 6x around. (24)
Round 11: (Sc in next 3 sts, 2 sc) 6x around. (30)
Round 12: (Sc in next 3 sts, invdec) 6x around. (24)
Round 13: (Sc in next 2 sts, invdec) 6x around. (18)
Round 14: (Sc, invdec) 6x around. (12)
— Neck :
Round 1: Sc in first ch, making a loop. Continue to sc in each ch around. (15)
— Body :
Round 1: Using gray, sc 6 into a magic ring. (6)
Round 2: 2 sc in each st around. (12)
Round 3: (Sc, 2 sc) 6x around. (18)
Round 4: (Sc in next 2 sts, 2 sc) 6x around. (24)
Round 5: (Sc in next 3 sts, 2 sc) 6x around. (30)
Round 17: Invdec 5x over first 10 sts, sc in next 20 sts. (25)
Round 18: Invdec over first 2 sts, sc, invdec again, then (sc in next 2 sts, invdec) 5x around. (18)
Round 19: (Sc, invdec) 6x around, stuff body. (12)
— Legs (make four) :
Round 1: Using black, sc 6 into a magic ring. (6)
Round 2: 2 sc in each st around. (12)
Round 3: Sc in each st around, switch to white.
Round 4: (Sc in next 2 sts, invdec) 3x around, switch to gray. (9)
— Ears (make two) :
Round 1: Using light brown, sc 6 into a magic ring. (6)
Round 2: Sc in first 2 sts, 2 sc in next 2 sts, sc in last 2 sts. (8)
— Part 36 :
Round 1: Using light brown, sc 6 into a magic ring. (6)
Round 2: 2 sc in each st around. (12)
Round 3: (Sc, 2 sc) 6x around. (18)
Round 4: (Sc in next 2 sts, 2 sc) 6x around. (24)
Round 7: (Sc in next 2 sts, invdec) 6x around. (18)
Round 8: (Sc in next 2 sts, 2 sc) 6x around. (24)
Round 13: (Sc in next 2 sts, invdec) 6x around. (18)
Round 14: (Sc, invdec) 6x around. (12)
— Neck :
Round 1: Sc in first ch, making a loop. Continue to sc in each ch around. (15)
Round 2: Sc in first 3 sts, 2 sc in each of next 3 sts, sc in next 3 sts, invdec 3x over last 6 sts.
Round 3: Sc in each st around.
Round 5: Sc in each st around.
Round 7: Sc in each st around.
Round 8: Sc in first 5 sts, 2 sc in each of next 3 sts, sc in next 3 sts, invdec 2x over last 4 sts. (16)
— Body :
Round 1: Using light brown, sc 6 into a magic ring. (6)
Round 2: 2 sc in each st around. (12)
Round 3: (Sc, 2 sc) 6x around. (18)
Round 4: (Sc in next 2 sts, 2 sc) 6x around. (24)
Round 5: (Sc in next 3 sts, 2 sc) 6x around. (30)
Round 10: Sc in first 12 sts, 2 sc in each of next 6 sts, sc in last 12 sts. (36)
Round 11: Sc in each st around.
Round 12: Sc in first 16 sts, 2 sc in each of next 4 sts, sc in last 16 sts. (40)
Round 17: Sc in first 16 sts, invdec 4x across next 8 sts, sc in last 16 sts. (36)
Round 18: Sc in each st around.
Round 19: Sc in first 12 sts, invdec 6x across next 12 sts, sc in last 12 sts. (30)
Round 20: Sc in each st around, begin stuffing.
Round 21: (Sc in next 3 sts, invdec) 6x around. (24)
Round 22: Sc in each st around.
Round 23: (Sc in next 2 sts, invdec) 6x around. (18)
Round 24: Sc in each st around.
Round 25: (Sc, invdec) 6x around. (12)
— Legs (make four) :
Round 1: Using light brown, sc 6 into a magic ring. (6)
Round 2: 2 sc in each st around. (12)
Round 3: Sc in first 3 sts, 2 sc in each of next 6 sts, sc in last 3 sts. (18)
Round 4: Sc in first 6 sts, invdec 3x over next 6 sts, sc in last 6 sts. (15)
Round 5: Sc in first 5 sts, invdec 3x over next 6 sts, sc in last 4 sts. (12)
Round 6: (Sc in next 2 sts, invdec) 3x around. (9)
— Blanket :
Round 1: Using red, sc 6 into a magic ring. (6)
Round 2: 2 sc in each st around. (12)
Round 3: (Sc, 2 sc) 6x around. (18)
Round 4: (Sc in next 2 sts, 2 sc) 6x around. (24)
Round 7: (Sc in next 3 sts, 2 sc) 6x around. (30)
Round 8: Sc in each st around.
Round 9: (Sc in next 4 sts, 2 sc) 6x around. (36)
Round 10: Sc in each st around.
Round 11: In front loops only, (sc in next 8 sts, 2 dc) 4x around. (40)
Round 12: (Sc in next 9 sts, ch 2, sc in next st) 4x around, switch to gold. (44)
Round 13: You’ll be one stitch past a corner as you begin this round, so directions for the first side;
Thank you for joining me on this Nativity crochet journey. I hope the amigurumi figures you create become touching reminders of peace, patience, and handmade care. As you work, you will be practicing precision in MR, SC, and INVDEC while building something you can pass down. If you would like more guidance, feel free to revisit the notes, test swatches, and adapt colors until your tableau feels right.May your shelf glow with a gentle scene that shines because you wove it with time and love. Share photos of your finished pieces so others can see how the linen, beige, white, and gold come together in your space. This pattern was written to be a trusted companion in your crochet library, with clear steps and steady rhythm. Wishing you patience, joy, and a warm holiday season as you stitch your Nativity amigurumi.