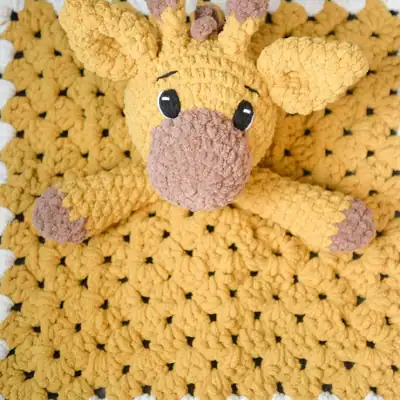
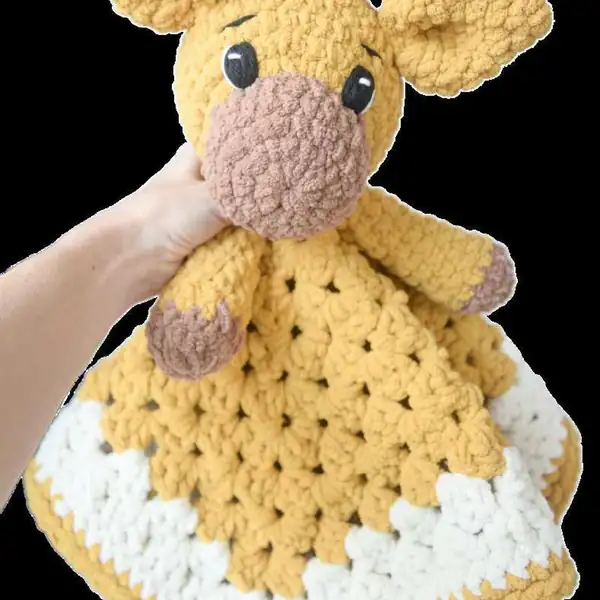
From the first slip knot to the final adjustable fabric, the Giraffe Lovey Blanket Amigurumi Pattern blends the cuddly silhouette of a giraffe with the softly weighted security of a lovey. The main body is worked in Bernat Blanket Yarn (super bulky) by using a 6.5 mm hook to build a tall, cozy form that stands up to cuddles while still remaining pliable enough for baby’s hands to explore textures. The giraffe’s spots are created with contrasting Black and Birch colorwork and a sprinkle of Premier Basix Chenille in Caramel for a plush, tactile contrast that catches the eye. An 8 mm edge or border adds a tidy frame around the head and neck, while invisible decreases keep the shaping smooth. The blanket portion, woven into the midsection, provides a gentle weight that doubles as a soothing comfort blanket when nap times roll around. As a finished piece, the giraffe measures approximately 18-19 inches long—large enough to be a focal toy, yet small enough to travel in a car seat or crib corner.
— Part 1 :
Round 3: Chain 3, turn your work, in that same space you're going to do 2 dc, then in the corner space do [3 dc, ch 2,;
— Part 2 :
Round 12: Chain 1, turn your work, now single crochet in every stitch around, when you reach the corners put 3 sc in;
Round 13: Chain 1, turn your work, now single crochet in every stitch around again. When you get to the corners, do;
Round 14: Chain 1, don't turn your work. To add a nice finished touch, slip stitch all the way around the blanket, make;
— Part 3 :
Round 1: (Your beginning chain needs to be about 16" long, it will be used later to sew the head onto the blanket.) Do;
Round 2: Chain 3, turn your work, you're now working on the backside, in that corner space do [2 dc, ch 2, 3 dc], in;
— Part 4 :
Round 1: Start with a magic circle of 6 sc stitches (6)
Round 2: sc in every st around (6)
Round 3: sc in every st around (6)
Round 4: [dec, sc, dec, sc] (4)
Round 5: sc in every st around (4)
Round 6: sc in every st around (4)
— Part 5 :
Round 1: Start with a magic circle of 6 sc stitches (6)
Round 2: sc in every st around (6)
Round 3: inc in every st around (12)
Round 4: sc in every st around (12)
Round 5: [inc, sc in next st] repeat around (18)
Round 6: sc in every st around (18)
Round 7: [dec, sc in next 2] (13) *you'll end with a dec*;
Round 8: dec all around (7)
— Part 6 :
Round 1: Start with a magic circle of 8 sc stitches (8)
Round 2: inc in every st around (16)
Round 3: [inc, sc in next st] repeat around (24)
Round 4: sc in every st around (24)
Round 5: sc in every st around (24)
Round 6: [dec, sc in next 2] repeat around (18)
Round 7: sc in 4 sts, inc in 10 sts, sc in 4 sts (28)
Round 8: sc in 4 sts, then [inc, sc in next 2 sts] repeat this 6 more times,;
Round 9: sc in every st around (35)
Round 10: sc in every st around (35)
Round 11: sc in every st around (35)
Round 12: sc in every st around (35)
Round 13: sc in every st around (35)
Round 14: sc in every st around (35)
Round 15: [dec, sc in next 2 sts] (26)
Round 16: [dec, sc in next st] (17)
Round 17: dec around until hole closes;
Round 18: dec around until hole closes;
— Part 7 :
Round 1: Start with a magic circle of 6 sc stitches (6)
Round 2: inc in every st around (12)
Round 3: sc in every st around (12)
Round 4: [dec, sc in next 4 sts] repeat around (10)
Round 5: sc in every st around (10)
Round 6: sc in every st around (10)
Round 7: [dec, sc in next 2 sts] repeat around (7) *you'll;
Round 8: sc in every st around (7)
Round 9: sc in every st around (7)
Round 10: sc in every st around (7)
Round 11: sc in every st around (7)
Round 12: sc in every st around (7)
Round 13: sc in every st around (7)
Round 14: sc in every st around (7)
— Part 8 :
Round 3: Chain 3, turn your work, in that same space you're going to do 2 dc, then in the corner space do [3 dc, ch 2,;
— Part 9 :
Round 14: Chain 1, turn your work, now half double crochet in every stitch around, when you reach the corners put 3;
Round 15: Chain 1, turn your work, now single crochet in every stitch around again. Again, putting 3sc into the;
— Part 10 :
Round 1: (Your beginning chain needs to be about 16" long, it will be used later to sew the head onto the blanket.) Do;
Round 2: Chain 3, turn your work, you're now working on the backside, in that corner space do [2 dc, ch 2, 3 dc], in;
— Part 11 :
Round 1: Start with a magic circle of 6 sc stitches (6)
Round 2: sc in every st around (6)
Round 3: inc in every st around (12)
Round 4: sc in every st around (12)
Round 5: sc in every st around (12)
Round 6: sc in every st around (12)
Round 7: sc in every st around (12)
Round 8: sc in every st around (12)
— Part 12 :
Round 1: Start with a magic circle of 6 sc stitches (6)
Round 2: inc in every st around (12)
Round 3: [inc, sc in next st] repeat around (18)
Round 4: [inc, sc in next 2 sts] repeat around (24)
Round 5: [inc, sc in next 3 sts] repeat around (30)
Round 6: sc in next 12 sts, BOBBLE STITCH, sc in next 4 sts,;
Round 7: sc in every st around (30)
Round 8: [dec, sc in next 4 sts] repeat around (25)
Round 9: sc in every st around (25)
Round 10: sc in every st around (25)
Round 11: [dec, sc in next 3 sts] repeat around (20)
Round 12: sc in every st around (20)
Round 13: sc in every st around (20)
Round 14: sc in every st around (20)
Round 15: sc in every st around (20)
Round 16: sc in every st around (20)
Round 17: sc in every st around (20)
Round 18: sc in every st around (20)
Round 19: sc in every st around (20)
Round 20: [dec, sc in next st] repeat around (12)
Round 21: dec around until hole closes;
— Part 13 :
Round 1: Start with a magic circle of 8 sc stitches (8)
Round 2: inc in every st around (16)
Round 3: sc in the very back loop (not *the* back loop,;
Round 4: sc in every st around (16)
Round 5: sc in every st around (16)
Round 6: [dec, sc in next 2 sts] repeat around (12)
Round 7: sc in every st around (12)
Round 8: sc in every st around (12)
Round 9: sc in every st around (12)
Round 10: sc in every st around (12)
Round 11: sc in every st around (12)
Round 12: sc in every st around (12)
Round 13: [dec, sc in next 2 sts] repeat around (8)
Round 14: sc in every st around (8)
Round 15: sc in every st around (8)
Round 16: sc in every st around (8)
Round 17: sc in every st around (8)
Round 18: dec all the way around (4)
— Part 14 :
Round 1: Start with a magic circle of 8 sc stitches (8)
Round 2: sc in every st around (8)
Round 3: inc in every st around (16)
Round 4: sc in every st around (16)
Round 5: sc in every st around (16)
Round 6: [inc, sc in next 2 sts] repeat around (23)
Round 7: sc in every st around (23)
— Part 15 :
Round 1: Start with a magic circle of 6 sc stitches (6)
Round 2: inc in every st around (12)
Round 3: [inc, sc in next st] repeat around (18)
Round 4: [inc, sc in next 2 sts] repeat around (24)
Round 5: [inc, sc in next 3 sts] repeat around (30)
Round 6: [inc, sc in next 4 sts] repeat around (36)
Round 7: [inc, sc in next 5 sts] repeat around (42)
Round 8: [inc, sc in next 6 sts] repeat around (48)
— Part 16 :
Round 1: Start with a magic circle of 12 dc stitches, sl st to beginning of round (12)
Round 2: Ch 2, inc in 4 stitches, inc in 4 stitches, inc in 4 stitches, sl st to beginning of round (24)
Round 3: Ch 2, dc in next 8 sts, dc in next 9 sts, dc in next 7 sts, sl st to beginning of round (24)
Round 4: Ch 2, [inc, dc in next st] repeat 3 times, [inc, dc in next st] repeat 4 times, [inc, dc in next;
Round 5: Ch 2, dc in next 13 sts, dc in next 14 sts, dc in next 9 sts, sl st to beginning of round (36)
Round 6: Ch 2, dc in next 13 sts, dc in next 14 sts, dc in next 9 sts, sl st to beginning of round (36)
Round 7: Ch 2, dc in next 13 sts, dc in next 15 sts, dc in next 8 sts, sl st to beginning of round (36)
Round 8: Ch 2, dc in next 13 sts, dc in next 15 sts, dc in next 8 sts, sl st to beginning of round (36)
Round 9: Ch 2, dc in next 14 sts, dc in next 14 sts, dc in next 8 sts, sl st to beginning of round (36)
Round 10: Ch 2, dc in next 14 sts, dc in next 15 sts, dc in next 7 sts, sl st to beginning of round (36)
Round 11: Ch 2, [dec, dc in next 2 sts] repeat 3 times, [dec, dc in next 2 sts] repeat 2 times, [dec,;
Round 12: Ch 2, dc in every st around, sl st to beginning of round (27) - (this round and the rest of;
Round 13: Ch 2, [dec all around] your last st might be one dc (14), sl st to beginning of round;
— Part 17 :
Round 1: Start with a magic circle of 6 sc stitches (6)
Round 2: [inc in each st] (12)
Round 3: [inc, sc in next st] repeat around (18)
Round 4: [inc, sc in next 2 sts] repeat around (24)
Round 5: [inc, sc in next 3 sts] repeat around (30)
Round 6: [inc, sc in next 4 sts] repeat around (36)
Round 7: sc in every st around (36)
Round 8: sc in every st around (36)
Round 9: sc in every st around (36)
Round 10: sc in every st around (36)
Round 11: sc in every st around (36)
Round 12: sc in every st around (36)
Round 13: sc in every st around (36)
Round 14: sc in every st around (36)
Round 15: sc in every st around (36)
Round 16: [dec, sc in next 4 sts] repeat around (30)
Round 17: [dec, sc in next 3 sts] repeat around (24)
Round 18: [dec, sc in next 2 sts] repeat around (18)
Round 19: [dec, sc in next st] repeat around (12)
Round 20: dec until hole closes, leave a 12" tail;
— Part 18 :
Round 1: Start with a magic circle of 8 sc stitches (8)
Round 2: sc in every st around (8)
Round 3: [inc, sc in next st] repeat around (12)
Round 4: sc in every st around (12)
Round 5: [inc, sc in next 2 sts] repeat around (16)
Round 6: sc in every st around (16)
— Part 19 :
Round 1: Start with a magic circle of 8 sc stitches (8)
Round 2: sc in every st around (8)
Round 3: [inc, sc in next st] repeat around (12)
Round 4: sc in every st around (12)
Round 5: [inc, sc in next 2 sts] repeat around (16)
Round 6: sc in every st around (16)
Round 7: [inc, sc in next 2 sts] repeat around (22)
Round 8: sc in every st around (22)
Round 9: sc in every st around (22)
Round 10: [dec, sc in next 2 sts] repeat around (16)
Round 11: sc in every st around (16)
Round 12: [dec, sc in next st] repeat around (10)
Round 13: sc in every st around (10)
Round 14: [dec, sc in next st] repeat around (6)
Round 15: sc in every st around (6)
— Part 20 :
Round 1: Start with a magic circle of 6 sc stitches (6)
Round 2: sc in every st around (6)
Round 3: [inc, sc in next st] repeat around (10)
Round 4: sc in every st around (10)
Round 5: [inc, sc in next st] repeat around (15)
Round 6: sc in every st around (15)
— Part 21 :
Round 1: Start with a magic circle of 4 sc stitches (4)
Round 2: sc in every st around (4)
Round 3: sc in every st around (4)
Round 4: sc in every st around (4)
— Part 22 :
Round 1: Start with a magic circle of 6 sc stitches (6)
Round 2: sc in every st around (6)
Round 3: inc in every st around (12)
Round 4: [inc, sc in next st] repeat around (18)
Round 5: sc in every st around (18)
Round 6: sc in every st around (18)
Round 7: sc in every st around (18)
— Part 23 :
Round 1: Start with a magic circle of 8 sc stitches (8)
Round 2: inc in every st around (16)
Round 3: [inc, sc in next st] repeat around (24)
Round 4: [inc, sc in next 2 sts] repeat around (32)
Round 5: sc in every st around (32)
Round 6: sc in every st around (32)
Round 7: sc in every st around (32)
Round 8: sc in every st around (32)
Round 9: sc in every st around (32)
Round 10: sc in next 10 sts, [dec x6] then sc in next 10 sts (26)
Round 11: [sc in next 2 sts, then dec] repeat around (20)
Round 12: sc in every st around (20)
Round 13: sc in every st around (20)
Round 14: sc in every st around (20)
Round 15: sc in every st around (20)
Round 16: sc in next 7 sts, BOBBLE, sc in next 4 sts, BOBBLE, then sc in next;
Round 17: dec in every st around (10)
Round 18: [sc in next st, then dec] repeat around (6)
— Part 24 :
Round 2: sc in every st around (12)
Round 3: sc in every st around (12)
Round 4: [inc, sc in next st] repeat around (18)
Round 5: sc in every st around (18)
Round 6: [inc, sc in next 2 sts] repeat around (24)
Round 7: sc in every st around (24)
Round 8: [inc, sc in next 3 sts] repeat around (30)
Round 9: sc in every st around (30)
Round 10: [inc, sc in next 4 sts] repeat around (36)
Round 11: sc in every st around (36)
Round 12: sc in every st around (36)
Round 13: sc in every st around (36)
Round 14: sc in every st around (36)
Round 15: sc in every st around (36)
Round 16: [dec, sc in next 4 sts] repeat around (30)
Round 17: [dec, sc in next 3 sts] repeat around (24)
Round 18: [dec, sc in next 2 sts] repeat around (18)
Round 19: [dec, sc in next st] repeat around (12)
Round 20: dec around until hole closes;
— Part 25 :
Round 1: mc with 8 sc (8)
Round 2: inc in every st around (16)
Round 3: Now work in the very back loop (not the back;
Round 4: SWITCH TO PURPLE HERE, sc in every st;
Round 5: [dec, sc in next 2 sts] repeat around (12)
Round 6: sc in every st around (12)
Round 7: [dec, sc in next st] repeat around (6)
Round 8: sc in every st around;
Round 9: sc in every st around;
Round 10: sc in every st around;
— Part 26 :
Round 1: Start with a magic ring of 6 stitches;
Round 2: [inc in each st around] (12)
Round 3: [sc in next st, inc] repeat around (18)
Round 4: [sc in next 2 sts, inc] repeat around (24)
Round 5: [sc in each st around] (24)
Round 6: [sc in each st around] (24)
Round 7: [sc in each st around] (24)
Round 8: [sc in next 6 sts, inc, sc in next st, inc, sc in;
Round 9: [sc in next 10 sts, inc, sc in next st, inc, sc in;
Round 10: [sc in each st around] (36)
Round 11: [sc in next 15 sts, inc, sc in next st, inc, sc in;
Round 12: [sc in each st around] (39)
Round 13: [sc in each st around] (39)
Round 14: [sc in each st around] (39)
Round 15: [sc in each st around] (39)
Round 16: [sc in each st around] (39)
Round 17: [dec, sc in next 5 sts] repeat around (33)
Round 18: [dec, sc in next 4 sts] repeat around (27)
Round 19: [dec, sc in next 3 sts] repeat around (21)
Round 20: [dec, sc in next 2 sts] repeat around (16)
Round 21: [dec, sc in next st] repeat around (11)
Round 22: [dec until hole closes] weave in ends;
— Part 27 :
Round 1: Start with a magic ring of 6 stitches;
Round 2: [inc in each st around] (12)
Round 3: [sc in next st, inc] repeat around (18)
Round 4: [sc in each st around] (18)
Round 5: [sc in each st around] (18)
Round 6: [dec, sc in next st] repeat around (12)
Round 7: [sc in each st around] 12;
— Part 28 :
Round 1: sc around in flat circle (12)
Round 2: (now switch to double crochet stitch), without slip;
Round 3: dc in each stitch around (18)
Round 4: [dc in next 2 sts, inc] repeat around (24)
Round 5: dc in each stitch around (24)
Round 6: [dc in next 3 sts, inc] repeat around (30)
Round 7: dc in each stitch around (30)
Round 8: dc in each stitch around (30)
Round 9: dc in each stitch around (30)
Round 10: dc in each stitch around (30)
Round 11: dc in each stitch around (30)
Round 12: [dec, dc in next 3 sts] repeat around (23)
Round 13: [dec, dc in next 2 sts] repeat around (16)
Round 14: Now we’ll close the body by using a hdc across the;
— Part 29 :
Round 1: Start with a magic ring of 6 stitches;
Round 2: [inc in each st around] (12)
Round 3: sc in each st around (12)
Round 4: sc in each st around (12)
Round 5: sc in each st around (12)
Round 6: sc in each st around (12)
Round 7: sc in each st around (12)
Round 8: [dec, sc in next 2 sts] repeat around (9)
Round 9: sc in each st around (9)
Round 10: sc in each st around (9)
Round 11: [dec, sc in next 2 sts] repeat around (6)
Round 12: sc in each st around (6)
Round 13: sc in each st around (6)
— Part 30 :
Round 1: Start with a magic ring of 6 stitches;
Round 2: [inc in each st around] (12)
Round 3: [sc in next st, inc] repeat around (18)
Round 4: [sc in each st around] (18)
Round 5: [sc in each st around] (18)
Round 6: [sc in each st around] (18)
Round 7: [sc in each st around] (18)
Round 8: [dec, sc in next st] repeat around (12)
Round 9: [sc in each st around] (12)
Round 10: [sc in each st around] (12)
Round 11: [dec, sc in next st] repeat around (8)
Round 12: [sc in each st around] (8)
— Part 31 :
Round 1: Chain 21 then sc across all chains (20), turn;
Round 2: Chain 1, inc, sc in next 2 sts, chain 6 and skip the next 6 chains, then sc in next the;
Round 3: Chain 1, sc in every st across (when you get to the chain 6 you'll do single crochets;
Round 4: Chain 1, inc, sc in next 9 sts, inc in next 2 sts, sc in next 9 sts, inc (26), turn;
Round 5: Chain 1, sc in every st across (26), turn;
Round 6: Chain 1, inc, sc in next 10 sts, inc, sc in next 2 sts, inc, sc in next 10 sts, inc (30), turn;
Round 7: Chain 1, sc in every st across (30), turn;
Round 8: Chain 1, inc, sc in next 11 sts, inc, sc in next 4 sts, inc, sc in next 11 sts, inc (34), turn;
Round 9: Chain 1, sc in every st across (34), turn;
Round 10: Chain 1, inc, sc in next 12 sts, inc, sc in next 5 sts, inc, sc in next 12 sts, inc (38), turn;
Round 11: Chain 1, sc in every st across (38), turn;
Round 12: Chain 1, inc, sc in next 13 sts, inc, sc in next 8 sts, inc, sc in next 13 sts, inc (42), turn;
Round 13: Chain 1, sc in every st across (42)
— Part 32 :
Round 1: In the corner of the sleeve hole, insert your hook in the front loop of the existing;
Round 2: Chain 1, sc in every st around (15), slip stitch to the beginning chain;
Round 3: Chain 1, sc in every st around (15), slip stitch to the beginning chain;
Round 4: Chain 1, sc in every st around (15), slip stitch to the beginning chain;
Round 5: Chain 1, sc in every st around (15), slip stitch to the beginning chain;
Round 6: Chain 1, sc in every st around (15), slip stitch to the beginning chain;
Round 7: Chain 1, sc in every st around (15), slip stitch to the beginning chain;
Round 8: Chain 1, sc in every st around (15), slip stitch to the beginning chain;
Round 9: sl st in every st around for a nice finished touch!;
— Part 33 :
Round 1: Start with a magic circle of 6 sc stitches (6)
Round 2: sc in every st around (6)
Round 3: sc in every st around (6)
Round 4: [dec, sc, sc, dec, sc] (4)
Round 5: sc in every st around (4)
Round 6: sc in every st around (4)
— Part 34 :
Round 1: Start with a magic circle of 6 sc stitches (6)
Round 2: sc in every st around (6)
Round 3: inc in every st around (12)
Round 4: sc in every st around (12)
Round 5: [inc, sc in next st] repeat around (18)
Round 6: sc in every st around (18)
Round 7: [dec, sc in next 2] (13) *you'll end with a dec*;
Round 8: sc in every st around (13)
Round 9: [dec, sc in next st] repeat around (8)
Round 10: sc in every st around (8)
— Part 35 :
Round 1: Start with a magic circle of 8 sc stitches (8)
Round 2: inc in every st around (16)
Round 3: [inc, sc in next st] repeat around (24)
Round 4: sc in every st around (24)
Round 5: sc in every st around (24)
Round 6: [dec, sc in next 2] repeat around (18)
Round 7: sc in 4 sts, inc in 10 sts, sc in 4 sts (28)
Round 8: sc in 4 sts, then [inc, sc in next 2 sts] repeat 6 times,;
Round 9: sc in every st around (36)
Round 10: sc in every st around (36)
Round 11: sc in every st around (36)
Round 12: sc in every st around (36)
Round 13: sc in every st around (36)
Round 14: sc in every st around (36)
Round 15: [dec, sc in next 2 sts] (27)
Round 16: [dec, sc in next st] (18)
Round 17: dec all around (9) *continue stuffing with polyfil*;
Round 18: dec until hole closes;
— Part 36 :
Round 1: (yellow) mc then chain 2 and insert 12 dc into center of ring (12),;
Round 2: (yellow) chain 2, dc in every st around (12)
Round 3: (yellow) chain 2, dc in next 5 sts, (brown) dc in next 3 sts, (yellow)
Round 4: (yellow) chain 2, dc in next 4 sts, (brown) dc in next 5 sts, (yellow)
Round 5: (yellow) chain 2, dc in next 5 sts, (brown) dc in next 3 sts, (yellow)
Round 6: (all yellow) chain 2, [inc, dc in next st] repeat around, sl st to;
Round 7: (all yellow) chain 2, dc in every st around, sl st to beginning chain;
Round 8: (all yellow) chain 2, [inc, dc in next 2 sts] repeat around, sl st to;
Round 9: (yellow) chain 2, dc in next 2 sts, (brown) dc in next 4 sts, (yellow)
Round 10: (yellow) chain 2, inc, dc in next st, (brown) dc in next 2 sts, inc, dc;
Round 11: (all yellow) ch 2, dc in every st around, sl st to beginning chain;
Round 12: (all yellow) ch 2, [inc, dc in next 3 sts] repeat around, sl st to;
Round 13: (all yellow) ch 2, dc in every st around, sl st to beginning chain;
Round 14: (yellow) ch 2, dc in next 10 sts, (brown) dc in next 4 sts,;
Round 15: (yellow) ch 2, dc in next 10 sts, (brown) dc in next 4 sts,;
Round 16: (all yellow) ch 2, [dec, dc in next st] repeat around, sl st to;
Round 17: (all yellow) ch 2, [dec all around] sl st to beginning chain (12)
Round 18: (yellow) press two layers together and do 6 sc across the row;
— Part 37 :
Round 1: Start with a magic circle of 6 sc stitches (6)
Round 2: inc in every st around (12)
Round 3: sc in every st around (12)
Round 4: [dec, sc in next 4 sts] repeat around (10)
Round 5: sc in every st around (10)
Round 6: sc in every st around (10)
Round 7: [dec, sc in next 2 sts] repeat around (7) *you'll end on a dec*;
Round 8: sc in every st around (7)
Round 9: sc in every st around (7)
Round 10: sc in every st around (7)
Round 11: sc in every st around (7)
Round 12: sc in every st around (7)
— Part 38 :
Round 1: Start with a magic circle of 8 sc stitches (8)
Round 2: inc in every st around (16)
Round 3: sc in every st around (16)
Round 4: [dec, sc in next 3 sts] repeat around (12) *you'll end on an extra dec*;
Round 5: sc in every st around (12)
Round 6: [dec, sc in next 2 sts] repeat around (9)
Round 7: sc in every st around (9)
Round 8: sc in every st around (9)
Round 9: sc in every st around (9)
Round 10: sc in every st around (9)
— Part 39 :
Round 1: Start with a magic circle of 6 stitches (6)
Round 2: [inc in each st] (12)
Round 3: [inc, sc in next st] repeat around (18)
Round 4: sc in every st around (18)
Round 5: sc in every st around (18)
Round 6: sc in every st around (18)
— Part 40 :
Round 1: Start with a magic circle of 6 stitches (6)
Round 2: sc in every st around (6)
Round 3: [inc in each st] repeat around (12)
Round 4: sc in every st around (12)
Round 5: [inc, sc in next st] repeat around (18)
Round 6: sc in every st around (18)
Round 7: sc in every st around (18)
Round 8: sc in every st around (18)
Round 9: sc in every st around (18)
Round 10: sc in every st around (18)
Round 11: sc in every st around (18)
Round 12: sc in every st around (18)
Round 13: [dec, sc in next st] repeat around (12)
Round 14: sc in every st around (12)
Round 15: sc in every st around (12)
— Part 41 :
Round 1: Start with a magic circle of 6 stitches (6)
Round 2: [inc in each st around] (12)
Round 3: [inc, sc in next] repeat around (18)
Round 4: [inc, sc in next 2 sts] repeat around (24)
Round 5: [inc, sc in next 3 sts] repeat around (30)
Round 6: [inc, sc in next 4 sts] repeat around (36)
Round 7: sc in every st around (36)
Round 8: sc in every st around (36)
Round 9: sc in every st around (36)
Round 10: sc in every st around (36)
Round 11: sc in every st around (36)
Round 12: sc in every st around (36)
Round 13: sc in every st around (36)
Round 14: sc in every st around (36)
Round 15: sc in every st around (36)
Round 16: sc in every st around (36)
Round 17: [dec, sc in next 4 sts] repeat around (30)
Round 18: [dec, sc in next 3 sts] repeat around (24)
Round 19: [dec, sc in next 2 sts] repeat around (18)
Round 20: [dec, sc in next st] repeat around (12)
Round 21: [dec around until hole closes];
— Part 42 :
Round 1: Start with a magic circle of 12 double crochet sts (remember;
Round 2: chain 2, [inc in each st around] sl st to first dc in round (24)
Round 3: chain 2, dc in every st around, sl st to first dc in round (24)
Round 4: chain 2, dc in every st around, sl st to first dc in round (24)
Round 5: chain 2, [inc, dc in next st] repeat around, sl st to first dc in round;
Round 6: chain 2, dc in every st around, sl st to first dc in round (36)
Round 7: chain 2, [inc, dc in next 2 sts] repeat around, sl st to first dc in;
Round 8: chain 2, dc in every st around, sl st to first dc in round (48)
Round 9: chain 2, dc in every st around, sl st to first dc in round (48)
Round 10: chain 2, dc in every st around, sl st to first dc in round (48)
Round 11: chain 2, dc in every st around, sl st to first dc in round (48)
Round 12: chain 2, dc in every st around, sl st to first dc in round (48)
Round 13: chain 2, dc in every st around, sl st to first dc in round (48)
Round 14: chain 2, [dec, dc in next 2 sts] repeat around, sl st to first dc in;
Round 15: chain 2, dc in every st around, sl st to first dc in round (36)
Round 16: chain 2, [dec, dc in next st], sl st to first dc in round (24)
Round 17: chain 2, dc in every st around, sl st to first dc in round (24)
— Part 43 :
Round 1: Start with a magic circle of 6 stitches (6)
Round 2: [inc in each st] (12)
Round 3: [inc, sc in next st] repeat around (18)
Round 4: sc in every st around in the back loop (18)
Round 5: sc in every st around (normal, both loops) (18)
Round 6: sc in every st around (normal, both loops) (18)
Round 7: [dec, sc in next st] repeat around (12)
Round 8: sc in every st around (12)
Round 9: sc in every st around (12)
Round 10: sc in every st around (12)
Round 11: sc in every st around (12)
Round 12: sc in every st around (12)
Round 13: sc in every st around (12)
Round 14: sc in every st around (12)
Round 15: [dec, sc in next st] repeat around (8)
Round 16: sc in every st around (8)
— Part 44 :
Round 1: Start with a magic circle of 6 stitches (6)
Round 2: [inc in each st] (12)
Round 3: [inc, sc in next st] repeat around (18)
Round 4: sc in every st around in the back loop (18)
Round 5: sc in every st around (normal, both loops) (18)
Round 6: sc in every st around (normal, both loops) (18)
Round 7: [dec, sc in next st] repeat around (12)
Round 8: sc in every st around (12)
Round 9: sc in every st around (12)
Round 10: sc in every st around (12)
Round 11: sc in every st around (12)
Round 12: sc in every st around (12)
Round 13: sc in every st around (12)
— Part 45 :
Round 1: Create magic ring, chain 1, then 6 sc into the ring, sl st in first chain (6)
Round 2: Chain 2, then 2 dc (inc) in every st around, sl st in first chain (12)
Round 3: Chain 2, dc in every st around, sl st in first chain (12)
Round 4: Chain 2, [dc in next st, inc] repeat around, sl st in first chain (18)
Round 5: Chain 2, dc in every st around, sl st in first chain (18)
Round 6: Chain 2, [dc in next 2 sts, inc] repeat around (24)
Round 7: Chain 2, dc in every st around, sl st in first chain (24)
Round 8: Chain 2, [dc in next 3 sts, inc] repeat around, sl st in first chain (30)
Round 9: Chain 2, dc in every st around, sl st in first chain (30)
Round 10: Chain 2, [dc in next 4 sts, inc] repeat around, sl st in first chain (36)
Round 11: Chain 2, dc in every st around, sl st in first chain (36)
Round 12: Chain 2, dc in every st around, sl st in first chain (36)
Round 13: Chain 2, dc in every st around, sl st in first chain (36)
Round 14: Chain 2, [dec, dc in next 4 sts] repeat around, sl st in first chain (30)
Round 15: Chain 2 [dec, dc in next 3 sts] repeat around, sl st in first chain (24)
Round 16: Chain 2 [dec, dc in next 2 sts] repeat around, sl st in first chain (18)
Round 17: Chain 2, dc in every st around, sl st in first chain (18)
— Part 46 :
Round 1: Chain 6, sc in 4 ch across, 3 sc in last ch (now you're starting on other side), sc in next 4 ch, 2 sc;
Round 2: inc, sc in next 4 sts, inc, sc next st, inc, sc in next 4 sts, inc (17)
Round 3: sc in next st, inc, bobble stitch, sc in next 3 sts, bobble stitch, inc, sc in next st, inc, sc in next 6;
Round 4: sc in every st around (21)
Round 5: sc in every st around (21)
Round 6: sc in every st around (21)
Round 7: sc in every st around (21)
Round 8: sc in every st around (21)
Round 9: sc in every st around (21)
Round 10: sc in every st around (21)
Round 11: sc in every st around (21)
Round 12: sc in every st around (21)
Round 13: sc in every st around (21)
Round 14: sc in every st around (21)
Round 15: sc in every st around (21)
Round 16: sc in every st around (21)
Round 17: sc in next 4 sts, inc in next 3 sts, then sc in remaining sts around (24) *NOTE: Depending on your;
Round 18: sc in next 4 sts, [inc, sc] repeat 2 more;
Round 19: sc in each st around (31)
Round 20: sc in each st around (31)
Round 21: sc in each st around (31)
Round 22: sc in each st around (31)
Round 23: sc in each st around (31)
Round 24: sc in each st around (31)
Round 25: [dec, sc in next 3 sts] repeat around (24)
Round 26: [dec, sc in next 2 sts] repeat around (21)
Round 27: [dec, sc in next st] repeat around (14)
Round 28: [dec around], leave 18 " tail, sew hole closed, you'll use the rest of this long tail to sew on the body;
— Part 47 :
Round 1: Chain 6, sc in 4 ch across, 3 sc in last ch (now;
Round 2: sc in every st around (13)
Round 3: sc in every st around (13)
Round 4: sc in every st around (13)
Round 5: sc in every st around (13)
Round 6: sc in every st around (13)
Round 7: sc in every st around (13)
Round 8: sc in every st around (13)
Round 9: sc in every st around (13)
Round 10: [dec, sc in next 2 sts] repeat around (9)
— Part 48 :
Round 1: Chain 6, sc in 4 ch across, 3 sc in last ch (now;
Round 2: sc in every st around (13)
Round 3: sc in every st around (13)
Round 4: sc in every st around (13)
Round 5: sc in every st around (13)
Round 6: sc in every st around (13)
Round 7: sc in every st around (13)
Round 8: sc in every st around (13)
Round 9: sc in every st around (13)
Round 10: [dec, sc in next 2 sts] repeat around (9)
Round 11: sc in every st around (9)
Round 12: [dec, sc in next 2 sts] repeat around (6)
Round 13: sc in every st around (6)
— Part 49 :
Round 1: Start with a magic circle of 6 stitches (6)
Round 2: inc in every st around (12)
Round 3: [inc, sc in next st] repeat around (18)
Round 4: [inc, sc in next 2 sts] repeat around (24)
Round 5: [inc, sc in next 3 sts] repeat around (30)
Round 6: sc in next 10 sts, BOBBLE, sc in next 8 sts, BOBBLE, sc in next 10 sts (30)
Round 7: sc in every st around (30)
Round 8: [dec, sc in next 3 sts] repeat around (24)
Round 9: [dec, sc in next 2 sts] repeat around (18)
Round 10: sc in next 6 sts, inc in next 6 sts, sc in next 6 sts (24)
Round 11: sc in next 6 sts, inc in next 12 sts, sc in next 6 sts (36)
Round 12: sc in next 17 sts, inc in next 2 sts, sc in next 17 sts (38)
Round 13: sc in every st around (38)
Round 14: sc in every st around (38)
Round 15: sc in every st around (38)
Round 16: sc in every st around (38)
Round 17: sc in every st around (38)
Round 18: [dec, sc in next 3 sts] repeat around (30) *you'll end on that first sc and that's ok;
Round 19: [dec, sc in next 2 sts] repeat around (22) *you'll end on a dec and that's ok;
Round 20: [dec, sc in next st] repeat around (14)
Round 21: dec all around until hole closes;
— Part 50 :
Round 1: Start with a magic circle of 8 stitches (8)
Round 2: inc in every st around (16)
Round 3: sc in every st around (16)
Round 4: sc in every st around (16)
Round 5: dec in every st around (8)
Round 6: sc in every st around (8)
— Part 51 :
Round 2: Chain 2, dc in every st around, sl st to the beginning ch (12)
Round 3: Chain 2, [inc, dc in next st] repeat around, sl st to the beginning ch (18)
Round 4: Chain 2, [inc, dc in next 2 sts] repeat around, sl st to the beginning ch (24)
Round 5: Chain 2, dc in every st around, sl st to the beginning chain (24)
Round 6: Chain 2, dc in every st around, sl st to the beginning chain (24)
Round 7: Chain 2, dc in every st around, sl st to the beginning chain (24)
Round 8: Chain 2, [dec, dc in next 2 sts] repeat around, sl st to beginning chain (18)
Round 9: Chain 2, [dec, dc in next st] repeat around, sl st to beginning chain (12)
— Part 52 :
Round 1: Start with a magic circle with 8 stitches (8)
Round 2: inc in every st around (16)
Round 3: [dec, sc in next st] repeat around (11) *the last 2 sts;
Round 4: sc in every st around (11)
Round 5: sc in every st around (11)
Round 6: sc in every st around (11)
Round 7: dec in every st around (6)
Round 8: sc in every st around (6)
— Part 53 :
Round 1: Start with a magic circle with 8 stitches (8)
Round 2: inc in every st around (16)
Round 3: [dec, sc in next st] repeat around (11) *the last 2 sts will be sc;
Round 4: sc in every st around (11)
Round 5: sc in every st around (11)
Round 6: dec in every st around (6)
— Part 54 :
Round 1: Start with a magic circle of 6 sc stitches (6)
Round 2: inc in every st around (12)
Round 3: [inc, sc in next st] repeat around (18)
Round 4: sc in every st around (18)
Round 5: sc in every st around (18)
Round 6: sc in every st around (18)
Round 7: sc in every st around (18)
Round 8: [dec, sc in next st] repeat around (12)
Round 9: [dec all around] (6)
— Part 55 :
Round 1: Start with a magic circle of 8 sc stitches (8)
Round 2: inc in every st around (16)
Round 3: [inc, sc in next st] repeat around (24)
Round 4: sc in every st around (24)
Round 5: [inc, sc in next 2 sts] repeat around (32)
Round 6: sc in every st around (32)
Round 7: sc in every st around (32)
Round 8: sc in every st around (32)
Round 9: sc in every st around (32)
Round 10: [dec, sc in next 2 sts] repeat around (24)
Round 11: [dec, sc in next st] repeat around (16)
Round 12: [dec all around] (8)
Round 13: sc in every st around (8)
Round 14: inc in every st around (16)
Round 15: sc in every st around (16)
Round 16: [inc, sc in next st] repeat around (24)
Round 17: sc in every st around (24)
Round 18: [inc, sc in next 2 sts] repeat around (32)
Round 19: sc in every st around (32)
Round 20: sc in every st around (32)
Round 21: sc in every st around (32)
Round 22: sc in every st around (32)
Round 23: [dec, sc in next 2 sts] repeat around (24)
Round 24: [dec, sc in next st] repeat around (16)
Round 25: [dec all around until hole closes];
— Part 56 :
Round 1: Start with a magic circle of 6 sc stitches (6)
Round 2: inc in every st around (12)
Round 3: sc in every st around (12)
Round 4: sc in every st around (12)
Round 5: sc in every st around (12)
Round 6: [dec, sc in next st] repeat around (8) *Stuff half w/polyfil, leave the last 3-4 rows w/o polyfil;
Round 7: sc in every st around (8)
Round 8: [dec, sc in next 3, dec, sc] (5)
Round 9: sc in every st around (5)
Thanks for following along with the Giraffe Lovey Blanket Amigurumi Pattern. I hope the process felt cozy and the final giraffe brings a smile to your favorite little person. May your color choices spark joy, your stitches stay neat, and your stuffing be just enough to keep the limbs kissable soft without losing shape. Share a photo of your finished giraffe lovey when you’re done; I love seeing how different palettes come to life. If you’re keeping this as a gift, attach a heartfelt note about the care and love that went into every stitch, and consider gifting alongside a tiny care card—the moment your little one first clutches the plush neck and blanket is the true reward.