About This Conversation Candy Hearts Amigurumi Pattern
Turn a tiny cloud of yarn into a friendly conversation starter with the Conversation Candy Hearts Amigurumi Pattern. This cheerful pair stands about 9 cm tall when finished, a perfect pocket-sized cuddle shaped like little talking hearts. The pattern uses worsted weight yarn (#4) and a 4.00 mm hook, so it’s friendly to beginners who want to practice magic rings, single crochet stitches, and gentle shaping.
You’ll work with a main color for both hearts—Color A: Pastel Pink—and optional Color B for a sweet written message, plus Color C for soft highlights. With approximately 100 g of main color total, you have a little cushion of stuffing and a lot of heart. The project is designed to be completed in about 1–2 hours, making it a quick win for gift-givers or self-care crochet sessions.
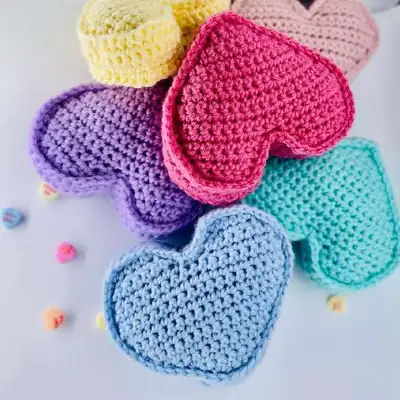
In the finished piece, you can choose to embroider a short phrase on the surface or keep the smooth, minimalist surface—either way, the heart shapes nest together as a little pair with friendly eyes and a cheerful grin. It’s a tiny friendship you can hold, share, and talk about.
Two little candy hearts are crocheted to form a sweet pair that can sit side by side on a shelf or in a little bouquet. The Conversation Candy Hearts Amigurumi Pattern guides you through two connected hearts, each with crisp shaping and a gentle seam that hides under a layer of stuffing. Using MR to start and a handful of SC rounds, you’ll build a compact figure that measures about 9 cm tall when finished. The main color is Color A Pastel Pink, with Color B Red available if you want to write a tiny message, and Color C White or a lighter shade for highlights. The result is a friendly, huggable pair with a tiny, friendly face you can draw with embroidery or leave bare. It’s a perfect beginner project that still feels special enough for gifting, party favors, or a little token of affection.
The pattern leans on classic amigurumi techniques—MR to begin, SC for rounds, and strategic increases and decreases to keep the heart curves smooth. Color changes are simple and neatly joined to avoid bulky joins, and the instructions include a note on invisible decreases to keep the exterior crisp. You’ll stuff firmly to hold shape but avoid distorting the curves, and you’ll sew the two halves with a yarn needle so the seam sits flat against the surface. The design stays compact and sturdy, ideal for a youngster to hold or for display on a desk, shelf, or bedside table.
Because the project uses a minimal palette, it’s quick to complete, and you can tailor the look by swapping in different pastels or bolder reds. I like to finish with optional highlight stitches in Color C to give the surface a subtle glow. This is a little heart pair that invites a second, third, or even a dozen follow-up projects—perfect for a crochet party or a Valentine’s market display. Finished size remains approximately 9 cm tall, giving you a reproducible, gift-ready keepsake.
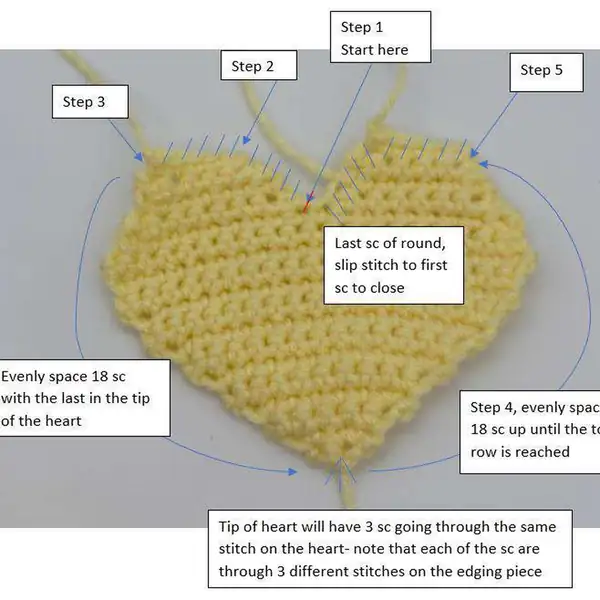
Construction notes for Conversation Candy Hearts Amigurumi Pattern: work each piece separately, stuff firmly as you close it, and pin the parts in place before sewing so the proportions match the sample. A 3.5 mm hook gives a dense fabric that holds its shape and hides the stuffing.
Because the construction of Conversation Candy Hearts Amigurumi Pattern is modular, you can work the pieces in any order, check your gauge as you go, and block or stuff each part before assembly for a tidy finish.
Beginners can follow Conversation Candy Hearts Amigurumi Pattern one round at a time, while experienced makers will move quickly through the repeats — the notation stays consistent from the first round to the last.
Take your time with colour changes and weave in ends as you reach them; it keeps the inside of Conversation Candy Hearts Amigurumi Pattern neat and makes the final assembly far easier.
If you are gifting Conversation Candy Hearts Amigurumi Pattern, work a tight gauge so the stuffing never shows, and use safety eyes or embroidered features depending on who will be holding it.