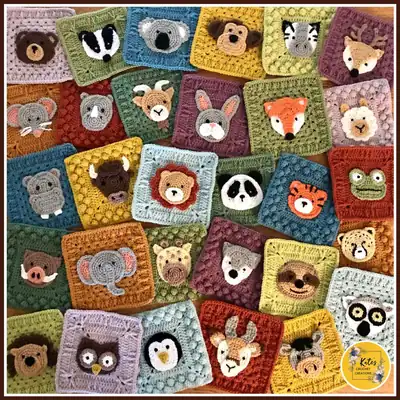
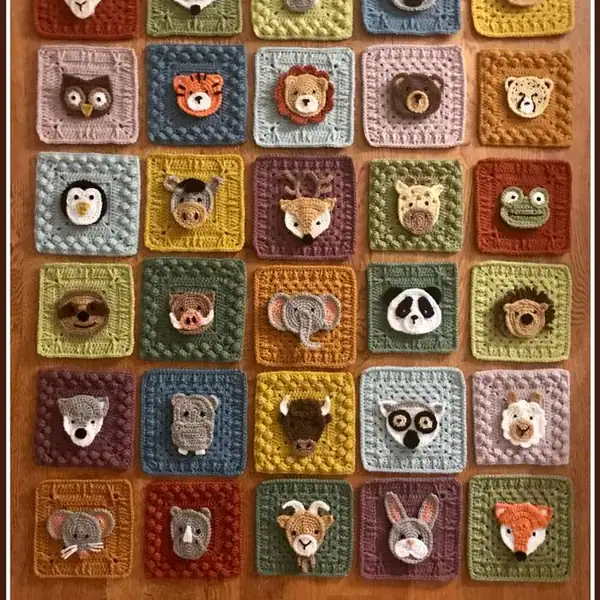
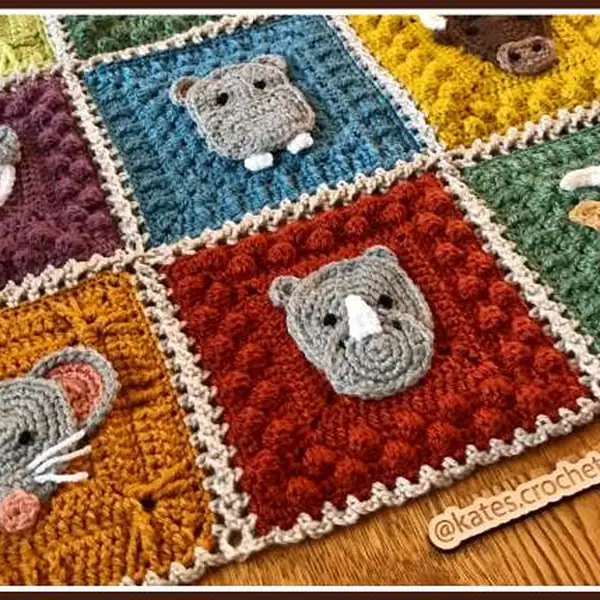
Think of the Animal Kingdom Blanket Pattern as a tiny menagerie rendered in simple stitches and color rather than a crowded zoo on a page. The design relies on DK weight yarn to build soft rounds that lie flat and drape comfortably over a sofa or bed. You'll stitch with a 3.5 mm hook, using a mix of single crochet, increases and decreases to shape the motif blocks, then slip them together with a parchment join for a clean, border-ready edge. The palette from Stylecraft Special DK—copper, Cypress, duck egg, gold, grape, meadow, mushroom, mustard, pistachio, storm blue, white, parchment, warm grey, and black—lets you map each animal into a distinct shade without overwhelming the eye. When you finish the last border round, you’ll have a cozy approximately 84 cm by 100 cm blanket that feels both playful and timeless.Because the pattern moves through rounds rather than rows, the texture stays crisp, and you can customize the look by swapping a few accent colors while preserving the overall balance. You’ll enjoy watching the animal motifs emerge as the colors click into place, and the parchment join/border gives the whole piece a framed, gallery-ready finish. I recommend setting aside a dedicated stitching session for the motifs and a separate day for assembly and weaving in ends, which keeps your focus fresh. With 12–15 hours of assembly in a steady rhythm, this blanket rewards patience with a finished heirloom that you’ll reach for again and again.
— Part 1 :
Round 1: Using White; CH3 and SLST into first CH to make a loop. CH1, then work 6SC into centre of loop. SLST to first SC to join.
Round 2: CH1, [2SC] into same stitch. Proceed to work [2SC] into each of the next 5 stitches. SLST to first SC.
Round 3: CH1, [2SC] into same stitch. *SC, [2SC]* - repeat between * until you have one stitch remaining. SC. SLST into first SC.
Round 4: CH1, [2SC] into same stitch. *2SC, [2SC]* - repeat between * until you have two stitches remaining. 2SC. SLST into first SC.
Round 5: CH1, [2SC] into same stitch. *3SC, [2SC]* - repeat between * until you have three stitches remaining. 3SC. SLST into first SC.
Round 6: CH1, SC into same stitch. 2SC, 2HDC, [3DC], 3DC, [3DC], 5HDC, [3DC], 5HDC, [3DC], 3DC, [3DC], 2HDC, 2SC. SLST to first SC. Fasten off, leaving a long enough tail for sewing;
Round 7: To make the markings: Using Black; CH2, [2SC] in 2nd CH from hook.
Round 8: CH1, turn your work. SC into same stitch. SC.
Round 9: CH1, turn your work. SC into same stitch. [2SC].
Round 10: CH1, turn your work. SC into same stitch. 2SC.
Round 12: CH1, turn your work. SC into same stitch. [2SC], SC.
Round 13: CH1, turn your work. SC into same stitch. 3SC.
Round 14: Repeat row 13. Then fasten off, leaving a long enough tail for sewing.
Round 16: To make the nose: Using Black; CH3 and SLST into first CH to make a loop. CH1, then;
Round 19: To make the ears: Using White; CH3 and SLST into first CH to make a loop. CH1, then;
Round 20: Attach Black to any stitch; CH1, [2SC] into same stitch. Proceed to work [2SC] into each;
— Part 2 :
Round 1: Using Walnut; CH3 and SLST into first CH to make a loop. CH1, then work 6SC into centre of loop. SLST to first SC to join.
Round 2: CH1, [2SC] into same stitch. Proceed to work [2SC] into each of the next 5 stitches. SLST to first SC.
Round 3: CH1, [2SC] into same stitch. *SC, [2SC]* - repeat between * until you have one stitch remaining. SC. SLST into first SC.
Round 4: CH1, [2SC] into same stitch. *2SC, [2SC]* - repeat between * until you have two stitches remaining. 2SC. SLST into first SC.
Round 5: CH1, [2SC] into same stitch. *3SC, [2SC]* - repeat between * until you have three stitches remaining. 3SC. SLST into first SC.
Round 6: CH1, [2SC] into same stitch. *4SC, [2SC]* - repeat between * until you have four stitches remaining. 4SC. SLST into first SC.
Round 7: CH1, SC into same stitch. 2SC, HDC, DC, [3DC], [2DC], 2DC, 2HDC, 4SC, 2HDC, [2HDC], 2HDC, 4SC, 2HDC, 2DC, [2DC], [3DC], DC, HDC, 4SC. SLST to first SC. Fasten off,;
Round 8: To make the ears: Using Camel; CH3 and SLST into first CH to make a loop. CH1, then work 6SC into centre of loop. SLST to first SC to join.
Round 9: CH1, [2SC] into same stitch. Proceed to work [2SC] into each of the next 5 stitches. SLST to first SC. Fasten off.
Round 10: Attach Walnut to any stitch; CH1, [2SC] into same stitch. *SC, [2SC]* - repeat between *;
Round 12: To make the muzzle: Using Camel; CH3 and SLST into first CH to make a loop. CH1, then;
Round 13: CH1, [2SC] into same stitch. Proceed to work [2SC] into each of the next 5 stitches. SLST;
Round 14: CH1, [2SC] into same stitch. *SC, [2SC]* - repeat between * until you have one stitch;
— Part 3 :
Round 1: Using Walnut; CH3 and SLST into first CH to make a loop. CH1, then work 6SC into centre of loop. SLST to first SC to join.
Round 2: CH1, [2SC] into same stitch. Proceed to work [2SC] into each of the next 5 stitches. SLST to first SC.
Round 3: CH1, [2SC] into same stitch. *SC, [2SC]* - repeat between * until you have one stitch remaining. SC. SLST into first SC.
Round 4: CH1, [2SC] into same stitch. *2SC, [2SC]* - repeat between * until you have two stitches remaining. 2SC. SLST into first SC.
Round 5: CH1, [2SC] into same stitch. 2HDC, DC, [2DC], DC, 2HDC, [2SC], 3SC, 3HDC. [2DC] into each of the next 3 stitches. 3HDC, 3SC. SLST into first SC.
Round 6: CH1, [2SC] into same stitch. 2HDC, [2HDC], 4HDC, [2HDC], 2HDC, [2SC], [3HDC], 6SC, HDC, [3HDC], [3HDC], HDC, 6SC, [3HDC]. SLST to first SC. Fasten off. (Note: where you;
Round 7: To make the right horn: Using Cream; CH9, SLST into 2nd CH from hook. 2SC, SC2TOG, HDC2TOG, DC. Fasten off, leaving a long enough tail for sewing.
Round 8: To make the left horn: Using Cream; CH7, SLST into 2nd CH from hook. 2SC, [2SC], [2HDC], DC. Fasten off, leaving a long enough tail for sewing.
Round 10: To make the ears: Using Walnut; CH4, SC in 2nd CH from hook. SC. [4HDC] in final CH to;
Round 12: To make the muzzle: Using Mocha; CH5, SC in 2nd CH from hook. 2SC. [4SC] in final CH;
Round 13: CH1, SC into same stitch. SLST into each of the next 2 stitches. SC. [2SC] into each of the;
Round 15: To make the fluffy top: Using Walnut; CH7, SC in 2nd CH from hook. 4SC. [4SC] in final;
Round 16: CH1, [3HDC] into same stitch. SLST into next stitch. *[3HDC] into next stitch, SLST into;
— Part 4 :
Round 1: Using Buttermilk; CH3 and SLST into first CH to make a loop. CH1, then work 6SC into centre of loop. SLST to first SC to join.
Round 2: CH1, [2SC] into same stitch. Proceed to work [2SC] into each of the next 5 stitches. SLST to first SC.
Round 3: CH1, [2SC] into same stitch. *SC, [2SC]* - repeat between * until you have one stitch remaining. SC. SLST into first SC.
Round 4: CH1, [2SC] into same stitch. *2SC, [2SC]* - repeat between * until you have two stitches remaining. 2SC. SLST into first SC.
Round 5: CH1, [2SC] into same stitch. *3SC, [2SC]* - repeat between * until you have three stitches remaining. 3SC. SLST into first SC.
Round 6: CH1, [2SC] into same stitch. *4SC, [2SC]* - repeat between * until you have four stitches remaining. 4SC. SLST into first SC.
Round 7: CH1, SC into same stitch. Proceed to work 1 SC into each stitch around. SLST to first SC. Fasten off, leaving a long enough tail for sewing your completed appliqué onto it’s square.
Round 8: To make the muzzle: Using White; CH3 and SLST into first CH to make a loop. CH1, then work 6SC into centre of loop. SLST to first SC to join.
Round 9: CH1, [2SC] into same stitch. Proceed to work [2SC] into each of the next 5 stitches. SLST to first SC. Fasten off.
Round 10: Attach Black to the BACK LOOP ONLY of any stitch; CH1, SLST into the BACK LOOPS;
Round 11: Skip the next 2 stitches and attach Black to the BACK LOOP ONLY of the next; CH1,;
Round 13: To make the ears: Using Black; CH5, SC in 2nd CH from hook. 2SC. [4SC] in final CH to;
Round 14: Attach Buttermilk to the same stitch from where you just fastened off; CH1, HDC into;
— Part 5 :
Round 1: Using Camel; CH2, [2SC] in 2nd CH from hook.
Round 2: CH1, turn your work. SC into same stitch. SC. 3 - 5. Repeat row 2.
Round 6: CH1, turn your work. [2SC] into same stitch. [2SC].
Round 7: CH1, turn your work. SC into same stitch. [2SC], [2SC], SC.
Round 8: CH1, turn your work. SC into same stitch. [2SC], 2SC, [2SC], SC.
Round 9: CH1, turn your work. SC into same stitch. 7SC. 10. Repeat row 9.
Round 11: CH1, turn your work. [3SC] into same stitch. [2SC], 4SC, [2SC], [3SC].
Round 12: CH1, turn your work. HDC into same stitch. 12DC, HDC. Fasten off, leaving a long enough;
Round 13: Using Cream; CH3 and SLST into first CH to make a loop. CH1, then work 6SC into;
Round 14: CH1, [2SC] into same stitch. Proceed to work [2SC] into each of the next 5 stitches. SLST;
Round 15: CH1, [2SC] into same stitch. *SC, [2SC]* - repeat between * until you have one stitch;
Round 16: CH1, [2SC] into same stitch. *2SC, [2SC]* - repeat between * until you have two stitches;
Round 17: CH1, [2SC] into same stitch. *3SC, [2SC]* - repeat between * until you have three stitches;
Round 18: CH1, SC into same stitch. 2SC, 2HDC, [3DC], 3DC, [3DC], 5HDC, [3DC], 5HDC, [3DC],;
Round 20: To make the nose: Using Black; CH3 and SLST into first CH to make a loop. CH1, then;
Round 23: To make the ears: Using Cream; CH3 and SLST into first CH to make a loop. CH1, then;
Round 24: Attach Camel to any stitch; CH1, SC into same stitch. 2SC, CH3 and SLST into 3rd CH;
Round 26: To make the antlers: Using Mocha; CH15, SLST in 2nd CH from hook. SLST into each of;
— Part 6 :
Round 1: Using Warm Grey; CH3 and SLST into first CH to make a loop. CH1, then work 6SC into centre of loop. SLST to first SC to join.
Round 2: CH1, [2SC] into same stitch. Proceed to work [2SC] into each of the next 5 stitches. SLST to first SC.
Round 3: CH1, [2SC] into same stitch. *SC, [2SC]* - repeat between * until you have one stitch remaining. SC. SLST into first SC.
Round 4: CH1, [2SC] into same stitch. *2SC, [2SC]* - repeat between * until you have two stitches remaining. 2SC. SLST into first SC.
Round 5: CH1, [2SC] into same stitch. *3SC, [2SC]* - repeat between * until you have three stitches remaining. 3SC. SLST into first SC.
Round 6: CH1, [2SC] into same stitch. *4SC, [2SC]* - repeat between * once more. HDC, 3DC, [2DC], 3DC, HDC, [2SC]. Repeat between * once more. 4SC. SLST to first SC.
Round 7: CH1, SC into same stitch. Proceed to work 1 SC into each stitch around. SLST to first SC to join. Fasten off, leaving a long enough tail for sewing your completed appliqué onto it’s;
Round 8: To make the muzzle: Using Camel; CH3 and SLST into first CH to make a loop. CH1, then work 6SC into centre of loop. SLST to first SC to join.
Round 9: CH1, [2SC] into same stitch. Proceed to work [2SC] into each of the next 5 stitches. SLST to first SC.
Round 10: CH1, [2SC] into same stitch. *SC, [2SC]* - repeat between * until you have one stitch;
Round 11: CH1, SC into same stitch. 4SC, [2HDC], 2DC, [2HDC], 4SC, [2HDC], 2DC, [2HDC], SC.
Round 14: To make the fringe: Using Black; CH14, SLST into 2nd CH from hook. SLST into each of;
Round 16: To make the ears: Using Camel; CH6, SC in 2nd CH from hook. 3SC. [3SC] in final CH to;
Round 17: Attach Warm Grey to very first stitch; CH1, SC into same stitch. 2SC, 2HDC, [3DC],;
— Part 7 :
Round 1: Using Warm Grey; CH3 and SLST into first CH to make a loop. CH1, then work 6SC into centre of loop. SLST to first SC to join.
Round 2: CH1, [2SC] into same stitch. Proceed to work [2SC] into each of the next 5 stitches. SLST to first SC.
Round 3: CH1, [2SC] into same stitch. *SC, [2SC]* - repeat between * until you have one stitch remaining. SC. SLST into first SC.
Round 4: CH1, [2SC] into same stitch. *2SC, [2SC]* - repeat between * until you have two stitches remaining. 2SC. SLST into first SC.
Round 5: CH1, [2SC] into same stitch. *3SC, [2SC]* - repeat between * until you have three stitches remaining. 3SC. SLST into first SC.
Round 6: CH1, [2SC] into same stitch. *4SC, [2SC]* - repeat between * until you have four stitches remaining. 4SC. SLST into first SC.
Round 7: CH1, SC into same stitch. Proceed to work 1 SC into each stitch around. SLST to first SC. Fasten off, leaving a long enough tail for sewing your completed appliqué onto it’s square.
Round 8: To make the ears: Using Vintage Peach; CH3 and SLST into first CH to make a loop. CH1, then work 6SC into centre of loop. SLST to first SC to join.
Round 9: CH1, [2SC] into same stitch. Proceed to work [2SC] into each of the next 5 stitches. SLST to first SC.
Round 10: CH1, [2HDC] into same stitch. HDC, [2SC], SC, [2SC], HDC, [2HDC], HDC, [2SC], SC,;
Round 11: CH1, [2SC] into same stitch. [2SC], 6SC. [2SC] into each of the next 3 stitches. 6SC,;
Round 12: Attach Warm Grey to the same stitch from where you just fastened off; CH2, DC into;
Round 14: To make the trunk: Using Warm Grey; CH15, HDC in 2nd CH from hook. HDC2TOG,;
— Part 8 :
Round 1: Using Spice; CH2, [3SC] in 2nd CH from hook.
Round 2: CH1, turn your work. SC into same stitch. 2SC. 3 - 5. Repeat row 2.
Round 6: CH1, turn your work. [2SC] into same stitch. SC, [2SC].
Round 7: CH1, turn your work. SC into same stitch. 4SC.
Round 9: CH1, turn your work. Skip the first 2 stitches and work [9DC] into the next stitch (the centre stitch). Then SLST into the final stitch of the row.
Round 10: CH1, turn your work. Into the final DC stitch of the [9DC] you just created, work a SC *SC;
Round 11: CH1, turn your work. SC into same stitch. *2SC, [2SC]* - repeat between * twice more.
Round 12: CH1, turn your work. [3SC] into same stitch. 4SC, [2SC], 3SC, [2SC], 4SC, [3SC].
Round 13: CH1, turn your work. [2SC] into same stitch. 18SC, [2SC]. Fasten off, leaving a long;
Round 14: Using White; CH3 and SLST into first CH to make a loop. CH1, then work 6SC into centre;
Round 15: CH1, [2SC] into same stitch. Proceed to work [2SC] into each of the next 5 stitches. SLST;
Round 16: CH1, [2SC] into same stitch. *SC, [2SC]* - repeat between * until you have one stitch;
Round 17: CH1, [2SC] into same stitch. *2SC, [2SC]* - repeat between * until you have two stitches;
Round 18: CH1, [2SC] into same stitch. *3SC, [2SC]* - repeat between * until you have three stitches;
Round 19: CH1, [2SC] into same stitch. *4SC, [2SC]* - repeat between * once more. 2HDC, 2DC,;
Round 20: CH1, [2SC] into same stitch. *5SC, [2SC]* - repeat between * once more. 2SC, 4HDC,;
Round 22: To make the ears: Using White; CH5, SC in 2nd CH from hook. 2SC. [4SC] in final CH to;
Round 23: Attach Spice to the same stitch from where you just fastened off; CH1, HDC into same;
Round 25: To make the nose: Using Black; CH3 and SLST into first CH to make a loop. CH1, then;
— Part 9 :
Round 1: Using Meadow; CH7, SC into 2nd CH from hook. 4SC. [5SC] into final CH to turn the corner. Working into the other side of your starting CH; 4SC. [4SC] into final CH, then;
Round 2: CH1, [2HDC] into same stitch. 4HDC. [2HDC] into each of the next 5 stitches. 4HDC. [2HDC] into each of the next 4 stitches. SLST to first HDC.
Round 3: CH1, HDC into same stitch. 10HDC, [2HDC], [2DC], [2HDC], 11HDC, [2HDC], [2DC], [2HDC]. SLST to first HDC to join. Fasten off, leaving a long enough tail for sewing your;
Round 4: To make the eyes: Using White; CH3 and SLST into first CH to make a loop. CH1, then work 6SC into centre of loop. SLST to first SC to join.
Round 5: CH1, [2SC] into same stitch. Proceed to work [2SC] into each of the next 5 stitches. SLST to first SC. Fasten off.
Round 6: Attach Meadow to any stitch; CH1, [2SC] into same stitch. *SC, [2SC]* - repeat between * until you have one stitch remaining. SC. SLST to first SC. Fasten off, leaving a long enough;
— Part 10 :
Round 1: Using Cream; CH3 and SLST into first CH to make a loop. CH1, then work 6SC into centre of loop. SLST to first SC to join.
Round 2: CH1, [2SC] into same stitch. Proceed to work [2SC] into each of the next 5 stitches. SLST to first SC.
Round 3: CH1, [2SC] into same stitch. *SC, [2SC]* - repeat between * until you have one stitch remaining. SC. SLST into first SC.
Round 4: CH1, [2SC] into same stitch. *2SC, [2SC]* - repeat between * until you have two stitches remaining. 2SC. SLST into first SC.
Round 5: CH1, [2SC] into same stitch. *3SC, [2SC]* - repeat between * until you have three stitches remaining. 3SC. SLST into first SC.
Round 6: CH1, [2SC] into same stitch. *4SC, [2SC]* - repeat between * once more. 2HDC, 2DC, [3DC], 2DC, 2HDC, [2SC]. Repeat between * once more. 4SC. SLST into first SC.
Round 7: CH1, [2SC] into same stitch. *5SC, [2SC]* - repeat between * once more. 2SC, 4HDC, [4DC], 4HDC, 2SC, [2SC]. Repeat between * once more. 4SC. SLST into first SC. Fasten;
Round 8: To make the muzzle and markings: Using Cream; CH3 and SLST into first CH to make a loop. CH1, then work 6SC into centre of loop. SLST to first SC to join.
Round 9: CH1, [2SC] into same stitch. Proceed to work [2SC] into each of the next 5 stitches. SLST to first SC.
Round 10: CH1, [2SC] into same stitch. *SC, [2SC]* - repeat between * until you have one stitch;
Round 11: Attach Walnut to any stitch; CH1, SC into same stitch. 5SC. Fasten off.
Round 12: Attach Camel to the second stitch; CH1, SC into same stitch. 3SC.
Round 13: CH1, turn your work. SC2TOG, SC2TOG. Omit the remaining stitch.
Round 14: CH1, turn your work. SC into same stitch. SC.
Round 15: CH1, turn your work. [2SC] into same stitch. [2SC].
Round 16: CH1, turn your work. SC into same stitch. [2SC], [2SC], SC.
Round 17: CH1, turn your work. SC into same stitch. [2SC], 2SC, [2SC], SC.
Round 18: CH1, turn your work. SC into same stitch. 7SC. Fasten off, leaving a long enough tail for;
Round 19: To make the horns: Attach Warm Grey to the first SC stitch of the last row; CH1, [2SC];
Round 20: CH1, turn your work. SC2TOG, 2SC.
Round 21: CH1, turn your work. [2SC] into same stitch. SC2TOG.
Round 22: CH1, turn your work. SC into same stitch. 2SC.
Round 26: CH1, turn your work. SC into same stitch. SC2TOG.
Round 27: CH1, turn your work. SC2TOG. Fasten off.
Round 28: Turn your work and attach Warm Grey to the final SC stitch of row 18; CH1, [2SC] into;
— Part 11 :
Round 39: To make the ears: Using Cream; CH6, SC in 2nd CH from hook. 3SC. [3SC] in final CH to;
Round 40: Attach Camel to very first stitch; CH1, SC into same stitch. 2SC, 2HDC, [3DC], 2HDC,;
Round 41: Attach Walnut to the first DC of the [3DC] cluster; CH1, into the next stitch work [SC, CH2;
— Part 12 :
Round 1: Using Buttermilk; CH3 and SLST into first CH to make a loop. CH1, then work 6SC into centre of loop. SLST to first SC to join.
Round 2: CH1, [2SC] into same stitch. Proceed to work [2SC] into each of the next 5 stitches. SLST to first SC.
Round 3: CH1, [2SC] into same stitch. *SC, [2SC]* - repeat between * until you have one stitch remaining. SC. SLST into first SC.
Round 4: CH1, [2SC] into same stitch. *2SC, [2SC]* - repeat between * until you have two stitches remaining. 2SC. SLST into first SC.
Round 5: CH1, [2SC] into same stitch. *3SC, [2SC]* - repeat between * until you have three stitches remaining. 3SC. SLST into first SC.
Round 6: CH1, [2SC] into same stitch. *4SC, [2SC]* - repeat between * once more. HDC, 3DC, [2DC], 3DC, HDC, [2SC]. Repeat between * once more. 4SC. SLST to first SC.
Round 7: CH1, SC into same stitch. Proceed to work 1 SC into each stitch around. SLST to first SC to join. Fasten off, leaving a long enough tail for sewing your completed appliqué onto it’s;
Round 8: To make the muzzle: Using Mocha; CH3 and SLST into first CH to make a loop. CH1, then work 6SC into centre of loop. SLST to first SC to join.
Round 9: CH1, [2SC] into same stitch. Proceed to work [2SC] into each of the next 5 stitches. SLST to first SC.
Round 10: CH1, [2SC] into same stitch. *SC, [2SC]* - repeat between * until you have one stitch;
Round 11: CH1, SC into same stitch. 4SC, [2HDC], 2DC, [2HDC], 4SC, [2HDC], 2DC, [2HDC], SC.
Round 13: To make the ears: Using Buttermilk; CH5, SC in 2nd CH from hook. SC, HDC. [5HDC] into;
Round 15: To make the horns: Using Mocha; CH6, SLST into 2nd CH from hook. SLST into each of;
— Part 13 :
Round 1: Using Camel; CH3 and SLST into first CH to make a loop. CH1, then work 6SC into centre of loop. SLST to first SC to join.
Round 2: CH1, [2SC] into same stitch. Proceed to work [2SC] into each of the next 5 stitches. SLST to first SC.
Round 3: CH1, [2SC] into same stitch. *SC, [2SC]* - repeat between * until you have one stitch remaining. SC. SLST into first SC.
Round 4: CH1, [2SC] into same stitch. *2SC, [2SC]* - repeat between * until you have two stitches remaining. 2SC. SLST into first SC.
Round 5: CH1, [2SC] into same stitch. *3SC, [2SC]* - repeat between * until you have three stitches remaining. 3SC. SLST into first SC.
Round 6: CH1, [2SC] into same stitch. *4SC, [2SC]* - repeat between * once more. HDC, 3DC, [2DC], 3DC, HDC, [2SC]. Repeat between * once more. 4SC. SLST to first SC. Fasten off,;
Round 7: To make the muzzle: Using Cream; CH3 and SLST into first CH to make a loop. CH1, then work 6SC into centre of loop. SLST to first SC to join.
Round 8: CH1, [2SC] into same stitch. Proceed to work [2SC] into each of the next 5 stitches. SLST to first SC.
Round 9: CH1, [2SC] into same stitch. *SC, [2SC]* - repeat between * until you have one stitch remaining. SC. SLST into first SC. Fasten off, leaving a long enough tail for sewing.
Round 12: To make the left horn: Using Cream; CH12, SLST into 2nd CH from hook. 2SC, SC2TOG,;
Round 13: To make the right horn: Using Cream; CH10, SLST into 2nd CH from hook. 2SC, [2SC],;
Round 15: To make the ears: Using Camel; CH6, HDC in 2nd CH from hook. 2HDC, SC. [3SC] in final;
Round 17: To make the beard: Using Mocha; CH5, SC in 2nd CH from hook. 3SC.
Round 18: CH5, SC in 2nd CH from hook. SC in each of the next 3 CH. Turn your work and SLST into;
— Part 14 :
Round 1: Using Camel; CH3 and SLST into first CH to make a loop. CH1, then work 6SC into centre of loop. SLST to first SC to join.
Round 2: CH1, [2SC] into same stitch. Proceed to work [2SC] into each of the next 5 stitches. SLST to first SC.
Round 3: CH1, [2SC] into same stitch. *SC, [2SC]* - repeat between * until you have one stitch remaining. SC. SLST into first SC.
Round 4: CH1, [2SC] into same stitch. *2SC, [2SC]* - repeat between * until you have two stitches remaining. 2SC. SLST into first SC.
Round 5: CH1, [2SC] into same stitch. *3SC, [2SC]* - repeat between * until you have three stitches remaining. 3SC. SLST into first SC.
Round 6: CH1, SC into same stitch. 4SC. CH3, HDC in 2nd CH from hook, DC in next CH, then SLST into the next stitch on your piece. 19SC. SLST into next stitch. CH3, HDC in 2nd CH;
Round 7: To make the muzzle: Using Camel; CH3 and SLST into first CH to make a loop. CH1, then work 6SC into centre of loop. SLST to first SC to join.
Round 8: CH1, [2SC] into same stitch. Proceed to work [2SC] into each of the next 5 stitches. SLST to first SC.
Round 9: CH1, [2SC] into same stitch. *SC, [2SC]* - repeat between * until you have one stitch remaining. SC. SLST into first SC. Fasten off, leaving a long enough tail for sewing.
Round 11: To make the nose: Using Black; CH3 and SLST into first CH to make a loop. CH1, then;
Round 14: To make the spikes: Using Walnut; CH3 and SLST into first CH to make a loop. CH1, then;
Round 15: CH1, [2SC] into same stitch. Proceed to work [2SC] into each of the next 5 stitches. SLST;
Round 16: CH1, [2SC] into same stitch. *SC, [2SC]* - repeat between * until you have one stitch;
Round 17: CH1, [2SC] into same stitch. *2SC, [2SC]* - repeat between * until you have two stitches;
Round 18: CH1, [2SC] into same stitch. *3SC, [2SC]* - repeat between * until you have three stitches;
Round 19: *CH6, SLST into 2nd CH from hook. SC into each of the next 4 CH. SLST into the next;
— Part 15 :
Round 1: Using Warm Grey; CH7, SC into 2nd CH from hook. 4SC. [5SC] into final CH to turn the corner. Working into the other side of your starting CH; 4SC. [4SC] into final CH, then;
Round 2: CH1, [2HDC] into same stitch. 4HDC. [2HDC] into each of the next 5 stitches. 4HDC. [2HDC] into each of the next 4 stitches. SLST to first HDC.
Round 3: CH1, [2HDC] into same stitch. [2HDC], 7HDC. [2HDC] into each of the next 7 stitches. 7HDC. [2HDC] into each of the next 5 stitches. SLST to first HDC.
Round 4: CH1, SC into same stitch. 2SC, 10HDC, 11SC, 10HDC, 8SC. SLST to first SC to join. Fasten off, leaving a long enough tail for sewing your completed appliqué onto it’s square.
Round 5: To make the muzzle: Using Warm Grey; CH7, SC into 2nd CH from hook. 4SC. [5SC] into final CH to turn the corner. Working into the other side of your starting CH; 4SC. [4SC] into;
Round 6: CH1, [2HDC] into same stitch. 4HDC. [2HDC] into each of the next 5 stitches. 4HDC. [2HDC] into each of the next 4 stitches. SLST to first HDC.
Round 7: CH1, HDC into same stitch. 12HDC. *SLST into next stitch, [6HDC] into next, SLST into next*. 6SC. Repeat between * once more. 3HDC. SLST to first SC to join. Fasten off,;
Round 9: To make the ears: Using Vintage Peach; CH5, SC in 2nd CH from hook. 2SC. [4SC] in final CH to turn the corner. Working into the other side of your starting CH; 2SC. [3SC] into;
Round 10: Attach Warm Grey to the same stitch from where you just fastened off; CH1, SC into same;
Round 13: To make the teeth: Using White; CH4, SC in 2nd CH from hook. 2SC.
Round 14: CH1, turn your work. SC into same stitch. 2SC.
Round 15: Repeat row 14. Fasten off, leaving a long enough tail for sewing.
— Part 16 :
Round 1: Using Warm Grey; CH3 and SLST into first CH to make a loop. CH1, then work 6SC into centre of loop. SLST to first SC to join.
Round 2: CH1, [2SC] into same stitch. Proceed to work [2SC] into each of the next 5 stitches. SLST to first SC.
Round 3: CH1, [2SC] into same stitch. *SC, [2SC]* - repeat between * until you have one stitch remaining. SC. SLST into first SC.
Round 4: CH1, [2SC] into same stitch. *2SC, [2SC]* - repeat between * until you have two stitches remaining. 2SC. SLST into first SC.
Round 5: CH1, [2SC] into same stitch. *3SC, [2SC]* - repeat between * until you have three stitches remaining. 3SC. SLST into first SC.
Round 6: CH1, [2SC] into same stitch. *4SC, [2SC]* - repeat between * until you have four stitches remaining. 4SC. SLST into first SC.
Round 7: CH1, SC into same stitch. 2SC, 2HDC, [2HDC], [2HDC], 3HDC, 3SC, [2HDC], 7DC, [2HDC], 3SC, 3HDC, [2HDC], [2HDC], 2HDC, 4SC. SLST to first SC. Fasten off, leaving a;
Round 8: To make the ears: Using White; CH3, and SLST into first CH to make a loop. CH1, 6DC into centre of loop. SLST into first SC to join.
Round 9: CH1, [2SC] into same stitch. [2SC] into each of the next 5 stitches. SLST into first SC.
Round 10: CH1, [2SC] into same stitch. *SC, [2SC]* - repeat between * until you have one stitch;
Round 11: Attach Warm Grey to any stitch; CH1, SC into same stitch. 4SC. [SC CH2 SC] into each of;
Round 13: To make the nose: Using Black; CH4, SC in 2nd CH from hook. SC. [4SC] into final CH to;
Round 14: CH1, SC into same stitch. HDC, [HDC DC], 2HDC, [DC HDC], HDC, SC, [SC HDC], [HDC;
— Part 17 :
Round 1: Using White; CH6, SC into 2nd CH from hook. 3SC. [5SC] into final CH to turn the corner. Working into the other side of your starting CH; 3SC. [4SC] into final CH, then SLST to first;
Round 2: CH1, [2HDC] into same stitch. 3HDC. [2HDC] into each of the next 5 stitches. 3HDC. [2HDC] into each of the next 4 stitches. SLST to first HDC.
Round 3: CH1, [2HDC] into same stitch. [2HDC], 6HDC. [2HDC] into each of the next 7 stitches. 2DC, 2TR, 2DC. [2HDC] into each of the next 5 stitches. SLST to first HDC.
Round 4: CH1, SC into same stitch. 17SC, 5HDC, 3DC, 2TR, 3DC, 5HDC, 4SC. SLST to first SC to join. Fasten off.
Round 5: Attach Warm Grey to the same stitch from where you just fastened off; CH1 (counts as first SLST), SC into next stitch. SC, 2HDC, 5DC, 2HDC, 2SC. SLST into next stitch. Fasten;
Round 6: To make the eyes: Using Buttermilk; CH3 and SLST into first CH to make a loop. CH1, then work 6SC into centre of loop. SLST to first SC to join.
Round 7: CH1, [2SC] into same stitch. Proceed to work [2SC] into each of the next 5 stitches. SLST to first SC. Fasten off.
Round 8: Attach Black to any stitch; CH1, [2SC] into same stitch. *SC, [2SC]* - repeat between * until you have one stitch remaining. SC. SLST to first SC. Fasten off, leaving a long enough;
Round 11: To make the muzzle: Using Black; CH4, SC into 2nd CH from hook. HDC. [6DC] into final;
Round 13: To make the ears: Using Warm Grey; CH5, SC in 2nd CH from hook. 2SC. [4SC] in final;
Round 14: Attach White to the same stitch from where you just fastened off; CH1, HDC into same;
— Part 18 :
Round 1: Using Camel; CH3 and SLST into first CH to make a loop. CH1, then work 6SC into centre of loop. SLST to first SC to join.
Round 2: CH1, [2SC] into same stitch. Proceed to work [2SC] into each of the next 5 stitches. SLST to first SC.
Round 3: CH1, [2SC] into same stitch. *SC, [2SC]* - repeat between * until you have one stitch remaining. SC. SLST into first SC.
Round 4: CH1, [2SC] into same stitch. *2SC, [2SC]* - repeat between * until you have two stitches remaining. 2SC. SLST into first SC.
Round 5: CH1, [2SC] into same stitch. *3SC, [2SC]* - repeat between * until you have three stitches remaining. 3SC. SLST into first SC.
Round 6: CH1, [2SC] into same stitch. *4SC, [2SC]* - repeat between * until you have four stitches remaining. 4SC. SLST into first SC.
Round 7: CH1, SC into same stitch. 12SC. *[6HDC] into next, then SC into next.* 9SC. Repeat between * once more. 10SC. SLST to first SC. Fasten off, leaving a long enough tail for;
Round 8: To make the muzzle: Using Cream; CH5, SC in 2nd CH from hook. 2SC. [4SC] in final CH to turn the corner. Working into the other side of your starting CH; 2SC. [3SC] into final,;
Round 9: CH1, SC into same stitch. 2HDC, SC. [2SC] into each of the next 2 stitches. SC, 2HDC, SC. [2SC] into each of the next 2 stitches. SLST to first SC to join. Fasten off, leaving a;
Round 12: To make the mane: Using Copper; CH3 and SLST into first CH to make a loop. CH1, then;
Round 13: CH1, [2SC] into same stitch. Proceed to work [2SC] into each of the next 5 stitches. SLST;
Round 14: CH1, [2SC] into same stitch. *SC, [2SC]* - repeat between * until you have one stitch;
Round 15: CH1, [2SC] into same stitch. *2SC, [2SC]* - repeat between * until you have two stitches;
Round 16: CH1, [2SC] into same stitch. *3SC, [2SC]* - repeat between * until you have three stitches;
Round 17: CH1, [2SC] into same stitch. *4SC, [2SC]* - repeat between * until you have four stitches;
Round 18: CH1, [2SC] into same stitch. *5SC, [2SC]* - repeat between * until you have five stitches;
Round 19: CH1, SC into same stitch. Proceed to work 1 SC into each stitch around. SLST to first SC.
Round 20: CH1 (counts as first SLST), *skip the next stitch and work [7DC] into next, skip the next;
— Part 19 :
Round 1: Using Cream; CH3 and SLST into first CH to make a loop. CH1, then work 6SC into centre of loop. SLST to first SC to join.
Round 2: CH1, [2SC] into same stitch. Proceed to work [2SC] into each of the next 5 stitches. SLST to first SC.
Round 3: CH1, [2SC] into same stitch. *SC, [2SC]* - repeat between * until you have one stitch remaining. SC. SLST into first SC.
Round 4: CH1, [2SC] into same stitch. *2SC, [2SC]* - repeat between * until you have two stitches remaining. 2SC. SLST into first SC.
Round 5: CH1, [2SC] into same stitch. *3SC, [2SC]* - repeat between * until you have three stitches remaining. 3SC. SLST into first SC.
Round 6: CH1, [2SC] into same stitch. *4SC, [2SC]* - repeat between * until you have four stitches remaining. 4SC. SLST into first SC.
Round 7: CH1 (counts as first SLST). *Into the next stitch work [4HDC], then skip the next stitch and SLST into the next* - repeat between * 10 more times. Into the next stitch work [4HDC],;
Round 8: To make the muzzle: Using Camel; CH3 and SLST into first CH to make a loop. CH1, then work 6SC into centre of loop. SLST to first SC to join.
Round 9: CH1, [2SC] into same stitch. Proceed to work [2SC] into each of the next 5 stitches. SLST to first SC.
Round 10: CH1, [2SC] into same stitch. *SC, [2SC]* - repeat between * until you have one stitch;
Round 13: To make the ears: Using Camel; CH6, HDC in 2nd CH from hook. 2HDC, SC. [3SC] in final;
— Part 20 :
Round 1: Using Walnut; CH3 and SLST into first CH to make a loop. CH1, then work 6SC into centre of loop. SLST to first SC to join.
Round 2: CH1, [2SC] into same stitch. Proceed to work [2SC] into each of the next 5 stitches. SLST to first SC.
Round 3: CH1, [2SC] into same stitch. *SC, [2SC]* - repeat between * until you have one stitch remaining. SC. SLST into first SC.
Round 4: CH1, [2SC] into same stitch. *2SC, [2SC]* - repeat between * until you have two stitches remaining. 2SC. SLST into first SC.
Round 5: CH1, [2SC] into same stitch. *3SC, [2SC]* - repeat between * until you have three stitches remaining. 3SC. SLST into first SC.
Round 6: CH1, [2SC] into same stitch. *4SC, [2SC]* - repeat between * until you have four stitches remaining. 4SC. SLST into first SC.
Round 7: CH1, SC into same stitch. Proceed to work 1 SC into each stitch around. SLST to first SC. Fasten off, leaving a long enough tail for sewing your completed appliqué onto it’s square.
Round 8: To make the face: Using Camel; CH3 and SLST into first CH to make a loop. CH1, then work 6SC into centre of loop. SLST to first SC to join.
Round 9: CH1, [2SC] into same stitch. Proceed to work [2SC] into each of the next 5 stitches. SLST to first SC.
Round 10: CH1, [2SC] into same stitch. *SC, [2SC]* - repeat between * until you have one stitch;
Round 11: CH1, [2SC] into same stitch. *2SC, [2SC]* - repeat between * until you have two stitches;
Round 12: CH1, SC into same stitch. 8SC. Skip the next stitch and work [7DC] into the next, skip the;
Round 13: To make the muzzle: Using Camel; CH6, SC into 2nd CH from hook. 3SC. [4SC] into final;
Round 14: CH1, [2HDC] into same stitch. 3HDC. [2HDC] into each of the next 4 stitches. 3HDC.
Round 15: CH1, HDC into same stitch. 6HDC. [2HDC] into each of the next 4 stitches. 7HDC. [2HDC];
Round 17: To make the nose: Using Black; CH3 and SLST into first CH to make a loop. CH1, then;
Round 20: To make the ears: Using Walnut; CH3 and SLST into first CH to make a loop. CH1, then;
Round 21: CH1, [2SC] into same stitch. Proceed to work [2SC] into each of the next 5 stitches. SLST;
Round 22: CH1, [2SC] into same stitch. *SC, [2SC]* - repeat between * until you have one stitch;
Round 23: CH1, SC into same stitch. Proceed to work 1 SC into each stitch around. SLST to first SC;
— Part 21 :
Round 1: Using Warm Grey; CH3 and SLST into first CH to make a loop. CH1, then work 6SC into centre of loop. SLST to first SC to join.
Round 2: CH1, [2SC] into same stitch. Proceed to work [2SC] into each of the next 5 stitches. SLST to first SC.
Round 3: CH1, [2SC] into same stitch. *SC, [2SC]* - repeat between * until you have one stitch remaining. SC. SLST into first SC.
Round 4: CH1, [2SC] into same stitch. *2SC, [2SC]* - repeat between * until you have two stitches remaining. 2SC. SLST into first SC.
Round 5: CH1, [2SC] into same stitch. *3SC, [2SC]* - repeat between * until you have three stitches remaining. 3SC. SLST into first SC.
Round 6: CH1, [2SC] into same stitch. *4SC, [2SC]* - repeat between * once more. 2HDC, 2DC, [3DC], 2DC, 2HDC, [2SC]. Repeat between * once more. 4SC. SLST into first SC. Fasten;
Round 7: To make the nose: Using Vintage Peach; CH3 and SLST into first CH to make a loop. CH1, then work 6SC into centre of loop. SLST to first SC to join. Fasten off, leaving a long;
Round 11: To make the ears: Using Vintage Peach; CH3 and SLST into first CH to make a loop. CH1,;
Round 12: CH1, [2SC] into same stitch. Proceed to work [2SC] into each of the next 5 stitches. SLST;
Round 13: CH1, [2SC] into same stitch. *SC, [2SC]* - repeat between * until you have one stitch;
Round 14: CH1, [2SC] into same stitch. *2SC, [2SC]* - repeat between * until you have two stitches;
Round 15: Attach Warm Grey to any stitch; CH1, SC into same stitch. Proceed to work 1 SC in each;
— Part 22 :
Round 1: Using Walnut; CH7, SC into 2nd CH from hook. 4SC. [5SC] into final CH to turn the corner. Working into the other side of your starting CH; 4SC. [4SC] into final CH, then;
Round 2: CH1, [2HDC] into same stitch. 4HDC. [2HDC] into each of the next 5 stitches. 4HDC. [2HDC] into each of the next 4 stitches. SLST to first HDC.
Round 3: CH1, [2HDC] into same stitch. [2HDC], 7HDC. [2HDC] into each of the next 7 stitches. 7HDC. [2HDC] into each of the next 5 stitches. SLST to first HDC.
Round 4: CH1, HDC into same stitch. [DC TR], CH3 and SLST into 3rd CH from hook, [TR DC], 2HDC, 2SC. SLST into next stitch. 2SC, 2HDC, [DC TR], CH3 and SLST into 3rd CH from;
Round 5: To make the eyes: Using White; CH3 and SLST into first CH to make a loop. CH1, then work 6SC into centre of loop. SLST to first SC to join.
Round 6: CH1, [2SC] into same stitch. Proceed to work [2SC] into each of the next 5 stitches. SLST to first SC. Fasten off.
Round 7: Attach Mocha to any stitch; CH1, [2SC] into same stitch. *SC, [2SC]* - repeat between * until you have one stitch remaining. SC. SLST to first SC. Fasten off, leaving a long enough;
Round 10: To make the beak: Using Mustard; CH5, SC in 2nd CH from hook. 3SC.
Round 11: CH1, turn your work. SC2TOG, SC2TOG.
Round 12: CH1, turn your work. SC2TOG. Fasten off, leaving a long enough tail for sewing.
— Part 23 :
Round 1: Using White; CH3 and SLST into first CH to make a loop. CH1, then work 6SC into centre of loop. SLST to first SC to join.
Round 2: CH1, [2SC] into same stitch. Proceed to work [2SC] into each of the next 5 stitches. SLST to first SC.
Round 3: CH1, [2SC] into same stitch. *SC, [2SC]* - repeat between * until you have one stitch remaining. SC. SLST into first SC.
Round 4: CH1, [2SC] into same stitch. *2SC, [2SC]* - repeat between * until you have two stitches remaining. 2SC. SLST into first SC.
Round 5: CH1, [2SC] into same stitch. *3SC, [2SC]* - repeat between * until you have three stitches remaining. 3SC. SLST into first SC.
Round 6: CH1, [2SC] into same stitch. *4SC, [2SC]* - repeat between * until you have four stitches remaining. 4SC. SLST into first SC.
Round 7: CH1, SC into same stitch. 2SC, HDC, DC, [3DC], [2SC], 2DC, 2HDC, 4SC, 2HDC, [2HDC], 2HDC, 4SC, 2HDC, 2DC, [2SC], [3DC], DC, HDC, 4SC. SLST to first SC. Fasten off,;
Round 8: To make the ears: Using Black; CH3 and SLST into first CH to make a loop. CH1, then work 6SC into centre of loop. SLST to first SC to join.
Round 9: CH1, [2SC] into same stitch. Proceed to work [2SC] into each of the next 5 stitches. SLST to first SC.
Round 10: CH1, [2SC] into same stitch. *SC, [2SC]* - repeat between * until you have one stitch;
Round 12: To make the eye markings: Using Black; CH6, SC in 2nd CH from hook. 2SC, HDC. [5DC];
Round 14: To make the muzzle: Using White; CH3 and SLST into first CH to make a loop. CH1, then;
Round 15: CH1, [2SC] into same stitch. Proceed to work [2SC] into each of the next 5 stitches. SLST;
Round 16: CH1, [2SC] into same stitch. *SC, [2SC]* - repeat between * until you have one stitch;
— Part 24 :
Round 1: Using Black; CH3 and SLST into first CH to make a loop. CH1, then work 6SC into centre of loop. SLST to first SC to join.
Round 2: CH1, [2SC] into same stitch. Proceed to work [2SC] into each of the next 5 stitches. SLST to first SC.
Round 3: CH1, [2SC] into same stitch. *SC, [2SC]* - repeat between * until you have one stitch remaining. SC. SLST into first SC.
Round 4: CH1, [2SC] into same stitch. *2SC, [2SC]* - repeat between * until you have two stitches remaining. 2SC. SLST into first SC.
Round 5: CH1, [2SC] into same stitch. *3SC, [2SC]* - repeat between * until you have three stitches remaining. 3SC. SLST into first SC.
Round 6: CH1, [2SC] into same stitch. *4SC, [2SC]* - repeat between * until you have four stitches remaining. 4SC. SLST into first SC.
Round 7: CH1, SC into same stitch. Proceed to work 1 SC into each stitch around. SLST to first SC. Fasten off, leaving a long enough tail for sewing your completed appliqué onto it’s square.
Round 8: To make the face: Using White; CH3 and SLST into first CH to make a loop. CH1, then work 6SC into centre of loop. SLST to first SC to join.
Round 9: CH1, [2SC] into same stitch. Proceed to work [2SC] into each of the next 5 stitches. SLST to first SC.
Round 10: CH1, [2SC] into same stitch. *SC, [2SC]* - repeat between * until you have one stitch;
Round 11: CH1, [2SC] into same stitch. *2SC, [2SC]* - repeat between * until you have two stitches;
Round 12: CH1, [2SC] into same stitch. *4SC, [2SC]* - repeat between * once more. 4SC. Skip the;
Round 14: To make the beak: Using Mustard; CH5, SC in 2nd CH from hook. 3SC.
Round 15: CH1, turn your work. SC2TOG, SC2TOG.
Round 16: CH1, turn your work. SC2TOG. Fasten off, leaving a long enough tail for sewing.
— Part 25 :
Round 1: Using Warm Grey; CH3 and SLST into first CH to make a loop. CH1, then work 6SC into centre of loop. SLST to first SC to join.
Round 2: CH1, [2SC] into same stitch. Proceed to work [2SC] into each of the next 5 stitches. SLST to first SC.
Round 3: CH1, [2SC] into same stitch. *SC, [2SC]* - repeat between * until you have one stitch remaining. SC. SLST into first SC.
Round 4: CH1, [2SC] into same stitch. *2SC, [2SC]* - repeat between * until you have two stitches remaining. 2SC. SLST into first SC.
Round 5: CH1, [2SC] into same stitch. *3SC, [2SC]* - repeat between * until you have three stitches remaining. 3SC. SLST into first SC.
Round 6: CH1, [2SC] into same stitch. HDC, 2DC, HDC, [2SC]. *4SC, [2SC]* - repeat between * 3 more times. HDC, 2DC, HDC. SLST into first SC.
Round 7: CH1, SC into same stitch. 5SC, [2SC], 23SC, [2SC], 5SC. SLST to first SC. Fasten off, leaving a long enough tail for sewing your completed appliqué onto it’s square. (Note:;
Round 8: To make the ears: Using Vintage Peach; CH10, SC in 2nd CH from hook. SC, 2HDC, 2DC, 2HDC. [5SC] into final CH to turn the corner. Working into the other side of your starting;
Round 9: Attach Warm Grey to the very first stitch; CH1, SC into same stitch. 9SC, [HDC 2DC HDC], 10SC. Fasten off, leaving a long enough tail for sewing.
Round 11: To make the muzzle: Using White; CH5, SC in 2nd CH from hook. 2SC. [4SC] in final CH;
Round 12: CH1, SC into same stitch. 2HDC, SC, [2SC]. [7DC] into next stitch, then skip the next;
— Part 26 :
Round 1: Using Warm Grey; CH3 and SLST into first CH to make a loop. CH1, then work 6SC into centre of loop. SLST to first SC to join.
Round 2: CH1, [2SC] into same stitch. Proceed to work [2SC] into each of the next 5 stitches. SLST to first SC.
Round 3: CH1, [2SC] into same stitch. *SC, [2SC]* - repeat between * until you have one stitch remaining. SC. SLST into first SC.
Round 4: CH1, [2SC] into same stitch. *2SC, [2SC]* - repeat between * until you have two stitches remaining. 2SC. SLST into first SC.
Round 5: CH1, [2SC] into same stitch. *3SC, [2SC]* - repeat between * until you have three stitches remaining. 3SC. SLST into first SC.
Round 6: CH1, [2SC] into same stitch. *4SC, [2SC]* - repeat between * once more. HDC, 3DC, [2DC], 3DC, HDC, [2SC]. Repeat between * once more. 4SC. SLST to first SC.
Round 7: CH1, SC into same stitch. Proceed to work 1 SC into each stitch around. SLST to first SC to join. Fasten off, leaving a long enough tail for sewing your completed appliqué onto it’s;
Round 8: To make the muzzle: Using Warm Grey; CH3 and SLST into first CH to make a loop. CH1, then work 6SC into centre of loop. SLST to first SC to join.
Round 9: CH1, [2SC] into same stitch. Proceed to work [2SC] into each of the next 5 stitches. SLST to first SC.
Round 10: CH1, [2SC] into same stitch. *SC, [2SC]* - repeat between * until you have one stitch;
Round 11: CH1, SC into same stitch. 4SC, [2HDC], 2DC, [2HDC], 4SC, [2HDC], 2DC, [2HDC], SC.
Round 13: To make the horn: Using White; CH6, SLST into 2nd CH from hook. 2SC, 2HDC. Fasten;
Round 15: To make the ears: Using Warm Grey; CH5, SC in 2nd CH from hook. 2SC. [5HDC] in final;
— Part 27 :
Round 1: Using Camel; CH6, SC into 2nd CH from hook. 3SC. [5SC] into final CH to turn the corner. Working into the other side of your starting CH; 3SC. [4SC] into final CH, then SLST to first;
Round 2: CH1, [2HDC] into same stitch. 3HDC. [2HDC] into each of the next 5 stitches. 3HDC. [2HDC] into each of the next 4 stitches. SLST to first HDC.
Round 3: CH1, [2HDC] into same stitch. [2HDC], 6DC. [2HDC] into each of the next 7 stitches. 6DC. [2HDC] into each of the next 5 stitches. SLST to first HDC.
Round 4: CH1, SC into same stitch. Proceed to work 1 SC in each stitch around. SLST to first SC to join. Fasten off.
Round 5: Attach Mocha to the same stitch from where you just fastened off; CH1, SC into same stitch. 12HDC, SC, [2SC], 4SC, [2SC], SC, 12HDC, SC, [2SC], 4SC, [2SC]. SLST to first;
Round 6: To make the eye markings: Using Walnut; CH6, SC in 2nd CH from hook. 2SC, HDC. [5DC] into final CH to turn the corner. Working into the other side of your starting CH;
Round 8: To make the nose: Using Black; CH3 and SLST into first CH to make a loop. CH1, then work 6SC into centre of loop. SLST to first SC to join. Fasten off, leaving a long enough tail;
— Part 28 :
Round 1: Using Spice; CH3 and SLST into first CH to make a loop. CH1, then work 6SC into centre of loop. SLST to first SC to join.
Round 2: CH1, [2SC] into same stitch. Proceed to work [2SC] into each of the next 5 stitches. SLST to first SC.
Round 3: CH1, [2SC] into same stitch. *SC, [2SC]* - repeat between * until you have one stitch remaining. SC. SLST into first SC.
Round 4: CH1, [2SC] into same stitch. *2SC, [2SC]* - repeat between * until you have two stitches remaining. 2SC. SLST into first SC.
Round 5: CH1, [2SC] into same stitch. *3SC, [2SC]* - repeat between * until you have three stitches remaining. 3SC. SLST into first SC.
Round 6: CH1, [2SC] into same stitch. *4SC, [2SC]* - repeat between * until you have four stitches remaining. 4SC. SLST into first SC.
Round 7: CH1, SC into same stitch. Proceed to work 1 SC into each stitch around. SLST to first SC. Fasten off, leaving a long enough tail for sewing your completed appliqué onto it’s square.
Round 8: To make the muzzle: Using White; CH5, SC in 2nd CH from hook. 2SC. [4SC] in final CH to turn the corner. Working into the other side of your starting CH; 2SC. [3SC] into final,;
Round 9: CH1, SC into same stitch. 2HDC, SC. [2SC] into each of the next 2 stitches. SC, 2HDC, SC. [2SC] into each of the next 2 stitches. SLST to first SC to join. Fasten off, leaving a;
Round 12: To make the ears: Using White; CH5, SC in 2nd CH from hook. 2SC. [4SC] in final CH to;
Round 13: Attach Spice to the same stitch from where you just fastened off; CH1, HDC into same;
— Part 29 :
Round 1: Using Mocha; CH3 and SLST into first CH to make a loop. CH1, then work 6SC into centre of loop. SLST to first SC to join.
Round 2: CH1, [2SC] into same stitch. Proceed to work [2SC] into each of the next 5 stitches. SLST to first SC.
Round 3: CH1, [2SC] into same stitch. *SC, [2SC]* - repeat between * until you have one stitch remaining. SC. SLST into first SC.
Round 4: CH1, [2SC] into same stitch. *2SC, [2SC]* - repeat between * until you have two stitches remaining. 2SC. SLST into first SC.
Round 5: CH1, [2SC] into same stitch. *3SC, [2SC]* - repeat between * until you have three stitches remaining. 3SC. SLST into first SC.
Round 6: CH1, [2SC] into same stitch. *4SC, [2SC]* - repeat between * until you have four stitches remaining. 4SC. SLST into first SC.
Round 7: CH1, SC into same stitch. Proceed to work 1 SC into each stitch around. SLST to first SC. Fasten off, leaving a long enough tail for sewing your completed appliqué onto it’s square.
Round 8: To make the snout: Using Vintage Peach; CH3 and SLST into first CH to make a loop. CH1, then work 6SC into centre of loop. SLST to first SC to join.
Round 9: CH1, [2SC] into same stitch. Proceed to work [2SC] into each of the next 5 stitches. SLST to first SC.
Round 10: CH1, [2SC] into same stitch. *SC, [2SC]* - repeat between * until you have one stitch;
Round 11: To make the right tusk: Using Cream; CH10, SLST into 2nd CH from hook. 2SC, SC2TOG,;
Round 12: To make the left tusk: Using Cream; CH8, SLST into 2nd CH from hook. 2SC, [2SC],;
Round 16: To make the ears: Using Vintage Peach; CH5, SC in 2nd CH from hook. 2SC. [4SC] in;
Round 17: Attach Mocha to the same stitch from where you just fastened off; CH1, HDC into same;
— Part 30 :
Round 1: Using White; CH3 and SLST into first CH to make a loop. CH1, then work 6SC into centre of loop. SLST to first SC to join.
Round 2: CH1, [2SC] into same stitch. Proceed to work [2SC] into each of the next 5 stitches. SLST to first SC.
Round 3: CH1, [2SC] into same stitch. *SC, [2SC]* - repeat between * until you have one stitch remaining. SC. SLST into first SC.
Round 4: CH1, [2SC] into same stitch. *2SC, [2SC]* - repeat between * until you have two stitches remaining. 2SC. SLST into first SC.
Round 5: CH1, [2SC] into same stitch. *3SC, [2SC]* - repeat between * until you have three stitches remaining. 3SC. SLST into first SC.
Round 6: CH1, [2SC] into same stitch. *4SC, [2SC]* - repeat between * once more. 2HDC, 2DC, [3DC], 2DC, 2HDC, [2SC]. Repeat between * once more. 4SC. SLST into first SC.
Round 7: CH1, [2SC] into same stitch. *5SC, [2SC]* - repeat between * once more. 2SC, 4HDC, [4DC], 4HDC, 2SC, [2SC]. Repeat between * once more. 4SC. SLST into first SC. Fasten;
Round 8: To make the muzzle: Using White; CH3 and SLST into first CH to make a loop. CH1, then work 6SC into centre of loop. SLST to first SC to join.
Round 9: CH1, [2SC] into same stitch. Proceed to work [2SC] into each of the next 5 stitches. SLST to first SC.
Round 10: CH1, [2SC] into same stitch. *SC, [2SC]* - repeat between * until you have one stitch;
Round 11: Attach Warm Grey to any stitch; CH1, SC into same stitch. 2SC.
Round 12: CH1, turn your work. SC into same stitch, 2SC.
Round 13: CH1, turn your work. [2SC] into same stitch. SC, [2SC].
Round 14: CH1, turn your work. Skip the first 2 stitches and work [9DC] into the next stitch (the;
Round 15: CH1, turn your work. Into the final DC stitch of the [9DC] you just created, work a SC *SC;
Round 16: CH1, turn your work. SC into same stitch. *2SC, [2SC]* - repeat between * twice more.
Round 17: CH1, turn your work. [3SC] into same stitch. 4SC, [2SC], 3SC, [2SC], 4SC, [3SC]. Fasten;
Round 19: To make the nose: Using Black; CH3 and SLST into first CH to make a loop. CH1, then;
Round 22: To make the ears: Using White; CH5, SC in 2nd CH from hook. 2SC. [4SC] in final CH to;
Round 23: Attach Warm Grey to the same stitch from where you just fastened off; CH1, HDC into;
— Part 31 :
Round 1: Using White; CH3 and SLST into first CH to make a loop. CH1, then work 6SC into centre of loop. SLST to first SC to join.
Round 2: CH1, [2SC] into same stitch. Proceed to work [2SC] into each of the next 5 stitches. SLST to first SC.
Round 3: CH1, [2SC] into same stitch. *SC, [2SC]* - repeat between * until you have one stitch remaining. SC. SLST into first SC.
Round 4: CH1, [2SC] into same stitch. *2SC, [2SC]* - repeat between * until you have two stitches remaining. 2SC. SLST into first SC.
Round 5: CH1, [2SC] into same stitch. *3SC, [2SC]* - repeat between * until you have three stitches remaining. 3SC. SLST into first SC.
Round 6: CH1, [2SC] into same stitch. *4SC, [2SC]* - repeat between * once more. HDC, 3DC, [2DC], 3DC, HDC, [2SC]. Repeat between * once more. 4SC. SLST to first SC.
Round 7: CH1, SC into same stitch. Proceed to work 1 SC into each stitch around. SLST to first SC to join. Fasten off, leaving a long enough tail for sewing your completed appliqué onto it’s;
Round 8: To make the muzzle: Using Warm Grey; CH3 and SLST into first CH to make a loop. CH1, then work 6SC into centre of loop. SLST to first SC to join.
Round 9: CH1, [2SC] into same stitch. Proceed to work [2SC] into each of the next 5 stitches. SLST to first SC.
Round 10: CH1, [2SC] into same stitch. *SC, [2SC]* - repeat between * until you have one stitch;
Round 11: CH1, SC into same stitch. 4SC, [2HDC], 2SC, [2HDC], 4SC, [2HDC], 2DC, [2HDC], SC.
Round 12: CH1, HDC into same stitch. 3HDC. Turn your work.
Round 13: Repeat row 12. Then fasten off, leaving a long enough tail for sewing.
Round 14: Repeat row 12. Then fasten off, leaving a long enough tail for sewing.
Round 15: Repeat row 12. Then fasten off, leaving a long enough tail for sewing.
Round 16: Repeat row 12. Then fasten off, leaving a long enough tail for sewing.
Round 17: Repeat row 12. Then fasten off, leaving a long enough tail for sewing.
Round 20: To make the ears: Using Warm Grey; CH5, SC in 2nd CH from hook. 2SC. [4SC] in final;
Round 21: Attach Black to the same stitch from where you just fastened off; CH1, HDC into same;
— Part 32 :
Round 1: CH3 and SLST into first CH to make a loop. CH3, work 2 DC into centre of loop. *CH2, 3 DC into centre* - repeat between * twice more. CH2, SLST into 3rd CH of the beginning;
Round 2: Turn your work, SLST into CH2 corner space. [CH3 2DC] into corner space. *In the next CH2 space make [3DC CH2 3DC] * - repeat between * twice more. Then work 3DC into;
Round 3: Turn your work, SLST into CH2 corner space. [CH3 2DC] into corner space. *3DC in between each of the 3DC clusters from the previous round, working [3DC CH2 3DC] into;
Round 8: Turn your work, SLST into corner space. CH1 (does NOT count as a stitch), SC into corner space. Proceed to work 1 SC into each stitch around with [SC CH2 SC] in each CH2;
Round 9: Turn your work, SLST into corner space. CH1 (does NOT count as a stitch), HDC into corner space. { HDC. *HDC. Instead of working into the top of the next stitch; work a FPTR;
Round 10: Do NOT turn your work. CH1 (does NOT count as a stitch), work 1 SC into each stitch;
— Part 33 :
Round 1: CH3 and SLST into first CH to make a loop. CH3, work 2 DC into centre. *CH2, 3 DC into centre* - repeat between * twice more. CH2, SLST into 3rd CH of beginning CH3 to join.
Round 2: Turn your work, SLST into corner space. CH3 (counts as first stitch), DC into corner space. *DC into each stitch across, [2DC CH2 2DC] into corner space* - repeat between * until;
Round 6: Turn your work, SLST into corner space. CH1 (does NOT count as a stitch), SC into corner space. { SC, *BBL, 3SC* - repeat between * until you have 2 stitches remaining on this;
Round 7: Turn your work, SLST into corner space. CH1 (does NOT count as a stitch), SC into corner space. *SC into each stitch across, [SC CH2 SC] into corner space* - repeat between * for;
Round 9: Turn your work, SLST into corner space. CH1 (does NOT count as a stitch), SC into corner space. Proceed to work 1 SC into each stitch around with [SC CH2 SC] in each CH2;
— Part 34 :
Round 1: CH3 and SLST into first CH to make a loop. CH3, work 2 DC into centre. *CH2, 3 DC into centre* - repeat between * twice more. CH2, SLST into 3rd CH of beginning CH3 to join.
Round 2: Turn your work, SLST into corner space. CH3 (counts as first stitch), DC into corner space. *DC into each stitch across, [2DC CH2 2DC] into corner space* - repeat between * until;
Round 7: Turn your work, SLST into corner space. CH1 (does NOT count as a stitch), HDC into corner space. { 2HDC. Instead of working into the top of the next stitch; work a FPTR;
Round 8: DO NOT turn your work. CH1 (does NOT count as a stitch), work 1 SC into each stitch around with [SC CH2 SC] in each CH2 corner space. SLST to first SC to join. Fasten off,;
— Part 35 :
Round 1: Starting with Square 1 (Mustard Square A with Monkey Appliqué), join Parchment to the first stitch after the CH2 corner at the top right of the square, CH4. *skip the next stitch, SC into;
Round 2: CH5, on Square 2 (Storm Blue Square C with Koala Appliqué) create a SC in the first stitch after the bottom right CH2 corner (working UP the right hand side of the square), *CH1,;
Round 3: CH3, remove your hook, insert your hook under the CH5 loop on the corner of Square 1, grab the working yarn loop and pull it through, CH3, SC in the first stitch after the CH2 corner on;
Round 4: When you come to the end of your first row of squares, continue down the side of the final square of the row (Copper Square A with Gazelle Appliqué), turn your work and then continue;
Round 5: CH5, create a SC in the first stitch after the CH2 on Square 6 (Gold Square B with Cheetah Appliqué), *CH1, remove your hook, insert your hook under the first CH3 loop of Square 1,;
Round 6: After completing the final CH3 loop; CH3, remove your hook, insert your hook under the CH5 loop at the bottom corner of Square 2, grab the working yarn loop and pull it through the CH5;
Round 7: After completing the final CH3 loop; CH3, remove your hook, insert your hook under the CH5 loop on the bottom left corner of Square 1, grab the working yarn loop and pull it through,;
Round 8: Continue to join your squares in the same way that you have this far, repeating the above methods for the rest of your squares. When you reach the final stitch along the bottom of your;
— Part 36 :
Round 1: Continuing from Joining (using Parchment); SLST into CH3 loop space. CH3 (counts as first stitch), DC into same space. Continue to make 2DC into each CH3 loop space around, with;
Round 2: CH2 (counts as first stitch), HDC into the BACK LOOP ONLY of the next stitch. Proceed to work 1 HDC into the BACK LOOP ONLY of each stitch around, with [2HDC CH2 2HDC] in;
Round 3: CH1 (counts as first SLST), turn your work so that the wrong side is facing you. *DC into next stitch, SLST into next* - repeat between * around, working [SLST DC SLST] in each CH2;
As I close this walkthrough, I hope you can feel the Animal Kingdom Blanket Pattern taking shape in your hands. It’s a thoughtful project that blends simple stitches with a lively palette to tell a little story on your couch. From the magic ring to the last parchment border, every step is a reminder that handmade items carry a place in our homes. This pattern uses DK yarn in Stylecraft Special DK colors, with a 3.5 mm hook to balance speed and precision. Now you get to weave, join, and trim while imagining your own forest, meadow, or seaside vignette coming to life. I can’t wait to see the colors you choose and the animal silhouettes that appear as you crochet.Once finished, care is straightforward: wash on a gentle cycle or hand wash, lay flat to dry, and avoid heavy agitation that could distort the border. With proper care, the blanket retains its soft hand and keeps colors bright after many seasons of use. It’s a multipurpose treasure—perfect for story time, movie nights, or a cozy nap on chilly days. Thank you for crocheting along with this free pattern and for inviting a little wild charm into your home. I hope it finds a forever corner where you, your family, and visitors can enjoy its comforting warmth. Happy crocheting, and may your Animal Kingdom Blanket Pattern become a cherished staple in your crafty repertoire.