Crochetologist
Free Crochet Pattern
Beautiful Detailed Adorable

Woof the Dog Amigurumi Pattern

Woof the Dog amigurumi head close-up in golden brown yarn
4.6Rating
8-10 HoursTime
IntermediateSkill
Highlights

What makes it special

Made with Love

An adorable friend to cherish, handcrafted with love to bring comfort and joy for years to come.

All-Day Adventure

A full day of immersive crocheting awaits as you sculpt the body, craft the limbs, attach the eyes, and sew the features with careful, patient stitching for a durable, cuddly result.

Intermediate Level

This pattern targets crocheters who enjoy shaping rounds, managing color transitions, performing visible decreases, and sewing parts together to form a character with clear personality. The instructions provide a gentle progression from basic rounds to more complex assembly, while remaining realistic for a confident beginner who wants a larger amigurumi.

Meet Woof the Dog, a cuddly amigurumi companion designed to spark smiles and offer friendly, poseable play. This project blends approachable shaping with durable, soft textures, so the finished toy is as satisfying to hug as it is to display. The pattern guides you through careful assembly, clean color changes, and steady planning that yields a polished, durable toy you’ll treasure for years.

About This Woof the Dog Amigurumi Pattern

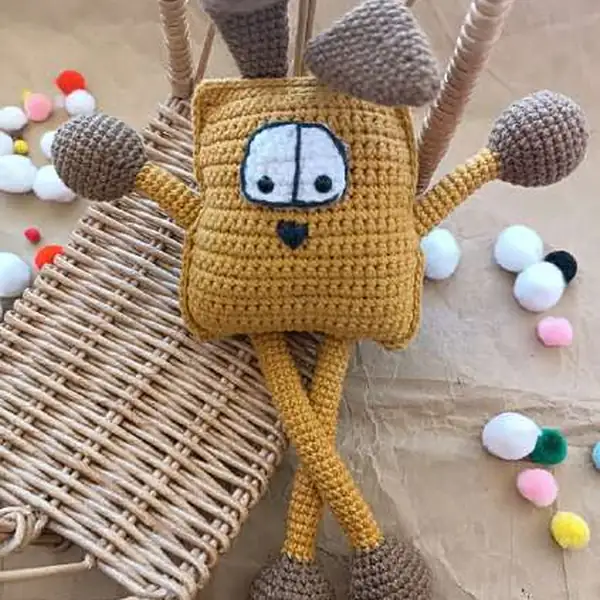
Woof the Dog amigurumi is built to invite long, gentle hugs and playful posing. The design emphasizes round, approachable shapes rather than complex textures, so the finished figure reads as an approachable character rather than a stylized sculpture. The body uses a softly golden-brown palette with contrasting brown ears, which helps Woof read as an inviting canine friend.

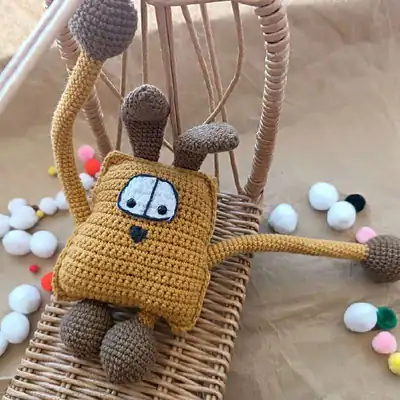
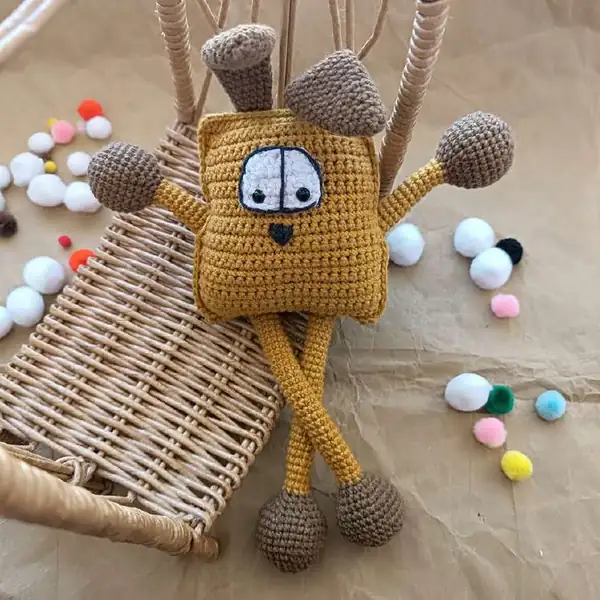
Color transitions are kept deliberate and tidy, so seams stay neat and the overall silhouette remains smooth when the toy is held or slid into a decorative corner. The limbs extend in a friendly, flexible range of motion, allowing dramatic stretches for photos or simple, cuddled repose on a sofa or bed. Construction focuses on practical seaming and sturdy shaping, so the toy holds its form during regular play, hugs, or trips in a bag.

The project favors common, beginner-friendly techniques—crocheted rounds that create solid, rounded forms, careful increases and decreases to shape the torso and limbs, and a straightforward method for joining parts that minimizes bulky gaps. The result is a character with clear personality, a soft, squeezable body, and dependable durability for everyday use. The pattern is well suited to gifting, classroom demonstrations, and dorm-room decor where a friendly companion is welcome.

A forgiving fabric choice makes Woof resilient enough to withstand daily handling while remaining gentle to contact with small hands. Expect thoughtful finishing steps—ears attached in symmetrical positions, facial features aligned with care, and minor touch-ups to ensure the pose holds steady after stuffing and assembly. The finished Woof embodies a balance of charm and practicality, inviting crafters to enjoy the process as much as the result, turning a simple skein of yarn into a trusty friend that sits beside you in the home or on the shelf.

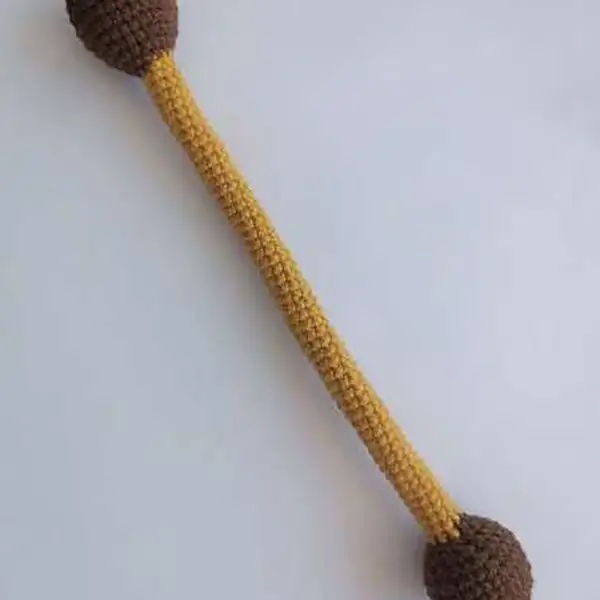
This amigurumi dog pattern is organized around four main components plus essential accessories that bring Woof to life. The torso is crocheted in a single color, forming a rounded, huggable center that anchors the limbs. Two forelimbs and two hind limbs are worked as elongated cylinders and joined to the torso to create a natural stance that can tilt with movement.

Ears are shaped separately and attached to the head for symmetry, while a small facial area is built with simple, replacing stitches to create a friendly expression. The eyes and nose are added in a way that emphasizes proportion and balance, with placement guided by round-by-round markers to ensure sameness on both sides. A head with gentle curvature sits atop the torso, creating a classic amigurumi silhouette.

The finishing sequence includes attaching limbs in a balanced arrangement, sewing ears with even tension, and aligning facial features before the final stuffing. The pattern presents a predictable routine: begin with a foundation chain, work in the round to form each segment, and close with secure fasten-offs that help the toy maintain its shape. Assembly is designed to minimize visible seams, but still encourages neat joins where limbs meet the torso and ears meet the head.

While the technique remains faithful to traditional amigurumi, the instructions stress inserting stuffing gradually to avoid shifting that could affect eye alignment or ear positions. The final finish involves stabilizing the limbs, making sure the toy sits evenly, and performing light touch-ups to ensure color boundaries appear clean. The overall objective is a durable, squeezable companion whose proportions feel natural and whose pose holds steady during everyday use, playtime, or display.

Arms and legs of Woof the Dog stretched out

This project is written to be approachable for confident beginners who want a larger amigurumi and to offer enough technique to satisfy seasoned crocheters. The color changes are gentle, with clear guidance on when and where to switch yarns to maintain smooth transitions. The limbs stretch for play, allowing expressive poses that still return to a cuddly silhouette when released.

Finishing touches—such as eyes, nose, and mouth—are described in straightforward steps to preserve symmetry and character without requiring specialized skills. The toy is robust enough for daily hugs, yet light enough to travel as a comforting companion on outings. In practice, the pattern emphasizes consistent stitching tension, regular round counts, and mindful stuffing to preserve shape without creating stiff areas.

Rather than relying on elaborate textures, the design uses clean stitches and careful seam placement to produce an end result that reads as a soft, characterful toy. Through mindful construction and patient assembly, Woof becomes a reliable friend that can accompany a child to daycare, a dorm room, or a cozy reading nook. The finished piece demonstrates how a straightforward amigurumi approach can yield a durable, lovable gift that is meaningful and easy to care for in daily life.

Stitches & Skills You'll Use

The technique relies on classic amigurumi methods, with an emphasis on working in continuous rounds to form rounded shapes. Basic stitches such as single crochet are used in all major sections, with increases and decreases employed strategically to shape the torso, head, and limbs. A starting tail or foundation chain is used to set up initial rounds for each component, and a magic ring begins the first round of each major piece to ensure a tight center.

Color changes are implemented at the boundaries where parts meet, keeping transitions tidy and minimizing visible gaps. Seaming is deliberately planned to be invisible from the outside, while still allowing for sturdy joins between the torso and limbs and between the head and neck. The construction plan minimizes bulky seams by attaching parts in thoughtful sequences and evenly distributing stuffing as the pieces are joined.

Finishing steps emphasize weaving in tails and tucking ends inside portions of the limbs to maintain a clean silhouette. The overall approach prioritizes consistency in tension, round counts, and alignment of facial features so that Woof maintains a balanced, friendly expression through play and display.

Why You'll Love This Woof the Dog Amigurumi Pattern

This pattern inspires delight as Woof takes shape and posture. The moment the limbs begin to extend and the body forms a gentle curve, the toy’s personality emerges, and the color contrast helps define each part clearly. The process of sewing facial features brings Woof’s expression to life, and the careful alignment of elements results in a look that feels friendly and approachable.

The assembly stage is particularly satisfying: each part finds its place with careful orientation, producing a durable finish that still remains soft to touch. The fabric’s softness and the even stuffing give Woof a plush, cuddly feel that invites hugs from kids and adults alike. The pattern rewards steady progress with predictable round-by-round growth, so beginners can see tangible results as confidence builds.

The result is a lasting keepsake that carries a sense of personality and charm, making Woof a reliable companion for gifting, display, or everyday companionship. The satisfaction extends beyond the finished piece; the process itself teaches fundamental amigurumi techniques, reinforcing a sense of accomplishment and skill that can be applied to future projects. The pattern’s clarity and forgiving nature leave crafters with a sense of pride in completing a durable, hand-crafted toy that invites storytelling and imaginative play.

Colour & Yarn Inspiration

Color palettes can shift the mood of Woof dramatically. A lighter golden hue for the body paired with cream or ivory for small details yields a cheerful, sunny appearance. Rich chocolate brown ears with a pale muzzle create a strong contrast that remains friendly.

For a gentler look, try pale taupe with soft cream accents and a subtle rust-colored nose. If the recipient loves whimsy, a two-tone approach with a bright accent color—such as teal or coral—for small accessories or decorative stitches can be charming. For a seasonal display, consider red-brown hues with white highlights to evoke a holiday vibe, while keeping the overall silhouette faithful to the pattern’s proportions.

Ensure that color changes are gradual and that color blocks align with seams to preserve a neat finish. When selecting yarns, opt for equally weighted fibers to maintain even tension and a uniform final texture across all components.

Woof the Dog standing with stretched limbs

Switch Things Up

I love how flexible this pattern is for customization, so I often swap color palettes to suit gifts or decor. Try pastel golds for a softer look or bold browns for a rustic vibe.

Want a bigger Woof? Increase the yarn weight and use a larger hook, but keep tension steady to maintain the same proportions and keep the stuffing comfortable.

To add personality, embroider a tiny tongue in the mouth area with a pink or light red yarn, or give Woof a small collar using a contrasting color. Personal touches make this toy truly yours.

Consider adding embroidered facial features or tiny felt accessories for different expressions. The aesthetics shift dramatically with where you place the eyes and shape the mouth—play a little before finalizing the stitch work.

If you’d like greater poseability, adjust the proportions by slightly lengthening the limbs and neck while keeping the same overall girth, ensuring the stuffing supports the new shape.

Ways to Use & Gift It

Gift Woof for birthdays, back-to-school kits, or as a comforting friendship toy for children and adults alike. It makes a thoughtful present for a new classroom, a hospital waiting room, or a cozy home corner where a soft friend can reside. Include a small tag with care instructions and the story of Woof to enhance the gifting experience.

For teachers and therapists, Woof serves as a gentle tool for storytelling, social-emotional learning, and imagined play. The simple construction and durable finish make it appropriate for travel, car rides, or sleepover adventures where a familiar companion adds a sense of security and joy.

Common Mistakes & How to Fix Them

Skipping stitch markers at color changes can lead to misaligned rounds; place a marker at the start of every round to stay on track. Not stuffing evenly causes lumpy heads or limbs; stuff gradually while shaping, adding small amounts at a time. Pulling yarn too tight creates stiff, inflexible pieces; maintain consistent, moderate tension throughout your work. Forgetting to count stitches results in uneven rounds; count after every round, especially during increases and decreases.

Maker's Notes

When I made Woof, I relied on DK yarn in gold and brown with a 3 mm hook for the body and a 2 mm hook for the limbs. The build took about 9 hours from start to finish, with careful stuffing to keep the limbs flexible and the torso sturdy. Color changes were gentle, and I found the eye placement critical for a friendly expression.

Beginners can confidently tackle the early rounds, while the more experienced will enjoy precise seaming and shaping. The most common stumbling blocks were stuffing consistency and aligning ears symmetrically; taking a moment to double-check before final sewing saved rework. Don’t rush the assembly—steady, measured stitches yield the best result.

I tried a substitution: I tested substituting DK cotton for the gold main color using a 2.5 mm hook. The finished piece was smaller by roughly 2 cm and a touch stiffer, but still charming. When a bulkier yarn was used with the same pattern, the limbs grew longer and the head appeared more rounded, altering the overall character. The key lesson was to adjust tension and stuffing slightly to compensate for fabric drift. If substituting material, anticipate a size difference of about 10-15% and adjust the round counts accordingly. Overall, Woof remains expressive and adorable with a new texture, provided the seams and stuffing are balanced to maintain proportion.

Woof the Dog Amigurumi Pattern

Make this cuddly Woof the Dog amigurumi with our free crochet pattern—complete round-by-round instructions, materials, and finishing tips. Start crocheting now!

Intermediate 8-10 Hours
Pattern at a glance
Skill level
Intermediate
Time to make
8-10 Hours
Hook size
3 mm
Yarn weight
DK / #3
Finished size
Approx. 5 cm / 2.0 in (varies with yarn, hook and stuffing)
Gauge
6 SC x 8 rows ≈ 2 cm square (3 mm hook on DK yarn); final size varies with tension
Yarn used
Main color (gold): ~350 g total; Brown: ~60 g; White: ~20 g; Black: ~20 g; total approx 450 g

Materials Needed

Main Fabric
  • 01
    YarnArt Jeans 50gr/160 m; 55% cotton; 45% acrylic: shades: 40 (brown), 28 (black), 84 (gold), 03 (white)
  • 02
    Fiber filler
  • 03
    8 mm safety eyes
  • 04
    Scissors, large eye needle, markers if necessary
Tools Required
  • 01
    2-3 mm crochet hooks
  • 02
    YarnArt Jeans 50gr/160 m; 55% cotton; 45% acrylic
  • 03
    Safety eyes 8 mm (2 pieces)
  • 04
    Scissors
  • 05
    Large-eyed blunt needle
  • 06
    Stitch markers

— Head :

Round 1: 3 rows straight: 9 SC.
Round 2: 3 rows straight: 9 SC.
Round 3: 3 rows straight: 9 SC.
Round 4: 1 SC, DEC, 3 SC, DEC, 1 SC (7)
Round 5: 1 SC, DEC, 1 SC, DEC, 1 SC (5)

— Body :

Round 1: 6 MR (6)
Round 2: INC*6 (12)
Round 3: (1 SC, INC)*6 (18)
Round 4: (2 SC, INC)*6 (24)
Round 5: (3 SC, INC)*6 (30)
Round 6: 4 rnds straight: 30 SC;
Round 7: 4 rnds straight: 30 SC;
Round 8: 4 rnds straight: 30 SC;
Round 9: 4 rnds straight: 30 SC;
Round 10: (DEC, 3 SC)*6 (24)
Round 11: (DEC, 2 SC)*6 (18)
Round 12: (DEC, 1 SC)*6 (12)
Round 13: (DEC, 4 SC)*2 (10).
Round 14: 52 rnds straight: 10 SC Switch to black yarn.
Round 15: 52 rnds straight: 10 SC Switch to black yarn.
Round 16: 52 rnds straight: 10 SC Switch to black yarn.
Round 17: 52 rnds straight: 10 SC Switch to black yarn.
Round 18: 52 rnds straight: 10 SC Switch to black yarn.
Round 19: 52 rnds straight: 10 SC Switch to black yarn.
Round 20: 52 rnds straight: 10 SC Switch to black yarn.
Round 21: 52 rnds straight: 10 SC Switch to black yarn.
Round 22: 52 rnds straight: 10 SC Switch to black yarn.
Round 23: 52 rnds straight: 10 SC Switch to black yarn.
Round 24: 52 rnds straight: 10 SC Switch to black yarn.
Round 25: 52 rnds straight: 10 SC Switch to black yarn.
Round 26: 52 rnds straight: 10 SC Switch to black yarn.
Round 27: 52 rnds straight: 10 SC Switch to black yarn.
Round 28: 52 rnds straight: 10 SC Switch to black yarn.
Round 29: 52 rnds straight: 10 SC Switch to black yarn.
Round 30: 52 rnds straight: 10 SC Switch to black yarn.
Round 31: 52 rnds straight: 10 SC Switch to black yarn.
Round 32: 52 rnds straight: 10 SC Switch to black yarn.
Round 33: 52 rnds straight: 10 SC Switch to black yarn.
Round 34: 52 rnds straight: 10 SC Switch to black yarn.
Round 35: 52 rnds straight: 10 SC Switch to black yarn.
Round 36: 52 rnds straight: 10 SC Switch to black yarn.
Round 37: 52 rnds straight: 10 SC Switch to black yarn.
Round 38: 52 rnds straight: 10 SC Switch to black yarn.
Round 39: 52 rnds straight: 10 SC Switch to black yarn.
Round 40: 52 rnds straight: 10 SC Switch to black yarn.
Round 41: 52 rnds straight: 10 SC Switch to black yarn.
Round 42: 52 rnds straight: 10 SC Switch to black yarn.
Round 43: 52 rnds straight: 10 SC Switch to black yarn.
Round 44: 52 rnds straight: 10 SC Switch to black yarn.
Round 45: 52 rnds straight: 10 SC Switch to black yarn.
Round 46: 52 rnds straight: 10 SC Switch to black yarn.
Round 47: 52 rnds straight: 10 SC Switch to black yarn.
Round 48: 52 rnds straight: 10 SC Switch to black yarn.
Round 49: 52 rnds straight: 10 SC Switch to black yarn.
Round 50: 52 rnds straight: 10 SC Switch to black yarn.
Round 51: 52 rnds straight: 10 SC Switch to black yarn.
Round 52: 52 rnds straight: 10 SC Switch to black yarn.
Round 53: 52 rnds straight: 10 SC Switch to black yarn.
Round 54: 52 rnds straight: 10 SC Switch to black yarn.
Round 55: 52 rnds straight: 10 SC Switch to black yarn.
Round 56: 52 rnds straight: 10 SC Switch to black yarn.
Round 57: 52 rnds straight: 10 SC Switch to black yarn.
Round 58: 52 rnds straight: 10 SC Switch to black yarn.
Round 59: 52 rnds straight: 10 SC Switch to black yarn.
Round 60: 52 rnds straight: 10 SC Switch to black yarn.
Round 61: 52 rnds straight: 10 SC Switch to black yarn.
Round 62: 52 rnds straight: 10 SC Switch to black yarn.
Round 63: 52 rnds straight: 10 SC Switch to black yarn.
Round 64: 52 rnds straight: 10 SC Switch to black yarn.
Round 65: 52 rnds straight: 10 SC Switch to black yarn.
Round 66: (INC, 4 SC)*2 (12)
Round 67: (1 SC, INC)*6 (18)
Round 68: (2 SC, INC)*6 (24)
Round 69: (3 SC,INC)*6 (30)
Round 70: 4 rnds straight: 30 SC;
Round 71: 4 rnds straight: 30 SC;
Round 72: 4 rnds straight: 30 SC;
Round 73: 4 rnds straight: 30 SC;
Round 74: (DEC, 3 SC)*6 (24)
Round 75: (DEC, 2 SC)*6 (18)
Round 76: (DEC, 1 SC)*6 (12)
Round 77: DEC*6 fasten off.

— Tail :

Round 3: 1 rnd straight: 9 SC (9)
Round 4: (2 SC, INC)*3 (12)
Round 5: (3 SC, INC)*3 (15)
Round 6: 6 rnds straight: 15 SC;
Round 7: 6 rnds straight: 15 SC;
Round 8: 6 rnds straight: 15 SC;
Round 9: 6 rnds straight: 15 SC;
Round 10: 6 rnds straight: 15 SC;
Round 11: 6 rnds straight: 15 SC;
Round 12: (4 SC, INC)*3 (18)
Round 13: 8 rnds straight: 18 SC;
Round 14: 8 rnds straight: 18 SC;
Round 15: 8 rnds straight: 18 SC;
Round 16: 8 rnds straight: 18 SC;
Round 17: 8 rnds straight: 18 SC;
Round 18: 8 rnds straight: 18 SC;
Round 19: 8 rnds straight: 18 SC;
Round 20: 8 rnds straight: 18 SC;
Round 21: (DEC, 4 SC)*3 (15)
Round 22: 3 rnds straight: 15 SC;
Round 23: 3 rnds straight: 15 SC;
Round 24: 3 rnds straight: 15 SC;
Round 25: (DEC, 3 SC)*3 (12)
Round 26: 3 rnds straight: 12 SC Fold in half and single crochet 6 through both edges. Leave a long yarn tail for sewing. Body (make 2)_____________________ Work in gold with 3 mm hook. Chain 25, and starting into the 2nd stitch from hook work 24 SC. Make 1 turning CH at the end of each row.
Round 27: 3 rnds straight: 12 SC Fold in half and single crochet 6 through both edges. Leave a long yarn tail for sewing. Body (make 2)_____________________ Work in gold with 3 mm hook. Chain 25, and starting into the 2nd stitch from hook work 24 SC. Make 1 turning CH at the end of each row.
Round 28: 3 rnds straight: 12 SC Fold in half and single crochet 6 through both edges. Leave a long yarn tail for sewing. Body (make 2)_____________________ Work in gold with 3 mm hook. Chain 25, and starting into the 2nd stitch from hook work 24 SC. Make 1 turning CH at the end of each row.

— Arms And Legs :

Round 1: 19 rnds straight: 24 SC.
Round 2: 19 rnds straight: 24 SC.
Round 3: 19 rnds straight: 24 SC.
Round 4: 19 rnds straight: 24 SC.
Round 5: 19 rnds straight: 24 SC.
Round 6: 19 rnds straight: 24 SC.
Round 7: 19 rnds straight: 24 SC.
Round 8: 19 rnds straight: 24 SC.
Round 9: 19 rnds straight: 24 SC.
Round 10: 19 rnds straight: 24 SC.
Round 11: 19 rnds straight: 24 SC.
Round 12: 19 rnds straight: 24 SC.
Round 13: 19 rnds straight: 24 SC.
Round 14: 19 rnds straight: 24 SC.
Round 15: 19 rnds straight: 24 SC.
Round 16: 19 rnds straight: 24 SC.
Round 17: 19 rnds straight: 24 SC.
Round 18: 19 rnds straight: 24 SC.
Round 19: 19 rnds straight: 24 SC.
Round 20: 1 SC, DEC, 18 SC, DEC, 1 SC (22)
Round 21: 1 rnd straight: 22 SC;
Round 22: 1 SC, DEC, 16 SC, DEC, 1 SC (20)
Round 23: З rnds straight: 20 SC. Fasten off and cut yarn.
Round 24: З rnds straight: 20 SC. Fasten off and cut yarn.
Round 25: З rnds straight: 20 SC. Fasten off and cut yarn.

Assembly Instructions

  1. {'step': 'Head to Body', 'instruction': 'Begin joining the body parts together from the right upper corner using 2 mm hook. Put the two parts together and work 19 SC through both parts’ stitches, work 2 SC to the corner stitch.'}
  2. {'step': 'Side edge attachment', 'instruction': 'Get to the side edge. You are going to insert the arm-leg piece here. It should go between rounds 11 and 15. I worked 10 SC through both parts’ stitches, then 3 SC across the front part of the body only (skip 3 stitches on the back body part), put the arm-leg piece and go on crocheting across both body parts 11 SC, 2 SC to the corner stitch.'}
  3. {'step': 'Bottom edge and stuffing', 'instruction': 'Get to the bottom edge. 5 SC through both parts’ stitches, 3 SC across the front part only, put the arm-leg piece, 6 SC across both body parts, 3 SC across the front part only, put the second arm-leg piece, 5 SC, 2 SC to the corner stitch. Stuff the body.'}
  4. {'step': 'Other side', 'instruction': 'Work the other side alike (11 SC across both body parts, 3 SC across the front part only, stuff the body, 10 SC through both parts’ stitches).'}
  5. {'step': 'Decoration', 'instruction': 'Ears: Attach the ears on the back, 4 SC away from the left and right edges. I like the ears bent in the middle slightly. Eyes: Sew on between rows 16 - 22 in the middle. Stitch around the eyes contour and in the middle with black yarn. Nose: Embroider a nose between rows 13-15 in black. Mouth: Embroider a mouth between rows 7-8 in black.'}

Important Notes

  • Stuff with a little more care around the head to avoid shifting when attaching parts.
  • Weave in yarn tails inside the limbs for a clean, durable finish.
  • Place facial features with careful alignment to ensure symmetry and a friendly expression.
  • Always fasten off securely and weave in the final tail to prevent unravelling during play.

This endearing Woof the Dog amigurumi invites you to craft a sturdy, lovable companion. It blends simple stitches with thoughtful shaping to create a durable toy you’ll treasure. May your needles click with joy as you complete every detail and share your handmade friend with someone special.

Good to know

You ask, we answer

The finished amigurumi measures approximately 30 cm tall when using the recommended yarn and hook size.

Yes, you can adapt the size by choosing a heavier or lighter yarn, but this will affect the final dimensions. Adjust hook size accordingly and recalculate rounds if needed.

This pattern is designed for confident beginners; basic knowledge of common crochet stitches and working in rounds is recommended for best results.

Most crocheters finish this project in 8-10 hours, depending on pace and how meticulously the parts are sewn together.

Ears being attached to Woof's head
Join 100k+ crocheters

Get new free patterns, stitch tips and exclusive content in your inbox.