Crochetologist
Free Crochet Pattern
Beautiful Detailed Adorable

Wallace and Wanda Whale Amigurumi Pattern

Pink Wallace whale amigurumi side view
4.2Rating
8-10 HoursTime
AdvancedSkill
Highlights

What makes it special

Made with Love

An adorable friend to cherish, handcrafted with love to bring comfort and joy for years to come.

All-Day Adventure

A full day project that fits into a weekend session, typically taking 8-10 hours with focused stitching, assembly, and finishing touches.

Advanced Level

This pattern is best suited for crocheters who are comfortable with shaping and color changes, and who can manage careful assembly. You will work with magic rings, increases, controlled decreases to close openings smoothly, circular rounds, and precise seaming to bring Wallace and Wanda to life. The techniques are standard and accessible to committed hobbyists who have completed at least a handful of amigurumi projects, though the color changes and final eyes alignment demand patience and attention to detail. The pattern rewards deliberate pacing, consistent tension, and careful stuffing to preserve form and softness alike. Beginners with curiosity and a willingness to slow down will still make strong progress, while experienced crocheters will find it easy to adjust scale or color with confidence.

Wallace and Wanda Whale invites crocheters into a gentle world where amigurumi presence can be both comforting and display-worthy. This pair is designed to be cuddly, portable, and tactile in a way that rewards careful shaping and thoughtful colorwork. The project favors a steady rhythm over speed, with a focus on foundations that keep the body smooth and the seam work discreet. You begin with a foundation chain and move through crocheted, seamless rounds so the form remains clean and round without visible gaps. Features are kept deliberately simple: small round eyes, a playful smile, and a poised tail that feels balanced in hand. As you progress from a basic silhouette to the final pose, Wallace and Wanda reveal distinct personalities through careful color placement and precise finishing. The intention behind this pattern is to offer a forgiving, repeatable workflow that yields a pair ideal for gifting, display, or a photo-ready moment in a nursery or on a shelf.

About This Wallace and Wanda Whale Amigurumi Pattern

Wallace and Wanda are a two-piece crocheted set built from DK cotton and assembled to present a friendly, approachable silhouette. The torso and head are shaped through a sequence of crocheted rounds that gradually increase to form the body, then mirror on the opposite side to preserve symmetry. The fins and tail are crocheted as separate pieces and joined with a secure whipstitch to preserve density and balance. Eyes are placed with careful measurement, typically centered across the head at a defined interval, to avoid an overly surprised or blank expression. Stuffing is added gradually to maintain a rounded contour without distorting the seam lines. The starting tail anchors the overall proportion, and the body is shaped in graduated rounds that keep the silhouette gentle and approachable. Detailing is kept minimal—enough to convey personality without introducing bulky patches or layering that could compromise softness or safety for small children.

Yellow Wanda whale amigurumi close-up with dots

In this pattern, the magic happens in small, controlled details. Marker guides help keep each round aligned and the color changes precise, so the transition from one shade to another remains crisp across the torso. The tail and side fins are constructed separately and then joined to the torso to simplify shaping and density control. This approach allows you to adjust stuffing density in the central area without impacting the outer curves. After assembly, the placement of the eyes and the curve of the mouth define the characters’ personalities, so measure widely to achieve a pleasant gaze. A gentle, even tension throughout prevents twisting of seams, and careful stuffing ensures the silhouette retains its roundness even after the final pose is fixed. In the end, the pattern demonstrates how a straightforward, well-planned construction yields a duo that is expressive and durable without requiring unusual techniques.

Stitches & Skills You'll Use

Stitch artistry centers on MR (magic ring) beginnings and seamless rounds where you never join with a slip stitch unless instructed. The body of each whale uses a sequence of increases, then steady rounds with color changes for Wallace’s dotted pattern. You’ll practice adjustable decreases to close openings smoothly, and you’ll carry the color A yarn along the wrong side to create the mid-body dots without breaking the surface. The fins are small, precise pieces sewn into position, while the tail is formed from paired elements and joined for a natural, curved silhouette. Texture comes from alternating single crochets, consistent tension, and careful stuffing to preserve shape while staying soft to the touch.

Technique-wise, you’ll master BLO (back loop only) for a neater edge on the final rounds, use single crochet and increases to build shape, and employ whipstitch for secure attachments. The eyes are fitted between approximate rounds to sit evenly with the head’s curvature. The colorwork requires calm, measured color changes and minimal cutting, with yarn carried along the back to minimize bulk. The assembly phase ties all parts together with patience, ensuring the fins lie evenly and the tail aligns symmetrically to the body—this is where the character of both whales truly emerges.

In short, you’ll weave traditional amigurumi discipline with deliberate color placement that rewards planning and neat execution. The result is not only two cuddle-worthy toys but a dependable template for future color-dot patterns and similarly scalable sea-creature designs that you can adapt for friends or family.

Why You'll Love This Wallace and Wanda Whale Amigurumi Pattern

The appeal of Wallace and Wanda lies in how approachable colorwork meets familiar amigurumi shaping. The pattern blends reliable crocheting methods with a dash of color placement that reads as accent rather than complexity. The color-dot motif can be carried across the wrong side to create a tidy transition, avoiding bulk where the surface would otherwise show a break. The two-whale pairing encourages a gentle storytelling frame—two companions that can be posed together or displayed separately—making the project feel like a small, complete scene rather than a single object. The bodies are generously rounded, which makes handling comforting and satisfying, while the simple facial features invite interaction and imaginative play. The design invites you to plan ahead for color coordination and to stretch your skills at shaping through careful stuffing and precise finishing. The result is a set that feels friendly to beginners who have mastered basic stitches and to seasoned crocheters seeking a reliable, scalable project with room to personalize through color and small accessories.

Colour & Yarn Inspiration

Begin with Tangerine for Wallace and White for Wanda, then explore ocean blues or coral hues for fresh variation. Light blues, teals, and sea greens can evoke a playful undersea mood, while pinks or lavender accents on Wanda offer a sweeter, child-friendly look. For a more natural whale appearance, charcoal gray or navy with white dots can present a classic silhouette. For bold, modern style, try a bright teal body with saturated accent colors that pop in photos, ensuring yarn quantities align with the chosen palette and tension remains consistent to keep color blocks crisp.

Substituting yarn brands is common; if you switch to a lighter DK or a heavier worsted, adjust hook size by a hair to retain proportions. A variegated body yarn can be decorative, but carry Wallace’s dots with a solid contrast color to keep the dot pattern legible. Substituting cotton for acrylic tends to yield a firmer stitch; be prepared to adjust stuffing density and gauge so the overall shape remains faithful.

Finished Wallace and Wanda whale set on white

Switch Things Up

Experimentation is part of the fun with Wallace and Wanda. Consider adjusting the color palette to match a room’s theme or a child’s favorite hues. A deep navy body with bright white accents can evoke a night-sky ocean vibe, while a sunny body with pale blue dots creates a cheerful display suitable for a playroom. You can alter scale by choosing a slightly heavier yarn for a chunkier pair or maintain the DK feel for a slimmer, more delicate duo. Tiny accessories such as a seashell applique, a small seaweed-inspired tail, or a miniature bow can personalize the pair further and tell a story.

Display options add another layer of charm. Build a shallow crochet sea stand with two small holds so the whales can be posed in narrative positions, or craft a simple “under the sea” backdrop with a few coral forms to stage a photo vignette. Personalization is encouraged—experiment with subtle color transitions or add a small facial feature that reflects the recipient’s personality. For longer projects, consider embroidering tiny freckles or a mouth line after assembly to further define character, ensuring the stitches are secure and do not compromise softness.

When selling finished pieces, include care guidance and a note about the color-dot technique to help buyers appreciate the craft. Photograph the set against a clean background to highlight the dots and color transitions, and keep the finishing tight so the pieces endure handling and display. With practice, you’ll find more opportunities to tailor Wallace and Wanda to individual crochet universes, turning a simple pair into a featured, cherishable project.

Ways to Use & Gift It

These whales make thoughtful gifts for baby showers, a baby’s first toy, or a seaside-themed nursery. Wrap one in tissue with a small card detailing the color-dot technique used to achieve Wallace’s dotted feel for a handmade narrative that’s easy to share. They also work well as photo props for newborn sessions, blog features, or as a charming display piece on a shelf.

Pair Wallace and Wanda with a simple crocheted seascape backdrop or a tiny stand to present the duo as a paired scene. For kids, a two-piece set with a small card describing their adventures can spark storytelling and pretend play. The pattern provides a durable, loving toy that remains soft, safe, and approachable while still offering a sense of accomplishment for the maker. The practical charm of the design also invites personalization through alternate colorways, making it a versatile gift for birthdays, holidays, or crochet milestones.

Common Mistakes & How to Fix Them

Rushing through rounds can lead to uneven density and visible seams in the body. Skipping marker placement or miscounting rounds can misalign the dots and overall symmetry. Inconsistent tension during color changes may result in pooling or bulky transitions on the surface. Poor eye spacing or misaligned mouth can shift the character's expression away from friendly. Forgetting to secure stuffing gradually can cause distortions when attaching fins and tail.

Maker's Notes

Pattern testing used a DK cotton as the baseline with a 2.75 mm hook, and standard stuffing. The color-dot technique held up well under repeated stuffing and shaping. Beginners may stumble securing clean invisible openings and keeping tension steady during color changes, but markers and a calm pace helped maintain round counts and alignment. The two-whale assembly is forgiving if the fins are attached symmetrically and eye placement is planned in advance. Overall, the build rewards deliberate counting and a steady tempo, producing a pair that feels confident in both construction and finish.

I tried a substitution: Swapping to a DK acrylic with similar thickness preserved the overall silhouette, though the surface texture became less crisp and the color transitions appeared a touch dull. Adjusting stuffing density stabilized the roundness, but expect a minor difference in dot sharpness and surface sheen. If you choose a plied yarn, monitor increases or decreases carefully as those changes can alter the dot pattern; testing a small swatch is wise before tackling the full pair to preserve the design’s visual clarity.

Wallace and Wanda Whale Amigurumi Pattern

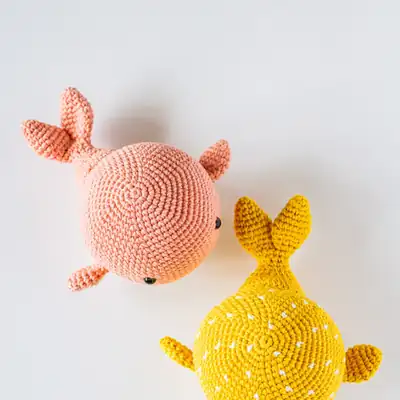
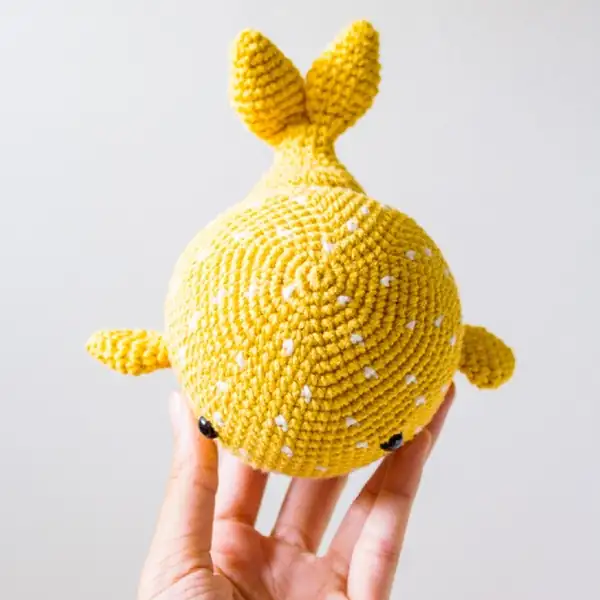
Make Wallace and Wanda Whale with our free crochet pattern—two cuddly DK yarn amigurumi that combine colorwork, shaping, and easy assembly. Start crocheting today!

Advanced 8-10 Hours
Pattern at a glance
Skill level
Advanced
Time to make
8-10 Hours
Hook size
2.75 mm (US C)
Yarn weight
DK / #3
Finished size
Approx. 10 cm / 3.9 in (varies with yarn, hook and stuffing)
Gauge
Gauge not critical; use recommended yarn and hook size to maintain proportions
Yarn used
Main color total approx. 60-80 g Tangerine and 40-60 g White per whale; two whales overall 140-280 g total

Materials Needed

Main Fabric
  • 01
    Dk yarn in your chosen colours
Tools Required
  • 01
    5 mm crochet hook
  • 02
    Stitch markers
  • 03
    Yarn needle
  • 04
    Fibrefill stuffing
  • 05
    Scissors
  • 06
    Safety eyes (optional)

— Head :

Round 2: Work in continuous rounds without joining the round with a slip stitch. Do not turn at the end of each round unless directed to.
Round 3: Use a stitch marker to keep track of the beginning of each round.

— Body :

Round 1: sc in color A around;
Round 2: sc in color A around;
Round 3: (5 sc in color A, 1 sc in color B) around;
Round 4: sc in color A around;
Round 5: sc in color A around;
Round 6: 2 sc in color A, (1sc in color B, 5 sc in color A)

— Side Fins (Make 2) :

Round 1: 6 sc in MR [6];
Round 2: (inc in each st) x 6 [12];
Round 3: (sc, inc) x 6 [18];
Round 4: (2 sc, inc) x 6 [24];
Round 5: (3 sc, inc) x 6 [30];
Round 6: (4 sc, inc) x 6 [36];
Round 7: (5 sc, inc) x 6 [42];
Round 8: (6 sc, inc) x 6 [48];
Round 9: (7 sc, inc) x 6 [54];
Round 10: (8 sc, inc) x 6 [60];
Round 11: sc in each st around [60];
Round 12: (9 sc, inc) x 6 [66];
Round 13: (10 sc, inc) x 6 [72];
Round 14: sc in each st around [72];
Round 15: sc in each st around [72];
Round 16: sc in each st around [72];
Round 17: sc in each st around [72];
Round 18: sc in each st around [72];
Round 19: sc in each st around [72];
Round 20: sc in each st around [72];
Round 21: sc in each st around [72];
Round 22: sc in each st around [72];
Round 23: sc in each st around [72];
Round 24: sc in each st around [72];
Round 25: (10 sc, dec) x 6 [66];
Round 26: sc in each st through BLO around [66];
Round 27: (9 sc, dec) x 6 [60];
Round 28: (8 sc, dec) x 6 [54];
Round 29: (7 sc, dec) x 6 [48];
Round 30: (6 sc, dec) x 6 [42];
Round 31: (5 sc, dec) x 6 [36];
Round 32: (4 sc, dec) x 6 [30];
Round 33: (3 sc, dec) x 6 [24];
Round 34: (2 sc, dec) x 6 [18];
Round 35: (1 sc, dec) x 6 [12];
Round 36: (dec) x 6 [6];

— Part 4 :

Round 1: 6 sc in MR [6];
Round 2: (sc, inc) x 3 [9];
Round 3: sc in each st around [9];
Round 4: (2 sc, inc) x 3 [12];
Round 5: (3 sc, inc) x 3 [15];
Round 6: (4 sc, inc) x 3 [18];
Round 7: sc in each st around [18];
Round 8: (4 sc, dec) x 3 [15];
Round 9: (3 sc, dec) x 3 [12];
Round 10: (1 sc, dec) x 4 [8];
Round 11: Joining round Insert your hook into the st next to the closing st of the first fin and draw up a loop and yarn through as you would for any sc stitch. Mark this as the first sc of this round and continue crocheting around through both fins. You should have 16 sts by the end of this round.
Round 12: (2 sc, dec) around [12];
Round 13: sc in each st around [12];
Round 14: (inc) x 2; sc in next 9 sts; inc around [15];
Round 15: (1 sc, inc) x 2; sc in next 10 sts; inc around [18];
Round 16: (2 sc, inc) around [24];
Round 17: sc in each st around [24];
Round 18: (inc) x 6 times; sc in next 18 sts around [30];
Round 19: (inc, 2 sc) x 4; sc in next 4 sts; hdc in next 10 sts;
Round 20: sc in next 20 sts; hdc in next 10 sts; sc in next 4 sts;

— Part 5 :

Round 1: 6 sc in MR [6];
Round 2: (1 sc; inc) x 3 [9];
Round 3: (2 sc, inc) x 3 [12];
Round 4: (3 sc, inc) x 3 [15];
Round 5: sc in each st around [15];
Round 6: (3 sc, dec) x 3 [12];
Round 7: (1 sc, dec) x 4 [8];
Round 8: sc in each st around [8];

— Tail :

Round 2: The side with hdc is the bottom side of the tail. Use fiberfill to stuff the front of the tail (not the fins). Using the side fins as a guide pin the tail centrally to the back of the body. Sew the tail neatly and carefully. ASSEMBLY The pattern and images contained in this pattern are the sole property of Love and Stitch Co. The written pattern is for personal use only. Please do not redistribute, sell, or share the pattern in part or in whole, electronically or physically. You MAY sell the finished product made from this pattern with the exception that you credit Love and Stitch Co. as the designer. If you sell the finished product on an online platform, we request that you provide a link to the Love and Stitch Co. Etsy page. Finished products made from this pattern may not be mass-produced or sold in bulk. Thank you!;

Assembly Instructions

  1. Stuff each piece firmly before closing.
  2. Pin all parts in place and check the proportions against the photos.
  3. Sew parts on securely with matching yarn.
  4. Weave in all ends and shape the finished piece.

Important Notes

  • Always begin with a foundation chain and transition to crocheted rounds to maintain a clean surface.
  • Keep a close watch on the body’s symmetry; if one side seems larger, adjust stuffing density before finishing the assembly.
  • Securely sew the fins and tail with a firm whipstitch to ensure durability during play and handling.
  • Position the eyes with precise spacing to avoid a startled look; test-fit before final sewing.
  • When carrying color along the wrong side, keep carries close to the surface and avoid over-tension that could warp the fabric.
  • Do not pull stitches too tightly near the seam lines, as this can cause puckering at the edge of the rounds.
  • Finish with a secure knot and weave the starting tail behind the work to keep the back neat and neat for display or photography.
  • Care for finished pieces by avoiding high heat washing; block minimally if required, and air-dry flat to maintain shape.

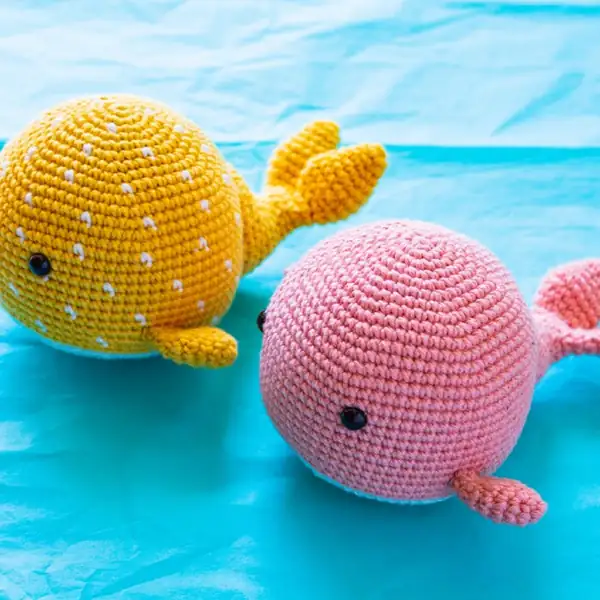
This pair of whales makes a charming addition to any crochet collection, inviting you to share a finished, huggable project with friends and family. Their rounded forms and dotted accents give them a playful personality that shines in photos and in the arms of a child. With care and focus, Wallace and Wanda become keepsakes that capture the warmth of handmade craft and the joy of a completed project kept close at hand for years to come.

Good to know

You ask, we answer

The finished amigurumi measures approximately 6.5 inches long when using the recommended yarn and hook size.

Yes, you can use different yarn weights, but this will affect the final size. Make sure to use an appropriate hook size for your chosen yarn.

The pattern is best suited for crocheters with basic skills in stitches, color changes, and assembly; it is not recommended for absolute beginners.

Most crocheters complete this project in 8-10 hours, though pace varies based on experience and working speed.

Pair of Wallace and Wanda whales together
Join 100k+ crocheters

Get new free patterns, stitch tips and exclusive content in your inbox.