Crochetologist
Free Crochet Pattern
Beautiful Detailed Adorable

Turtle Memory Game Amigurumi Pattern

Pair of baby turtle amigurumi pieces in two colors showing the FLO round detail and small circular baby bottoms
4.3Rating
12-15 HoursTime
IntermediateSkill
Highlights

What makes it special

Made with Love

Small, sweet, and gift-worthy creations that fit perfectly in the palm of your hand with detailed charm.

Multi-Day Project

This multi-piece memory game takes roughly twelve to fifteen hours to crochet, assemble and sew, making it a satisfying small-batch project spread across several sessions.

Intermediate Level

An intermediate-level amigurumi pattern: the work requires careful stitch-counting, multiple small-piece assemblies, and accurate placement for consistent nesting. Prior experience with multi-piece crochet toys and basic finishing stitches will make production faster and neater.

About This Turtle Memory Game Amigurumi Pattern

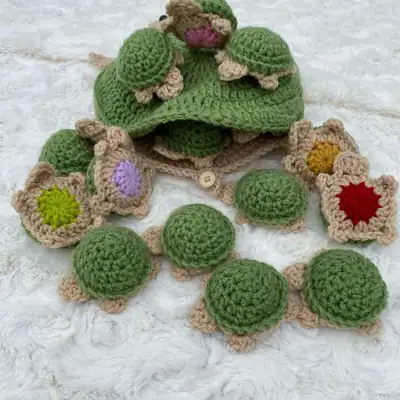
This pattern produces a compact crochet memory game: ten matched pairs of small baby turtles and one larger mama turtle whose shell becomes a tidy storage pocket for the babies. Materials list for one standard set: worsted weight (#4) yarn in green and tan (each under 7 oz), small scraps in ten distinct colors for paired babies, polyester stuffing, one small button for the shell closure, and two 12 mm safety eyes for the mama. Two hook sizes are specified for the original gauge and scale: 4.0 mm for most shell and body work, and 3.5 mm for the mama's finer head details.

The finished set combines playable token-sized pieces with a soft toy design that will withstand normal handling and gentle machine washing when finished neatly.

This design leads you to crochet a nestable set: small, matched baby turtles that pair in color, and a larger female turtle whose top shell detaches to form a pocket. Each baby is worked and finished so that it is a discrete piece you can match and place inside the mama's shell for storage and play.

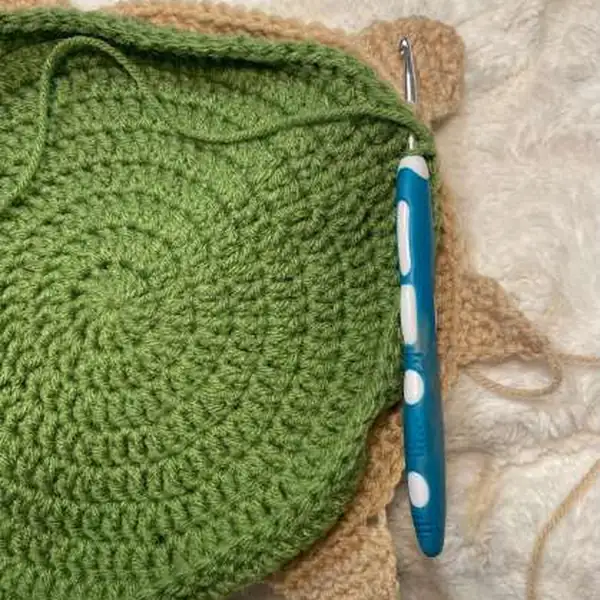
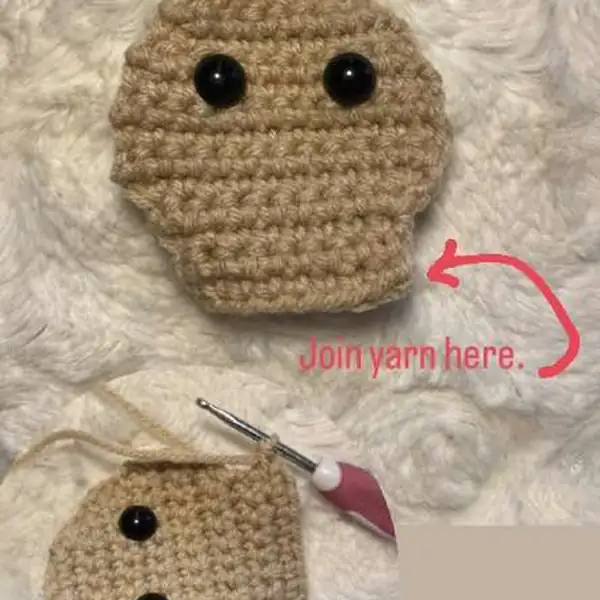
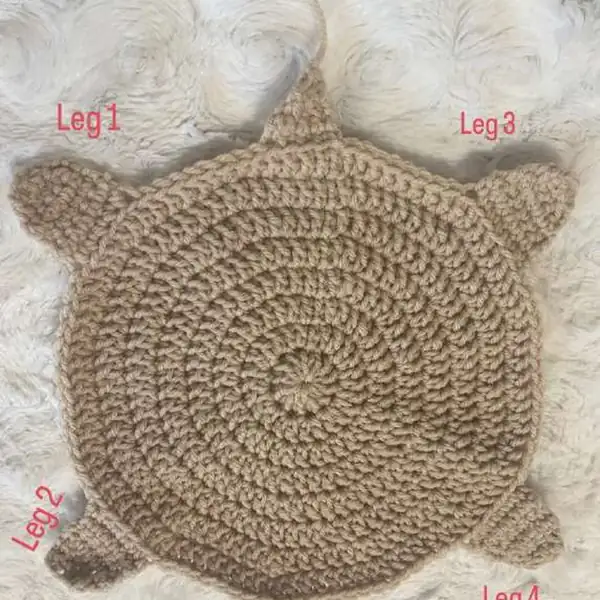
Construction emphasizes small circular shell elements for the babies and a larger domed shell for the mama, paired with compact flat bottoms and simple two-piece heads that are joined and stuffed before attachment. The pattern sequences finishing so you crochet each component to a neat stopping point, join where indicated, and complete assembly in a small number of tidy sewing steps.

Placement and alignment are part of the finish: the shell top joins through the shell rim to form a pocket, tails are left long enough for sewing the head and secure closure, and a single button functions as a removable anchor for the tail tab. Follow the layout and placement counts in the assembly section for consistent nesting and a clean final silhouette.

Mama turtle bottom shell worked in tan yarn laid flat to show round increases and leg placement

The instructions are written to produce uniform baby turtles in any ten scrap colors, making matched pairs straightforward to assemble for an educational memory set. Scale relationships between the babies and the mama are maintained so the smaller pieces fit neatly inside the larger shell pocket as intended.

Pattern structure alternates expanding circular shell rounds with compact flat bottom pieces and short shaping sequences for the larger head; precise stitch counts and measured finishing yield a durable, toy-safe result when you complete the recommended finishing steps. The written order minimizes reworking by letting you finish small pieces before combining them into the final toy assembly, which speeds production when making many pairs.

Stitches & Skills You'll Use

This pattern uses a concise group of crochet techniques suitable for intermediate amigurumi and toy construction. Magic circle starts provide tight, closed centers for all rounded pieces. Double crochet rounds are used for rapid shell expansion on the larger domes and for the baby shell tops, while half double crochet increases can smooth transition zones when shaping a shallow dome. Single crochet work, including planned increases and paired decreases, creates the smaller shaped head pieces and tidy short-row shaping for the mama's facial area.

Joining and finishing rely on a few targeted methods: working a shaping round into only one loop along the shell rim produces an exposed rim that serves as the seam interface for the shell top; slip stitch joins finish rounds cleanly and reduce visible join lines; basic decrease pairs are used to taper rows neatly for the head and tail tents. Short rows and worked-in-row assembly appear on the mama's head to create gentle shaping without complex stitch patterns.

Sewing and assembly techniques that this pattern practices are standard amigurumi finishing: surface seaming where required, sewing pieces with long finishing tails for strong joins, consistent placement counting for leg and head offsets, and basic weaving methods to hide ends inside the shell. These skills together yield stable, low-bulk joins and predictable, repeatable placement so multiple identical baby turtles are easy to produce and match.

Why You'll Love This Turtle Memory Game Amigurumi Pattern

This project balances child-friendly functionality with a compact crochet footprint: it produces many small, quick-to-make motifs while culminating in a single, slightly larger piece that stores them all.

The set has an appealing tactile quality—the small pieces are gratifying to hold and match, and fitting them into the mama's shell creates a repetitive, calming action that children return to again and again.

The limited color-count approach makes production efficient: working the babies in short bursts permits color experimentation without long stretches of monotonous stitching, so you can complete a full set in manageable sessions and adjust color difficulty for different ages or players.

Colour & Yarn Inspiration

Select ten scrap colors that read clearly as pairs by choosing two tones within the same hue family—for example, two blues with one slightly darker than the other—so small players learn color families first and then progress to shade matching as their perceptual skills develop.

For a crisp, washable finish suited to heavy play, consider using mercerized cotton scraps for the matched turtles; cotton reduces surface fuzzing and slides more easily in and out of the shell pocket. For a softer, plush hand prefer non-mercerized yarns but plan for a bit more pilling over time.

Finished mama turtle with babies stored inside and button closure visible on the tail

Switch Things Up

Create difficulty variations by designing baby-match sets with either high-contrast pairs for beginners or tonal sets for an advanced matching challenge; shifting the color palette alone changes game complexity without altering stitchwork.

Produce a chunkier, tactile travel version by carrying two thinner strands together throughout and adjusting the stitch gauge so shapes remain proportionate; work a gauge swatch, then choose a hook that restores the fabric feel you want.

For very young recipients, substitute embroidered facial features on the mama to eliminate hardware and produce an all-needle finish. Add a felt lining to the shell interior for a smoother pocket surface so the babies slide in and out with less friction during repeated play.

Adapt closure styles: a small decorative loop and coordinating button shank creates a simple, low-profile fastener for small hands, while a tuck-style tab under the button yields a sleeker external profile. To increase internal capacity, add one extra shell-expansion round to the top shell before finishing; conversely, remove a round for a more compact travel set.

Add a narrow ribbon loop tucked inside the shell as a carrying strap when making a portable, bag-ready miniature set, or sew a thin cotton panel to the shell interior when you need a version that is easier to clean frequently.

Ways to Use & Gift It

Package a finished set in a small fabric drawstring bag to present multiple matched pairs as a ready-play gift; the bag keeps all pieces together and reinforces the nesting concept when the mama and babies are returned between play sessions.

Put together themed bundles for holidays or seasons: create color-coordinated pairs (autumnal hues, pastels for spring, or festive palettes) and include a simple cardboard memory board or a small wooden tray so the recipient has both the tokens and a tidy play surface. Such bundles travel well and present attractively at craft fairs or shower gift tables.

Common Mistakes & How to Fix Them

Leaving finishing tails too short makes secure sewing difficult; always leave several inches of yarn at closure points so you can stitch through multiple layers and knot safely before weaving in the end. Skipping the practice of pinning or basting parts before sewing leads to misaligned heads and uneven leg spacing; temporarily pin pieces in place and recheck offsets on both sides before committing to permanent stitches. Working with an inconsistent tension will cause mismatched pieces when producing many babies; maintain even hand tension and periodically compare completed pieces so you can correct gauge drift early. Overstuffing the pocket or smaller pieces creates a bulky seam and distorts the shell profile; use light, even stuffing, add small amounts incrementally, and check shape before tightening the final stitches. Assembling the top shell without checking that all component edges align first causes raw edges to bunch; lay the top onto the bottom and match the perimeter stitch counts before you join so the rim sits flat and even. Trimming yarn tails at the end of one piece and then realizing you need them for sewing forces additional joins; keep long tails until the final assembly is complete, and tuck tails inside the shell when present so they remain hidden.

Maker's Notes

Making a full standard set of ten matched baby turtles plus the mama required about twelve hours of active crocheting spread across multiple sessions during testing; time will vary by speed, familiarity with small amigurumi work, and how many pieces you assemble in sequence versus batch work. The largest practical stumbling point during production is maintaining consistent placement counts when positioning limbs and the head on the mama shell: use stitch markers at the tail baseline and at each planned leg offset to preserve symmetry and reduce rereads of the pattern. When constructing multiple pairs, work in small batches—complete a single baby from start to finish to lock in your finishing routine, then repeat—to keep results uniform and minimize finishing errors.

I tried a substitution: A deliberate substitution was tested using a lighter-weight yarn in DK gauge with a 3.5 mm hook; the resulting mama shell measured roughly four-fifths the diameter of the original sample and produced baby turtles that fit with modest extra room. The DK sample yielded a slightly denser fabric with less stretch; the reduced capacity can be acceptable for a travel-sized set, but if you prefer the original storage capacity and spacing, keep to the stated yarn weight and hook sizes or be prepared to add an additional expansion round to the top shell when using lighter yarn.

Turtle Memory Game Amigurumi Pattern

Make a turtle memory game with this free crochet pattern — full materials list, hooks, and assembly instructions to create a mama turtle that stores baby matches. Start now!

Intermediate 12-15 Hours
Pattern at a glance
Skill level
Intermediate
Time to make
12-15 Hours
Hook size
4.0 mm (G/6) and 3.5 mm (E/4)
Yarn weight
Worsted / #4
Finished size
Approx. 18 cm / 7 in wide (mama shell diameter); baby turtles approx. 4.5 cm / 1.75 in across
Gauge
Approximate gauge: 12 sc x 12 rows = 10 cm (4 in) square when using worsted weight yarn with a 4.0 mm hook; work with tight tension so stuffing does not show.
Yarn used
Approx. 350 g / 760 yards total (green main <7 oz, tan main <7 oz, assorted scraps for matches totaling under 100 g)

Materials Needed

Main Fabric
  • 01
    Worsted weight yarn (#4) green - less than 7 oz for mama shell
  • 02
    Worsted weight yarn (#4) tan - less than 7 oz for mama body and legs
  • 03
    Scraps in 10 different colors for baby turtles (small amounts each)
  • 04
    Polyester stuffing (polyfil) for bodies and shell pocket
  • 05
    Button for shell tail closure (one small button)
  • 06
    Safety eyes 12mm (2 pieces) for the mama turtle
  • 07
    Yarn needle for sewing and weaving ends
Tools Required
  • 01
    Crochet hook size 4.0 mm (G/6)
  • 02
    Crochet hook size 3.5 mm (E/4) for the mama's head
  • 03
    Yarn needle for sewing and finishing
  • 04
    Polyester stuffing (polyfil)
  • 05
    Button for shell closure
  • 06
    Two 12mm safety eyes

— Head :

Round 1: with your match color- start a magic circle and chain 2. (chain 2 will NOT count as a stitch) 12 dc into a magic circle. Ss to top of first dc.
Round 2: In tan- Join to any st on the previous round. Chain 2 and dc inc into the same st and each st around. Ss to first dc. (24)
Round 3: this will form the head and legs of the baby- [this whole round is worked into the FLO.] chain 2. Dc and Tr into the same St as Ss.

— Baby shell :

Round 1: In green- starting with a MC ch1 and sc6 into the ring. ss in 1st st, ch 1 (6)
Round 2: hdc inc in all,ss to 1st st, ch 1(12)
Round 3: (hdc, hdc inc)x6 ss to 1st st, ch1 (18)
Round 4: (hdc 2,hdc inc)x6 ss to 1st st, ch 1(24)

— Bottom of mama turtles shell :

Round 1: In tan- Starting with a MC, ch2 and dc 12 into the ring. Ss to the top of the first dc. (12)
Round 2: ch2, dc inc x 12. (24)
Round 3: ch2 (dc,dc inc)x12 (36)
Round 4: ch2 (dc2,dc inc)x12 ( 48)
Round 5: ch2 (dc3,dc inc)x12 (60)
Round 6: ch2 (dc4, dc inc)x12 (72)
Round 7: ch2 (dc5,dc inc)x12 (84)
Round 8: ch2 (dc6,dc inc)x12 (96)

— To create tail :

Round 1: Ch 1 and sc 4. Ch 1 turn. (4)
Round 2: Sc 4 across. Ch 1 turn. (4)
Round 3: Sc dec x2. Ch 1 turn. (2)
Round 4: Sc 2. Ch 1 turn. (2)
Round 5: Sc dec (1)

— Tails :

Round 1: Join yarn ch1 sc in same st, sc 5. Ch1 turn.(6)
Round 2: Ch1 sc 6 across. Ch1 turn. (6)
Round 3: Ch1 sc 6 across. Ch1 turn. (6)
Round 4: Ch1 sc 6 across. Ch1 turn. (6)
Round 5: Sc dec, sc2, sc dec Ch1 turn. (4)
Round 6: (Sc dec) x2 ch 1 to secure yarn and cut off (2) Weave in yarn tails & cut ends.

— Part 6 :

Round 1: starting in 2ch from hook, Sc 8 across. Ch1 turn. (8)
Round 2: & 3: Sc 8. Ch 1 turn. (8)
Round 4: Sc INC, Sc 6, Sc INC. Ch 1 turn. (10)
Round 5: Sc INC, Sc 8, Sc INC. Ch 1 turn. (12)
Round 6: Sc 12 Ch 1 turn. (12)
Round 7: Sc 12 Ch 1 turn. (12)
Round 8: Sc 12 Ch 1 turn. (12)
Round 9: Sc 12 Ch 1 turn. (12)
Round 10: Sc DEC, Sc 8, SC DEC. Ch 1 turn. (10)
Round 11: Sc 10. Ch 1 turn. (10)
Round 12: Sc DEC, sc 6, Sc DEC. Ch 1 turn. (8)
Round 13: Sc DEC, sc 4, Sc DEC Ch 1 turn. (6)

— Part 7 :

Round 9: & 10, 4 st apart.

— Top of mama’s shell :

Round 1: In green- Starting with a MC, ch2 and dc 12 into the ring. Ss to the top of the first dc. (12)
Round 2: ch2, dc inc x 12. (24)
Round 3: ch2 (dc,dc inc)x12 (36)
Round 4: ch2 (dc2,dc inc)x12 ( 48)
Round 5: ch2 (dc3,dc inc)x12 (60)
Round 6: ch2 (dc2,dc inc,dc2)x12 (72)
Round 7: ch2 (dc5,dc inc)x12 (84)
Round 8: ch2 (dc6,dc inc)x12 (96)
Round 9: ch2 and dc 96 around. (96)

— Part 9 :

Round 76: All the way until you get to the last exposed stitch of the;

Assembly Instructions

  1. Insert the two safety eyes into the second head piece between rows 9 and 10, spaced four stitches apart, then place that piece on top of the other head piece and join at the neck; leave a long tail for sewing the head to the bottom shell.
  2. Sew the head to the front of the bottom shell using the head tail; align the center of the front legs (seven unworked stitches on each side) and stitch the head through both loops of the head pieces and the BLO of the shell across the middle eight stitches.
  3. Place the top shell onto the bottom shell with right sides outward and join yarn at the first stitch of the right back leg; working through both loops of the shell top and the exposed front loops of the bottom, single crochet around until you reach the last exposed stitch of the fourth leg, stuffing the cavity with polyfil before closing.
  4. Position all four legs by counting stitches from the tail as instructed: first leg nine stitches left of the tail, second leg sixteen stitches left of the first leg, third leg fourteen stitches right of the tail, and fourth leg twenty-one stitches right of the third leg; join yarn and crochet legs in place.
  5. Sew the small tail piece in its position behind the legs and use the eight-inch tail left from the tail piece to sew a button through the matching DC hole that sits above the tail for the closure.
  6. Weave in all ends securely and check that seams are neat; hide remaining tails inside the shell pocket and verify the button closure passes through the DC stitch to hold the top shell closed.

Important Notes

  • Adhere to the pattern's stitch placement counts precisely when positioning legs and the head; inaccurate offsets will affect symmetry and the internal pocket shape and can make nesting difficult.
  • Pause before finishing the shell seam and add stuffing incrementally so the pocket forms correctly; close the final few stitches only after confirming the interior shape and that the baby turtles fit as intended.
  • Use stitch markers to mark the tail baseline and each leg placement on the mama shell so you can maintain even spacing and avoid reworking the seam during attachment.
  • Leave deliberate long finishing tails on components that require sewing; these tails provide strong, secure joins and avoid the need to add new yarn for assembly.
  • Pin pieces and check visual alignment before you sew any permanent joins; this simple step yields the straightest seams and the neatest final appearance.

Turtle Memory Game is a small-batch crochet project that combines a tactile matching activity with handcrafted storage: colorful baby turtles nest inside a larger mama shell for tidy containment and intuitive play. The finished product is gift-ready, portable, and designed to help children practice color recognition and memory in a soft toy format that emphasizes careful finishing and durable joins.

Good to know

You ask, we answer

The finished mama shell measures approximately 18 cm (about 7 inches) across at the widest point when you use the yarn and hook sizes given in the materials; baby turtles are scaled to nest inside that pocket with minimal extra room.

Yes. For toddler-safe pieces avoid any sewn-on or hard fasteners on the babies: embroider faces and facial features rather than attaching hardware, stitch all small appendages with secure, reinforced sewing, and either sew the shell closure completely closed or use a sewn fabric loop rather than a loose button fastener to remove choking risk.

Store the babies inside the mama shell to keep the set together and save space; for routine care keep the set in a breathable cotton bag if you live somewhere humid and avoid sealed, airtight containers that can trap moisture. For longer-term storage place the set away from direct sunlight to reduce fading.

Yes. Changing yarn weight alters finished dimensions, fabric stretch, and shell capacity; before committing to a full set crochet a single mama shell and a baby turtle at your chosen yarn and hook to confirm fit, then adjust one extra expansion round to the top shell or change hook size as needed to reach the desired internal volume.

A practical play set is ten matched pairs (twenty baby turtles) for a robust memory game suited to older toddlers and preschoolers, though you can start with fewer pairs for younger children. If you want the mama to hold more pieces, add one extra expansion round to the top shell before finishing to increase capacity without redesigning the pattern.

No. Basic stitch-by-stitch sewing—simple whipstitch or a running mattress-style join—will hold parts securely if you leave generous finishing tails and pin pieces in place before stitching; the pattern gives exact stitch offset counts to guide placement so careful, patient sewing rather than advanced techniques yields the cleanest result.

Mama turtle top shell in green with front loop exposed and hook joining top to bottom
Join 100k+ crocheters

Get new free patterns, stitch tips and exclusive content in your inbox.