Crochetologist
Free Crochet Pattern
Beautiful Detailed Adorable

Tofi the Mushroom Amigurumi Pattern

Tofi mushroom amigurumi yellow cap with white spots and beige body
4.6Rating
12-15 HoursTime
IntermediateSkill
Highlights

What makes it special

Made with Love

An adorable friend to cherish, handcrafted with love to bring comfort and joy for years to come.

Multi-Day Project

A rewarding 12+ hour journey—perfect for dedicated crafters who love detailed work across several sessions.

Intermediate Level

This pattern is ideal for makers who enjoy a tactile challenge, using a foundation ring, controlled increases, color changes, working in the round, and meticulous seaming to create a lovable mushroom character. The construction emphasizes steady progress and clear milestones, with a focus on balance, proportion, and a friendly facial expression that remains readable from various angles.

Tofi the Mushroom bursts from the page with a grin and a chunky, cuddle-ready silhouette that invites hands-on play. This is the kind of amigurumi that teaches patience through repetition, rewarding you with a character that stands proudly and photographs beautifully. Tofi feels like a small friend who’s always up for a story, a snack, or a quiet moment of yarn-filled calm after a busy day. Its size and presence make it an ideal desk companion, nursery buddy, or playful prop for photo memories that last beyond the moment of completion.

Design-wise, this mushroom mascot blends whimsy with straightforward technique, offering a satisfying build that scales from a simple mug component to a full, cuddly figure. The project rewards careful stuffing, precise seaming, and considered color choices, all while staying approachable for makers who want to enjoy a tangible sense of progress without getting bogged down in intricate textures. The result is a toy that feels friendly and ready to accompany storytellers, crafters, and dreamers through everyday moments.

About This Tofi the Mushroom Amigurumi Pattern

Tofi the Mushroom is a cheerful amigurumi that fuses a mug-ready accessory with a mushroom-inspired torso and cap. The build prioritizes chunky texture and tactile delight, delivering a sturdy toy that’s pleasant to hold and easy to photograph from multiple angles. Working with bulky yarn and a large crochet hook, you’ll learn to shape a friendly character through measured increases, careful stuffing, and strategic seaming that hides joins in plain sight.

What makes this pattern special is the deliberate layering of size, color, and form into a single creature. The mug serves as a playful prop that doubles as a hands-on element; the cap defines the silhouette with bold yellow, white spots, and a gentle curvature that echoes a cartoonish mushroom. The facial features are small but meaningful, created with simple stitches that read as expressive when viewed up close and charming from across the room. The outcome is a character whose personality emerges as the yarn settles together, offering comfort in both display and playtime.

The workflow is designed to be approachable yet rewarding: begin with the mug component, then build the legs and arms with careful shaping, sculpt the stem and cap in complementary hues, and finally attach facial features and a touch of grass embroidery to frame the figure. Each step reinforces fundamentals—starting tail management, color changes, and precise placement—while inviting you to add your own flair with size tweaks, pose options, or decorative accents. The pattern’s rhythm is steady, and the finish is as satisfying as the journey itself.

Close-up of mug accessory and arms of Tofi

The process is as much about confidence as it is about technique. Each piece is crocheted with intention, then joined in a way that creates a playful figure you’ll want to cradle and display. As you proceed, you’ll refine your sense for how much stuffing to use in different parts and where to place the limbs for a stable, natural stance. The cap’s curvature emerges from a series of evenly spaced rounds, while the grass embroidery provides a gentle border that grounds the character in a tiny, world-building landscape.

The end result is a keepsake that can be gifted or kept as a personal reminder of a successful crochet journey. The toy’s bright palette and approachable expression invite touch, storytelling, and countless photo moments, making it a favourite prop for desk decor, nursery rooms, or a cozy couch-side companion during chilly evenings.

The pattern prioritizes predictable progress and visible milestones: a compact mug piece and rounded cap formed through steady increases, then limbs shaped with careful seam placement to preserve mobility. The skin-toned areas are joined with concealed seams, while the cap’s dotted motif is achieved through simple color changes and back-loop emphasis to preserve a clean outline without resorting to any advanced texture techniques. This approach keeps the build approachable, even for crafters who are transitioning from basic projects to more character-driven amigurumi.

Stitches & Skills You'll Use

Stitch by stitch, you’ll explore foundational amigurumi methods that yield a durable, huggable figure. The starting foundation ring locks six stitches in a tight circle, creating a stable core before you begin the rounds. Each increase is deliberate, gradually expanding the fabric to form a plump mug and a rounded cap. You’ll weave through back loops to sculpt limbs that retain a gentle seam and a soft, springy feel, then switch to front loops on the cap to emphasize the dotted design with clean, even stitches. In assembly, the challenge shifts to aligning the mug, limbs, and cap so that each piece looks balanced from every angle and the final pose captures Tofi’s curious, cheerful personality.

The pattern leans on simple, repeatable sequences—(1 sc, 1 inc) and (4 sc, 1 inc) motifs—to create predictable growth while keeping the work approachable. Invisible decreases reduce bulk where needed, particularly around the face, while color changes occur in a controlled, staged fashion so the transitions read as deliberate art rather than random patches. The layering of stuffing is essential; you’ll learn to press and shape each area as you go, which avoids lumps and ensures that the finished figure remains portable and poseable for photography and play.

Finally, a careful seaming technique ties everything together with invisible anchors, so joints stay firm yet flexible. The finishing touches—tiny cheeks, a little mouth, and eyes—are placed with intention to achieve a friendly expression that radiates warmth. This is a design that rewards methodical progress and deliberate, patient stitching, producing a durable keepsake that you’ll be proud to display and gift.

Why You'll Love This Tofi the Mushroom Amigurumi Pattern

This pattern offers a well-paced journey from a cozy mug to a charming mushroom figure, with clear instructions that help you build confidence as you go. The design emphasizes steady progress, readable rounds, and straightforward assembly so you can see results at each stage. It’s especially rewarding for makers who enjoy a friendly, photogenic toy that stays posable and durable through routine handling.

Colour & Yarn Inspiration

For a fresh look, switch the cap to coral or mint while keeping the beige body for contrast. You could also experiment with a monochrome palette—cream, tan, and white—to create a minimalist mushroom that fits modern interiors. If you want a seasonal version, choose a red cap with white spots for a festive feel or a lavender cap for a dreamy, whimsical vibe.

Substituting the grass color with teal or sky blue creates a different landscape around the base and can help coordinate with a room’s existing color scheme. When selecting colors, keep the scale of the torso and cap in mind so the final silhouette remains balanced and readable in photos. Effective color changes are deliberate and gradual, ensuring transitions read as design choices rather than accidental patches.

Tofi the Mushroom seated upright with mug handcrafted

Switch Things Up

You can personalize Tofi with alternate colour palettes to suit a room or gift idea. For a fresh look, swap the yellow cap for coral or mint while keeping the beige body for gentle contrast. A monochrome palette—cream, tan, and white—delivers a minimalist, modern mushroom that blends with contemporary interiors. If you want a seasonal twist, try a red cap with white spots for festive charm or a lavender cap for a dreamy mood. Substituting the green grass with teal or sky blue creates an entirely new landscape around the base, influencing the character’s presence in a room’s color scheme.

Scale the project by using a lighter weight yarn and a smaller hook if you prefer a compact version that sits neatly on a bookshelf or beside a computer monitor. You may also explore facial details such as a stitched smile, embroidered eyebrows, or tiny rosy cheeks using a small amount of contrasting yarn. A tiny accessory—like a felt leaf or a miniature crochet carrot—can be attached with a subtle pin for seasonal decor. For durability in little hands, consider a soft fabric lining inside the mug or a crochet Cozy Sleeve that slides over the mug piece. This adds a tactile layer that’s gentle to touch and easier to grip during play.

Posing variations can reveal different character dynamics. Try placing the limbs in slightly different angles and testing balance on a flat surface to study gravity’s effect on the toy’s stance. Your photos will gain depth when you rotate the figure between shots and capture it from multiple angles. If you want a display-worthy upgrade, switch to a slightly thicker thread for the grass embroidery and crisper white spots on the cap to emphasize the silhouette more clearly on camera. You can also adjust eye size and placement to alter mood—from bright, friendly to cheeky or curious—without changing the overall proportions of the figure.

Other ideas include weaving a tiny backpack or scarf around the neck with a slender yarn strap, or adding a small decorative element like a bee motif near the grass area for whimsy. The core charm remains intact when the shape and proportions stay true, allowing your personal tweaks to shine without altering the character’s essence.

Ways to Use & Gift It

Give Tofi as a handmade birthday surprise for a friend who loves quirky desk buddies or fairy-tale decor. Its bright yellow cap and cheerful face make it a delightful gift that’s both playful and comforting. When tucked into a gift bag or presented on a shelf, Tofi adds an immediate sense of warmth and whimsy that resonates with recipients of all ages.

As a nursery or kids’ room accent, Tofi can brighten a shelf, act as a gentle bedtime companion, or be used as a photo prop for memories. A small note tucked under the mug portion with a comforting message can turn the piece into a keepsake. The design’s chunky texture and forgiving seams make it a resilient toy that can withstand frequent handling while preserving its cheerful expression over time.

Common Mistakes & How to Fix Them

Skipping stitch markers during round work can lead to miscounts. Place markers at the start of each round and move them as you crochet, especially through the long shaping sections of the stem and neck. Overstuffing the head or neck creates stiffness that hinders poseability. Add stuffing gradually and check symmetry by comparing opposite sides after every few rounds. Tight color changes without securing the previous color can cause strands to pull and create visible gaps. Pause to secure each color transition with a gentle tug and complete the join cleanly before continuing.

Maker's Notes

During testing, a bulky yarn paired with a large crochet hook helped the pieces come together quickly, while careful round-by-round counting maintained consistency across limbs and cap. I spent time shaping the stem to hold a natural curve, which contributed to a cohesive whole rather than a set of separate parts. Beginners often stumble on stuffing depth in the head and neck; the recommendation is to stuff incrementally and check symmetry after every few rounds. Practicing a few rounds on the mug piece before tackling the cap helps build confidence with transitions and attachment points.

Keep a small stash of scrap yarn and tails for seam work and fasten-off tips. The mug’s long tail is handy for shaping the handle’s curve and for securing limbs during assembly. Laying out yarns in order, rather than hunting for the next color mid-round, reduces interruptions and supports cleaner color changes. Patience yields more polished joins and fewer visible gaps, contributing to a professional finish that lasts through play and display.

I tried a substitution: Using DK weight yarn and a 4.5 mm hook reduces the finished size by roughly one-third, producing a piece that reads more like a toy than a display item. The stitch density shifts enough that the stuffing becomes more compact, necessitating adjustments to the amount of filling to maintain the same silhouette. The mug component remains functional, but its structural integrity relies on tighter tension and careful attachment to the arms. When substituting yarns, plan for a smaller final size and test-fit each section before committing to full assembly, then adapt the number of rounds as needed to preserve proportion.

Tofi the Mushroom Amigurumi Pattern

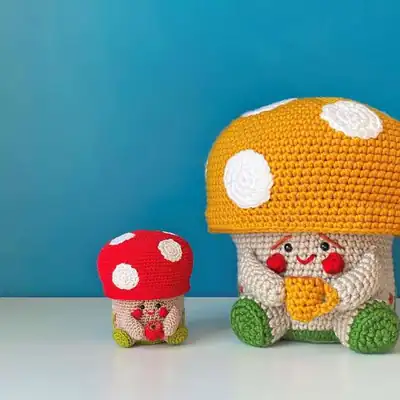
Download the free crochet pattern for Tofi the Mushroom, with complete rounds, materials list, and assembly tips. Perfect for intermediate crocheters seeking a playful amigurumi project.

Intermediate 12-15 Hours
Pattern at a glance
Skill level
Intermediate
Time to make
12-15 Hours
Hook size
6.0 mm (J/10)
Yarn weight
Super Bulky / #6
Finished size
Approx. 25 cm tall / 9.8 in
Gauge
Gauge not critical; aim for tight, even stitches so stuffing stays controlled.
Yarn used
Approx. 550 g total yarn (all colours combined), ~1200 m equivalent for bulky weight

Materials Needed

Main Fabric
  • 01
    Super Bulky yarn (100% anti-pilling acrylic), Green - ~50g
  • 02
    Super Bulky yarn (100% anti-pilling acrylic), Beige - ~120g
  • 03
    Super Bulky yarn (100% anti-pilling acrylic), Brown - ~50g
  • 04
    Super Bulky yarn (100% anti-pilling acrylic), Yellow - ~250g
  • 05
    Super Bulky yarn (100% anti-pilling acrylic), White - ~50g
  • 06
    Super Bulky yarn (100% anti-pilling acrylic), Red - ~20g
Tools Required
  • 01
    Crochet hook size 6.0 mm (US size J/10)
  • 02
    Scissors
  • 03
    Yarn needle for weaving in ends
  • 04
    Stitch markers
  • 05
    Polyester stuffing
  • 06
    Pins for position checks

— Mug :

Round 1: Start with a magic circle, 6sc in the loop. [6st];
Round 2: 1 sc, 1 inc. Repeat. [9st];
Round 3: [YELLOW] BACK LOOP this row, sc all around. [9st];
Round 4: Sc all around. [9st];
Round 5: Sc all around. [9st];
Round 6: Sc all around. [9st];
Round 7: Sc all around. [9st];
Round 8: 1 sc, 1 dec. Repeat [6sc] Fasten off with a very long tail. With the help of a pencil, push the brown part in, as the inside part of the cup. You can very, very lightly stuff the rest of the cup. Using your long tail, weave loose ends through each stitch and pull it close. Feed your tail inside first, then pull it out from where you want the bottom of your mug handle to start. Using adjacent stitches, attach your yarn tail. Chain 9 (or more, if you think you need more) and attach your last chain to the brim of the mug with a slip stitch and fasten off. I also used this new yarn tail to weave it back in and come out again to shape my handle as an half-S shape. Leave a long tail again, you will use this to sew the mug to the hands.

— Spots :

Round 1: Start with a magic circle, 8sc in the loop. [8st];
Round 2: Increase each stitch. [16st];
Round 3: 1 sc, 1 inc. Repeat. [24st];

— Legs (X2) :

Round 1: Start with a magic circle, 6sc in the loop. [6st];
Round 2: Increase all stitches. [12st];
Round 3: 1 sc, 1 inc. Repeat. [18st];
Round 4: BACK LOOP this row, sc all around. [18 st];
Round 5: [BEIGE] Sc all around. [18st];
Round 6: Sc all around. [18st];
Round 7: Sc all around. [18st] Fasten off with a long tail. Make two. Stuff firmly.

— Arms (X2) :

Round 1: Start with a magic circle, 6sc in the loop. [6st];
Round 2: 1 sc, 1 inc. Repeat. [9st];
Round 3: Sc all around. [9st];
Round 4: Sc all around. [9st];
Round 5: Sc all around. [9st];
Round 6: Sc all around. [9st];
Round 7: Sc all around. [9st];
Round 8: Sc all around. [9st];
Round 9: Sc all around. [9st];
Round 10: Sc all around. [9st];

— Mushroom Stem :

Round 1: Start with a magic circle, 8sc in the loop. [8st];
Round 2: Increase all stitches. [16st];
Round 3: 1 sc, 1 inc. Repeat. [24st];
Round 4: 2 sc, 1 inc. Repeat. [32st];
Round 5: 3 sc, 1 inc. Repeat. [40st];
Round 6: 4 sc, 1 inc. Repeat. [48st];
Round 7: 5 sc, 1 inc. Repeat. [56st];
Round 8: BACK LOOP this row, sc all around. [56st];
Round 9: Sc all around. [56st] Change to BEIGE yarn.
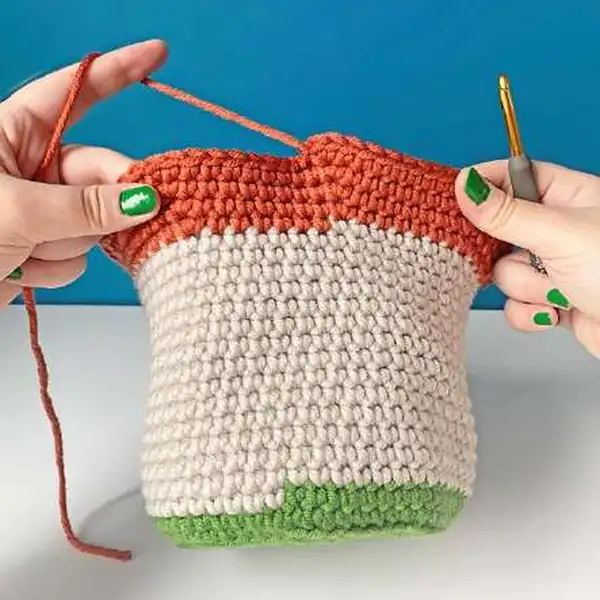
Round 10: [BEIGE] 15 rows of sc all around. [56st] Change to BROWN yarn.
Round 11: [BEIGE] 15 rows of sc all around. [56st] Change to BROWN yarn.
Round 12: [BEIGE] 15 rows of sc all around. [56st] Change to BROWN yarn.
Round 13: [BEIGE] 15 rows of sc all around. [56st] Change to BROWN yarn.
Round 14: [BEIGE] 15 rows of sc all around. [56st] Change to BROWN yarn.
Round 15: [BEIGE] 15 rows of sc all around. [56st] Change to BROWN yarn.
Round 16: [BEIGE] 15 rows of sc all around. [56st] Change to BROWN yarn.
Round 17: [BEIGE] 15 rows of sc all around. [56st] Change to BROWN yarn.
Round 18: [BEIGE] 15 rows of sc all around. [56st] Change to BROWN yarn.
Round 19: [BEIGE] 15 rows of sc all around. [56st] Change to BROWN yarn.
Round 20: [BEIGE] 15 rows of sc all around. [56st] Change to BROWN yarn.
Round 21: [BEIGE] 15 rows of sc all around. [56st] Change to BROWN yarn.
Round 22: [BEIGE] 15 rows of sc all around. [56st] Change to BROWN yarn.
Round 23: [BEIGE] 15 rows of sc all around. [56st] Change to BROWN yarn.
Round 24: [BEIGE] 15 rows of sc all around. [56st] Change to BROWN yarn.
Round 25: [BROWN] 6 sc, 1 inc. Repeat. [64st];
Round 26: 7sc, 1 inc. Repeat. [72st];
Round 27: 8sc, 1 inc. Repeat. [80st];
Round 28: 19sc, 1 inc. Repeat. [84st];

— Cheeks :

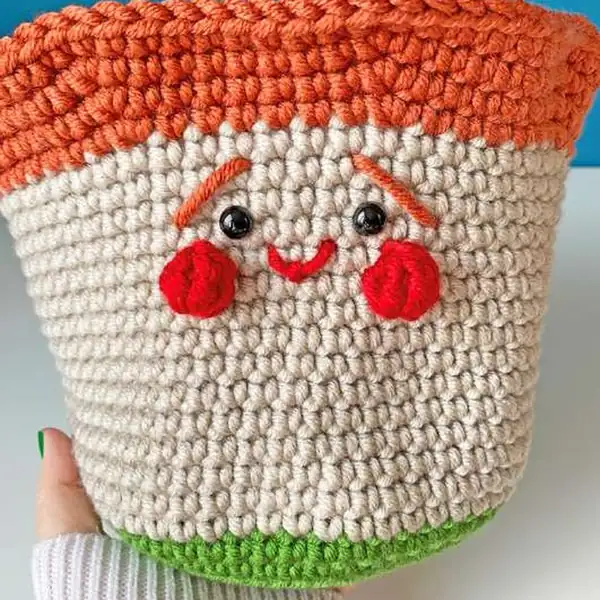
Round 1: and the bottom of the eyebrow between row 3-4. In total, the eyebrow is 2sc wide. Between two eyebrows (the top part), there are 3sc. Place your Amigurumi eyes between row 3- 4, where the top and the bottom of the eyebrow aligns. Place your cheeks by feeding the end tails in and making a knot inside. The cheek is between row 5-7. For the mouth, make a simple U shape between row 5-6. After completing the face, stuff the beige part of the mushroom stem very firmly, leave brown part empty for now.
Round 2: and the bottom of the eyebrow between row 3-4. In total, the eyebrow is 2sc wide. Between two eyebrows (the top part), there are 3sc. Place your Amigurumi eyes between row 3- 4, where the top and the bottom of the eyebrow aligns. Place your cheeks by feeding the end tails in and making a knot inside. The cheek is between row 5-7. For the mouth, make a simple U shape between row 5-6. After completing the face, stuff the beige part of the mushroom stem very firmly, leave brown part empty for now.

— Mushroom Cap :

Round 1: Start with a magic circle, 6sc in the loop. [6st];
Round 2: Increase all stitches. [12st];
Round 3: 1 sc, 1 inc. Repeat. [18st];
Round 4: 2 sc, 1 inc. Repeat. [24st];
Round 5: 3 sc, 1 inc. Repeat. [30st];
Round 6: 4 sc, 1 inc. Repeat. [36st];
Round 7: 5 sc, 1 inc. Repeat. [42st];
Round 8: 6 sc, 1 inc. Repeat. [48st];
Round 9: 7 sc, 1 inc. Repeat. [54st];
Round 10: 8 sc, 1 inc. Repeat. [60st];
Round 11: 9 sc, 1 inc. Repeat. [66st];
Round 12: 10 sc, 1 inc. Repeat. [72st];
Round 13: 11 sc, 1 inc. Repeat. [78st];
Round 14: 12 sc, 1 inc. Repeat. [84st];
Round 15: sc all around. [84st];
Round 16: sc all around. [84st];
Round 17: sc all around. [84st];
Round 18: sc all around. [84st];
Round 19: sc all around. [84st];
Round 20: sc all around. [84st];
Round 21: sc all around. [84st];
Round 22: sc all around. [84st];
Round 23: sc all around. [84st];
Round 24: sc all around. [84st];
Round 25: sc all around. [84st];
Round 26: sc all around. [84st];
Round 27: Sandwich this row and the last BROWN row of mushroom stem together, sc all around. [84st];
Round 28: Continue only with YELLOW, 3 rows of sc all around. [84st];
Round 29: Continue only with YELLOW, 3 rows of sc all around. [84st];
Round 30: Continue only with YELLOW, 3 rows of sc all around. [84st];

Assembly Instructions

  1. Attach mug to hands using the long tail from the mug, sewing through the inner edges so the mug sits centered and upright when the arms are positioned naturally.
  2. Position legs under the body between rounds 9-11, ensuring even spacing so Tofi can sit without tipping forward.
  3. Sew arms to the sides between top beige rows 4-7, angling them slightly toward the front for a friendly, hugging pose.
  4. Sew white spots to the mushroom cap between rounds 16-18, distributing them evenly around the cap to create a balanced spotted look.
  5. Embroider grass around the base using the back-loop stitches to form a gentle, leaf-like border, then add floral accents as desired.
  6. Finish by securing facial features with a few whip-stitched seams and a firm, even stuffing to maintain the cap’s round silhouette.

Important Notes

  • Use stitch markers to keep track of rounds and color changes, especially during the mushroom stem's long shaping sections to maintain symmetry.
  • Stuff gradually; stop before the piece becomes overly firm to preserve flexibility in the limbs and the cap.
  • Weave in ends as you go and secure tails securely to prevent unraveling after assembly.
  • Pin all pieces first to confirm placement and balance before sewing attachments permanently.
  • Ensure the mug remains firmly attached to the hands so Tofi can be posed without slipping.

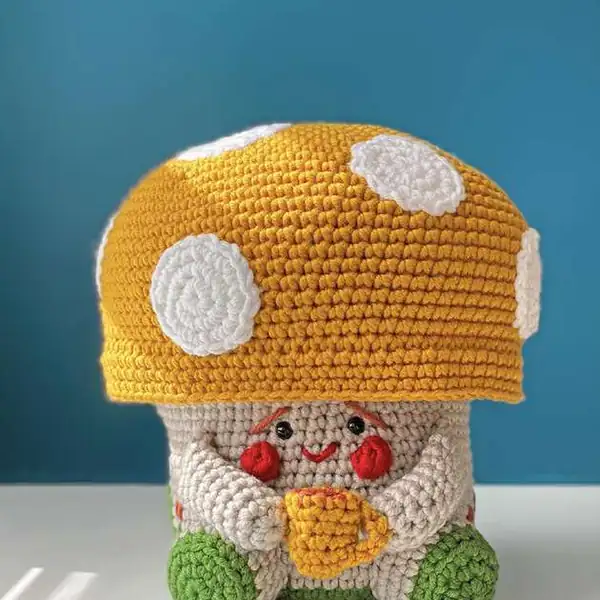
This little amigurumi mushroom is crafted to be a cherished keepsake. Its bright colours, soft texture, and playful mug-hand motif invite lots of cuddly moments and cozy photos. May your finished Tofi bring joy to friends and family alike.

Good to know

You ask, we answer

The finished amigurumi stands about 25 cm tall when crocheted with the recommended bulky yarn and 6 mm hook, with the mug adding some extra width when attached.

Yes, you can use a lighter yarn, but the final size will shrink and the stuffing requirements will shift. If you switch yarn weight, adjust your hook size accordingly and be prepared for a smaller finished piece.

This pattern is intermediate, so basic stitches and technique knowledge help; you’ll benefit from understanding a foundation ring, color changes, and simple seaming.

Expect 12–15 hours depending on your pace and how many colour changes you choose; the project unfolds in clear sections that you can complete over several crochet sessions.

Grass embroidery around the base of Tofi mushroom
Join 100k+ crocheters

Get new free patterns, stitch tips and exclusive content in your inbox.