Crochetologist
Free Crochet Pattern
Beautiful Detailed Adorable

Teddy Bear in Suitcase Amigurumi Pattern

Beige teddy inside pink suitcase amigurumi
4.2Rating
12-15 HoursTime
AdvancedSkill
Highlights

What makes it special

Made with Love

An adorable friend to cherish, handcrafted with love to bring comfort and joy for years to come.

Multi-Day Project

A rewarding 12+ hour journey that invites sustained focus, careful stuffing, and precise assembly across multiple sessions to reveal a charming, playful suitcase companion.

Advanced Level

Designed for crocheters with solid amigurumi experience, this project requires careful shaping, color changes, and precise assembly. It combines core amigurumi skills with finishing touches and prop-building to tell a tiny, endearing story. While approachable for an intermediate crafter, beginners who practice planning, stuffing, and seam placement with smaller pieces can successfully complete it with patience and time.

Prepare to meet a pocket-sized storyteller: a teddy bear tucked into a miniature suitcase. This crochet project blends amigurumi charm with portable display, yielding a soft creature dressed in a tiny dress that slides into a travel-ready container. The build unfolds in simple, repeating rounds that teach careful stuffing, measured color changes, and precise seam placement.

The suitcase frame supports the whole scene while the outer cover closes around the interior pieces. The finished piece is ideal for gifting, nursery decor, and playful shelf display.

About This Teddy Bear in Suitcase Amigurumi Pattern

Charm meets portability in this teddy-in-a-suitcase project. The design centers on a crocheted bear that fits snugly inside a decorative suitcase, with arms, legs, ears, a head, a tiny dress, and a coordinating headband. The build begins with a starting tail and foundation chain to establish the core form, then continues with a sequence of crocheted components worked in joined rounds.

Each segment is shaped through controlled increases and decreases to preserve balance and proportion, while little seam work anchors the pieces once they are stuffed evenly. The facial features are added with careful embroidery or discrete beads after assembly, allowing the work to retain a clean surface and a gentle personality. The dress is crocheted separately and attached with small seams, with the headband sharing the same color story for cohesion.

When the core bear is finished, the interior pieces are placed inside the suitcase and secured with light tacking so they remain aligned during handling. The suitcase itself is constructed as a bottom portion and an upper cover that can be fastened around the interior pieces, creating a frame that opens to reveal the miniature scene inside. Finishing touches include weaving in all tails, securing eyes or embroidering them, and checking the balance of weight so the piece sits naturally when displayed.

This project emphasizes reliable crochet technique, careful stuffing, and neat seam placement to produce a charming, portable keepsake that invites gentle play and thoughtful display.

This pattern yields a complete crocheted teddy bear inside a decorative suitcase. The bear includes arms, legs, ears, a head, a tiny dress, and a matching headband. The suitcase body is crocheted in two main parts: a bottom and an upper cover that fasten around the interior pieces to seal the scene. All components are joined with simple seam work and careful stuffing to maintain proportion and balance.

The color story uses beige for the bear, soft pinks for the dress, lilac interior lining, and a taupe or brown exterior for the suitcase to create contrast and a vintage look. The interior lining provides a gentle contrast when the case opens, and the palette is chosen to showcase the bear while offering tactile interest through blocky color changes within the basics of amigurumi technique. No specialized textures are required; basic stitches and careful shaping carry the form.

Close-up of teddy head and ears

As you work, the pattern guides you through rounds, color changes, and careful placement of each part to bring the scene together. The steps emphasize a steady rhythm and precise counting, a satisfying blend of technique and storytelling that results in a portable keepsake suitable for display or gifting.

Stitches & Skills You'll Use

Stitch spotlight: The project relies on a foundation chain to start the torso and limbs, then joined rounds to build the body in a compact form. A simple single crochet stitches are used throughout, with careful increases to widen the head and limbs and purposeful decreases to taper the muzzle and hands. A magic ring starts each small piece so the center remains neat; color changes are executed in small, evenly spaced rounds to avoid visible ladders. Safety eyes may be placed at precise coordinates before final stuffing, or eyes can be embroidered with a short tail of thread for a softer look. The face is formed with careful embroidery or stitched features after the pieces are joined. The dress and headband are crocheted separately in basic stitches, then sewn on with a few simple seams. The suitcase exterior is built from two panels or a tub-shaped frame with a lid that slides or folds, joined with a few slip stitches or simple seams. The whole build relies on consistent tension and even stuffing, ensuring the toy stays balanced and rigid when displayed.

Why You'll Love This Teddy Bear in Suitcase Amigurumi Pattern

I absolutely love this pattern because it marries craft with whimsy, turning a simple amigurumi into a tiny narrative. I appreciate the sense of play in dressing the bear and fitting it into a suitcase that opens to reveal a mini world. The attention to finishing details—facial features, clothing, and the interior lining—gives me a chance to practice precision while still enjoying the cozy rhythm of crochet.

This project rewards patience with a finished piece that feels special enough for gifting, yet delightful enough to keep for myself.

Colour & Yarn Inspiration

Consider a pastel palette for a gentle, dreamy look: beige for the bear with light pink accents, a soft pink dress, and a lilac interior lining to add a whimsical glow when the suitcase opens. For a bold twist, swap in teal or cobalt for the dress or accessories while keeping beige as the bear’s base to maintain a cohesive silhouette. A vintage vibe can be achieved by using cream or taupe for the suitcase exterior and a warm chocolate interior, with a burgundy dress to add depth.

Substituting different fibers also changes the feel: a cotton-blend yarn yields a crisp stitch with a gentle sheen, while a wool-blend or acrylic provides a plush hand and forgiving shaping. If yarn weights change, adjust foundation chains, hook size, and stuffing to maintain proportions for both bear and suitcase. The possibilities are endless, and each combination tells a new story through color and texture.

Dress and headband accessories for teddy bear

Switch Things Up

I love how this project invites customization, from swapping color schemes to changing the dress length or even the suitcase dimensions. You could adapt the beige and pink palette to suit a nursery theme or alter the interior lining color for a stronger contrast. If you want a bulkier bear, try a heavier yarn with a slightly larger hook, remembering to adjust stuffing as you go to preserve shape. For a cuter vibe, switch to softer pastels and a smaller headband; for a retro look, add tiny buttons and lace edging around the dress. Embroider extra facial features or a tiny smile to impart a unique personality.

Another avenue is to modify the suitcase exterior with a textured edge or different yarn textures to create a vintage trunk feel, or replace the dress with a tiny vest for a more minimalist aesthetic. You can also experiment with adding tiny props inside the suitcase, such as a crocheted mini book or a tiny scarf, to tell a richer story. Consider adding non-structural details such as a small yarn bow or a faux leather strap with tiny stitches. The pattern lends itself to experiments with scale by using a finer yarn for a mini version or a chunkier version for a bold statement piece, and by adjusting the stuffing to keep the overall silhouette intact. Try combinations you’ve never attempted before with confidence and curiosity, because the journey is part of the charm, not just the destination.

Colorful embroidery or felt appliqués on the bear’s sweater or headband can personalize this piece for a child’s favorite character or a special celebration, turning the suitcase into a keepsake full of memories. There’s really no limit to the playful stories you can tell with just a ball of yarn, a hook, and a dash of imagination.

Whenever the project begins, start with a small, color-coordinated plan and let creativity take the lead; you’ll find that maintaining a steady rhythm and consistent tension keeps the process engaging from first stitch to final seam.

Ways to Use & Gift It

Gift this teddy inside a suitcase for a birthday surprise that doubles as a keepsake box, perfect for a child who loves to unpack new stories. It also makes a thoughtful baby shower gift with its portable appeal and soft, huggable texture. Assemble a small gift set inside the suitcase, including a crocheted blanket, a tiny notepad, or a handmade keychain as complementary treasures that create a complete gift experience.

Display the suitcase on a shelf as a mini storytelling piece, or present it as a nursery decor feature that doubles as a play companion. For sentimental gifting, personalize the bear’s dress color to reflect the recipient’s favorite hue or a meaningful color combination. The compact size makes it easy to wrap, ship, or tuck into a keepsake box, turning a simple crochet project into a memory-filled present.

Common Mistakes & How to Fix Them

Skipping even stuffing in limbs or the head can lead to lopsided shapes and weak balance when the piece is displayed. Overly tight stitching during rounds can distort proportions and create stiff seams that hinder the bear’s ability to sit comfortably inside the suitcase. Neglecting to weave in tails or secure ends before assembling can allow loose ends to unravel with handling and display. Positioning facial features after final assembly without testing alignment first may produce an uneven smile or misaligned eyes. Rushing color changes without securing yarn tails can produce visible join lines or ladders in color transitions.

Maker's Notes

Testing used the specified sport weight yarn and a 2.0 mm hook to achieve crisp, compact stitches for tiny details. The process took approximately 14 hours from start to finish, including sewing the limbs and attaching the head to the body. Gradual stuffing aided shaping, and placing the eyes before final stuffing ensured even alignment. The interior lining required careful stitching to prevent bulk at the seam. Beginners may struggle with proportion in the head-to-body region; take time to test fit and adjust stuffing before final sewing.

I tried a substitution: A substitution with a DK weight yarn and a 2.5 mm hook produced a larger bear with a looser silhouette; the solution included slightly firmer stuffing and extra rounds on the limbs to preserve proportion. The suitcase interior still maintained shape, and the overall piece remained endearing and structurally sound. The pattern remains forgiving with mindful adjustments to scale and balance.

Teddy Bear in Suitcase Amigurumi Pattern

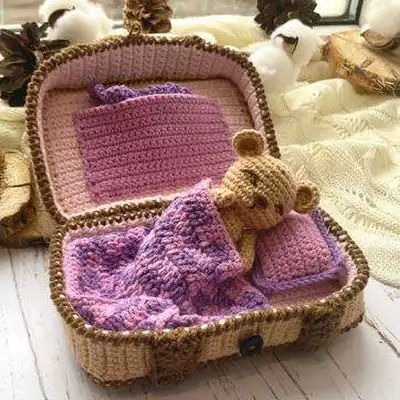
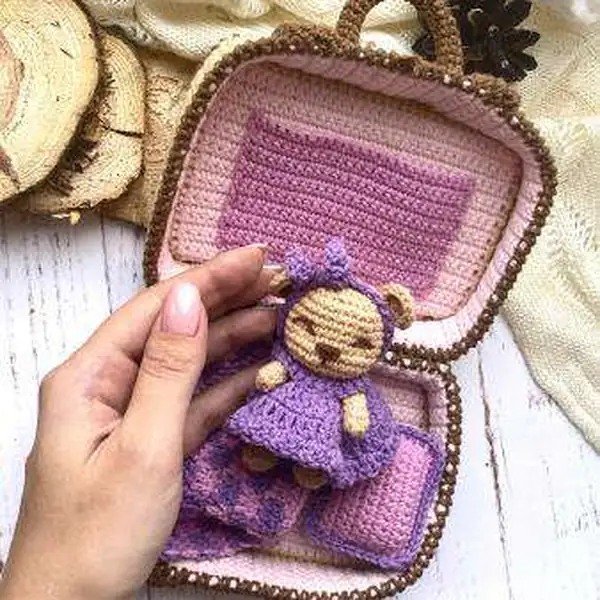
Make this teddy bear in a suitcase with our free crochet amigurumi pattern—step-by-step instructions, full materials list, and assembly tips. Start crocheting today!

Advanced 12-15 Hours
Pattern at a glance
Skill level
Advanced
Time to make
12-15 Hours
Hook size
2.0 mm (B/1)
Yarn weight
Sport weight (4-ply) Yarn Art Jeans
Finished size
Approx. 14 cm tall suitcase with 11 cm tall bear
Gauge
Gauge not specified; aim for tight amigurumi tension to avoid gaps
Yarn used
Beige 140 m; Light Pink 80 m; Pink 80 m; Purple 60 m; Brown 40 m

Materials Needed

Main Fabric
  • 01
    Sport weight Yarn Art Jeans (4-ply) – Beige (N07) ~50g / 160m
  • 02
    Light Pink (N18) ~50g / 160m
  • 03
    Pink (N20) ~50g / 160m
  • 04
    Purple (N50) ~50g / 160m
  • 05
    Brown (N40) ~50g / 160m
  • 06
    Optional accent colors for dress or lining
Tools Required
  • 01
    Crochet hook 2.0 mm (B/1)
  • 02
    Fiberfill stuffing
  • 03
    Needle for sewing pieces
  • 04
    Cardboard for interior supports
  • 05
    Two small buttons for fasteners
  • 06
    Scissors, stitch markers
  • 07
    Yarn needle or tapestry needle

— Teddy Bear :

Round 1: 6sc in MR Place row marker here.
Round 2: 6sc;
Round 3: 6sc;
Round 4: 6sc;
Round 5: 6sc;
Round 6: 6sc;

— Arms (Make 2) :

Round 1: 6sc in MR Place row marker here.
Round 2: 6inc (12)
Round 3: 3sc, 3dec, 3sc (9)
Round 4: (1sc, dec) *3 (6)
Round 5: 6sc;
Round 6: 6sc;
Round 7: 6sc;
Round 8: 6sc;
Round 9: 6sc;

— Tail :

Round 1: 6sc in MR Place row marker here.
Round 2: 6inc (12)
Round 3: 12sl st Leave long tail for sewing.

— Legs (Make 2) :

Round 1: 6sc in MR Place row marker here.
Round 2: 6inc (12)
Round 3: 6dec (6)

— Body :

Round 1: 6sc in MR Place row marker here.
Round 2: 6inc (12)
Round 3: (1sc, inc) *6 (18)
Round 4: (2sc, inc) *6 (24)
Round 5: 24sc (4 rouds)
Round 6: 24sc (4 rouds)
Round 7: 24sc (4 rouds)
Round 8: 24sc (4 rouds)
Round 9: (2sc, dec) *6 (18)
Round 10: 18sc;
Round 11: (1sc, dec) *6 (12)
Round 12: 12sc Stuff the body with fiberfill. Head;
Round 13: 12inc (24)
Round 14: (3sc, inc) *6 (30)
Round 15: 30sc;
Round 16: 30sc;
Round 17: 30sc;
Round 18: 30sc;
Round 19: 30sc;
Round 20: 30sc;
Round 21: 30sc;
Round 22: (3sc, dec) *6 (24)
Round 23: (2sc, dec) *6 (18)
Round 24: (1sc, dec) *6 (12)
Round 25: 6dec (6)

— Pillow :

Round 1: Chain 19. From the second chain on the hook: 18sc, turn (18)
Round 2: ch1, 3sc, ch4, (skip 4 sc, start from the next stitch), 4sc, ch4, (skip 4 sc, start from the next stitch), 3sc, turn (18)
Round 3: ch2, 18dcinc, turn (36)
Round 4: ch2, 36dc, turn (36)
Round 5: ch2, (dcinc, sc) *18 Cut the yarn. Make a fastener on the dress (sew a button on one side, make a button loop on the other) Put on a dress on the bear. Pillow Crochet 2 pieces in pink color.

— Ears (Make 2) :

Round 1: Chain 15. Start in the second chain from the hook: 14sc, turn (14)
Round 2: Ch1, 14sc, turn (10 rows).
Round 3: Ch1, 14sc, turn (10 rows).
Round 4: Ch1, 14sc, turn (10 rows).
Round 5: Ch1, 14sc, turn (10 rows).
Round 6: Ch1, 14sc, turn (10 rows).
Round 7: Ch1, 14sc, turn (10 rows).
Round 8: Ch1, 14sc, turn (10 rows).
Round 9: Ch1, 14sc, turn (10 rows).
Round 10: Ch1, 14sc, turn (10 rows).
Round 11: Ch1, 14sc, turn (10 rows).

— Body - Head :

Round 1: Ch 31. Start in the second chain from the hook: 30sc, turn (30)
Round 2: Attention! Crochet in jacquard technique from Row 2 to 11. Add purple yarn (these stitches are highlighted in red). 3. ch2, (3dc, 3dc) *5, turn (30)
Round 4: ch2, (3dc, 3dc) *5, turn (30)
Round 5: ch2, (3dc, 3dc) *5, turn (30)
Round 6: ch2, (3dc, 3dc) *5, turn (30)
Round 7: ch2, (3dc, 3dc) *5, turn (30)
Round 8: ch2, (3dc, 3dc) *5, turn (30)
Round 9: ch2, (3dc, 3dc) *5, turn (30)
Round 10: ch2, (3dc, 3dc) *5, turn (30)
Round 11: ch2, (3dc, 3dc) *5, turn (30)
Round 12: With pink yarn. Ch1, 30sc. Fasten off, cut the yarn, weave in the yarn ends.

— Suitcase :

Round 1: Chain 7. From the second chain on the hook: 6sc, turn (6)
Round 2: Ch1, 6sc, turn (106 rows)

— Head :

Round 1: Chain 33. Start from the second chain on the hook: inc, 30sc, inc, turn (34)
Round 2: Ch1, 34sc, turn;
Round 3: Ch1, 34sc, turn;
Round 4: Ch1, 34sc, turn;
Round 5: Ch1, 34sc, turn;
Round 6: Ch1, 34sc, turn;
Round 7: Ch1, 34sc, turn;
Round 8: Ch1, 34sc, turn;
Round 9: Ch1, 34sc, turn;
Round 10: Ch1, 34sc, turn;
Round 11: Ch1, 34sc, turn;
Round 12: Ch1, 34sc, turn;
Round 13: Ch1, 34sc, turn;
Round 14: Ch1, 34sc, turn;
Round 15: Ch1, 34sc, turn;
Round 16: Ch1, 34sc, turn;
Round 17: Ch1, 34sc, turn;
Round 18: Ch1, 34sc, turn;
Round 19: Ch1, 34sc, turn;
Round 20: Ch1, 34sc, turn;
Round 21: Ch1, 34sc, turn;
Round 22: Ch1, 34sc, turn;
Round 23: ch1, dec, 30sc, dec (32)

— Headband :

Round 1: Chain 33. Start from the second chain on the hook: inc, 30sc, inc, turn (34)
Round 2: Ch1, 34sc, turn;
Round 3: Ch1, 34sc, turn;
Round 4: Ch1, 34sc, turn;
Round 5: Ch1, 34sc, turn;
Round 6: Ch1, 34sc, turn;
Round 7: Ch1, 34sc, turn;
Round 8: Ch1, 34sc, turn;
Round 9: Ch1, 34sc, turn;
Round 10: Ch1, 34sc, turn;
Round 11: Ch1, 34sc, turn;
Round 12: Ch1, 34sc, turn;
Round 13: Ch1, 34sc, turn;
Round 14: Ch1, 34sc, turn;
Round 15: Ch1, 34sc, turn;
Round 16: Ch1, 34sc, turn;
Round 17: Ch1, 34sc, turn;
Round 18: Ch1, 34sc, turn;
Round 19: Ch1, 34sc, turn;
Round 20: Ch1, 34sc, turn;
Round 21: Ch1, 34sc, turn;
Round 22: Ch1, 34sc, turn;
Round 23: ch1, dec, 30sc, dec (32)

— Dress :

Round 1: Chain 26. Start from the second chain on the hook: 25sc, turn (25)
Round 2: Ch1, 25sc, turn (15 rows) Leave long tail for sewing. Sew the pocket to the light pink part.
Round 3: Ch1, 25sc, turn (15 rows) Leave long tail for sewing. Sew the pocket to the light pink part.
Round 4: Ch1, 25sc, turn (15 rows) Leave long tail for sewing. Sew the pocket to the light pink part.
Round 5: Ch1, 25sc, turn (15 rows) Leave long tail for sewing. Sew the pocket to the light pink part.
Round 6: Ch1, 25sc, turn (15 rows) Leave long tail for sewing. Sew the pocket to the light pink part.
Round 7: Ch1, 25sc, turn (15 rows) Leave long tail for sewing. Sew the pocket to the light pink part.
Round 8: Ch1, 25sc, turn (15 rows) Leave long tail for sewing. Sew the pocket to the light pink part.
Round 9: Ch1, 25sc, turn (15 rows) Leave long tail for sewing. Sew the pocket to the light pink part.
Round 10: Ch1, 25sc, turn (15 rows) Leave long tail for sewing. Sew the pocket to the light pink part.
Round 11: Ch1, 25sc, turn (15 rows) Leave long tail for sewing. Sew the pocket to the light pink part.
Round 12: Ch1, 25sc, turn (15 rows) Leave long tail for sewing. Sew the pocket to the light pink part.
Round 13: Ch1, 25sc, turn (15 rows) Leave long tail for sewing. Sew the pocket to the light pink part.
Round 14: Ch1, 25sc, turn (15 rows) Leave long tail for sewing. Sew the pocket to the light pink part.
Round 15: Ch1, 25sc, turn (15 rows) Leave long tail for sewing. Sew the pocket to the light pink part.
Round 16: Ch1, 25sc, turn (15 rows) Leave long tail for sewing. Sew the pocket to the light pink part.

— Blanket :

Round 1: Chain 82. Start in the third chain from the hook: 80dc, turn (80)
Round 2: ch2, 80dc (80)

— Suitcase Side Parts (Make 2) :

Round 1: 6sc in MR Place row marker here.
Round 2: 6sc;
Round 3: 6sc;
Round 4: 6sc;
Round 5: 6sc;
Round 6: 6sc;
Round 7: 6sc;
Round 8: 6sc;
Round 9: 6sc;
Round 10: 6sc;
Round 11: 6sc;
Round 12: 6sc;
Round 13: 6sc;
Round 14: 6sc;
Round 15: 6sc;
Round 16: 6sc;
Round 17: 6sc;
Round 18: 6sc;
Round 19: 6sc;
Round 20: 6sc;
Round 21: 6sc;
Round 22: 6sc;
Round 23: 6sc;
Round 24: 6sc;

Assembly Instructions

  1. Stuff each piece firmly before closing.
  2. Pin all parts in place and check the proportions against the photos.
  3. Sew parts on securely with matching yarn.
  4. Weave in all ends and shape the finished piece.

Important Notes

  • Use stitch markers to keep track of rounds, especially during color changes and shaping sections.
  • Stuff firmly but not too tightly for the best shape and structure; overstuffing can distort your work.
  • Pin all parts in place before sewing to ensure correct positioning and symmetry.
  • Weave in ends as you go to avoid a tedious finishing session at the end.
  • Work with consistent tension throughout for even, professional-looking results.

This cozy Teddy Bear in Suitcase pattern blends technique with whimsy. It makes a thoughtful gift or a charming decorative piece. The finished bear sits proudly in a handmade suitcase that opens to reveal tiny interior details. May the crochet journey be colored with texture and joy.

Good to know

You ask, we answer

The finished teddy bears stand about 11 cm tall, with a suitcase body roughly 14 cm tall when closed, based on the recommended yarn and hook size from the pattern.

Yes, you can substitute yarn weights, but size, proportion, and final look will change. If using a heavier yarn, consider a smaller hook and looser stuffing to maintain proportions.

Basic amigurumi knowledge and experience with precise seaming will help you achieve polished results; the pattern involves multi-part assembly and finishing steps that build on fundamentals.

Most crocheters allocate 12–15 hours, though time can vary based on experience, chosen yarn, and how meticulously interior details are customized.

Interior of suitcase with tiny teddy
Join 100k+ crocheters

Get new free patterns, stitch tips and exclusive content in your inbox.