Crochetologist
Free Crochet Pattern
Beautiful Detailed Adorable

Stitch Amigurumi Pattern

Finished Stitch amigurumi in three blue tones seated, showing head and arms, crochet toy close-up
4.0Rating
5-7 HoursTime
IntermediateSkill
Highlights

What makes it special

Made with Love

An adorable friend to cherish, handcrafted with love to bring comfort and joy for years to come.

Weekend Treat

Expect to spend about 5 to 7 hours making this small amigurumi, including the time for colour changes, stuffing, and careful assembly of ears, eyes and claws.

Intermediate Level

This pattern is ideal for confident beginners moving to intermediate; it uses magic ring, working-in-the-round, invisible decreases, colour changes and basic seaming to shape head, body and limbs in a compact amigurumi.

About This Stitch Amigurumi Pattern

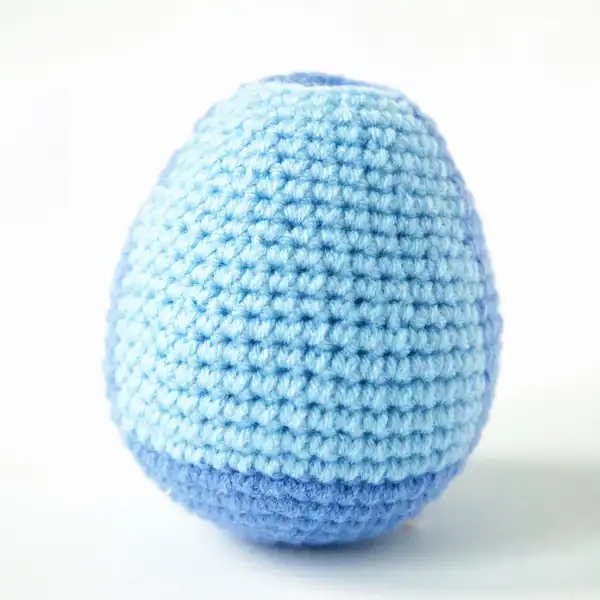
Make a cuddly Stitch-inspired amigurumi using soft blue DK yarn and simple shaping techniques; this fanart pattern guides you through head, body, limbs, ears and tail with friendly, photo-supported assembly notes. The finished toy measures about 18 cm and is perfect for gifting or desk decor. You will work in the round with colour changes and simple seaming to achieve that signature pale belly and big expressive eyes.

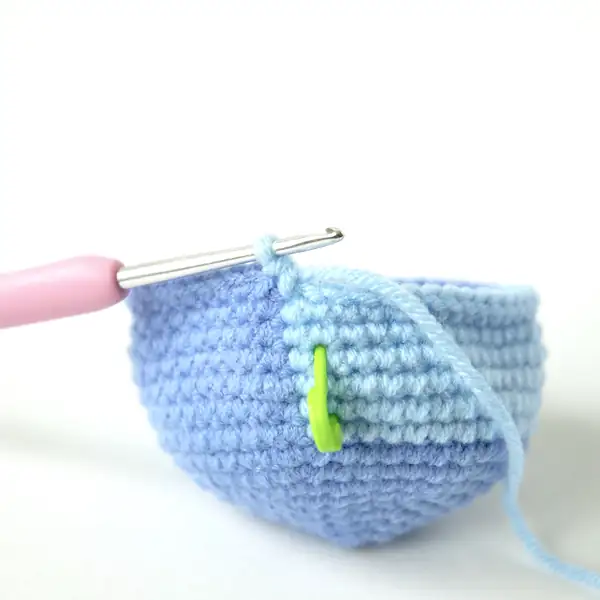
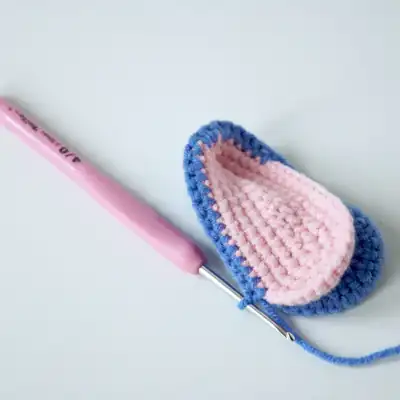
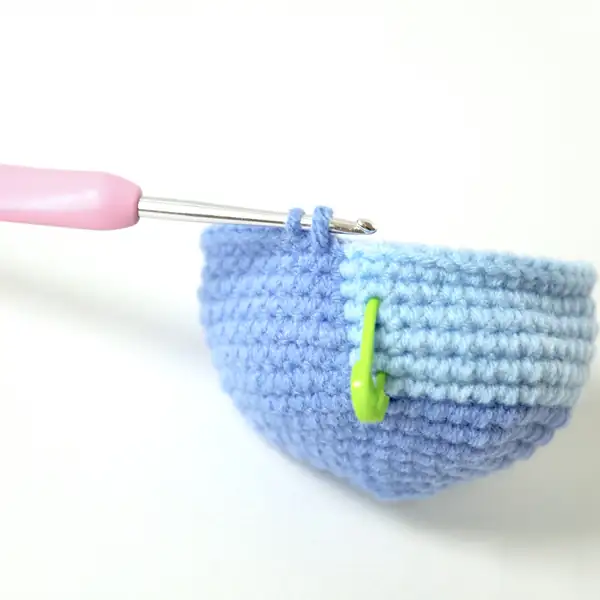
This pattern creates a small fanart amigurumi inspired by the character Stitch, worked in four main colours: dark blue, medium blue, light blue and pink, with felt details for the eyes and embroidered highlights for the pupils. The design is built from separate pieces: head, body, two arms, two legs, four ear halves (assembled in pairs), a small tail and a tiny nose, each crocheted in the round and then sewn together using a mattress stitch for a neat join. Colour changes are used on body and limbs to replicate the character's lighter belly and darker tips, with short rows of single crochet to place the transitions at specific rounds that give Stitch his characteristic look.

The pattern uses a 2.5 mm hook with DK weight yarn to achieve a firm fabric so the stuffing stays hidden and the final toy stands and sits with good posture. Felt is applied for the large eye shapes and a tiny white embroidered dot gives life to the pupils; alternatively you can embroider the entire eye if you prefer to avoid glued or sewn felt. Each piece is carefully stuffed while working and finished with long tails left for sewing to ensure a strong, clean assembly.

The instructions include rounded shaping sequences for increases and invisible decreases, directions for making the claw details on hands and feet, and clear placement notes for attaching the ears, eyes, nose and tail so your finished Stitch looks symmetrical and well-balanced from every angle.

Detail of Stitch head with felt eyes and embroidered white dot, showing light blue face patch amigurumi

This two-part description highlights the maker experience and practical benefits of the toy: the pattern balances playful shaping with straightforward rounds, making the head and body easy to match while practising smooth colour changes. The ear template is worked flat inside a small chain foundation and then joined, which lets you control the inner pink panel precisely before finishing the outer blue layer and sewing it onto the head.

The pattern also suggests knotting and trimming yarn ends after every colour change to keep the inside neat, and it explains how to position the felt eye pieces to align with the top of the arms for the classic open-eyed expression; these small layout notes help avoid frustrating re-sewing at the end and speed up assembly while preserving professional-looking results.

Stitches & Skills You'll Use

This pattern relies primarily on single crochet in the round, often abbreviated as FM in the original instructions, plus a classic magic ring to start each toy part with a tidy centre. You will use increases (Zun./INC) to expand the circles for head, body and limb tops, and invisible decreases (uns. Abn/INV DEC) to shape the neck and reduce the bottoms neatly without puckering the fabric. Learning or practicing the invisible decrease will pay off here because it keeps the lines smooth where the head joins the body and where the limbs taper to the claws.

In addition to the basic rounds, there are planned colour changes in the body and limbs that require cutting and tying the yarn after each change or carrying it carefully if you prefer less waste; the pattern explicitly recommends knotting the ends after every colour change to keep the inside tidy and prevent slips. The ear pieces start from a chain foundation and build with single crochet and increases before joining the inner pink and outer blue halves, so chain tension and seam placement are small technical areas to watch. You will also use slip stitches to finish rounds cleanly when shaping the ears and felt eye edges.

Finally, the finishing skills you practice here — mattress stitch for an invisible seam between head and body, precise placement and sewing of felt eye pieces, and even small embroidery for the white eye dot — are transferable to many other amigurumi patterns and will boost your finishing quality. Overall the stitches and techniques are approachable but teachable, making this a rewarding intermediate-level project focused on tidy shaping and expressive facial details.

Why You'll Love This Stitch Amigurumi Pattern

Colour & Yarn Inspiration

The original pattern calls for dark, medium and light blues plus a touch of pink for the ear interiors; keeping these tones creates the iconic look, but you can swap them boldly to make theme variations such as ocean blues with a turquoise belly or a sunset palette with coral inner ears and soft lavender belly. Using cotton-blend yarn gives a clearer stitch definition and a slightly firmer fabric that holds the rounded shapes well, while acrylic DK maintains softness and flexibility for gentle play and easier washing. If you choose to substitute fibres, test gauge and stitch tension on a 4 to 5 cm swatch to ensure your increases and decreases form the same curves as the sample in the pattern.

For a gender-neutral palette, try slate blue for the main colour with a pale mint belly and a tiny accent of cream for the inner ears; this gives a modern, minimalist feeling while preserving the design contrasts. To create a vintage or muted variant, choose tonal greys and dusty pink rather than bright primaries, and distress the felt slightly by brushing it for a worn, heirloom look. Contrasting yarn weights will change final size: a sport weight yarn with a 2.5 mm hook will give you a slightly taller, slimmer toy, while a bulky yarn with a larger hook will make a chubby, huggable version where you may want to add extra stuffing for structural stability.

Close-up of Stitch limb and claw details, showing colour change and curled toe on the crocheted leg

Switch Things Up

I love how swapping the yarn tones gives this pattern an entirely different personality; a muted slate main colour with cream belly creates a modern, sophisticated companion.

For a playful variant, try pastel aquas and a soft coral inner ear to make a nursery-friendly version that coordinates with baby room decor.

To make the doll larger, change to a heavier yarn and a larger hook, but remember to add more stuffing to maintain the same round shapes and avoid sagging at the joins.

I sometimes replace the felt eyes with small embroidered ovals for a fully washable option that is safer for infants and easier to launder without damaging glued pieces.

Adding a little wire in the arms or neck gives subtle posability, which I enjoy for display pieces; use thin florist wire wrapped in tape to prevent sharp ends from working through the stuffing.

If you prefer keychain pals, work the pattern in a lighter weight yarn and reduce rounds proportionally, then attach a metal keyring loop through a reinforced chain or a sewn tab at the top of the head.

To make a set, repeat the pattern in three sizes — tiny, medium and large — so each toy forms part of a cohesive collection that displays well on a shelf or in a gift box.

Experiment with eye placement to change expression: moving the eyes slightly closer makes the toy look more mischievous, whereas wider spacing produces an innocent, open look.

Embellish the body with tiny appliqued stars or a crocheted mini scarf to theme the toy for holidays or special occasions using left-over yarn scraps for economical upgrades.

Consider a monochrome palette with texture contrasts, like switching to a boucle or cotton-blend yarn for the belly to create subtle, tactile interest while keeping shaping identical.

When trying a different fibre, always make a small test head and compare decreases so you can tweak hook choice and stuffing to match the pattern’s intended silhouette.

If you are gifting multiple dolls, embroider a small initial on the underside of the tail as a discreet personalisation that does not change the outward appearance but makes each gift unique.

Ways to Use & Gift It

This little Stitch amigurumi makes an ideal pocket-sized gift for many occasions because it fits into a small gift box and carries bright, cheerful colours that appeal to kids and fans of the character alike. I have wrapped versions of this amigurumi in tissue with a tiny handmade tag for birthdays and included the matching nose and eye detail as part of a themed present set; a single small but well-made toy often feels more thoughtful than several lower-quality items. Consider pairing the toy with a small printed postcard describing the yarn colours and care tips if you are gifting to someone who might treasure it as a collectible.

Another practical idea is to create multiple scaled versions and give them as a set: a mini keychain version made from thinner yarn and a regular tabletop size made with the recommended DK weight make a charming pair that matches while serving different practical uses. For baby gifts, use the embroidered eyes option and remove any glued felt, then present the finished toy with a lightly washed cloth and an instruction card for gentle care; the soft tactile blues and the compact size make this project a sweet handmade keepsake for nursery displays or stroller toys when supervised carefully.

Common Mistakes & How to Fix Them

Skipping stitch counts on increase rounds will distort shaping and create lopsided pieces; always recount after every increase row and mark the start of rounds with a stitch marker so you can confirm totals before moving on. Leaving colour ends loose instead of knotting or weaving them in will create tangles inside the body; cut and knot neatly after each colour change and weave tails into the nearest stitches to secure them. Overstuffing early while shaping the head can prevent proper neck decreases and create a tight, misshapen seam; stuff gradually and add firm stuffing only after the main shaping rounds are done to keep curves smooth. Sewing ears on without checking alignment against the arms and eye placement can make the face look uneven; pin the ears, step back and compare both sides in a mirror before stitching them down. Using a hook that is too large for the yarn results in visible stuffing and loose fabric; swap to a smaller hook or choose a firmer yarn to ensure stitches are dense enough for amigurumi. Attaching felt with glue alone may work temporarily but will fail in washing or play; sew the felt eye pieces with small, neat stitches or use a combination of tiny hand stitches and a dab of fabric glue for added security.

Maker's Notes

When I made my sample amigurumi I used DK weight acrylic yarn (50 g/133 m) and a 2.5 mm hook and spent roughly six hours from start to finish including stuffing and assembly. I used about 120 g of the medium blue for head and body, and under 30 g each of light blue, dark blue and pink for details and ears. Beginners often stumble at the invisible decrease rounds around the neck because missing a stitch changes the count, so I recommend counting stitches after each decrease round and using a stitch marker to mark the round start.

Another tricky spot is the ear assembly where inner and outer halves must align; pin both pieces and check the outer curve before sewing. Finally, placing the felt eye pieces on the head requires checking alignment with the arms and the colour-change boundary; pin them, take a photo, and adjust before sewing permanently.

I tried a substitution: I tested the pattern in a slightly thicker DK cotton blend on a 3.0 mm hook and found the finished figure grew about 10–15 percent taller and the fabric felt slightly stiffer; the increased stitch definition made the felt eyes sit cleaner but required heavier stuffing to keep the body rounded evenly.

Stitch Amigurumi Pattern

Make this cute Stitch fanart amigurumi with our free crochet pattern — full round-by-round instructions, materials and assembly tips. Download and start today!

Intermediate 5-7 Hours
Pattern at a glance
Skill level
Intermediate
Time to make
5-7 Hours
Hook size
2.5 mm (B/1)
Yarn weight
DK / #3
Finished size
Approx. 18 cm / 7 in tall
Gauge
Approx. 18 sc x 20 rows = 10 cm / 4 in square worked in single crochet with DK yarn and 2.5 mm hook; aim for a tight gauge to prevent stuffing showing.
Yarn used
Approx. 130-180 g total yarn; medium blue main colour 100-150 g (approx. 266-399 m), other colours combined less than 50 g (approx. <133 m).

Materials Needed

Main Fabric
  • 01
    DK weight yarn / #3: Medium blue - 100-150 g (approx. 266-399 m)
  • 02
    DK weight yarn / #3: Dark blue - under 50 g (approx. <133 m)
  • 03
    DK weight yarn / #3: Light blue - under 50 g (approx. <133 m)
  • 04
    DK weight yarn / #3: Pink - under 50 g (approx. <133 m)
  • 05
    Small amounts of black and white embroidery thread for eye details
Tools Required
  • 01
    Crochet hook size 2.5 mm
  • 02
    Stitch markers
  • 03
    Tapestry needle for sewing and weaving ends
  • 04
    Sewing needle for felt and embroidery
  • 05
    Scissors
  • 06
    Pins for assembly
  • 07
    Filling polyfill / stuffing
  • 08
    Felt sheets (light blue or white and black) for eyes
  • 09
    Embroidery thread in white and black
  • 10
    Optional: stitch holder or spare yarn for placing eyes

— Mit mittelblauem Garn :

Round 1: 6 FM in den MR (6)
Round 2: 2 FM in jede Masche (12)
Round 3: (1 FM, Zun.) x6 (18)
Round 4: (2 FM, Zun.) x6 (24)
Round 5: (3 FM, Zun.) x6 (30)
Round 6: (4 FM, Zun.) x6 (36)
Round 7: (5 FM, Zun.) x6 (42)
Round 8: (6 FM, Zun.) x6 (48)
Round 9: (7 FM, Zun.) x6 (54)
Round 10: 1 FM in jede Masche (54)
Round 11: 1 FM in jede Masche (54)
Round 12: 1 FM in jede Masche (54)
Round 13: 1 FM in jede Masche (54)
Round 14: 1 FM in jede Masche (54)
Round 15: 1 FM in jede Masche (54)
Round 16: 1 FM in jede Masche (54)
Round 17: 1 FM in jede Masche (54)
Round 18: 1 FM in jede Masche (54)
Round 19: 1 FM in jede Masche (54)
Round 20: (7 FM, uns. Abn.) x6 (48)
Round 21: (6 FM, uns. Abn.) x6 (42)
Round 22: (5 FM, uns. Abn.) x6 (36)
Round 23: (4 FM, uns. Abn.) x6 (30)
Round 24: (3 FM, uns. Abn.) x6 (24)
Round 25: (2 FM, uns. Abn.) x6 (18)

— Part 2 :

Round 1: 13 FM, 5 FM in letzte M, 13 FM;
Round 3: 1LM++, 12 FM, (1 FM, Zun.) x5,;
Round 4: 1 LM, 40 FM (40)

— Part 3 :

Round 1: 6 FM in MR (6)
Round 2: 2 FM in jede M (12)
Round 3: (1 FM, Zun.) x6 (18)
Round 4: (2 FM, Zun.) x6 (24)
Round 5: (3 FM, Zun.) x6 (30)
Round 6: (4 FM, Zun.) x6 (36)
Round 7: (5 FM, Zun.) x6 (42)
Round 8: (6 FM, Zun.) x6 (48)
Round 9: 1 FM in 46 Maschen. 47. Masche mit;
Round 10: in hellblau: 15 FM;
Round 11: in hellblau: 15 FM;
Round 12: in hellblau: 15 FM;
Round 13: in hellblau: 15 FM;
Round 14: in hellblau: 15 FM;
Round 15: in hellblau: 15 FM;
Round 16: Masche mit mittelblau abschliessen.

— Part 4 :

Round 16: in hellblau: (3 FM, uns. Abn.), 6 FM, uns. Abn., 2 FM, Farbwechsel (1 FM)
Round 17: in hellblau: 14 FM, 15. Masche mit mittelblau abschliessen;
Round 18: in hellblau: 14 FM, 15. Masche mit mittelblau abschliessen;
Round 19: in hellblau: (5 FM, uns. Abn) x2, (Masche aufnehmen, mit mittelblau abschliessen) (1 FM),;
Round 20: in hellblau: 12 FM, Farbwechsel zu mittelblau (1 FM) in mittelblau: 22 FM,;
Round 21: in hellblau: 13 FM, Farbwechsel, (1 FM), 21 FM, Farbwechsel (1 FM) (36)
Round 22: in hellblau: (4 FM, uns. Abn) x2, 1 FM, Farbwechsel (1 FM) in mittelblau: 2 FM, uns. Abn., (4 FM, uns. Abn) x2, 4 FM, uns. Abn, uns. Abn mit;
Round 23: 1 FM in jede M (Farbwechsel machen) (30)
Round 24: in hellblau: (3 FM, uns. Abn)
Round 25: FM in jede M (Farbwechsel;
Round 26: (2 FM, uns. Abn.) x2, 1 FM,;

— in dunkelblau :

Round 1: 6 FM in MR (6)
Round 2: 2 FM in jede M (12)
Round 3: (1 FM, Zun.) x6 (18)
Round 4: (2 FM, Zun.) x6 (24)
Round 5: 1 FM in jede M (24)
Round 6: 1 FM in jede M (24)
Round 7: 1 FM in jede M (24)
Round 8: (2 FM, uns. Abn.) x6 (18)
Round 9: 1 FM in jede M (18)
Round 10: (2 FM, Zun.) x6 (24)
Round 11: 1 FM in jede M (24)
Round 12: 1 FM in jede M (24)
Round 13: 1 FM in jede M (24)
Round 14: 1 FM in jede M (24)
Round 15: (2 FM, uns. Abn.) x6 (18)
Round 16: 1 FM in jede M (18)
Round 17: 1 FM in jede M (18)

— Part 6 :

Round 1: 6 FM in MR (6)
Round 2: 2 FM in jede M (12)
Round 3: (1 FM, Zun.) x6 (18)
Round 4: (2 FM, Zun.) x6 (24)
Round 5: 1 FM in jede M (24)
Round 6: 1 FM in jede M (24)
Round 7: 1 FM in jede M (24)
Round 8: (2 FM, uns. Abn.) x6 (18)
Round 9: 1 FM in jede M (18)
Round 10: (2 FM, Zun.) x6 (24)
Round 11: 1 FM in jede M (24)
Round 12: 1 FM in jede M (24)
Round 13: 1 FM in jede M (24)
Round 14: 1 FM in jede M (24)
Round 15: 1 FM in jede M (24)
Round 16: (2 FM, uns. Abn.) x6 (18)
Round 17: 1 FM in jede M (18)
Round 18: 1 FM in jede M (18)
Round 19: (1 FM, uns. Abn.) x6 (12)
Round 20: 1 FM in jede M (12)

— Part 7 :

Round 1: 6 FM in MR;
Round 2: 2 FM in jede M (12)
Round 3: 1 FM in jede M (12)
Round 4: (1 FM, Zun.) x6 (18)
Round 5: (1 FM, uns. Abn.) x6 (12)

— Part 8 :

Round 23: und 24, eine Masche ins;

Assembly Instructions

  1. Sew head to body using mattress stitch along the long tail left at the end of the head, aligning the neck narrowing with the beginning of the body colour change to hide the seam.
  2. Attach arms by placing the top of each arm between rounds 23 and 24 and sewing one stitch into the light-blue section so the shoulders line up with the chest shading.
  3. Position the lower arm ends between rounds 19 and 20, offset by 1–3 stitches from the light-blue panel, and sew securely so the claws point upwards when the toy is seated.
  4. Sew the legs so the underside begins near rounds 7 and 8 and the tops align between rounds 15 and 16, leaving three stitches between the legs and the light-blue belly seam for balanced posture.
  5. Pin the ears before sewing so that the top of each ear ends between rounds 11 and 12 and the lower edge sits one round above the body colour change, then stitch the ear halves together with the right side facing out.

Important Notes

  • Work in continuous rounds without turning unless explicitly stated, and use a stitch marker to mark the first stitch of each round to keep your counts accurate.
  • After each colour change cut and knot the yarn ends as recommended in the pattern to keep the inside tidy and prevent long tails from causing lumps.
  • Stuff pieces firmly but in small increments to maintain smooth shaping, and add extra stuffing near shaping points only after the main decreases are complete to avoid overfilling.

Thank you for making this Stitch amigurumi with love and patience; your handmade companion will carry warmth and charm to its new home. Whether you gift it or keep it, every stitch tells a small story about care and creativity. Share a photo and tag the pattern designer to celebrate your completed toy and inspire others to try this cozy project.

Good to know

You ask, we answer

The finished amigurumi measures approximately 18 cm tall when using DK weight yarn and a 2.5 mm crochet hook, with small variations depending on tension and stuffing amount.

Yes, using a different yarn weight will change the final size; choose a smaller hook for finer yarn or a larger hook for bulky yarn and expect to adjust stuffing amounts and perhaps the number of rounds to maintain proportions.

Intermediate skill is recommended because the pattern uses magic rings, invisible decreases, colour changes and careful assembly, although confident beginners familiar with single crochet and basic shaping can follow along with patience.

Most crocheters complete this small amigurumi in about 5 to 7 hours, including cutting felt, sewing eyes, stuffing and finishing; times will vary by experience and any customisation you add.

For baby-safe toys choose embroidered eyes or securely sewn felt rather than safety eyes, and double-stitch felt pieces with matching thread to prevent detachment during handling and washing.

Spot clean gently with a damp cloth for small stains and avoid machine washing when possible; if necessary place the toy in a laundry bag and use a gentle cycle, then reshape and air dry to maintain its form.

Back and side view of Stitch amigurumi highlighting ear seam and tail attachment, crochet doll
Join 100k+ crocheters

Get new free patterns, stitch tips and exclusive content in your inbox.