Crochetologist
Free Crochet Pattern
Beautiful Detailed Adorable

Sorting Hat Pattern

Finished brown Sorting Hat crochet hat with pointed crown and ruffled brim, displayed on a neutral surface
4.6Rating
5-7 HoursTime
IntermediateSkill
Highlights

What makes it special

Wear It Proudly

Fun patterns meet timeless design in pieces that express personality while remaining wonderfully wearable.

Weekend Treat

Expect to spend 5–7 hours making the hat; the crown shaping and finishing take most of the time while the brim works up quickly with larger rounds.

Intermediate Level

Aimed at crocheters comfortable with working in unjoined spirals, the pattern uses an adjustable ring, front-loop-only rounds, triple crochet sections and paired decreases for shaping, suitable for intermediate skill development.

Make an instantly recognizable costume piece with soul and personality: the Sorting Hat has the perfect mix of theatrical shape and humble, handmade charm that only crochet can deliver. This project is for makers who love a little drama in their work and who enjoy the satisfying arc from a tiny adjustable ring to a full cone-shaped hat that seems to have a mind of its own.

If you are crafting for a costume party, a theatrical night, or as a display prop, this hat gives you options—floppy or structured brim, subtle stuffing for a perky peak, and an expressive mouth-and-eye finish that breathes character into the finished piece. Its the kind of project that transforms a pile of yarn into something that sparks a smile every time someone recognizes it.

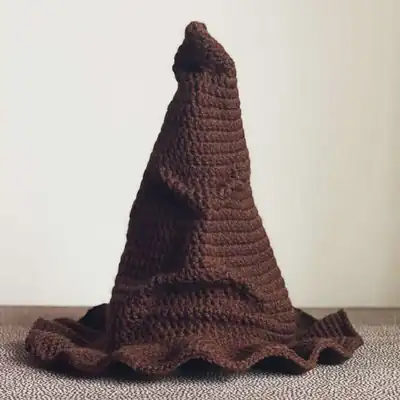
About This Sorting Hat Pattern

This pattern creates a full-size crocheted Sorting Hat with a shaped crown, floppy brim, built-in mouth shaping and eye shaping for that classic grumpy expression. Worked in spiral rounds from an adjustable ring to the final brim shaping, the pattern uses brown chenille or double-stranded worsted weight yarn and a Size N crochet hook. The finished hat includes instructions for creating the mouth (formed across rounds 23–25), the eye shaping (created with textured rounds 18–19) and optional felt reinforcement for a stiffer brim.

Materials list and finishing notes cover felt placement, inserting polyester fiberfill under the crown if needed, and how to weave the internal securing thread to tilt the eyes. Suitable for costume wear or display, the pattern gives counts for each round through round 37 and options to increase further for larger sizes.

The pattern walks you through building the hat from the very top down, letting you sculpt the crown by changing increases and working in both loops or front loops only where indicated. You will work many short rounds to form the eyes and mouth details and then switch to larger counts for a wide, undulating brim.

Working in an unjoined spiral keeps the texture continuous and helps the crown take on the natural cone shape; the instructions remind you when to move your locking stitch marker to the loop on your hook so rows remain aligned. As you stitch you'll progressively see the hat take on character — the mouth tucks inboard and the eye shaping is formed by textured rounds and strategic decreases.

The finishing section guides you through pulling the mouth to the inside and using a long yarn tail to tilt the center of the eyes downward slightly for a grumpy expression, and optional felt reinforcement instructions let you stiffen the brim without changing the overall look.

Close-up photograph of the Sorting Hat brim and textured crocheted rows showing front-loop-only ridges and stitch detail

You'll enjoy the balance of straightforward single crochet work and occasional special stitches that give the Sorting Hat its personality. The layout places shaping instructions in clear round-by-round counts so you always know how many stitches you should have at the end of each round.

Finishing notes are intentionally explicit about where to stitch felt and how to weave the internal yarn to create the facial tilt so your completed hat has both form and function, making dressing up or displaying it a satisfying finish to the project.

Stitches & Skills You'll Use

This pattern uses core crochet skills that are approachable yet capable of shaping character: single crochet forms the body of the hat, while sc2tog creates the decreases that sculpt the crown profile. You will also work half double crochet in the brim shaping and triple crochet in short clusters to add height and textural contrast in selected rounds.

Another essential technique used here is front-loop-only (FLO) rounds, which change the surface of the fabric and let you build visible ridges that read as facial features. The adjustable ring to start the top produces a neat closed centre, and working in unjoined spirals keeps the texture continuous and natural rather than producing a visible seam.

Finishing skills include threading a long yarn tail and weaving it strategically to fold the mouth inward and tilt the eyes; basic hand-stitching with a yarn or sewing needle is required for attaching felt strips and securing internal reinforcements. Together these stitches and techniques make the hat both sculpted and sturdy.

Why You'll Love This Sorting Hat Pattern

I absolutely love this pattern because it turns simple crochet shaping into a characterful prop with personality; the gradual increases and selective textured rounds create a sculpted crown that feels handmade and theatrical. Making the hat is a satisfying rhythm of single crochet rounds interrupted by small shaping moments that reward attention and patience. I enjoy the finishing step where a threaded yarn is pulled through the mouth and between the eyes to set the Sorting Hat's famously grumpy expression, because it is the single action that truly brings the design to life.

The optional felt reinforcement lets me tailor the brim's stiffness for different uses, so the same pattern works for costume wear or as a lightweight prop on a shelf.

Colour & Yarn Inspiration

Although the classic Sorting Hat is brown, this project responds beautifully to variations: try a deep chocolate chenille for a plush, velvety finish or combine two tones held together for a subtly variegated look that reads richer from a distance. Holding two strands of worsted weight together will give the structure needed for the brim and crown while keeping the hat soft and wearable.

For whimsical alternatives, choose autumnal shades—burnt orange, rust and moss held as a palette—to create a fall-ready version that still nods to the original design. Swapping to a smoother acrylic rather than chenille produces crisper stitch definition which emphasizes the mouth and eye shaping, so choose fibers based on whether you want plush texture or sculptural clarity.

Inside view of the hats brim showing pinned felt strips ready for trimming and stitching for reinforcement

Switch Things Up

I like to experiment with brim depth to change the hats silhouette; by adding or removing rounds of increases before the brim you can create a shallow floppy brim or a dramatic wide edge that billows when you move.

For a different character, alter the mouth shaping: instead of pulling the mouth inside, leave it outward and embroider teeth or folds for a mischievous grin that changes the hats mood entirely.

Try swapping the textured triple crochet bands for alternating front-loop-only ribbing to create vertical ridges on the crown; this tweak gives a more artisanal, hand-crafted appearance while using the same round counts.

If you want a more wearable, weatherproof hat, attach a fabric lining in a light-weight cotton instead of felt; stitch the lining to the inner edge of the brim and to the crown seam so the hat sits comfortably on hair and resists wind.

I sometimes add a small detachable brooch or ribbon band around the base of the crown for a seasonal look; use a few discreet stitches to make the band removable so you can wash the hat without damaging the embellishment.

Ways to Use & Gift It

The Sorting Hat makes a memorable handmade gift for fans of costume play and theatrical collectables; present it as part of a costume set, paired with a cloak or character-themed accessory to create a ready-to-wear ensemble. Because the brim can be stiffened with felt, the hat can travel better in a gift box and arrive looking presentable, making it ideal for shipping to friends and family who appreciate handmade finery.

For a special keepsake, personalise the inside with a small embroidered label or a stitched initial on the felt lining; a subtle personalization transforms the hat from a prop to a heirloom piece. Display ideas include placing it on a simple hat stand, using it as a conversation piece on a shelf, or creating themed mantel displays with fairy lights and comfy fabrics for seasonal decoration that highlights the hats silhouette.

Common Mistakes & How to Fix Them

Skipping the locking stitch marker when working in unjoined spirals causes missed stitches and miscounted rounds; always place a marker at the start and move it to the loop on your hook after each row to stay accurate. Working the front-loop-only rounds without checking orientation can reverse the texture and spoil the eye shaping; confirm you are inserting the hook in the front loop only on the rounds marked FLO before you begin. Forgetting to tighten the adjustable ring at the start leaves a visible hole at the crown center; pull the tail until the center is closed and check the first round for gaps before proceeding. Overstuffing the crown insert or felt support will distort the hat's fit and change the intended brim fall; add polyester fiberfill conservatively and fit the hat on a head-form if possible while adjusting. Stitch counting errors during the sections that use sc2tog will rapidly throw off later counts and shaping; recount your stitches at the end of every round that includes decreases to ensure accuracy. Sewing felt to the brim without trimming the overlap evenly can create lumps and misalignment on the hat edge; pin the felt strips in place first and trim to match the crocheted edge before stitching down carefully.

Maker's Notes

When I made the sample I used double-stranded worsted weight acrylic held together on a 9.0 mm hook and spent about six hours from start to finish, including planning and the felt finishing. The rounds that caused most hesitation for testers were the textured triple crochet bands in rounds 18–19 and the sc2tog sequences in round 19 and again in rounds 25–27; beginners often miscount there because the extra height of trc changes the row rhythm. I recommend stuffing slowly if using fiberfill and pinning felt carefully before sewing; taking time at the finishing stage prevents fit and brim issues.

Overall the pattern sewed together cleanly when following the round counts provided.

I tried a substitution: I tried holding two DK skeins together on a 5.5 mm hook to mimic the recommended thickness and produced a hat about 18 cm tall, noticeably smaller and with a softer brim than the sample made on a Size N hook; the stitch definition was finer and the facial shaping appeared less pronounced. This substitution works for a child-sized or decorative mini version but will not provide the same adult fit or sculptural crown as the original hook and yarn combination.

Sorting Hat Pattern

Make this free crochet pattern for a Sorting Hat — full round-by-round instructions, materials and finishing tips included for costume makers. Download the pattern and start stitching today.

Intermediate 5-7 Hours
Pattern at a glance
Skill level
Intermediate
Time to make
5-7 Hours
Hook size
9.0 mm (M/N)
Yarn weight
Worsted / #4 (held double or chenille equivalent)
Finished size
Approx. 24 cm / 9.5 in tall
Gauge
Approx. 9 sc x 8 rounds = 5 cm (2 in); work at a tight tension so stuffing and felt do not show through.
Yarn used
Approx. 150-200 g (300-400 m / 328-437 yd) of main brown yarn

Materials Needed

Main Fabric
  • 01
    Brown chenille yarn, or double-stranded worsted (approx. 150-200g / 300-400m)
  • 02
    Brown felt for brim reinforcement (optional, several small strips plus one circle)
  • 03
    Polyester fiberfill for crown top support (small bag, optional)
Tools Required
  • 01
    Size N crochet hook
  • 02
    Yarn needle for weaving and finishing
  • 03
    Tapestry needle or sewing needle for felt
  • 04
    Scissors
  • 05
    Locking stitch marker
  • 06
    Pins for holding felt in place (optional)
  • 07
    Polyester stuffing (optional)

— PATTERN :

Round 1: Starting at top of hat with N hook, make an adjustable ring, ch 1, sc 3 into ring.
Round 2: Work 2 sc into each st (6 sts)
Round 3: Sc in each st.
Round 4: Sc in each st.
Round 5: Sc in each st.
Round 6: 2 Sc in next st, sc in each st around (7 sts)
Round 7: Sc in next 3 sts, 2 sc in next st, sc in next 3 sts (8 sts)
Round 8: *(2 Sc in next st, sc in next 3 sts), rep from * around (10 sts)
Round 9: *(Sc in next 2 sts, 2 sc in next st, sc in next 2 sts), rep from * around (12 sts)
Round 10: *(Sc in next st, 2 sc in next st), rep from * around (18 sts)
Round 11: Sc in each st.
Round 12: Sc in each st.
Round 13: *(2 Sc in next st, sc in next 8 sts), rep from * around (20 sts)
Round 14: Sc in each st.
Round 15: *(Sc in next 4 sts, 2 sc in next st, sc in next 5 sts), rep from * around (22 sts)
Round 16: Sc in each st.
Round 17: *(2 Sc in next st, sc in next 10 sts), rep from * around (24 sts)
Round 18: Sc in next 8 sts, 2 trc in next 4 sts, hdc in next 4 sts, 2 trc in next 4 sts, sc in next 4 sts (32 sts)
Round 19: Sc in next 8 sts, sc2tog 4 times, sc in next 4 sts, sc2tog 4 times, sc in next 4;
Round 20: *(Sc in next 3 sts, 2 sc in next st, sc in next 4 sts), rep from * around (27 sts)
Round 21: *(Sc in next 8 sts, 2 sc in next st), rep from * around (30 sts)
Round 22: Sc in each st.
Round 23: Sc in next 14 sts, 2 hdc in next 10 sts, sc in next 6 sts (40 sts)
Round 24: Sc in next 14 sts, hdc in next 20 sts, sc in next 6 sts (40 sts)
Round 25: Sc in next 14 sts, sc2tog 10 times, sc in next 6 sts (30 sts)
Round 26: *(Sc in next 9 sts, 2 sc in next st), rep from * around (33 sts)
Round 27: *(Sc in next 5 sts, 2 sc in next st, sc in next 5 sts), rep from * around (36 sts)
Round 28: *(2 Sc in next st, sc in next 11 sts), rep from * around (39 sts)
Round 29: *(Sc in next 12 sts, 2 sc in next st), rep from * around (42 sts)
Round 30: Sc in each st.
Round 31: Working in FLO of each st, *(2 sc in next st, sc in next 6 sts), rep from * around (48)
Round 32: Working in both loops of each st, *(Sc in next 3 sts, 2 sc in next st, sc in next 4;
Round 33: *(Sc in next 8 sts, 2 sc in next st), rep from * around (60 sts)
Round 34: *(2 sc in next st, sc in next 9 sts), rep from * around (66 sts)
Round 35: *(Sc in next 3 sts, 2 sc in next st, sc in next 7 sts), rep from * around (72 sts)
Round 36: *(Sc in next 10 sts, 2 sc in next st, sc in next st), rep from * around (78 sts)
Round 37: *(2 sc in next st, sc in next 12 sts), rep from * around (84 sts)

Assembly Instructions

  1. Thread a yarn needle with a long strand of the brown yarn, knot the end, and push the mouth created in rounds 23–25 to the inside of the hat before stitching.
  2. Weave the yarn from the bottom edge up through the mouth and secure it to the inside; stitch both sides of the mouth the same way so it holds folded inward.
  3. Bring the same thread up between the eye areas formed in rounds 18–19 and down toward the mouth, pull tightly to tilt the center of the eyes downward slightly and knot securely inside the hat.
  4. For a stiffer brim, overlap rounded strips of brown felt on the inside of the brim, pin into place, trim edges to match the crocheted border, then stitch felt along the outer and inner edges using brown thread.
  5. If the top is too floppy, insert a felt circle or a small amount of polyester fiberfill beneath the crown just under the eye area and stitch into place ensuring the felt circle does not sit so low that the hat will not fit on a head.

Important Notes

  • Work in unjoined spirals and move your locking stitch marker to the loop on your hook after each round to maintain correct orientation for shaping.
  • When a round is marked FLO, insert your hook into the front loop only; this changes the surface texture and is essential for some shaping instructions.
  • Check your stitch counts at the end of each round, especially after rounds containing sc2tog or multiple trc sections, to avoid cascading errors.
  • Pin felt reinforcements in place and trim to match the crochet edge before stitching; sewing untrimmed felt will create uneven tension and an irregular brim.
  • Use a long tail when weaving the internal securing thread through the mouth and eyes so you can pull and test the expression before knotting and hiding the end.

This Sorting Hat pattern was written to bring a little theatrical mischief to your costume or display shelf. The step-by-step rounds let you sculpt the crown and form the mouth and eye tilt that give the hat its personality. Optional felt reinforcement and stuffing tips mean you can choose a floppy or rigid brim depending on your final use. Happy stitching and may your hat always declare the right house!

Good to know

You ask, we answer

The finished hat measures approximately 24 cm tall with a wide brim that will sit over most adult heads when made with the recommended yarn held double and a Size N hook; exact fit will vary with tension and any added felt.

Yes; to enlarge the crown continue increasing by 3 stitches per round (as noted in the pattern) until the crown diameter reaches the desired size, then continue shaping as instructed. To make a smaller version use lighter yarn and a smaller hook, remembering that proportions will change.

The pattern is recommended as intermediate due to working in unjoined spirals, front-loop-only rounds and a mix of triple crochet and decrease shaping; a confident beginner who knows sc, hdc and how to manage stitch markers could attempt it with patience.

For a stiffer brim overlap and pin rounded strips of brown felt to the inside edge, trim the felt to match the crocheted border, and stitch the felt to both the outer and inner edge of the brim; this preserves the drape but adds structure.

The eye expression is shaped by working textured rounds in the crown (rounds 18–19) then weaving a long yarn tail from the bottom, up through the mouth, and between the eye areas before pulling tight; the instruction to pull and knot inside creates the downward tilt.

If the top is too floppy insert a small circle of felt just beneath the eye area inside the crown and stitch it into place with brown thread, or add a small amount of polyester fiberfill under the felt circle for subtle support, being careful not to lower the felt too far.

Materials laid out for the Sorting Hat project including brown chenille yarn, a Size N crochet hook, yarn needle and felt pieces
Join 100k+ crocheters

Get new free patterns, stitch tips and exclusive content in your inbox.