Crochetologist
Free Crochet Pattern
Beautiful Detailed Adorable

Snuggle Bunny Amigurumi Pattern

Cover image of Snuggle Bunny amigurumi with blanket on green background
4.0Rating
2-4 HoursTime
Beginner FriendlySkill
Highlights

What makes it special

Made with Love

An adorable friend to cherish, handcrafted with love to bring comfort and joy for years to come.

Bite-Sized Project

Finishes in 2-4 hours—perfect for an afternoon of cozy crochet and a quick gift.

Beginner Friendly Level

This project is tailored for beginners who want to practice basic amigurumi techniques: foundational shaping through simple increases and decreases, working in the round, and basic seaming. The included blanket adds a straightforward textile element to reinforce consistency in tension and finishing across two different textures, creating a satisfying dual-result project.

Delight in a soft, cuddly bunny that you craft to be hugged again and again. This amigurumi toy is paired with a coordinating crochet square blanket, forming a complete, gift-ready keepsake the moment you finish. The project starts with approachable rounds and gentle shaping, inviting you to grow your skills without losing the comforting charm that makes handmade toys so cherished.

Whether you’re welcoming a new baby or seeking a thoughtful present for a nursery, this duo offers warmth and whimsy in a manageable, confidence-boosting build. The pattern emphasizes clean finishing, even tension, and tidy seams, so you’ll finish with a polished toy that sits nicely on a shelf or in a little play corner. Get ready to crochet something that feels as comforting as a hug.

About This Snuggle Bunny Amigurumi Pattern

The Snuggle Bunny presents a compact amigurumi form paired with a comforting crochet square blanket. The design relies on a simple magic-ring foundation to begin the head, followed by a series of evenly spaced rounds that build a rounded torso and gentle cheeks. Minimal shaping keeps the process approachable, with ears that project forward to convey an endearing expression. The accompanying blanket employs a basic, airy motif that creates a soft, yarn-draping fabric, forming a neutral backdrop that enhances the bunny’s warmth. Clear assembly steps ensure the limbs and ears align neatly when sewn in place, minimizing guesswork as you finish.

Finishing is focused on precision: consistent tension to prevent gaps, secure attachment points for limbs and ears, and careful alignment so the features sit symmetrically. A restrained color palette supports a calm aesthetic, allowing the toy to remain a versatile piece for any nursery or display shelf. The instructions emphasize straightforward, repeatable rounds and increases that help the beginner maintain a steady rhythm rather than chasing complex shaping with every stitch.

What makes the pattern approachable is the balance between a compact toy and a softly textured backdrop. The rounds progress in a predictable cadence, so you can anticipate the build without overthinking each move. You’ll gain confidence in shaping, sewing, and finishing as a cohesive unit, which sustains motivation for future projects while delivering a finished piece you’ll be proud to gift.

Close-up of Snuggle Bunny head and ears

The Snuggle Bunny pattern reinforces work in the round, starting with a tight magic-ring and incrementing through a series of evenly spaced rounds to craft a rounded head and plump cheeks. The ears are created as separate elements and then attached to maintain symmetry, with placement guided by a photo or a simple reference notch to ensure even alignment. A light embroidery or minimal facial accents can be added after assembly if desired, but the technique remains straightforward and within the reach of a newer crocheter.

The blanket portion uses a simple, granny-style square approach that yields a soft, airy texture. Color changes are introduced sparingly to maintain a calm, cohesive look, while tension remains consistent to prevent fabric distortion. The two components—toy and square—share a common, restrained design language that helps the set feel cohesive when displayed together. As you work, you’ll practice keeping stitches uniform, aligning rounds, and sewing pieces with tidy, near-invisible seams.

In practice, you’ll see a gentle ramp-up: form the head, then the body, then attach limbs, and finally switch to the blanket’s motif. This sequencing supports a steady pace and reduces the sense of overwhelm for a first amigurumi project, while still delivering a finished piece that looks polished and intentional.

Stitches & Skills You'll Use

The core techniques in this project align with a typical beginner-friendly amigurumi workflow. Start by forming a tight magic ring to establish the head’s center, then work single crochet stitches into each round to create a dense, plush fabric. Increase and decrease methods are used to shape the head and the cheeks, with a steady progression of rounds ensuring a smooth curve rather than abrupt angles. Working in the round, you maintain a continuous surface without gaps, and you’ll eventually close the top or body with careful stuffing that preserves a rounded silhouette.

The ears are introduced as separate components, each worked in a straightforward sequence and then placed and secured to achieve symmetrical placement. A small amount of embroidery or surface detailing can be added after assembly to introduce facial expression without overwhelming the basic silhouette. For the blanket, a granny-style square or other simple motif yields a soft texture that drapes well; color changes are kept minimal to maintain a serene overall look. Finishing emphasizes neat seams and hidden tails, which contribute to a tidy final appearance.

Together, these steps forge a dependable workflow: foundation chain foundation stitches, form the head in a tight circle, build the body with a sequence of rounds, attach limbs with careful alignment, and sew the pieces with small, neat stitches. The result is a cuddly figure that remains faithful to the pattern’s proportions while offering room for individual adjustments if necessary. Precision in seam placement, consistent tension, and measured stuffing are the defining details that transform a good craft into a polished keepsake.

For newcomers, the pattern offers gentle troubleshooting paths: verify that each round contains the correct stitch count before continuing, mark the start of each round to prevent counting errors, and test-fit the ears before final sewing to ensure balanced symmetry. By sequencing the build in small, repeatable steps, you maintain momentum and reduce the risk of misalignment or uneven stuffing influencing the final look.

Why You'll Love This Snuggle Bunny Amigurumi Pattern

This pattern strikes a balance between approachability and charm, making it ideal for a first amigurumi project that also feels complete as a gift. The finished toy remains inherently cuddly, and the accompanying square elevates the present into a cohesive keepsake that can be enjoyed in play or as nursery decor. The rounds progress with a rhythm that yields a uniform fabric, and gentle shaping keeps the figure approachable without introducing complex techniques. The design invites light customization through color choices, allowing a sense of personal touch without sacrificing the overall harmony of the set.

Another strength is the sense of accomplishment that accompanies steady progress. Beginners experience small, tangible wins as each round comes together, then move on to assembling ears, limbs, and the blanket without feeling overwhelmed. The result is a polished, heartwarming keepsake that pairs a soft toy with a peaceful textile element, making the gift feel thoughtfully curated rather than assembled piece by piece.

Finally, the pattern lends itself to flexible pacing. You can complete the bunny first to enjoy a quick win, then set aside time to tackle the blanket, or alternate between components to stretch the process over days. The combination of forgiving stitches, simple shaping, and straightforward finishing gives you confidence to adapt the project to your own schedule and preferences.

Colour & Yarn Inspiration

A classic, gentle palette can emphasize timeless charm: a creamy body, soft grey ears, and a pink nose provide a traditional, comforting look. For contemporary spaces, combine dove grey with ivory and pair the bunny with a mint or sage blanket for a soothing, airy feel.

When substituting brands or yarn types, maintain the same DK weight to preserve fabric density. Before committing to the main project, crochet a small swatch and compare the fabric feel against the original to ensure you’re happy with the resulting texture and drape. This pre-check helps you avoid surprises in fullness or stiffness once the pieces are stuffed and assembled.

Paintbox Yarns color palette sheet

Switch Things Up

Color experimentation can dramatically alter the mood of the project, so start with a palette that evokes the intended room—soft creams and pale pastels for a nursery, or neutral tones with a gentle contrast for a modern space. You can swap in a tonal variegated yarn in place of a solid color, as long as the yarn weight remains DK and the hook size remains appropriate to preserve gauge. Subtle color placements, such as a different shade for the inner ears or the nose, can add personality without complicating the technique.

To adjust scale, try using a slightly thicker yarn with a matching hook or choosing a finer yarn with a smaller hook. In both cases, check gauge early by crocheting a small swatch to compare finished fabric density with the project’s target size. If the fabric becomes stiffer or too loose, revise hook size or tension to restore the balance between softness and structure.

Additional accessories can personalize the finished piece: a tiny crocheted scarf around the neck, a small bow near the ear, or a carrot-themed prop stitched to the blanket’s corner. Keep alterations light to maintain the overall proportion and avoid crowding the facial features or seams. These touches encourage creative exploration without demanding new stitching techniques.

Consider producing a mini family by replicating the bunny shape at a smaller or larger scale using proportional adjustments to the starting rounds. Practicing this kind of sizing exercise helps you understand how early decisions about the starting round influence overall dimensions, which is valuable when you take on future projects of varying sizes.

Ways to Use & Gift It

The Snuggle Bunny pattern lends itself to thoughtful presentation: present the amigurumi with the matching square as a coordinated gift set that feels curated rather than handcrafted in isolation. The combination of a plush toy and a soft backdrop creates a visually balanced display, ideal for nursery decor or a celebratory keepsake.

Consider delivering this as part of a baby shower gift bundle, paired with a small card that notes care instructions and care-friendly yarn suggestions. The handmade act adds a layer of sentiment that is often missing from mass-produced toys, giving recipients something tangible and meaningful to treasure as their child grows.

Common Mistakes & How to Fix Them

Over-tightening stitches when forming the head can create an overly stiff surface; loosen your grip slightly and place a stitch marker at the round start to maintain even tension. Skipping a round or miscounting stitches leads to asymmetry in the head; count the stitches at the end of each round and correct before continuing. Filling too firmly distorts the shape; add stuffing gradually and adjust as you go to keep a soft, rounded silhouette without creating hard points at joints. Narrow seam lines reduce the plush look; sew with small, neat stitches and use a whip stitch or invisible join to minimize edge visibility. Ears mounted unevenly tilt forward; position both ears symmetrically before sewing, and compare against a reference point to ensure balance.

Maker's Notes

During testing, the body used a light DK yarn with a 3.0 mm hook, while the blanket used a slightly larger 4.0 mm hook to achieve a looser, drapier texture. The assembly required careful alignment of the limbs and ears, with minimal seam visibility when finished. The size of the completed bunny is sensitive to stuffing density; a gentle, even fill maintains a soft silhouette without creating bulk around joints. Eye and nose detailing can be achieved with embroidery floss or small safety features, depending on safety preferences and the recipient.

Time estimates for the full build can vary by experience. A dedicated beginner may spend several sessions, with each session focusing on one component at a time and then moving to assembly. Cleaning and finishing require attention to careful weaving of tails and ends to avoid loosening stuffing over time. When joining the pieces, use small, even stitches to maintain a cohesive edge and avoid a visible seam that interrupts the smooth surface of the toy.

I tried a substitution: Using a DK-weight yarn with a slightly thicker core produced a noticeable increase in final height by about 2 cm, while the overall silhouette remained proportionate. The fabric appeared puffier yet retained softness, thanks to a compatible hook adjustment and careful tension. The blanket retained its drape, though the stitch definition changed subtly due to the yarn’s fiber content and plies. If you choose a lighter yarn, anticipate a smaller finished size and a softer, more delicate texture, but adjust the hook to maintain the same density of fabric. Overall, the substitution preserved the character of the design while altering scale and tactile feel.

Snuggle Bunny Amigurumi Pattern

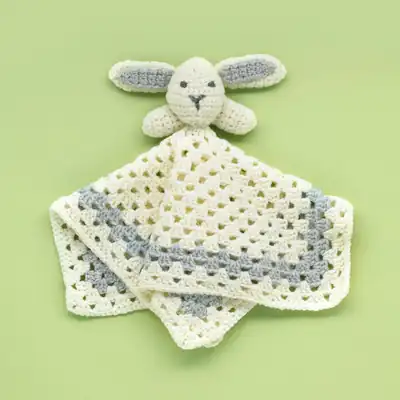
Make this Snuggle Bunny amigurumi with our free crochet pattern—detailed round-by-round instructions, materials, gauge tips, and finishing ideas. Start crocheting today!

Beginner Friendly 2-4 Hours
Pattern at a glance
Skill level
Beginner Friendly
Time to make
2-4 Hours
Hook size
3.0 mm (C/2) and 4.0 mm (G/6)
Yarn weight
DK / #3 (Baby DK)
Finished size
Approx. 30 cm square blanket; bunny height ~8-10 cm
Gauge
24 stitches and 24 rows to 10 cm (4 in) over dc (sc) using 3 mm hook
Yarn used
50g Champagne White, 50g Misty Grey; small amount Slate Grey for embroidery

Materials Needed

Main Fabric
  • 01
    Paintbox Yarns Baby DK (DK / #3), Champagne White - 50g
  • 02
    Paintbox Yarns Baby DK (DK / #3), Misty Grey - 50g
  • 03
    Paintbox Yarns Baby DK (DK / #3), Slate Grey - 0-5g (embroidery)
  • 04
    3mm crochet hook
  • 05
    4mm crochet hook
  • 06
    Washable toy filling
Tools Required
  • 01
    Crochet hook size 3.0 mm (C/2)
  • 02
    Crochet hook size 4.0 mm (G/6)
  • 03
    Yarn needle for sewing
  • 04
    Stitch markers
  • 05
    Scissors

— Main Section :

Round 1: (rs) 3 ch (counts as first st), 2 tr (dc) into ring, (2 ch, 3 tr (dc) into ring) 3 times, 1 ch, 1 dc (sc) into top of 3 ch at beg of round.
Round 2: 3 ch (counts as first st), 2 tr (dc) into ch sp partly formed by dc (sc) at end of previous round, *1 ch, miss 3 tr (dc), (3 tr (dc), 2 ch and 3 tr (dc)) into next ch sp, rep from * twice more, 1 ch, 3 tr (dc) into same ch sp as used at beg of round, 1 ch, 1 dc (sc) into top of 3 ch at beg of round.
Round 3: 3 ch (counts as first st), 2 tr (dc) into ch sp partly formed by dc (sc) at end of previous round, *1 ch, miss 3 tr (dc), 3 tr (dc) into next ch sp, 1 ch, miss 3 tr (dc), (3 tr (dc), 2 ch and 3 tr (dc)) into next ch sp, rep from * to end, ending last rep at, 3 tr (dc) into same ch sp as used at beg of round, 1 ch, 1 dc (sc) into top of 3 ch at beg of round.
Round 4: 3 ch (counts as first st), 2 tr (dc) into ch sp partly formed by dc (sc) at end of previous round, *(1 ch, miss 3 tr (dc), 3 tr (dc) into next ch sp) twice, 1 ch, miss 3 tr (dc), (3 tr (dc), 2 ch and 3 tr (dc)) into next ch sp, rep from * to end, ending last rep at, 3 tr (dc) into same ch sp as used at beg of round, 1 ch, 1 dc (sc) into top of 3 ch at beg of round.
Round 5: 3 ch (counts as first st), 2 tr (dc) into ch sp partly formed by dc (sc) at end of previous round, *(1 ch, miss 3 tr (dc), 3 tr (dc) into next ch sp) 3 times, 1 ch, miss 3 tr (dc), (3 tr (dc), 2 ch and 3 tr (dc)) into next ch sp, rep from * to end, ending last rep at, 3 tr (dc) into same ch sp as used at beg of round, 1 ch, 1 dc (sc) into top of 3 ch at beg of round.
Round 6: 3 ch (counts as first st), 2 tr (dc) into ch sp partly formed by dc (sc) at end of previous round, *(1 ch, miss 3 tr (dc), 3 tr (dc) into next ch sp) 4 times, 1 ch, miss 3 tr (dc), (3 tr (dc), 2 ch and 3 tr (dc)) into next ch sp, rep from * to end, ending last rep at, 3 tr (dc) into same ch sp as used at beg of round, 1 ch, 1 dc (sc) into top of 3 ch at beg of round.
Round 7: 3 ch (counts as first st), 2 tr (dc) into ch sp partly formed by dc (sc) at end of previous round, *(1 ch, miss 3 tr (dc), 3 tr (dc) into next ch sp) 5 times, 1 ch, miss 3 tr (dc), (3 tr (dc), 2 ch and 3 tr (dc)) into next ch sp, rep from * to end, ending last rep at, 3 tr (dc) into same ch sp as used at beg of round, 1 ch, 1 dc (sc) into top of 3 ch at beg of round.
Round 8: 3 ch (counts as first st), 2 tr (dc) into ch sp partly formed by dc (sc) at end of previous round, *(1 ch, miss 3 tr (dc), 3 tr (dc) into next ch sp) 6 times, 1 ch, miss 3 tr (dc), (3 tr (dc), 2 ch and 3 tr (dc)) into next ch sp, rep from * to end, ending last rep at, 3 tr (dc) into same ch sp as used at beg of round, 1 ch, 1 dc (sc) into top of 3 ch at beg of round.
Round 9: 3 ch (counts as first st), 2 tr (dc) into ch sp partly formed by dc (sc) at end of previous round, *(1 ch, miss 3 tr (dc), 3 tr (dc) into next ch sp) 7 times, 1 ch, miss 3 tr (dc), (3 tr (dc), 2 ch and 3 tr (dc)) into next ch sp, rep from * to end, ending last rep at, 3 tr (dc) into same ch sp as used at beg of round, 1 ch, 1 dc (sc) into top of 3 ch at beg of round.
Round 10: 3 ch (counts as first st), 2 tr (dc) into ch sp partly formed by dc (sc) at end of previous round, *(1 ch, miss 3 tr (dc), 3 tr (dc) into next ch sp) 8 times, 1 ch, miss 3 tr (dc), (3 tr (dc), 2 ch and 3 tr (dc)) into next ch sp, rep from * to end, ending last rep at, 3 tr (dc) into same ch sp as used at beg of round, 1 ch, 1 dc (sc) into top of 3 ch at beg of round.
Round 11: 3 ch (counts as first st), 2 tr (dc) into ch sp partly formed by dc (sc) at end of previous round, *(1 ch, miss 3 tr (dc), 3 tr (dc) into next ch sp) 9 times, 1 ch, miss 3 tr (dc), (3 tr (dc), 2 ch and 3 tr (dc)) into next ch sp, rep from * to end, ending last rep at, 3 tr (dc) into same ch sp as used at beg of round, 1 ch, 1 dc (sc) into top of 3 ch at beg of round. Break off A and join in B.
Round 12: 3 ch (counts as first st), 2 tr (dc) into ch sp partly formed by dc (sc) at end of previous round, *(1 ch, miss 3 tr (dc), 3 tr (dc) into next ch sp) 10 times, 1 ch, miss 3 tr (dc), (3 tr (dc), 2 ch and 3 tr (dc)) into next ch sp, rep from * to end, ending last rep at, 3 tr (dc) into same ch sp as used at beg of round, 1 ch, 1 dc (sc) into top of 3 ch at beg of round.
Round 13: 3 ch (counts as first st), 2 tr (dc) into ch sp partly formed by dc (sc) at end of previous round, *(1 ch, miss 3 tr (dc), 3 tr (dc) into next ch sp) 11 times, 1 ch, miss 3 tr (dc), (3 tr (dc), 2 ch and 3 tr (dc)) into next ch sp, rep from * to end, ending last rep at, 3 tr (dc) into same ch sp as used at beg of round, 1 ch, 1 dc (sc) into top of 3 ch at beg of round. Break off B and join in A.
Round 14: 3 ch (counts as first st), 2 tr (dc) into ch sp partly formed by dc (sc) at end of previous round, *(1 ch, miss 3 tr (dc), 3 tr (dc) into next ch sp) 12 times, 1 ch, miss 3 tr (dc), (3 tr (dc), 2 ch and 3 tr (dc)) into next ch sp, rep from * to end, ending last rep at, 3 tr (dc) into same ch sp as used at beg of round, 1 ch, 1 dc (sc) into top of 3 ch at beg of round.
Round 15: 3 ch (counts as first st), 2 tr (dc) into ch sp partly formed by dc (sc) at end of previous round, *(1 ch, miss 3 tr (dc), 3 tr (dc) into next ch sp) 13 times, 1 ch, miss 3 tr (dc), (3 tr (dc), 2 ch and 3 tr (dc)) into next ch sp, rep from * to end, ending last rep at, 3 tr (dc) into same ch sp as used at beg of round, 2 ch, ss to top of 3 ch at beg of round.
Round 16: 1 ch (does NOT count as st), 1 dc (sc) into st at base of 1 ch, 1 dc (sc) into each of next 2 tr, *(1 dc (sc) into next ch sp, 1 dc (sc) into each of next 3 tr) 14 times, 3 dc (sc) into next ch sp, 1 dc (sc) into each of next 3 tr, rep from * to end, ending last rep at, ss to first dc (sc). Fasten off. HEAD Make 2 ch using 3mm (UK 11 - US C2/D3) crochet hook and A.

— Head :

Round 1: (rs) 6 dc (sc) into 2nd ch from hook, ss to first dc (sc), turn. 6 sts.
Round 2: 1 ch (does NOT count as st), 2 dc (sc) into st at base of 1 ch, 2 dc (sc) into each of next 5 dc (sc), ss to first dc (sc), turn. 12 sts.
Round 3: 1 ch (does NOT count as st), (1 dc (sc) into next dc (sc), 2 dc (sc) into next dc (sc)) 3 times, (2 dc (sc) into next dc (sc), 1 dc (sc) into next dc (sc)) 3 times, ss to first dc (sc), turn. 18 sts.
Round 4: 1 ch (does NOT count as st), 1 dc (sc) into each of first 8 sts, 2 dc (sc) into each of next 2 sts, 1 dc (sc) into each of last 8 sts, ss to first dc (sc), turn. 20 sts.
Round 5: 1 ch (does NOT count as st), (1 dc (sc) into each of next 2 dc (sc), 2 dc (sc) into next dc (sc)) twice, 1 dc (sc) into each of next 3 dc (sc), 2 dc (sc) into each of next 2 dc (sc), 1 dc (sc) into each of next 3 dc (sc), (2 dc (sc) into next dc (sc), 1 dc (sc) into each of next 2 dc (sc)) twice, ss to first dc (sc), turn. 26 sts.
Round 6: 1 ch (does NOT count as st), 1 dc (sc) into each st to end, ss to first dc (sc), turn.
Round 7: 1 ch (does NOT count as st), (1 dc (sc) into each of next 3 dc (sc), 2 dc (sc) into next dc (sc)) twice, 1 dc (sc) into each of next 4 dc (sc), 2 dc (sc) into each of next 2 dc (sc), 1 dc (sc) into each of next 4 dc (sc), (2 dc (sc) into next dc (sc), 1 dc (sc) into each of next 3 dc (sc)) twice, ss to first dc (sc), turn. 32 sts. round 8 as round 6.
Round 9: 1 ch (does NOT count as st), 1 dc (sc) into each of first 15 dc (sc), 2 dc (sc) into each of next 2 dc (sc), 1 dc (sc) into each of last 15 dc (sc), ss to first dc (sc), turn. 34 sts. round 10 as round 6.
Round 11: 1 ch (does NOT count as st), (1 dc (sc) into each of next 3 dc (sc), dc2tog (sc2tog) over next 2 dc (sc)) twice, 1 dc (sc) into each of next 14 dc (sc), (dc2tog (sc2tog) over next 2 dc (sc), 1 dc (sc) into each of next 3 dc (sc)) twice, ss to first dc (sc), turn. 30 sts. round 12 as round 6.
Round 13: 1 ch (does NOT count as st), (1 dc (sc) into each of next 2 dc (sc), dc2tog (sc2tog) over next 2 dc (sc)) twice, 1 dc (sc) into each of next 5 dc (sc), (dc2tog (sc2tog) over next 2 dc (sc)) twice, 1 dc (sc) into each of next 5 dc (sc), (dc2tog (sc2tog) over next 2 dc (sc), 1 dc (sc) into each of next 2 dc (sc)) twice, ss to first dc (sc), turn. 24 sts.
Round 14: 1 ch (does NOT count as st), 1 dc (sc) into each of first 10 sts, (dc2tog (sc2tog) over next 2 sts) twice, 1 dc (sc) into each of last 10 sts, ss to first dc (sc), turn. 22 sts.
Round 15: 1 ch (does NOT count as st), (1 dc (sc) into next st, dc2tog (sc2tog) over next 2 sts) 3 times, (dc2tog (sc2tog) over next 2 sts) twice, (dc2tog (sc2tog) over next 2 sts, 1 dc (sc) into next st) 3 times, ss to first dc (sc), turn. 14 sts.
Round 16: 1 ch (does NOT count as st), (dc2tog (sc2tog) over next 2 sts) 7 times, ss to first st. 7 sts. Fasten off, leaving a fairly long end. EARS (MAKE 2) Make 2 ch using 3mm (UK 11 - US C2/D3) crochet hook and A.

— Ears (Make 2) :

Round 1: (rs) 4 dc (sc) into 2nd ch from hook, ss to first dc (sc), turn. 4 sts.
Round 2: 1 ch (does NOT count as st), 2 dc (sc) into st at base of 1 ch, 2 dc (sc) into each of next 3 dc (sc), ss to first dc (sc), turn. 8 sts.
Round 3: 1 ch (does NOT count as st), 1 dc (sc) into st at base of 1 ch, 1 dc (sc) into each dc (sc) to end, ss to first dc (sc), turn.
Round 4: 1 ch (does NOT count as st), 2 dc (sc) into st at base of 1 ch, 1 dc (sc) into each of next 2 dc, 2 dc (sc) into each of next 2 dc (sc), 1 dc (sc) into each of next 2 dc (sc), 2 dc (sc) into last dc (sc), ss to first dc (sc), turn. 12 sts. rounds 5 to 14 as round 3.

— Ear :

Round 15: 1 ch (does NOT count as st), dc2tog (sc2tog) over first 2 sts, 1 dc (sc) into each of next 2 dc (sc), (dc2tog (sc2tog) over next 2 dc (sc)) twice, 1 dc (sc) into each of next 2 dc (sc), dc2tog (sc2tog) over last 2 dc (sc), ss to first st, turn. 8 sts. round 16 as round 3. Fasten off, leaving a fairly long end. EAR PATCHES (MAKE 2) Make 2 ch using 3mm (UK 11 - US C2/D3) crochet hook and B.

— Ear Patches (Make 2) :

Round 1: (rs) 3 dc (sc) into 2nd ch from hook, turn. 3 sts.
Round 2: 1 ch (does NOT count as st), 1 dc (sc) into each dc (sc) to end, turn. rows 3 to 9 as row 2.
Round 10: 1 ch (does NOT count as st), dc3tog (sc3tog) over all 3 sts, turn. 1 st.
Round 11: 1 ch (does NOT count as st), 1 dc (sc) into top of dc3tog (sc3tog). row 12 as row 2. Fasten off, leaving a fairly long end. ARMS (MAKE 2) Make 2 ch using 3mm (UK 11 - US C2/D3) crochet hook and A.

— Arms (Make 2) :

Round 1: (rs) 6 dc (sc) into 2nd ch from hook, ss to first dc (sc), turn. 6 sts.
Round 2: 1 ch (does NOT count as st), 2 dc (sc) into st at base of 1 ch, 2 dc (sc) into each of next 5 dc (sc), ss to first dc (sc), turn. 12 sts.
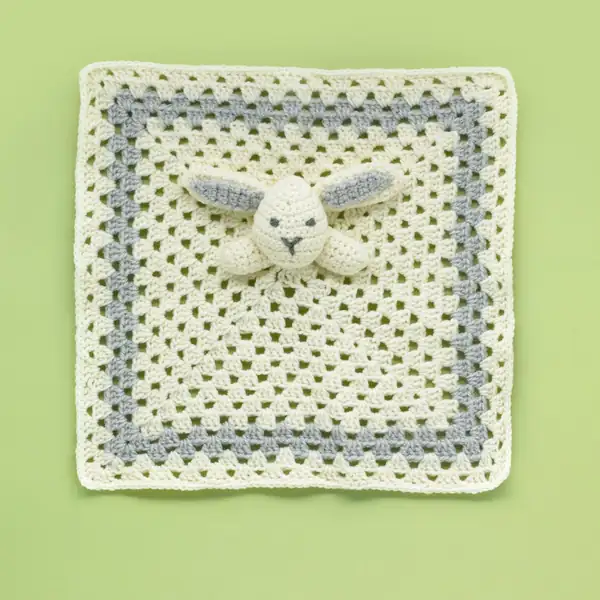
Round 3: 1 ch (does NOT count as st), 1 dc (sc) into st at base of 1 ch, 1 dc (sc) into each of next 11 sts, ss to first dc (sc), turn. Rep last round 6 times more. Fasten off, leaving a fairly long end. MAKING UP Press Main Section only very carefully. Insert toy filling into Head so that Head is firmly filled but still fairly soft. Beg and end of rounds is centre back of Head, and last round is neck edge round. Fold Ears flat – final round is edge that will be attached to Head. Using photograph as a guide, lay Ear Patch centrally along one side of Ear so that foundation ch edge of Patch is level with final round of Ear, and very neatly sew Patch in place. Sew Ears to Head as in photograph – Ears should “flop” forwards, with Ear Patch towards front of Head. Using oddment of C and photograph as a guide, embroider satin stitch eyes onto Head, then embroider a straight stitch “Y” shape for nose. Insert toy filling into Arms so that Arms are firmly filled but still fairly soft. Fold Arm flat at top (last round) and then neatly sew Arms to neck edge of Head, using photograph as a guide. Sew completed Head, Ears and Arms onto centre of Main Section as in photograph. Safety note: Ensure all stitching is very secure to avoid the risk of the baby pulling sections apart and swallowing them!;

Assembly Instructions

  1. Attach head to body by sewing neck edge to the neck area between rounds 12-16, ensuring the head sits centered on the torso.
  2. Sew ears to the head on the top, placing them between rounds 6-8 and allowing the ears to flop slightly forward.
  3. Position arms on either side of the body between rounds 8-12; sew securely with even stitches for a natural pose.
  4. Sew the ear patches onto the ears along the final round before attaching to the head, aligning the patches centrally for neat appearance.

Important Notes

  • Mark the start of each round and move markers as you progress to avoid miscounting increases or decreases.
  • Stuff gradually and evenly to maintain a soft, cuddly feel without forming lumps or voids.
  • Weave in all ends securely at the end of assembly to prevent stuffing from escaping over time.
  • Check gauge before starting; consistent tension ensures the finished piece matches expected size and proportions.
  • Allow the limbs some flexibility; avoid over-stuffing near joints to enable gentle posability and natural movement.

This refined Snuggle Bunny project offers a gentle, confidence-building entry into amigurumi with a coordinating blanket. The pair demonstrates how simple motifs can come together to form a cohesive, cuddly keepsake that’s suitable for display or play. The approach balances accessible stitches with a polished finish, making the finished set an ideal gift or treasured keepsake that deserves careful presentation and care.

Good to know

You ask, we answer

The finished amigurumi stands around 8-10 cm tall for the bunny, with the blanket generally measuring similar width to create a balanced display when paired, though final dimensions will vary with yarn weight and tension.

Yes, different yarn weights will change the final size and texture; adjust the hook size accordingly and recalculate the gauge to maintain proportion.

This pattern is beginner-friendly and teaches basic stitches, working in the round, and simple seaming. Some prior familiarity with amigurumi basics helps, but is not required.

Most crocheters finish the bunny and blanket together in 2-4 sessions, with time varying based on pace, comfort with shaping, and how thoroughly you finish each seam and end.

Yes, safety eyes can be replaced with embroidered eyes if you prefer, but ensure the stitches are secure and use a small satin stitch for a neat finish.

Cream and grey granny-square crochet blanket
Join 100k+ crocheters

Get new free patterns, stitch tips and exclusive content in your inbox.