Crochetologist
Free Crochet Pattern
Beautiful Detailed Adorable

Snowman Amigurumi Pattern

Hand holding a completed snowman amigurumi wearing a red hat and green scarf, close-up on head and face
4.2Rating
5-7 HoursTime
IntermediateSkill
Highlights

What makes it special

Made with Love

An adorable friend to cherish, handcrafted with love to bring comfort and joy for years to come.

Weekend Treat

Expect to spend around five to seven hours assembling the full snowman with hat, scarf and facial finishing, suitable for a couple of focused sessions over a weekend.

Intermediate Level

This pattern is best suited to crocheters comfortable working in the round with the magic ring, single crochet increases and decreases, back-loop work and basic color changes, plus experience in seaming and sewing small parts.

About This Snowman Amigurumi Pattern

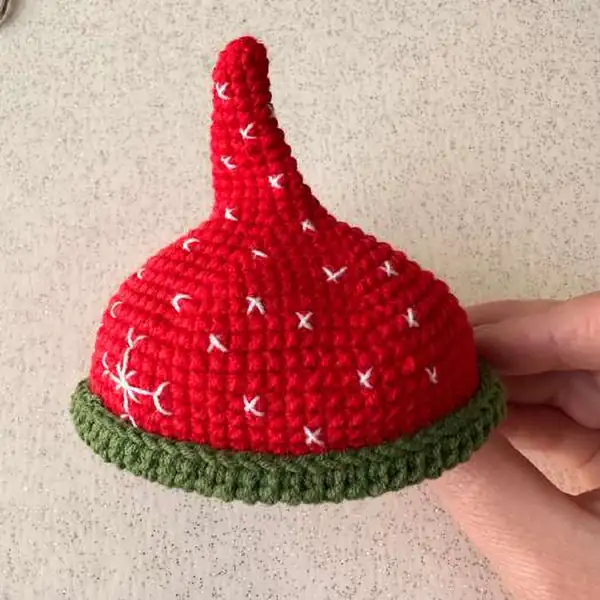
This pattern creates a small handmade snowman amigurumi composed of a head, body, two arms, a carrot nose, a hat and a scarf, finished at approximately 15 cm tall. The design was made with YarnArt Jeans (DK/#3) in white for the body, green and red for accessories, and a small amount of orange for the carrot nose. Recommended hook size range for the original sample was 1.8-2.0 mm to achieve a dense fabric; I used 1.8 mm for the photographed sample.

Materials listed in the pattern include 8 mm safety eyes (2 pieces), white and black sewing yarn for facial details, two small buttons, fiberfill stuffing and a yarn needle for assembly. Gauge is tight to avoid visible stuffing, so work firmly and follow the stitch counts exactly to reproduce the shape and round counts given in the pattern.

Working this design feels like assembling a little personality stitch by stitch; you create a single continuous silhouette of the body and head by following clear round counts and shaping sections to form the torso and neck. Construction relies on increasing and decreasing rounds to sculpt the tapered waist and rounded shoulders, while the head is shaped independently and attached afterward for a neat neck join.

The hat and scarf are crocheted as small separate accessories that add a big visual finish, and the hat uses a color change to create a green brim before shaping the red crown. Sewing plays a big role in the final look: the carrot nose, safety eyes and stitched smile are added with careful placement to preserve symmetry.

Throughout the project you will stuff each section as directed so shaping happens naturally while you work, and the assembly sequence in the pattern keeps finishing tidy and manageable even when working on small details.

Progress photo showing the crocheted white body and head shape for the snowman amigurumi in mid-stuffing

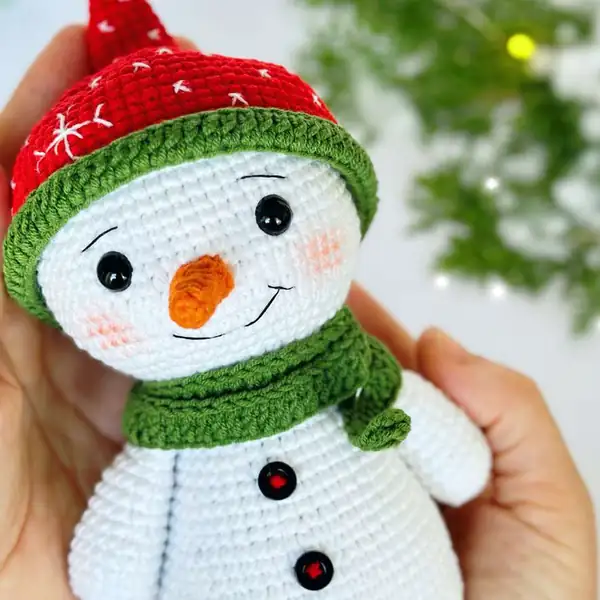
This pattern emphasizes tidy finishing and consistent tension so the stuffed shape reads cleanly after sewing. I included short, direct notes about attaching the eyes at specific rows and spacing so the face looks friendly and even.

The pattern language uses simple abbreviations and round-by-round counting to make following the shaping straightforward, which helps when you pin parts together for a trial fit before you sew them permanently.

Stitches & Skills You'll Use

This pattern relies primarily on single crochet worked in the round, which is the building block for the body shaping and most accessory construction; single crochet rounds are combined with counted increases and decreases to sculpt the silhouette precisely. The magic ring is used to start small, closed tops like the head and nose, giving a neat, adjustable center with no hole left visible after closing.

Increases (inc) and decreases (dec) are called at specific intervals to form the tapered neck and rounded belly, and the back-loop-only (BLO) instruction is used in a few rounds to create a subtle brim or ridge effect for accessory edges. Color changes are introduced cleanly when switching from white body sections to green and red for the hat and scarf, and the pattern uses slip stitch and chain stitches in short sections for structural details.

Finishing skills such as surface sewing, safe attachment of safety eyes and strategic stuffing are essential for the final presentation: you will practice even stuffing, neat whipstitch joins for the head-to-body seam, and embroidered lines for the smile using sewing yarn to give expressive facial detail while keeping the small scale crisp.

Why You'll Love This Snowman Amigurumi Pattern

I absolutely love this snowman pattern because it balances simple shaping with charming personality, and it finishes quickly enough to be a satisfying gift project. I enjoy that the hat and scarf are small accessories that let me play with color while the body remains a classic clean white silhouette. Sewing the carrot nose and stitching the smile always feels like bringing the character to life, and I appreciate designs that look delightful on a shelf but still take only a few focused hours to complete.

Making multiples for seasonal gifts or holiday markets becomes addictive because each tiny change to the hat or buttons changes the mood of the finished snowman.

Colour & Yarn Inspiration

White paired with evergreen and classic red yields a traditional holiday look that reads attractively at small scale and preserves the iconic snowman palette; choose slightly saturated DK shades so the accessories stand out against the white body. Subtle variations such as cream instead of stark white or sage instead of bright green can give a vintage or Scandinavian feel, while jewel tones create a bolder, modern ornament that still reads clearly from a short distance.

For yarn fibers, cotton-blend DK produces a matte, defined stitch texture that highlights sculpting lines, whereas acrylic DK gives a slightly softer sheen and is very durable for repeated handling; using a small amount of metallic thread woven into the hat crown can add festive sparkle without altering gauge significantly if you keep it as an accent rather than the main yarn.

Series of small circular photos showing scarf construction and embroidered face steps for the snowman amigurumi

Switch Things Up

I like to switch the hat and scarf colors to match seasonal decor, attempting softer pastels for a nursery version or metallic threads for a glittering holiday edition.

If you want a much smaller charm, try fingering-weight yarn and a 1.5 mm hook to create a tiny pocket-sized snowman for a keyring or ornament.

To make a sturdier imprint of facial features, substitute safety eyes with embroidered French knot eyes and use pale peach sewing yarn for a softer smile.

Adding lightweight armature wire into the arms allows gentle posing for display on shelves or bookcases without changing the external appearance dramatically.

I sometimes embroider tiny snowflake motifs on the hat crown before assembly so each hat becomes a unique little scene on its own.

For a plush, squishy version, use a thicker DK/aran hybrid yarn and a larger hook, then add heavier stuffing to emphasize the round body sections.

Try swapping round buttons for tiny wooden beads to add rustic charm and contrast against the white body fabric for a handcrafted aesthetic.

Create a family set by changing nose length and eye spacing slightly between pieces so each snowman reads as an individual character on the mantel.

Turn the scarf into a slip stitch rib for added texture, working several rows in green then finishing with contrasting fringe to catch the eye.

I often personalize gifts by embroidering initials on the inside hem of the hat, a subtle addition that keeps the exterior clean while adding meaning for recipients.

Ways to Use & Gift It

This small snowman makes a lovely stocking stuffer or a handmade tree ornament when made in the smallest yarn and hook substitution; its compact size and cheerful face suit both children and adults as a seasonal keepsake. For baby showers or new apartment celebrations, crochet a pair with matching colorways and present them in a small gift box with tissue paper so they arrive ready to display.

Consider turning the snowman into a themed set by crafting several with different hats and scarves in coordinating palette families for a mantel grouping; they also work well as place setting gifts at holiday dinners, tied with a ribbon and a tiny name tag to help attendees feel special and remembered.

Common Mistakes & How to Fix Them

Skipping the instruction to work BLO on the indicated rounds reduces the hat brim definition and flattens the edge; follow the BLO note exactly to keep the brim raised. Placing safety eyes too high or too low on the head will alter the expression noticeably; position eyes between the specified rounds and count stitches for correct spacing before securing. Overstuffing the head before closing causes bulges and makes the neck join awkward; add small amounts of fiberfill gradually and shape with your fingers as you stuff. Failing to crochet the arm edges together where indicated makes the seam gap and creates uneven arm tubes; join the two edges as written to produce a tidy finished arm. Using a much larger hook than recommended produces a loose fabric where stuffing shows through easily; switch to the smaller hook size or tighter tension to maintain clean stitch definition. Not counting after increase and decrease rounds leads to cumulative errors in shaping the body; verify stitch counts at the end of each round and correct them immediately if they do not match the pattern.

Maker's Notes

When I tested the pattern I worked deliberately with the small hook sizes and timed sections to learn where makers commonly hesitate; the whole make took me about six hours across two sessions and confirmed that the hat shaping and the last decreases on the torso require careful stitch counting for consistent shaping. I found that beginners pause most during the BLO round that forms the brim because loop orientation changes slightly, and I recommend marking the start of that round and counting immediately after completing it to confirm the correct stitch total. While sewing the head to the neck I used many small whipstitches and adjusted stuffing to avoid a visible seam, and I recommend pinning the head first to confirm positioning.

The scarf construction flew by but takes precision when joining the ends to sit neatly around the neck.

I tried a substitution: I tried the pattern once using a thicker DK blend and a 3.0 mm hook for a chunkier, more tactile version and the result was a larger, squishier snowman with softer shaping; the body rounds relaxed slightly and the hat brim lost some crispness. To counter that I added one extra BLO round to the brim and used larger safety eyes to keep facial proportions, which worked well for a plush, child-friendly toy. The substitution shows you can adapt the pattern to a warmer, huggable variant, but expect altered finished dimensions and adjust eye placement and button sizes accordingly.

Snowman Amigurumi Pattern

Make this cheerful snowman with our free crochet pattern — full round-by-round instructions, materials list and assembly tips to get you crafting today.

Intermediate 5-7 Hours
Pattern at a glance
Skill level
Intermediate
Time to make
5-7 Hours
Hook size
1.8-2.0 mm
Yarn weight
DK / #3
Finished size
Approx. 15 cm / 5.9 in tall
Gauge
Approximate gauge: 10 sc x 12 rounds = 4 cm (work tightly so stuffing does not show)
Yarn used
Main color (white) approx. 50 g / 160 m; accents total approx. 40 g combined (green, red, orange)

Materials Needed

Main Fabric
  • 01
    White yarn, YarnArt Jeans (DK/#3) or similar, approximately 50 g for the body
  • 02
    Green yarn, DK/#3, approximately 15 g for scarf and hat brim
  • 03
    Red yarn, DK/#3, approximately 20 g for hat crown and trim
  • 04
    Orange scrap, DK/#3, approximately 5 g for the carrot nose
  • 05
    Black sewing yarn, small amount for face stitching
  • 06
    2 small black buttons for body decoration
  • 07
    8 mm safety eyes (2 pieces)
  • 08
    Polyester fiberfill, small bag (enough to firmly stuff head and body)
Tools Required
  • 01
    Crochet hook size 1.8 mm (steel/very small)
  • 02
    Crochet hook size 2.0 mm (optional in the recommended range)
  • 03
    8 mm safety eyes (2 pieces)
  • 04
    Scissors
  • 05
    Yarn needle for sewing and weaving ends
  • 06
    Stitch markers to mark the beginning of rounds
  • 07
    Polyester stuffing (fiberfill)
  • 08
    Small pins for positioning parts during assembly
  • 09
    2 small buttons for decoration

— Part 1 :

Round 1: 15 ch, starking from 2nd ch inc, 12 sc, 3 sc in 1 stitch (work on the other side of tihe chain) 13 sc. (30)
Round 2: 2 inc, 12 sc, 3 inc, 12 sc, inc. (36)
Round 3: (sc, inc) 2 times, 13 sc, (inc, sc) 3;
Round 4: (2 sc, inc) 2 times, 14 sc, (inc, 2 sc) 3 times,12 sc, inc. (48)
Round 5: BLO sc around. (48)
Round 6: sc around. (48)
Round 7: (7 sc, inc) 6 times. (54)
Round 8: sc around. (54)
Round 9: sc around. (54)
Round 10: sc around. (54)
Round 11: sc around. (54)
Round 12: sc around. (54)
Round 13: sc around. (54)
Round 14: sc around. (54)
Round 15: (7 sc, dec) 6 times. (48)
Round 16: sc around. (48)
Round 17: sc around. (48)
Round 18: (6 sc,dec) 6 times. (42)
Round 19: sc around. (42)
Round 20: sc around. (42)
Round 21: (5 sc, dec) 6 times. (36)
Round 22: sc around. (36)
Round 23: sc around. (36)
Round 24: (4 sc, dec) 6 times. (30)
Round 25: sc around. (30)
Round 26: sc around. (30)
Round 27: (3 sc, dec) 6 times. (24)
Round 28: sc around. (24)
Round 29: sc around. (24)
Round 30: (3sc, inc) 6 times. (30)
Round 31: (4 sc, inc) 6 times.(36)
Round 32: (5 sc, inc) 6 times.(42)
Round 33: (6 sc,inc) 6 times. (48)
Round 34: (7 sc,inc) 6 times. (54)
Round 35: (8 sc,inc) 6 times. (60)
Round 36: sc around. (60)
Round 37: sc around. (60)
Round 38: sc around. (60)
Round 39: sc around. (60)
Round 40: sc around. (60)
Round 41: sc around. (60)
Round 42: sc around. (60)
Round 43: sc around. (60)
Round 44: sc around. (60)
Round 45: sc around. (60)
Round 46: sc around. (60)
Round 47: sc around. (60)
Round 48: sc around. (60)
Round 49: (8 sc,dec) 6 times. (54)
Round 50: (7 sc,dec) 6 times. (48)
Round 51: (6 sc,dec) 6 times.(42)
Round 52: (5 sc,dec) 6 times.(36)
Round 53: (4 sc,dec) 6 times. (30)
Round 54: (3 sc,dec) 6 times. (24)
Round 55: (2 sc,dec) 6 times. (18)
Round 56: (sc,dec) 6 times. (12)

— Part 2 :

Round 1: 4 sc into a magic ring. (4)
Round 2: ( sc,inc) 2 times. (6)
Round 3: sc around. (6)
Round 4: (2 sc,inc) 2 times. (8)
Round 5: sc around. (8)
Round 6: (3 sc,inc) 2 times. (10)
Round 7: sc around. (10)

— Part 3 :

Round 1: 6 sc into a magic ring. (6)
Round 2: (inc) 6 times. (12)
Round 3: (sc,inc) 6 times. (18)
Round 4: BLO sc around. (18)
Round 5: sc around. (18)
Round 6: sc around. (18)
Round 7: sc around. (18)
Round 8: (4 sc,dec) 3 times. (15)
Round 9: sc around. (15)
Round 10: sc around. (15)
Round 11: sc around. (15)
Round 12: (3 sc,dec) (12)

— Part 4 :

Round 1: 6 sc into a magic ring. (6)
Round 2: 5 sc, inc. (7)
Round 3: 6 sc, inc. (8)
Round 4: 7 sc, inc. (9)
Round 5: 8 sc, inc. (10)
Round 6: 9 sc, inc. (11)
Round 7: 10 sc, inc. (12)
Round 8: 11 sc, inc. (13)
Round 9: 12 sc, inc. (14)
Round 10: 13 sc, inc. (15)
Round 11: 14 sc,inc. (16)
Round 12: 15 sc, inc. (17)
Round 13: 16 sc, inc. (18)
Round 14: (2 sc, inc) 6 times. (24)
Round 15: (3sc, inc) 6 times. (30)
Round 16: (4 sc, inc) 6 times.(36)
Round 17: (5 sc, inc) 6 times.(42)
Round 18: (6 sc,inc) 6 times. (48)
Round 19: (7 sc,inc) 6 times. (54)
Round 20: (8 sc,inc) 6 times. (60)
Round 21: (9 sc, inc) 6 times.(66)
Round 22: sc around. (66)
Round 23: sc around. (66)
Round 24: sc around. (66)
Round 25: sc around. (66)
Round 26: sc around. (66)
Round 27: sc around. (66)
Round 28: sc around. (66)
Round 29: sc around. (66)
Round 30: sc around. (66)
Round 31: sc around. (66)
Round 32: sc around. (66)
Round 33: BLO Go back, 2;

Assembly Instructions

  1. Attach the safety eyes at the 43rd and 44th rounds of the head, placing them nine stitches apart and securing the washers firmly behind the fabric.
  2. Sew the carrot nose centrally on the face, aligning its base at the seam line between rounds so the tip projects outward naturally.
  3. Position and sew the arms to the body between the designated rounds so that they sit slightly forward; use a whipstitch and reinforce with back-and-forth passes for strength.
  4. Seat the head atop the body neck opening and sew evenly around the joining rounds to avoid gaps, easing the fabric as you secure it to preserve the intended neck shape.
  5. Wrap the scarf around the neck and sew the ends discreetly to the body; attach small buttons centered on the front of the torso spaced to match the pattern photograph.

Important Notes

  • Work with a tight tension to avoid visible stuffing through the stitches, especially when using the small recommended hook sizes.
  • Place a stitch marker at the start of each round to maintain correct stitch alignment and to make increases and decreases easier to locate.
  • Stuff parts gradually and check shaping frequently so you can adjust stuffing levels to achieve a smooth silhouette.
  • Pin pieces in place before sewing to check symmetry and positioning, making adjustments until the balance and pose look right.
  • Weave in ends as you go when switching colors or finishing small accessories to keep assembly tidy and reduce finishing time.

Thank you for choosing this snowman crochet pattern; I designed it to be approachable yet full of character for holiday displays and cozy handmade gifts. The small hat and scarf offer room to experiment with color while the simple body silhouette keeps the construction quick and satisfying. I hope this pattern helps you create a little friend who will radiate charm on a shelf, a mantel, or as a thoughtful seasonal present to someone you care about. Enjoy the rhythmic repetition of rounds and the small moments that make the finishing touches truly special.

Good to know

You ask, we answer

The finished snowman measures approximately 15 cm tall when made using the recommended DK yarn and the 1.8–2.0 mm hook range; size will vary with different yarn weights and hooks.

Yes, you can substitute yarn weights, but a heavier yarn combined with a larger hook will produce a much larger and softer snowman while a thinner yarn with a smaller hook makes a smaller, firmer toy; adjust stuffing and eye placement accordingly.

This pattern is rated intermediate because it uses in-the-round shaping, increases, decreases and back-loop work, and it requires neat sewing for facial placement; basic amigurumi experience is helpful for best results.

Most crocheters finish this snowman in about five to seven hours spread over one or two focused sessions, with additional time for careful sewing and facial finishing if you choose to hand-stitch details.

The pattern specifies 8 mm safety eyes for a proportionate look on the 15 cm sample; if you change yarn weight or hook size, choose eye sizes that maintain safe spacing and a balanced expression.

The hat is crocheted separately and slipped onto the head during assembly so you can position it freely and secure it with a few stitches, which makes colorwork and brim shaping easier to manage.

Full view of the finished snowman amigurumi held in both hands showing buttons and scarf detail
Join 100k+ crocheters

Get new free patterns, stitch tips and exclusive content in your inbox.