Crochetologist
Free Crochet Pattern
Beautiful Detailed Adorable

Snowberry Cushion Cover Crochet Pattern

Finished Snowberry cushion cover in blue and teal stripes showing textured Sideways Puff Stitch amigurumi-style surface
4.5Rating
5-7 HoursTime
IntermediateSkill
Highlights

What makes it special

Handmade Charm

A warm touch for your space that transforms ordinary corners into inviting nooks filled with handmade charm.

Weekend Treat

This project typically takes 5-7 hours to complete, allowing time for colour striping, the textured Sideways Puff Stitch rows, and careful seaming of the two panels.

Intermediate Level

Well suited to an intermediate crocheter who is comfortable working flat rows, using standing stitches for tidy joins, working clustered stitches to consistent loop height, executing tidy colour changes across short runs, and seaming two panels with even tension.

A decorative cushion cover worked as two flat panels and joined to form a neat boxed square. The construction is entirely in rows, with a textured striped layout that combines basic treble and half-treble bands with a clustered puff technique to produce horizontal relief. This introduction outlines the project at a glance so you can decide quickly whether the size, stitch rhythm and colourwork suit your making time and the intended placement in your home.

About This Snowberry Cushion Cover Crochet Pattern

This Snowberry Cushion Cover is constructed as two identical flat panels that are joined to form a decorative square with a defined crocheted edge. The sample was worked in Paintbox Yarns Simply Aran using Dolphin Blue (approx. 161 yds / 147 m, 80 g), Washed Teal (approx. 100.5 yds / 92 m, 50 g) and Duck Egg Blue (approx. 161 yds / 147 m, 80 g), using a 5.0 mm (H) crochet hook. The pattern establishes horizontal bands built from alternating taller and shorter row heights to create textured stripes and subtle raised motifs across each panel; the edge is finished with an even round of double or treble crochet to frame the square.

Materials listed in the pattern include yardage estimates for the three colours and a hook recommendation to achieve the fabric balance shown in the sample photo.

Working the panels is a paced, row-by-row process that rewards steady counting and simple repetition. Each horizontal band changes the look immediately, so progress feels visible and satisfying as you complete a set of rows and move into a different height and texture.

The sequence alternates predictable row types, which helps the pattern become memorisable after the first repeat; this makes the work suitable for a relaxed evening project where the rhythm of the hook matters more than constant reference to the page. The stitch pattern keeps the tension consistent along straight edges and across stripe joins, producing two panels that line up when placed side by side.

Because the panels are worked flat, the project fits easily into short sessions and can be carried from room to room without special setup. The design was conceived so the tactile bands read clearly at arm’s length and the finished square layers well on sofas, beds or occasional chairs as an accent piece.

Close-up of Sideways Puff Stitch clusters in progress on the cushion panel showing long loops and hook

This complementary description focuses on the practical skills reinforced by the pattern: managing short colour runs across a narrow foundation, counting to maintain even bands, and working repeated clustered stitches within a row. The layout guides you to keep puff clusters aligned across the panel width and to balance colour patches so banding remains consistent from edge to edge.

The pattern uses a fixed row sequence that clarifies colour placement choices and gives a template for swapping colours or repeating bands while preserving the layered look of the sample. Makers will build confidence in working tidy short runs and keeping row ends neat, which pays off at seaming and in the visual regularity of the finished cover.

Stitches & Skills You'll Use

The pattern uses a small set of predictable row stitches plus one clustered technique that defines the texture. Main stitches in the row bands are treble crochet (UK), half-treble crochet (UK), chains for starts and turning, and slip stitches for close joins or short joins; the pattern includes a short abbreviation list for the stitches used on the charts and notes.

The special cluster used to produce the raised motifs is a Sideways Puff Stitch formed by drawing up a series of tall loops across the row and securing them together into a single base stitch to create a compact cluster. Work each puff by inserting the hook, drawing up a long loop to the desired loop height, repeating this loop formation the specified number of times into the same base, then yarn over and pull through all loops on the hook to fasten the cluster. Maintain consistent loop height and even tension so clusters lie uniformly along the band.

The foundation for each panel is a starting chain that establishes the panel width. Watch stitch counts at the end of each row; the pattern provides explicit stitch-count targets at the end of every worked row to help you confirm correct placement of crosses and clusters before moving on. The square is built edge to edge, and the final rounds use evenly spaced double or treble crochet increases to shape corners so the border sits flat.

Why You'll Love This Snowberry Cushion Cover Crochet Pattern

I love the way the horizontal stripes interact with the clustered texture to create a small, tactile landscape of stitches that is both decorative and cosy. The directional contrast between taller and shorter rows invites touch and frames each puff cluster without competing with colour. The repeatable band structure makes it easy to plan a colour scheme or to make small changes without losing the overall balance, so the project is both creative and reliably producible as a gift or home accent.

Colour & Yarn Inspiration

Neutral living-room palette: Dove grey for the main bands, light stone for the shorter rows, and a pale blue accent to emphasise the cluster bands. Coastal scheme: Sand or oatmeal base with bands in washed teal and corals for a warm highlight. Nursery-friendly soft set: A creamy off-white ground with very pale mint and blush accents to keep the surface gentle and tactile.

High-contrast contemporary option: Charcoal ground with a central band in deep teal and narrow pale stripes to highlight texture. Gradient idea: Use three tonal steps of the same shade family (light, medium, dark) across the three yarn colours so the puffs sit in the mid-tone band with contrasting top and bottom stripes for a cohesive ombré effect. For a festive statement, pair a deep jewel base with a metallic strand worked into the treble bands only, keeping clusters in plain yarn for clear definition.

Two finished panels laid right sides together before sewing to form the cushion cover amigurumi project

Switch Things Up

Scale and yarn choice are the simplest ways to change the finished look: using a heavier aran or bulky yarn with a larger hook will produce a larger, chunkier cushion with more pronounced cluster relief, while substituting a lighter-weight yarn and a smaller hook yields a tighter, denser panel better suited to a smaller insert.

To create a reversible or dual-look cover, reverse the band order on one panel so each side presents a different dominance of colour or texture; this keeps both faces attractive and adds versatility to the finished piece.

To make an oversized statement cushion, upsize one or two yarn weights and increase the hook by one or two sizes, working extra repeats of the band sequence until the panel reaches the desired dimensions. For a neat, firm border that resists stretch, hold two strands together for the final edge round to create a binding that reads like a thick frame without changing the banding inside the square.

Colour placement changes the mood dramatically: place the darkest shade at the outermost bands to create a framed or grounded look; position a darker or contrasting band centrally to draw the eye in for a contemporary focal point. For seasonal or themed changes, choose coral and sand tones for a beachy vibe, jewel tones for a richer effect, or a soft monochrome gradient for minimalist interiors.

Turn the pattern into a sampler by making multiple small panels in alternate accent colours and joining them to form a throw or lap blanket; each square can use the same band sequence but with a different highlight colour so the grid reads cohesive yet varied. For a personalised accent, add a small embroidered motif worked in a contrasting strand into a plain treble band between cluster rows; keep embroidery stitches small and spaced to avoid puckering the textured rows.

If you prefer a removable cover, add a hidden zipper or internal ties to the inside edge before closing the final seam; attach the zipper to the inside so the exterior edge remains uninterrupted. For subtle surface interest, hold a metallic or slub novelty strand together with the main yarn when working the treble bands and leave clusters worked in plain yarn to keep the puffs defined against the shimmery ground.

Ways to Use & Gift It

Make this cushion as a considered home gift for new homeowners, housewarmings, birthdays, or seasonal presents. Choose colours that suit the recipient’s décor and, if gifting, include simple care notes: gentle hand wash or cool machine wash on a delicate cycle recommended for acrylic- or wool-blend yarns, reshape while damp and dry flat; avoid high heat in tumble dryers to preserve puff definition. Pair the finished cushion with a matching small accessory—such as a crocheted coaster, a skein of coordinating yarn, or a handmade care card explaining fibre content and washing instructions—to create a coordinated gift set.

For an extra personal touch, tuck a handwritten note inside the cushion before final closure or attach a small gift tag to the inside seam that notes fibre content and the hook size used. When gifting to someone who values removable covers, include a small zipper or instruction on how to open the seam safely if you left the final side closed.

Common Mistakes & How to Fix Them

Not checking the printed stitch count at the end of each row; always compare your worked stitches to the row count to catch missed crosses or extra stitches before beginning the next band. Making cluster loops inconsistently tight or short so the puff compresses unevenly; aim for the same loop height and let the final pull-through secure them in a uniform cluster. Joining colours without securing a neat start; use a standing stitch or the recommended join method to avoid a loose or visible gap at colour changes. Pulling the joining seam too tightly when sewing the panels together, which creates puckers; maintain gentle, even tension and check alignment as you go. Forgetting to keep track of which base stitch each cluster aligns with across a row; mark the first and last cluster positions to maintain alignment for subsequent repeats.

Maker's Notes

The sample panels were completed in a concentrated session: working both panels back-to-back took approximately six hours from foundation chain to the final seamed edge in the maker’s trial. Before committing to panels, work a small swatch of the clustered stitch to confirm loop height and tension so the clusters sit proportionally against the taller row heights; make a two- to three-inch swatch and adjust hook if loops are too loose or too tight. The first set of cluster repeats in the pattern (occurring early in the main band sequence) is where most makers pause; these initial cluster rows reveal loop-height inconsistencies that affect the overall look of later clusters, so practise three or four clusters on a short chain to establish a consistent motion.

Keep a note of which stitch in the base row receives clustered loops so you place subsequent clusters in the same alignment across the panel.

I tried a substitution: In a controlled substitution test the pattern was worked in a firmer aran-style acrylic with a 4.5 mm hook rather than the recommended 5.0 mm. The resulting cover measured about 1.5 cm (approximately 0.6 in) smaller across, and the puff clusters read denser and less lofty compared with the sample made at the recommended gauge; the fabric became firmer and more structured. This trial demonstrates that reducing hook size or using a firmer yarn compresses the stitch height of both treble rows and clusters, so adjust hook size or accept a slightly smaller finished dimension when substituting yarns.

Snowberry Cushion Cover Crochet Pattern

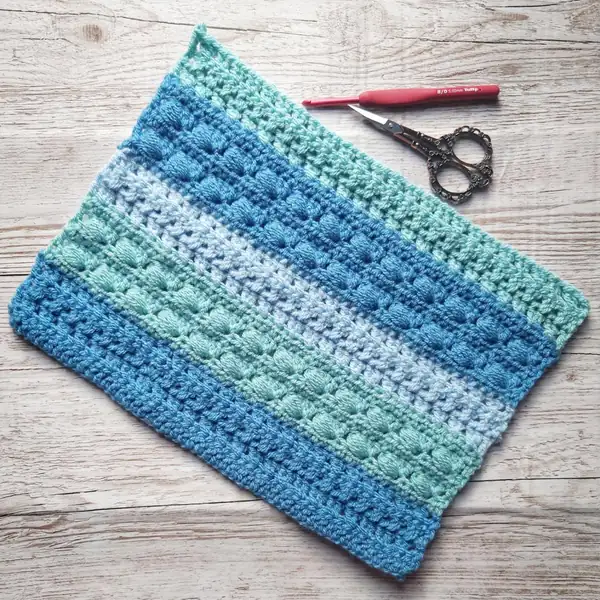
Make the Snowberry Cushion Cover with this free crochet pattern — full instructions, materials list and photo help for the Sideways Puff Stitch. Download and start your project today.

Intermediate 5-7 Hours
Pattern at a glance
Skill level
Intermediate
Time to make
5-7 Hours
Hook size
5.0 mm (H)
Yarn weight
Aran / #4 (Paintbox Simply Aran sample)
Finished size
Approx. 37 cm / 14.5 in square
Gauge
3 HTR = 1" (3 HTR = 2.5 cm)
Yarn used
Approx. 422.5 yards / 386 meters total (approx. 210 grams combined)

Materials Needed

Main Fabric
  • 01
    Paintbox Yarns Simply Aran - Dolphin Blue - approx. 161 yards / 147 meters (80 grams)
  • 02
    Paintbox Yarns Simply Aran - Washed Teal - approx. 100.5 yards / 92 meters (50 grams)
  • 03
    Paintbox Yarns Simply Aran - Duck Egg Blue - approx. 161 yards / 147 meters (80 grams)
  • 04
    Extra yarn in Duck Egg Blue or matching colour for sewing panels together - small amount
Tools Required
  • 01
    Crochet hook size 5.0 mm (H)
  • 02
    Yarn needle for weaving in ends and sewing panels
  • 03
    Scissors
  • 04
    14" x 14" pillow form
  • 05
    Pins or clips to hold panels while sewing

— Part 1 :

Round 1: 1 TR into the 4th CH from the hook, 1 TR in each CH to end TURN (50 TR)
Round 2: CH 2 (counts as TR), {SK 1 ST, 1 TR in next ST, 1 TR in skipped ST} 24 times, 1 TR in top of 3 CH TURN (2 TR, 24 TR „crosses”)
Round 3: same as Row 2 Fasten off.
Round 4: same as Row 2 Fasten off.
Round 5: (WS): Join Color 2 (Washed Teal) to the last ST of last row with a standing HTR or alternatively, you can CH 1 and HTR in same ST 1 HTR in next 48 STS, 1 HTR in top of CH 2 TURN (50 HTR)
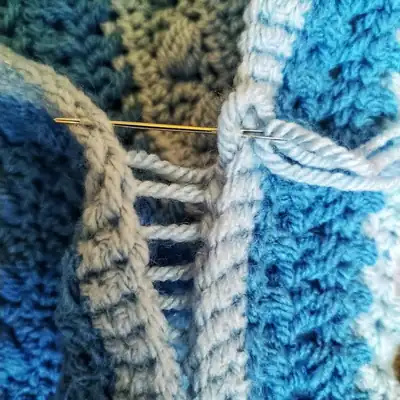
Round 6: (RS): CH 2 (counts as TR), {1 TR in next 3 STS, 1 SWPuff ST, SK 1 ST} 12 times, 1 TR in last ST TURN (38 TR, 12 SWPuff ST)
Round 7: (WS): CH 1, 1 HTR in same ST, 1 HTR in next 48 STS, 1 HTR in top of CH 2 TURN (50 HTR)
Round 8: same as Row 6-7 Fasten off.
Round 9: same as Row 6-7 Fasten off.
Round 10: (RS): Join Color 3 (Duck Egg Blue) to the last ST of last row with a standing TR or alternatively, you can CH 1 and TR in same ST {SK 1 ST, 1 TR in next ST, 1 TR in skipped ST} 24 times, 1 TR in last ST TURN (2 TR, 24 TR „crosses”)
Round 11: same as Row 2 Fasten off.
Round 12: same as Row 2 Fasten off.
Round 13: (WS): Join Color 1 (Dolphin Blue) the last ST of last row with a standing HTR or alternatively, you can CH 1 and HTR in same ST same as Row 5 TURN (50 HTR)
Round 14: repeat Row 6-7 twice Fasten off.
Round 15: repeat Row 6-7 twice Fasten off.
Round 16: repeat Row 6-7 twice Fasten off.
Round 17: repeat Row 6-7 twice Fasten off.
Round 18: Join Color 2 (Washed Teal) to the last ST of last row with a standing TR or alternatively, you can CH 1 and TR in same ST same as Row 10-12 Fasten off.
Round 19: Join Color 2 (Washed Teal) to the last ST of last row with a standing TR or alternatively, you can CH 1 and TR in same ST same as Row 10-12 Fasten off.
Round 20: Join Color 2 (Washed Teal) to the last ST of last row with a standing TR or alternatively, you can CH 1 and TR in same ST same as Row 10-12 Fasten off.
Round 21: Join Color 3 (Duck Egg Blue) to the last ST of last row with a standing HTR or alternatively, you can CH 1 and HTR in same ST same as Row 13-17 Fasten off.
Round 22: Join Color 3 (Duck Egg Blue) to the last ST of last row with a standing HTR or alternatively, you can CH 1 and HTR in same ST same as Row 13-17 Fasten off.
Round 23: Join Color 3 (Duck Egg Blue) to the last ST of last row with a standing HTR or alternatively, you can CH 1 and HTR in same ST same as Row 13-17 Fasten off.
Round 24: Join Color 3 (Duck Egg Blue) to the last ST of last row with a standing HTR or alternatively, you can CH 1 and HTR in same ST same as Row 13-17 Fasten off.
Round 25: Join Color 3 (Duck Egg Blue) to the last ST of last row with a standing HTR or alternatively, you can CH 1 and HTR in same ST same as Row 13-17 Fasten off.
Round 26: Join Color 1 (Dolphin Blue) the last ST of last row with a standing TR or alternatively, you can CH 1 and TR in same ST same as Row 10-12 Fasten off.
Round 27: Join Color 1 (Dolphin Blue) the last ST of last row with a standing TR or alternatively, you can CH 1 and TR in same ST same as Row 10-12 Fasten off.
Round 28: Join Color 1 (Dolphin Blue) the last ST of last row with a standing TR or alternatively, you can CH 1 and TR in same ST same as Row 10-12 Fasten off.

— Part 2 :

Round 1: Join Color 3 (Duck Egg Blue) to the first ST of last Row (that’s the top right corner on the right side) CH 1, 2 DC in same ST, 1 DC in next 48 STS, 3 DC in next ST, DC 48 evenly on the side, 3 DC into the base of 3 CH, 1 DC in next 48 CH, 3 DC in last CH, DC 48 evenly on the side, 1 DC into the first ST with the 2 DC in it, join with a SLST to first DC Corner: 3 DC Sides: 48 DC;
Round 2: CH 1, 2 DC in same ST, 1 DC in next 50 STS, 3 DC in next ST, 1 DC in next 50 STS, 3 DC in next ST, 1 DC in next 50 STS, 3 DC in next ST, 1 DC in next 50 STS, 1 DC in first ST with the 2 DC in it, join with a SLST to first DC Fasten off, weave in all ends.
Round 8: Base of 1st DC;

— Part 3 :

Round 1: 1 DC into the 4th CH from the hook, 1 DC in each CH to end TURN (50 DC)
Round 2: CH 2 (counts as DC), {SK 1 ST, 1 DC in next ST, 1 DC in skipped ST} 24 times, 1 DC in top of 3 CH TURN (2 DC, 24 DC „crosses”)
Round 3: same as Row 2 Fasten off.
Round 4: same as Row 2 Fasten off.
Round 5: (WS): Join Color 2 (Washed Teal) to the last ST of last row with a standing HDC or alternatively, you can CH 1 and HDC in same ST 1 HDC in next 48 STS, 1 HDC in top of CH 2 TURN (50 HDC)
Round 6: (RS): CH 2 (counts as DC), {1 DC in next 3 STS, 1 SWPuff ST, SK 1 ST} 12 times, 1 DC in last ST TURN (38 DC, 12 SWPuff ST)
Round 7: (WS): CH 1, 1 HDC in same ST, 1 HDC in next 48 STS, 1 HDC in top of CH 2 TURN (50 HDC)
Round 8: same as Row 6-7 Fasten off.
Round 9: same as Row 6-7 Fasten off.
Round 10: (RS): Join Color 3 (Duck Egg Blue) to the last ST of last row with a standing DC or alternatively, you can CH 1 and DC in same ST {SK 1 ST, 1 DC in next ST, 1 DC in skipped ST} 24 times, 1 DC in last ST TURN (2 DC, 24 DC „crosses”)
Round 11: same as Row 2 Fasten off.
Round 12: same as Row 2 Fasten off.
Round 13: (WS): Join Color 1 (Dolphin Blue) the last ST of last row with a standing HDC or alternatively, you can CH 1 and HDC in same ST same as Row 5 TURN (50 HDC)
Round 14: repeat Row 6-7 twice Fasten off.
Round 15: repeat Row 6-7 twice Fasten off.
Round 16: repeat Row 6-7 twice Fasten off.
Round 17: repeat Row 6-7 twice Fasten off.
Round 18: Join Color 2 (Washed Teal) to the last ST of last row with a standing DC or alternatively, you can CH 1 and DC in same ST same as Row 10-12 Fasten off.
Round 19: Join Color 2 (Washed Teal) to the last ST of last row with a standing DC or alternatively, you can CH 1 and DC in same ST same as Row 10-12 Fasten off.
Round 20: Join Color 2 (Washed Teal) to the last ST of last row with a standing DC or alternatively, you can CH 1 and DC in same ST same as Row 10-12 Fasten off.
Round 21: Join Color 3 (Duck Egg Blue) to the last ST of last row with a standing HDC or alternatively, you can CH 1 and HDC in same ST same as Row 13-17 Fasten off.
Round 22: Join Color 3 (Duck Egg Blue) to the last ST of last row with a standing HDC or alternatively, you can CH 1 and HDC in same ST same as Row 13-17 Fasten off.
Round 23: Join Color 3 (Duck Egg Blue) to the last ST of last row with a standing HDC or alternatively, you can CH 1 and HDC in same ST same as Row 13-17 Fasten off.
Round 24: Join Color 3 (Duck Egg Blue) to the last ST of last row with a standing HDC or alternatively, you can CH 1 and HDC in same ST same as Row 13-17 Fasten off.
Round 25: Join Color 3 (Duck Egg Blue) to the last ST of last row with a standing HDC or alternatively, you can CH 1 and HDC in same ST same as Row 13-17 Fasten off.
Round 26: Join Color 1 (Dolphin Blue) the last ST of last row with a standing DC or alternatively, you can CH 1 and DC in same ST same as Row 10-12 Fasten off.
Round 27: Join Color 1 (Dolphin Blue) the last ST of last row with a standing DC or alternatively, you can CH 1 and DC in same ST same as Row 10-12 Fasten off.
Round 28: Join Color 1 (Dolphin Blue) the last ST of last row with a standing DC or alternatively, you can CH 1 and DC in same ST same as Row 10-12 Fasten off.

— Part 4 :

Round 1: Join Color 3 (Duck Egg Blue) to the first ST of last Row (that’s the top right corner on the right side) CH 1, 2 SC in same ST, 1 SC in next 48 STS, 3 SC in next ST, SC 48 evenly on the side, 3 SC into the base of 3 CH, 1 SC in next 48 CH, 3 SC in last CH, SC 48 evenly on the side, 1 SC into the first ST with the 2 SC in it, join with a SLST to first SC Corner: 3 SC Sides: 48 SC;
Round 2: CH 1, 2 SC in same ST, 1 SC in next 50 STS, 3 SC in next ST, 1 SC in next 50 STS, 3 SC in next ST, 1 SC in next 50 STS, 3 SC in next ST, 1 SC in next 50 STS, 1 SC in first ST with the 2 SC in it, join with a SLST to first SC Fasten off, weave in all ends.

Assembly Instructions

  1. Place the two finished squares right sides together, aligning all edges and matching the stripe placement visually before you pin or clip them.
  2. Begin sewing at one corner using the yarn tail from the last round and a yarn needle, working a neat whipstitch or mattress stitch through both loop pairs and keeping tension even to avoid puckering.
  3. Sew two full sides and most of the third side, leaving a wide opening so you can insert the 14" pillow form without forcing it through the seam.
  4. Insert the pillow form gently, arranging the corners and smoothing the banding so the puff rows sit evenly across the face of the cushion before completing the final side.
  5. Finish the remaining side with the same stitch, then weave in all ends securely and, if desired, block the cushion lightly to even the texture and relax any uneven areas.

Important Notes

  • Weave in tails at regular intervals during the work to avoid excess bulk at the back and to make final finishing faster and neater.
  • When shaping corners and finishing the border, check for a hidden base stitch that may sit under the corner cluster; missing that stitch alters the corner count and will distort the edge.
  • Chain 2 at the start of a row is treated as a treble (UK) throughout this pattern unless you choose to follow the US conversion in the terminology pages; confirm your chosen convention before you start each panel.
  • Be consistent when beginning rows: use standing stitches for colour joins if you prefer that finish, or begin with the written chains but keep the method consistent across both panels so row heights match.
  • Block or gently steam the completed panels before seaming to relax fibres and even out the cluster texture; allow panels to dry flat and reshaped to the intended edge dimensions before closure.

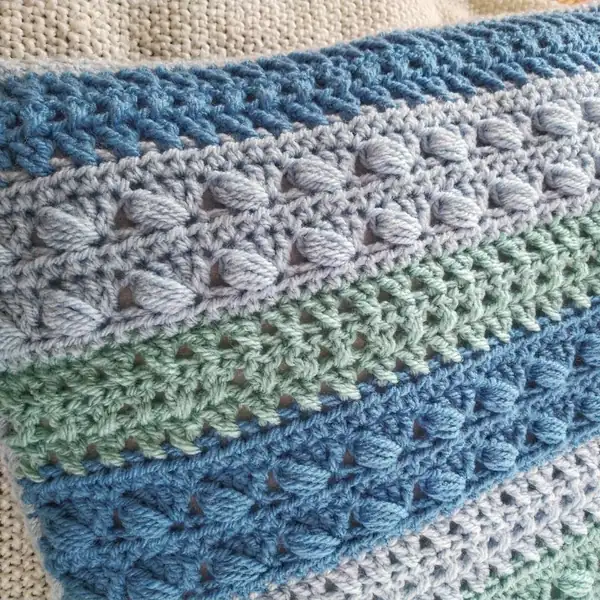
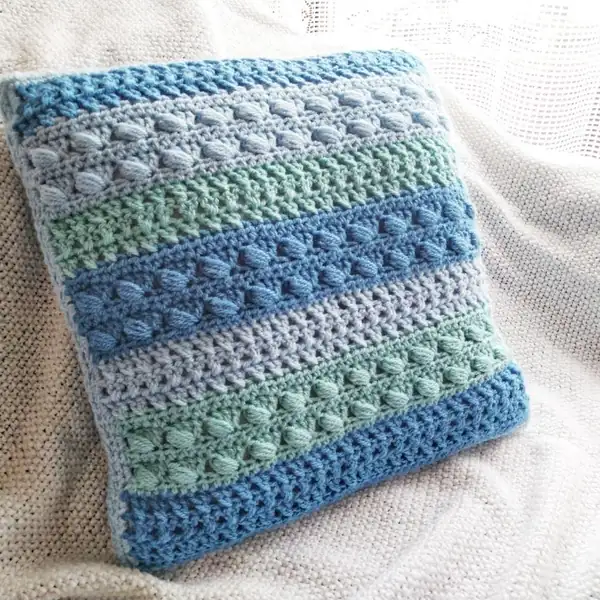
Thank you for choosing the Snowberry Cushion Cover pattern. May the textured bands and clustered motif bring a tactile accent to your home. The pattern is intended to be a calm, approachable project that offers a clear sense of progress as you complete each band, and to provide a finished piece suitable for gifting or everyday room styling.

Good to know

You ask, we answer

The finished cushion cover measures approximately 14.5 inches (37 cm) square when worked in the sample yarn and with the recommended 5.0 mm hook; the cover is designed to fit a standard 14" pillow insert with a slight positive ease to accommodate the textured fabric.

Yes; you can substitute a different yarn weight but the finished dimensions, drape and cluster appearance will change. To keep the same visual balance, work a row gauge swatch in the band sequence, compare the stitch and row totals to the pattern gauge, and adjust hook size or foundation chain so your panel reaches the square dimension you prefer.

No. The downloadable pattern includes a step-by-step photographic sequence for the Sideways Puff Stitch and explains loop formation and fastening in detail; follow those steps and practise a few clusters on a short chain before beginning full panels.

The pattern package contains both UK and US terminology reference pages so you may work the instructions using the notation you prefer; the conversion table and a short abbreviations list are included to show direct equivalents between UK and US stitch names.

For the tidiest result, place the two completed panels with right sides together and align stripe sequences; pin across the width to ensure band placement matches. Use mattress stitch or a close whipstitch with matching yarn to join three sides, insert the pillow form, then close the final side using the same seam technique. Keep tension even on the joining yarn so the seam lies flat; fasten off securely and hide tails by weaving into the seam allowance on the inside.

After seaming, plump and distribute the pillow insert so the clusters sit upright and corners are filled evenly. Trim any stray fibres or short loose ends close to the fabric, then smooth the surface with gentle hand shaping; if needed, use a low-heat steam held briefly at arm’s length to relax the fabric before allowing it to dry flat. Finally, inspect the border rounds and add a narrow slipstitch or tidy single-row edging if any corners require subtle evening to sit perfectly square.

Edge round detail on the cushion showing double crochet corner clusters and even side spacing amigurumi panel
Join 100k+ crocheters

Get new free patterns, stitch tips and exclusive content in your inbox.