Crochetologist
Free Crochet Pattern
Beautiful Detailed Adorable

Sleepy Snuggle-saurus Rag Doll Amigurumi Pattern

Sleepy Snuggle-saurus head close-up amigurumi in pale gray
4.4Rating
8-10 HoursTime
Beginner FriendlySkill
Highlights

What makes it special

Made with Love

An adorable friend to cherish, handcrafted with love to bring comfort and joy for years to come.

All-Day Adventure

Takes a full day of relaxed crocheting, with multiple components and careful stuffing, making it a satisfying weekend project for an ambitious maker.

Beginner Friendly Level

This pattern is well suited to a confident beginner who wants to practice continuous rounds, magic rings, simple increases, basic color accents, and careful seaming while building a memorable amigurumi companion that is friendly for children. The construction emphasizes a steady pace, consistent tension, and tidy finishing, enabling a maker to progress from basic rounds to a more complete, huggable figure without becoming overwhelmed by complexity. The project grows from small, intuitive steps to a larger, forgiving result, reinforcing a sense of accomplishment as skills expand. The design supports a mindful approach to stuffing, seam alignment, and facial detailing, ensuring the final piece remains soft and welcoming even after repeated play.

Begin with a plush dinosaur-inspired rag doll crafted for gentle hugs and quiet play. The pattern centers on forgiving shaping, approachable finishing, and a friendly silhouette that reads as a cuddly companion rather than a toy with sharp edges. Built from super bulky yarn, this creature grows quickly from the hook to a generous scale, making progress visible in short sessions and inviting makers of varying speed to celebrate small wins along the way. The design emphasizes a soft surface, round contours, and a row of playful spikes that cascade along the spine without creating stiff, angular geometry. The result is a hand-made friend that feels like a comforting presence in a child’s world or a cozy accent in a nursery corner. The instructions are written to support steady, confident progress, with clear rounds, simple increases and decreases, and finishing steps that keep the feel approachable for beginners while offering enough nuance for more seasoned crocheters to enjoy.

With a focus on a starting tail and a single, seamless build for most of the body, this pattern minimizes the need for complex assembly. It uses color changes sparingly to preserve a peaceful look, while spikes provide a cheerful texture contrast that remains forgiving to catch and touch. Crochet in the round is introduced gently, and the shaping steps emphasize maintaining a soft, consistent curve rather than creating abrupt angles. Finishing touches—eye placement, nostril detailing, and tail weaving—are designed to be approachable, so the maker can achieve a friendly expression without requiring intricate embroidery or delicate threading. Ultimately, this Sleepy Snuggle-saurus Rag Doll invites makers to slow down, enjoy the rhythm of stitches, and create a cherished keepsake that travels from playtime to bedtime with ease.

About This Sleepy Snuggle-saurus Rag Doll Amigurumi Pattern

This project yields a plush amigurumi rag doll with a friendly face, a long tail, and a row of colorful spikes that cascade along the spine. The body is built from a single warm color for the bulk, with bright accent colors for the spikes to add whimsy. It integrates simple shaping with careful stuffing to achieve a cuddly silhouette that retains personality at every curve. You’ll enjoy learning to crochet in the round, work through rounds that gradually increase and decrease, and fasten off with tails long enough for neat finishing. The finished toy is perfect for kids, collectors, or anyone who loves a soft, huggable sculpture.

The pattern embraces forgiving technique choices, such as a bulky yarn choice and large hook, which helps beginners see progress quickly. Subtle facial detailing, including sleepy eyes and nostrils, adds character without demanding intricate embroidery. The spikes offer a playful texture contrast that elevates the overall look while remaining approachable for new crocheters. The assembly steps emphasize seam alignment, secure attachment points, and tidy finishing so the completed rag doll is sturdy for daily play.

In practice, you’ll stitch in a single piece for most of the body and limbs, with occasional turning points to maintain a pleasant flow. The instructions include tips for marking the beginning of each round, measuring stitch counts, and shaping the head and snout to achieve a balanced expression. Color changes, when used, are kept minimal to ensure the peaceable vibe of Sleepy Snuggle-saurus is preserved. By the end, the maker will have a friendly toy that stands up to handling and becomes a cherished keepsake.

Side view of spikes along the back of the amigurumi rag doll

From start to finish, the construction centers on a soft, forgiving texture that invites touch. You’ll experience pillowy spikes, a rounded head, and a tail that follows the curvature of the body rather than jutting out awkwardly. The pattern weaves in color accents with strategic placement to maximize whimsy without complicating the stitch work. Lastly, the finishing touches—eye embroidery, nostril details, and tail weaving—are designed to be approachable while still delivering a polished result.

As a maker, you’ll feel a gentle rhythm as you crochet, stuff, and sew. The project invites you to slow down, enjoy the process, and celebrate small victories around round counts and seam alignment. It’s the kind of pattern that rewards patience with a soft, expressive toy that has real character and a playful vibe. You’ll likely reach for this pattern again when you want a satisfying weekend project that yields a tangible, comforting plush at the end.

Stitches & Skills You'll Use

The project centers on the classic trio of magic ring, single crochet, and simple shaping to maintain a rounded silhouette. The head is formed with a magic ring base, then built in the round with consistent stitch counts to keep symmetry. Increases are placed at measured intervals to create a gentle bulge that becomes the cheeks and the top of the head, while decreases close openings gracefully to preserve the plush look without creating hollows. A slight belly curve emerges from subtle increases in the center of the torso, giving a natural, cuddly form that stays soft when cuddled.

Color changes are limited to the spikes and a few tiny details around the snout, which keeps the overall color rhythm calm and comforting. The spikes themselves are straightforward: small circles that begin as a tight ring, expanding into triangular shapes that taper toward the tip. They are stitched on after the body is constructed, using a standard whip stitch and even tension to prevent distortion. Eye and nostril details are created with a separate yarn tail threaded into place, offering expressive touches without pulling or distorting the fabric. Gradual stuffing helps maintain plump cheeks and a soft, squeezable body overall.

Blocking is not required, but proper stuffing technique helps the head maintain a gentle curvature rather than flattening under gravity. Seam alignment remains a focus during assembly, with careful checks along the spike row to ensure uniform spacing. The technique set is friendly for beginners yet provides enough scope for intermediate crocheters to practice consistent tension and precise finishing. The end result is a light, huggable friend with a row of colorful spikes that energize the look without complicating the pattern.

Why You'll Love This Sleepy Snuggle-saurus Rag Doll Amigurumi Pattern

This pattern blends simplicity with personality, creating an amigurumi that feels like a friend rather than a toy. The shaping remains forgiving while the result stays visually charming enough to elicit smiles from kids and adults alike. The spikes transform a conventional rag doll into a joyful dinosaur-inspired companion that still reads as cozy and approachable.

The balance between ease and charm is especially satisfying: the stitches are friendly to learn, yet the visual payoff is bold thanks to the spikes and soft body. Color accents can be swapped to craft a family of snuggle-saurus that feels uniquely yours. Handmade gifts carry a warmth that mass-produced items cannot match, and this pattern makes that warmth easy to achieve with thoughtful planning and patient execution.

Finished pieces are delightful in various poses and lighting, with the spikes offering a gentle tilt or an expressive eye line that changes the mood of the toy. It’s a project that invites repeat projects with new color stories and a sense of accomplishment you can feel in every stitch. The Sleepy Snuggle-saurus Rag Doll also makes a thoughtful gift idea for baby showers, birthdays, or simply to show you care, because the pattern’s soft aesthetics and forgiving construction translate into a durable, cozy friend anyone would treasure.

Ultimately, the joy is in the process as much as the product—an inviting crochet ritual that yields a dependable companion and a memory you can hold onto as you grow your skills.

Colour & Yarn Inspiration

Choose a calm, monochrome palette by using a single main body color and small, muted spike tones for a sophisticated look that fits modern nurseries. A high-contrast spike color palette can transform the finished piece into a playful focal point for a child’s room.

Experiment with variegated bulky yarn for the body to create subtle color shifts that add depth without complicating the pattern. If substituting yarns, keep the weight consistent to maintain the plush texture and preserve shape integrity.

Front view of the finished Sleepy Snuggle-saurus rag doll

Switch Things Up

Experiment with color swaps by selecting spike colours that reflect a personal palette, or use a single vivid accent for a bold, modern look.

Try different yarn textures for the spikes—the regular bulky yarn yields a sleek silhouette, while boucle or textured yarn adds tactile interest that children naturally explore with their fingers.

Scale the project by choosing a slightly heavier yarn and a larger hook to create a bigger, more imposing companion while keeping the same soft, friendly features.

Embroider a tiny mouth or add stitched eyebrows to alter the expression, testing several placements before committing to a final look.

Play with nose shading and eyelid shapes to convey different moods; a downturned eyelid line reads sleepy, while a bright arc can imply curiosity or mischief.

For a display-ready option, add a tiny fabric bow or a felt accessory that can be swapped seasonally to refresh the toy’s appearance without changing the core construction.

If you want more poseability, you might insert a small amount of flexible support into the spikes or limbs, but keep the pieces soft and bendable to preserve plush movement.

Document color experiments with photos so you can recreate a favorite look later or share a vibrant variation with a friend as a gift idea.

A light spray of fabric-safe conditioner can help preserve the plush surface and maintain a gentle sheen that remains pleasant to touch over time.

Remember, the magic of this pattern lies in its warm vibe and approachable construction rather than technical complexity, so let creativity guide the process.

Use this approach to spark a family of Sleepy Snuggle-sauruses, each with a different color story and a unique personality.

Ways to Use & Gift It

Gift this cuddly rag doll for baby showers as a comforting companion that also doubles as decor. Choose colors that match a nursery theme and ensure the surface remains soft and safe for tiny hands to explore.

Consider presenting a customized Sleepy Snuggle-saurus to a friend who loves handmade toys; include a short note describing the techniques used and the care taken in stitching, turning the gift into a story they can treasure.

Common Mistakes & How to Fix Them

Losing your stitch count — place a marker at the start of each round. Working too loosely, which lets the stuffing show through the fabric. Forgetting to stuff firmly before closing a piece. Sewing parts on before pinning and checking the proportions.

Maker's Notes

In my test build, I worked with super bulky yarn and a large hook to achieve a notably fluffy result that grows quickly. The project took several evenings of focused crochet time, with most sessions lasting under two hours due to the generous yarn thickness and simple shaping. Early rounds require attention to round counts; marking the start of each round helps maintain a steady pace and reduces miscounts that can throw off symmetry. The head and body shaping benefit from pausing to verify cheek fullness and the height of the head before proceeding with further rounds. The spikes come together quickly and provide a motivating positive feedback loop as you see the back row rise with color pops. I found that delaying facial embroidery until after the main construction lets the expression settle naturally, producing a softer gaze that reads as sleepy and friendly rather than fixed or stern. This is a project that rewards mindful, slow progression and careful stuffing to avoid a firm, top-heavy look. When finished, the rag doll remains soft to the touch and continues to respond well to gentle handling, making it a dependable companion for daily play.

I tried a substitution: When substituting a DK-weight yarn for the main body while maintaining the same hook size, the doll becomes noticeably smaller and denser. The plush feel remains, but the silhouette loses some bulk and roundness, which alters the overall cuddling quality. The spikes retain their energy and visual emphasis, though their scale relative to the body shifts, creating a slightly leaner silhouette. Reverting to the original bulky yarn restores the intended fullness and rounded shape that are essential to the comforting, squishy effect. A smaller hook (if used) tightens the fabric further, increasing density and reducing softness; this can still yield a charming toy but shifts the tactile experience away from the intended plush feel. The recommended weight is important for achieving the consistent, generous surface that defines this pattern’s intent.

Sleepy Snuggle-saurus Rag Doll Amigurumi Pattern

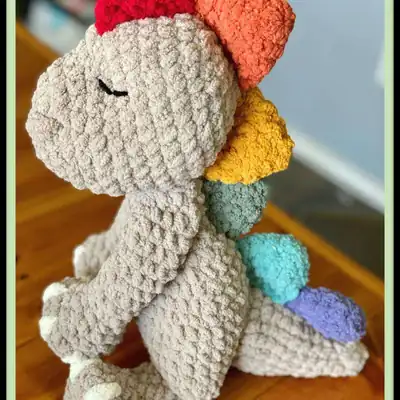
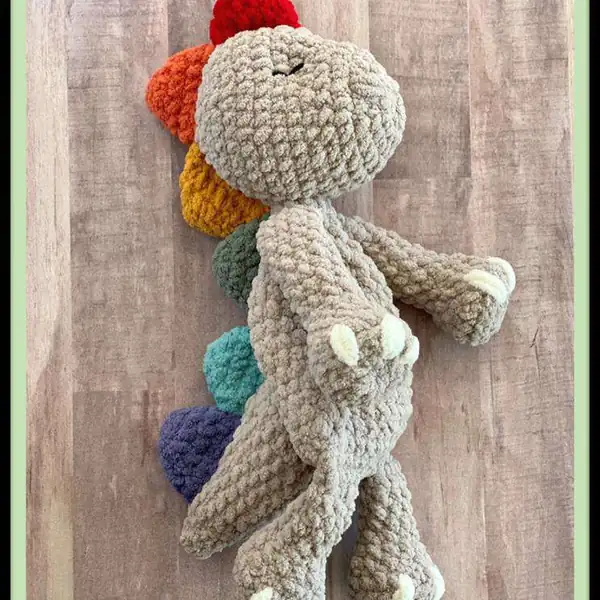
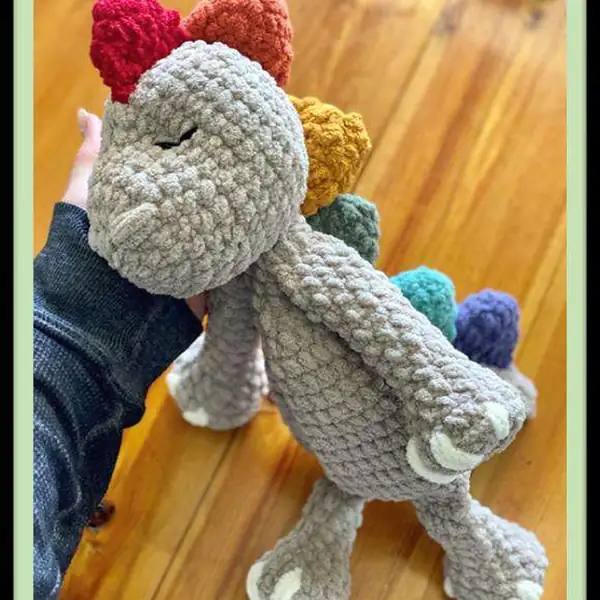
Make Sleepy Snuggle-saurus Rag Doll with our free crochet amigurumi pattern. Complete instructions, materials list, and finishing tips included. Start crocheting today!

Beginner Friendly 8-10 Hours
Pattern at a glance
Skill level
Beginner Friendly
Time to make
8-10 Hours
Hook size
6.0 mm (J)
Yarn weight
Super Bulky / #6
Finished size
Approx. 5 cm / 2.0 in (varies with yarn, hook and stuffing)
Gauge
Work tightly enough that stuffing does not show (0 mm hook)
Yarn used
Main body color: approx. 220 yds; Spike colors: small amounts totaling ~30-60 yds; Toenail and eye detailing ~5-10 yds

Materials Needed

Main Fabric
  • 01
    Worsted weight yarn (not used here) – placeholder for template consistency
  • 02
    Super Bulky 6 main color, approximately 220 yds
  • 03
    Spike colors: Crimson, Burnt Mustard, Orange Leaf, Smoky Green, Light Teal, Dusk Blue – small amounts
  • 04
    Toenail color: Vintage White – small amount for detailing
  • 05
    Black yarn for embroidered eyes – small amount
  • 06
    Polyester stuffing for limbs and head (body is lightly stuffed)
Tools Required
  • 01
    6.0 mm crochet hook
  • 02
    Yarn needle for sewing and weaving in ends
  • 03
    Stitch markers
  • 04
    Scissors
  • 05
    Safety eyes (optional) if you prefer over embroidered eyes

— Front Legs a.k.a the Arms (make 2) :

Round 1: 6 sc in a mc (6sc)
Round 2: inc in each stitch around x 6 (12sc)
Round 3: [1sc, inc] repeat around x 6 (18sc)
Round 4: BLO sc around (18sc)
Round 5: [1sc, dec] repeat around x 6 (12sc)
Round 6: sc around (12sc)
Round 7: [2sc, dec] repeat x 3 (9sc)
Round 8: sc around (9sc in each round) *Stuff only the foot area of the leg, leaving the rest of the leg free of stuffing* - Rnd 17: press the top of the leg flat, crochet both sides together to close the leg (4sc)
Round 9: sc around (9sc in each round) *Stuff only the foot area of the leg, leaving the rest of the leg free of stuffing* - Rnd 17: press the top of the leg flat, crochet both sides together to close the leg (4sc)
Round 10: sc around (9sc in each round) *Stuff only the foot area of the leg, leaving the rest of the leg free of stuffing* - Rnd 17: press the top of the leg flat, crochet both sides together to close the leg (4sc)
Round 11: sc around (9sc in each round) *Stuff only the foot area of the leg, leaving the rest of the leg free of stuffing* - Rnd 17: press the top of the leg flat, crochet both sides together to close the leg (4sc)
Round 12: sc around (9sc in each round) *Stuff only the foot area of the leg, leaving the rest of the leg free of stuffing* - Rnd 17: press the top of the leg flat, crochet both sides together to close the leg (4sc)
Round 13: sc around (9sc in each round) *Stuff only the foot area of the leg, leaving the rest of the leg free of stuffing* - Rnd 17: press the top of the leg flat, crochet both sides together to close the leg (4sc)
Round 14: sc around (9sc in each round) *Stuff only the foot area of the leg, leaving the rest of the leg free of stuffing* - Rnd 17: press the top of the leg flat, crochet both sides together to close the leg (4sc)
Round 15: sc around (9sc in each round) *Stuff only the foot area of the leg, leaving the rest of the leg free of stuffing* - Rnd 17: press the top of the leg flat, crochet both sides together to close the leg (4sc)
Round 16: sc around (9sc in each round) *Stuff only the foot area of the leg, leaving the rest of the leg free of stuffing* - Rnd 17: press the top of the leg flat, crochet both sides together to close the leg (4sc)

— Hind Legs (make 2) :

Round 1: 6 sc in a mc (6sc)
Round 2: inc in each stitch around x 6 (12sc)
Round 3: [1sc, inc] repeat around x 6 (18sc)
Round 4: BLO sc around (18sc)
Round 5: [1sc, dec] repeat around x 6 (12sc)
Round 6: sc around (12sc)
Round 7: [2sc, dec] repeat x 3 (9sc)
Round 8: sc around (9sc in each round) *Stuff only the foot area of the leg, leaving the rest of the leg free of stuffing* - For First Hind Leg: sl st into next stitch, fasten off and weave in ends, (leaving the top of the leg open) set aside for ‘body’. - For Second Hind Leg: Rnd 12: press the top of the leg flat, crochet both sides together to close the opening of the leg (4sc)
Round 9: sc around (9sc in each round) *Stuff only the foot area of the leg, leaving the rest of the leg free of stuffing* - For First Hind Leg: sl st into next stitch, fasten off and weave in ends, (leaving the top of the leg open) set aside for ‘body’. - For Second Hind Leg: Rnd 12: press the top of the leg flat, crochet both sides together to close the opening of the leg (4sc)
Round 10: sc around (9sc in each round) *Stuff only the foot area of the leg, leaving the rest of the leg free of stuffing* - For First Hind Leg: sl st into next stitch, fasten off and weave in ends, (leaving the top of the leg open) set aside for ‘body’. - For Second Hind Leg: Rnd 12: press the top of the leg flat, crochet both sides together to close the opening of the leg (4sc)
Round 11: sc around (9sc in each round) *Stuff only the foot area of the leg, leaving the rest of the leg free of stuffing* - For First Hind Leg: sl st into next stitch, fasten off and weave in ends, (leaving the top of the leg open) set aside for ‘body’. - For Second Hind Leg: Rnd 12: press the top of the leg flat, crochet both sides together to close the opening of the leg (4sc)

— Body :

Round 1: following instructions from Rnd 12 of the second hind leg, you have just completed 4 sc across, to close the leg. These 4 stitches WILL count in the final stitch count of row 1 of the body. Now, chain 5, then sc across the first hind leg you made to close the top of that leg (now both legs should be crocheted closed with 4 sc each and a ch 5 between them. (4sc, 5 ch, 4sc) -;
Round 2: ch 1 and turn your work over, inc in the first stitch, 3 sc, 5sc in ch 5 from previous row, 3sc, inc in last stitch. (15sc)
Round 3: now you will begin working in the round: ch 1, and turn your work, inc in first FLO, 14 FLO sc across, once you reach the end of the body, turn your work and continue to work on the back loops of Row 2 (keep in mind, this loop will LOOK like the front loop from your current perspective, since you have already turned your work), inc in next FLO, 14 FLO sc across the other side of Row 2 (32 sc)

— Arms :

Round 3: of the body will be tricky if you use the suggested bulky yarn. It can seem difficult to see normal stitches, let alone identify the front loop only. My advice is to first insert your hook through both loops, to help you find the front and back loops, then remove your hook, & reinsert through the FLO. Doing so will help loosen up your stitch. After a few stitches, it will become easier to feel the FL…and it’s only for 32 stitches!;
Round 4: inc, 15sc, inc, 15sc, (34sc)
Round 5: inc, 16sc, inc, 16sc (36sc)
Round 6: sc in each stitch (36sc in each round) -;
Round 7: sc in each stitch (36sc in each round) -;
Round 8: sc in each stitch (36sc in each round) -;
Round 9: sc in each stitch (36sc in each round) -;
Round 10: sc in each stitch (36sc in each round) -;
Round 11: dec, 16sc, dec, 16sc (34sc)
Round 12: sc around (34sc)
Round 13: dec, 15sc, dec, 15sc (32sc)
Round 14: dec, 14sc, dec, 14sc (30sc)
Round 15: [3sc, dec] repeat around x 6 (24sc)
Round 16: [2sc, dec] repeat around x 6 (18sc)
Round 17: [1sc, dec] repeat around x 6 (12sc)
Round 18: sc in each stitch around (12sc)
Round 19: In this round, you will crochet the front legs (a.k.a. the arms) to the body. 4sc through front leg and body, 2sc through body only, 4 sc through front leg and body, 2sc through body only (12sc)
Round 20: sc in each stitch around (12sc)

— Head :

Round 1: 6sc in mc (6 sc)
Round 2: inc x 6 (12sc)
Round 3: [sc, inc] repeat x 6 (18sc)
Round 4: [2sc, inc] repeat x 6 (24sc)
Round 5: sc around (24sc in each round) -;
Round 6: sc around (24sc in each round) -;
Round 7: [2sc, inc] repeat around (32sc)
Round 8: 14sc, inc, inc, (insert a stitch marker) inc, inc, 14sc (36sc)
Round 9: sc in each st around (36sc in each round) -;
Round 10: sc in each st around (36sc in each round) -;
Round 11: sc in each st around (36sc in each round) -;
Round 12: sc in each st around (36sc in each round) -;
Round 13: [4c, dec] repeat x 6 (30sc)
Round 14: [3sc, dec] repeat x 6 (24sc)
Round 15: [2sc, dec] repeat x 6 (18sc)
Round 16: [1sc, dec] repeat x 6 (12sc)
Round 17: dec x 6 (6sc) sl st in next stitch, cut yarn and leave a long tail. Use the yarn tail to weave through the last remaining stitches to close the back of the head, secure the yarn tail and move on to instructions for shaping the head and adding nostrils. Closing the back of the head, after round 17 Stitch marker applied in row 8, I use a contrasting piece of yarn to mark the;

— Spikes (make 6) :

Round 1: 6 sc in mc (6sc)
Round 2: [sc, inc] repeat around x 3 (9sc)
Round 3: [2sc, inc] repeat around x 3 (12sc)

— Hind Legs :

Round 1: 6 sc in mc (6sc)
Round 2: [sc, inc] repeat around x 3 (9sc)
Round 3: [2sc, inc] repeat around x 3 (12sc)
Round 4: [3sc, inc] repeat around x 3 (15sc)

— Tail :

Round 1: 4sc in a mc (4sc)
Round 2: [1sc, inc] repeat x 2 (6sc)
Round 3: [2sc, inc] repeat x 2 (8sc)
Round 4: [3sc, inc] repeat x 2 (10sc)
Round 5: [4sc, inc] repeat x 2 (12sc)
Round 6: [5sc, inc] repeat x 2 (14sc)
Round 7: [6sc, inc] repeat x 2 (16sc)
Round 8: [7sc, inc] repeat x 2 (18sc)
Round 9: [8sc, inc] repeat x 2 (20sc)
Round 10: (2 rounds total): 1 sc in each stitch around (20sc in each round) -;
Round 11: (2 rounds total): 1 sc in each stitch around (20sc in each round) -;
Round 12: inc, inc, (insert stitch marker), inc, inc, 16sc (24sc)
Round 13: sc in each stitch around (24sc)

Assembly Instructions

  1. Attach head to body by inserting the neck portion into the opening at the top of the body, then sew securely using whipstitch with a long tail for stability.
  2. Position arms on either side of the body between rounds 12-14, angling slightly forward for a natural pose, and sew in place.
  3. Sew legs to the bottom of the body, spacing them evenly and ensuring they’re firmly attached for stability.
  4. Attach ears to the top of the head between rounds 6-8, spacing them about 8-10 stitches apart for symmetry.

Important Notes

  • Use stitch markers to keep track of your rounds, especially during color changes and shaping sections.
  • Stuff firmly but not too tightly for the best shape and structure - overstuffing can distort your work.
  • Pin all parts in place before sewing to ensure correct positioning and symmetry.
  • Weave in ends as you go to avoid a tedious finishing session at the end.
  • Work with consistent tension throughout for even, professional-looking results.

This Sleepy Snuggle-saurus Rag Doll is crafted to be a reassuring companion with a soft presence that invites gentle play and quiet moments alike. The combination of simple stitches, chunky yarn, and deliberate shaping makes it an approachable project for makers of many skill levels. You can look forward to a finished piece that not only looks delightful but also stands up to curious fingers and frequent cuddles. May your crochet journey be filled with cozy moments and plenty of smiles as you bring this friendly creature to life. As you complete your rag doll, take pride in the care you invested in each round, the careful assembly, and the subtle personalization of spikes and facial touches. A handmade friend is a memory you can hold, a symbol of patience and creativity, and a reminder that small stitches can carry big warmth. Enjoy the process and the result, and share your creation with someone you love. Happy crocheting and warm wishes for many cozy moments ahead.

Good to know

You ask, we answer

The finished rag doll will measure roughly 25 to 28 inches in length when crocheted with bulky yarn and a large conventional hook, depending on tension and how firmly the piece is stuffed.

Yes, different weights will alter size and texture. If you switch weights, use a proportionally larger hook for lighter yarns or a smaller hook for heavier yarns to maintain a plush feel and gentle roundness.

The pattern is suitable for confident beginners who are comfortable with magic rings, working in the round, and basic increases and decreases. It builds foundational amigurumi techniques without requiring advanced stitches.

Expect 8 to 12 hours for a first-time completion, distributed over multiple sessions. Faster completion is common for makers who have prior experience with bulky yarns and seamless rounds.

Tail detail showing the gentle taper and stitches
Join 100k+ crocheters

Get new free patterns, stitch tips and exclusive content in your inbox.