Crochetologist
Free Crochet Pattern
Beautiful Detailed Adorable

Sage Advice Square Pattern

Close-up of Sage Advice Square center petal motif in Coral and Sage showing 3rd-loop stitches and extended puff
3.9Rating
5-7 HoursTime
IntermediateSkill
Highlights

What makes it special

Handmade Charm

A warm touch for your space that transforms ordinary corners into inviting nooks filled with handmade charm.

Weekend Treat

This square typically takes 5-7 hours to complete for an experienced crocheter, allowing time for careful stitch placement, color changes and blocking.

Intermediate Level

Skill level: Intermediate. This pattern expects familiarity with starting rings, working post stitches that push a new stitch in front of or behind the fabric, forming and closing clusters, and executing a neat round finish using the invisible join technique. Some experience with reading round repeats and changing colour cleanly at the start of rounds is required. An adventurous beginner who is already comfortable with basic stitches and willing to practice the special techniques may progress through the design, but plan extra time for sampling and practice swatches.

Sage Advice Square is a single decorative crochet square designed to showcase layered petals, sculpted texture and an airy border that reads well at tabletop scale or joined into larger projects. The instructions guide you through a focused sequence of rounds that turn a floral centre into a neat square with defined corners and a balanced visual weight on both faces.

About This Sage Advice Square Pattern

This pattern yields one decorative square worked in the round, progressing from a small central ring into a petalled motif and finishing with a cornered border that squares the piece. The pattern provides full round-by-round instructions for sixteen rounds plus finishing notes to tidy the motif and prepare it for blocking and joining. Written text describes stitch placement and sequence for each round so that each increase, cluster and border repeat is clear and traceable as you work.

Exact stitch counts are printed at the end of rounds that require them so you can confirm accuracy before moving on. Photographic and schematic references are supplied in the original publication for visual confirmation of stitch placement and overall layout.

Working this design is a stepwise build from centre to edge: the motif begins in a small ring and grows outward as rounds add structured layers that suggest petals, then transform the circular arrangement into a square. The progression is deliberate—each round locks the previous texture into place while setting the foundation for the next shaping element, so you can see the piece change as you crochet.

The rhythm of repeated sections provides a steady work flow that suits focused sessions and allows easy progress-checking between rounds. Each repeat is written to be worked the same way in every segment, so once a repeat is understood the crocheting becomes confidently repetitive without losing interest.

Full Sage Advice Square laid flat on wood background displaying colorway two with merlot border and parchment background

Pattern text uses US crochet terminology and the published layout includes step-by-step round instructions in sequence. Photographs and round-by-round visual references are provided in the original publication to help confirm stitch placement and the finished layout of the petals and border.

Special stitches that are new to some crocheters are supported by a dedicated explanatory section elsewhere in this document; refer to that section for close-up guidance and visual cues if you need them while working a round.

Stitches & Skills You'll Use

This project uses a short set of specialty techniques. The following descriptions explain how each is made and what to watch for while you work; these definitions appear here to support the round-by-round instructions. Double magic circle (double ring): Work a loop of yarn with the tail laid across the working strand and hold the loop with the tail over the top.

Insert the hook under the loop from front to back to draw up a loop of working yarn, then chain the number of stitches specified for the centre foundation (commonly 2 or 3 for the equivalent of a double crochet). Work the first round of stitches into the ring created by the tail-loop; when the round is complete, pull the tail to close the ring tightly and form a compact centre. The double magic circle gives a neat, adjustable hole and provides a flat, anchored start for clustered petal work.

Extended puff (pattern-specific puff): Yarn over, insert hook into the indicated stitch or space, yarn over and draw up a loop; repeat this process for the number of yarn-over-and-draw-up repetitions the pattern calls for (count them as you make them). After making the specified loops on the hook, yarn over and draw through all loops, then chain one to close the puff if the round instructions require it. Keep the final pull-through moderate: too-tight closure will flatten the puff, too-loose will leave a gap in the centre.

When placing puffs in a radial petal layout, position them so that the last yarn-over before closure sits at the petal tip; this produces a tidy visual point on each petal. 2-dc cluster and 2-tr cluster (cluster conventions): For a 2-dc (two double crochet) cluster, yarn over, insert the hook in the indicated stitch or space, yarn over and draw up a loop, yarn over and draw through two loops (leaving one loop on the hook); repeat that sequence once more into the same stitch or space so two cluster loops remain in progress on the hook, then yarn over and draw through all remaining loops to close the cluster. For a 2-tr (two treble) cluster, yarn over twice, insert, draw up a loop, yarn over and draw through two loops twice as needed so the required loops remain, then yarn over and draw through all loops to finish. Clusters reduce multiple stitch symbols into a single physical element; count clusters as a single repeat unit when checking pattern counts unless otherwise noted.

Working into the third loop (3rd-loop) and identifying loops: On garments and motifs that use worked-toward-texture rounds, each double crochet (or other stitch) creates a front loop, back loop and the loop lying behind the back loop that is often called the third loop. To work into that third loop, rotate the fabric so you can sight the horizontal bar sitting behind the standard back loop; inserting the hook under that horizontal bar from front to back and completing the stitch places the new stitch into the third loop. This technique moves the new stitch behind the body of the fabric, producing an on-top texture when later rounds are worked on the face of the square.

If the fabric is tight, gently ease the working yarn to create a little slack before inserting the hook so you do not split yarn strands or pull too tightly. Invisible join for rounds: To finish a round without a visible seam, stop after the last stitch of the round and cut the working yarn with a long tail for weaving. Insert the hook through the front loop of the first stitch of the round and pull the tail through to the front; then insert the hook through the front loop of the last stitch worked, pull the tail through and tighten gently to bring the two loops together so the join lies flat.

Weave the tail into the back of the fabric to anchor. The invisible join used in this pattern is written in the rounds where a seamless finish is required; follow the round notes for precise placement of the join and whether an alternative slip-stitch or fasten-off is allowed for that specific round. Common placement notes: When a round calls for clusters, extended puffs or working into the third loop, place markers at the segment boundaries for the first repetition; markers make it easier to find the start and to keep track of repeats and corner spaces as you go.

If you need more definition while learning these techniques, practice each special stitch in a short sample strip before working it into the motif so you can judge tension and closure.

Why You'll Love This Sage Advice Square Pattern

The design balances sculpted texture with open spaces: raised petal sections push forward visually while the corner spaces keep the square light and lace-like. Color decisions read clearly because the layered rounds separate hues into distinct bands, letting even modest contrast show off the petal shapes. The construction makes it straightforward to change color at the start of a new round without reworking foundation elements, so sampling a palette as you go is easy.

The finished piece blocks predictably into a tidy square with both faces appealing for display or use.

Colour & Yarn Inspiration

Color placement defines the motif's mood. For a soft, vintage palette choose parchment or bone for the background, olive for midrounds and a muted mauve for the petals; use a deeper merlot or coral as a small accent in the final rounds to draw the eye to the border. For a bright, contemporary finish pick a neutral ground colour and alternate two high-contrast brights in successive rounds to highlight the petal edges and border geometry.

If you prefer tonal depth, work the centre in the lightest shade, progress through two mid-tones for the petal and border rounds, and finish with a darkest contrast in the outermost round to anchor the piece. When planning a multi-square blanket, choose one consistent border colour to frame each motif so the joins read uniform from a distance.

Blocked Sage Advice Square shown diagonally to highlight the squared corners and textured border

Switch Things Up

Color and construction variations expand how the square reads and what it becomes in a finished project. Hold two worsted-weight strands together and work with a larger hook to create a chunkier, loftier square; the doubled strands add body and increase the finished thickness while making the puff elements more pronounced.

Use mercerized cotton for a crisper, slightly shiny surface that improves stitch definition and suits decorative pieces such as coasters or placemats. A linen-cotton blend adds a soft drape and slight slub to the fabric, lending a relaxed vintage feel to petal rounds and smoothing the appearance of post-stitch work.

To emphasize the floral centre, choose a bright or saturated colour for the petals and a neutral for the background rounds; reversing those roles—neutral petals and bright background—creates a subtler centre with the background taking visual priority. For a modern, graphic look, pick high-contrast colours in alternating rounds to create concentric rings that read clearly when the square is joined into a blanket.

Small decorative touches: add beads before completing the stitch that will enclose them so they sit securely in the fabric, or work a narrow crocheted picot edging in a contrast shade after completing the border rounds to give a framed finish. For a scaled-down version suitable for key fobs or ornaments, work in a lighter-weight cotton and omit the final border rounds so the motif remains compact.

Ways to Use & Gift It

Sage Advice Square converts easily into many giftable items. Make a set of four for matched coasters in coordinated contrast shades; choose mercerized cotton for a crisp surface and faster laundering. Make three or five squares and frame them individually for small wall art—mount each blocked square on a thin board and slip into a floating frame for a quick, handmade gallery.

Sew two squares together with a narrow strip of batting between to make a small decorative pillow; match the border colour to piping for a polished finish. For a seasonal gift, work a series of small squares in a limited palette and join them into a runner for a table display, alternating border colours to create rhythm along the length. When gifting as a sampler, include a small swatch card listing the yarns and hook sizes used so the recipient can replicate the square if they wish.

Common Mistakes & How to Fix Them

Failing to tuck and secure the starting tail after closing the centre ring can allow the centre to loosen during use; weave the tail into the back of the first rounds to hold the centre closed. Working clusters into the wrong space—placing a cluster into a corner chain rather than the designated stitch—changes the repeat rhythm and distorts petal alignment; when a round lists both corner chains and cluster spaces, place a marker at the first cluster so you can see the intended offsets. Letting the tension spike when completing long post-stitch rounds creates uneven height across a round and can push the fabric out of square; maintain an even hand and check that post heights match the previous post stitches as you work around. Mismatching join direction when you intend to create a reversible seam can make one side neater than the other; plan the join method in advance and practice it on a sample square so the final assembly produces the side you want to show. Skipping the chain that closes a puff or cluster when the pattern explicitly calls for it alters the stitch count for that round; always check whether a puff or cluster is followed by a chain in the written instruction and execute exactly as printed.

Maker's Notes

Test crocheting was conducted using worsted-weight cotton held singly and worked to pattern gauge. Average elapsed build time for a practiced crocheter was approximately six hours to complete one finished square, including weaving ends and blocking. During trials, the element that required the most careful handling was inserting the hook behind the structural loops formed in the early rounds; some testers found those insertions fiddly until the fabric relaxed a bit.

Rounds that combine multiple stitch types were the most common points for stitch-count errors; testers found it helpful to use stitch markers and to pause after completing a repeat to confirm counts before moving on. Blocking had a marked effect on the finished appearance: gentle, evenly spaced pins and a light application of steam or a spray block evened tension variations and opened the border so corners reached their intended straightness. Those who prefer a stiffer finish can starch lightly after blocking; those wanting a softer drape should block to shape with fewer pins and allow the fabric to dry naturally.

I tried a substitution: A substitution trial replaced the pattern's recommended worsted-weight cotton with a DK-weight cotton on a 3.5 mm hook. The resulting blocked motif measured approximately 23 cm (9 in) across rather than the larger dimensions achieved with worsted yarn; the fabric appeared denser and more delicate, with slightly finer stitch definition and a flatter appearance to the extended puff elements. This substitution produces a smaller, sleeker square that will suit tighter-gauge projects or when a less lofty texture is desired, but it reduces the pronounced three-dimensional quality of the puffed petals compared with worsted-weight results.

Sage Advice Square Pattern

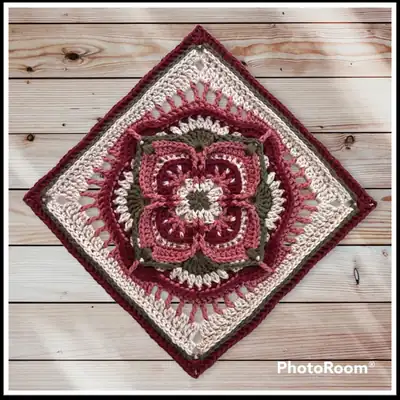
Make the Sage Advice Square with this free crochet pattern — full round-by-round instructions, yarn and hook recommendations, and finishing tips. Start now!

Intermediate 5-7 Hours
Pattern at a glance
Skill level
Intermediate
Time to make
5-7 Hours
Hook size
4.5 mm (7) and 5.0 mm (H/8)
Yarn weight
Worsted / #4
Finished size
Approx. 28 cm / 11 in (4.5 mm hook blocked) or 30.5 cm / 12 in (5.0 mm hook blocked)
Gauge
Approximate gauge: 12 dc x 8 rounds = 10 cm (4") square before blocking; work tightly so no stuffing shows and block to open stitches.
Yarn used
Approx. 120 g / 260 m (285 yds) total across all colors (estimate for a single 11–12" square)

Materials Needed

Main Fabric
  • 01
    I Love This Cotton (Worsted Weight, 100% cotton) - used for Colorway 1 colors A (Parchment), B (Sage), C (Coral), approximate amounts 30-60g per color depending on choice
  • 02
    Yarn Bee Pima Suprema (Worsted Weight, 100% cotton) - used for Colorway 2 colors B (Bone) and D (Merlot), approximate amounts 30-60g per color depending on choice
  • 03
    Yarn Bee Cotton Et Lin (Worsted Weight, 80% cotton, 20% linen) - used for Colorway 2 color C (Mauve), approximate amount 30-60g
Tools Required
  • 01
    Crochet hook 4.5 mm (7) for a tighter finish
  • 02
    Crochet hook 5.0 mm (H/8) for a larger blocked size
  • 03
    Stitch markers
  • 04
    Yarn darning needle for weaving ends
  • 05
    Blocking pins or T-pins and a blocking surface

— Part 1 :

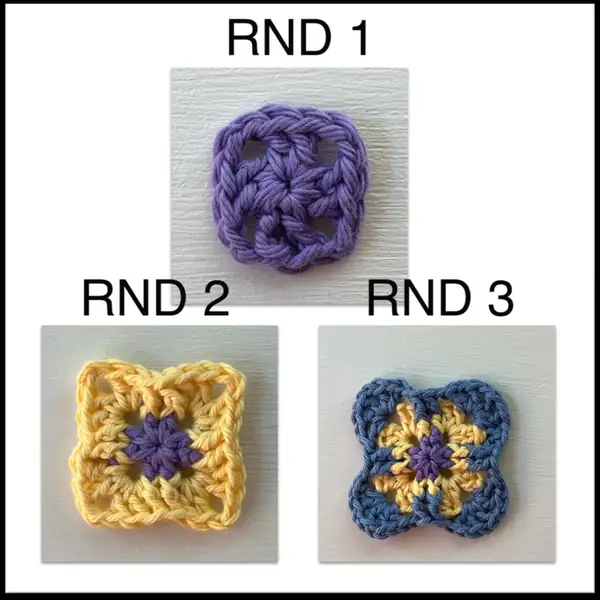
Round 1: Colorway 1: A, Parchment Colorway 2: A, Olive In a double magic circle, ch 3 as a dc, dc; [ch 2, 2 dc] 3 times, ch 2; Join: slst to 3rd starting ch OR invisible join to 1st true dc of rnd, fasten off. Counts: 8 dc, 4 ch-2 corner sp (8 total) RND 2 Colorway 1: B, Sage Colorway 2: B, Bone Note: Before starting, read the information about slst join and starting the next rnd.
Round 3: Colorway 1: A, Parchment Colorway 2: C, Mauve Start in any ch-2 corner sp OR slst to corner, ch 3 (as 1st dc of rnd), *([dc, ch 1] 5 times) in ch-2 corner sp; sk 2 dc; FPdc around 2 FPdc; ch 1, sk 2 dc*; REPEAT FROM * TO * 3 MORE TIMES; Join: invisible join to 1st ch of rnd, fasten off. Counts: 20 dc, 8 FPdc, 24 ch-1 sp (52 total)
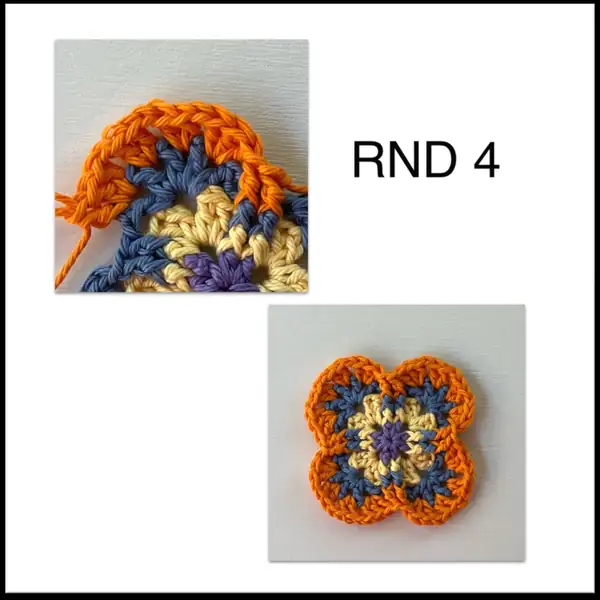
Round 4: Colorway 1: A, Parchment Colorway 2: D, Merlot Start around 1st FPdc of 2 FPdc, *FPdc around each of the next 2 FPdc; sk ch-1 sp AND dc; (3 dc) in ch-1 sp;
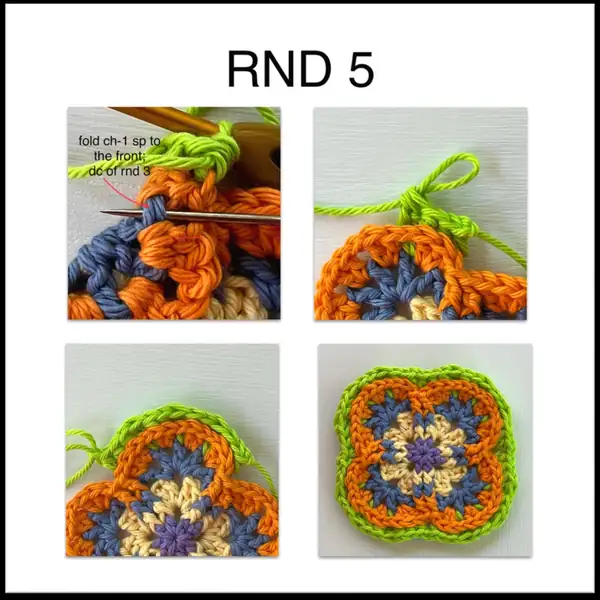
Round 5: Colorway 1: C, Coral Colorway 2: B, Bone Start in 1st dc after any 2 FPdc OR slst into next FPdc and dc, then ch 2 (as 1st hdc of rnd), *hdc in 3LP of 3 dc; fold ch-1 sp to the front, [2tr-cluster in dc of rnd 3, sk ch-1 sp; hdc in 3LP of 2 dc of rnd 4] 2 times; 2tr-cluster in dc of rnd 3, sk ch-1 sp; hdc in 3LP of 3 dc of rnd 4; ch 1, sk 2 FPdc*; REPEAT FROM * TO * 3 MORE TIMES; Join: slst to 2nd starting ch OR invisible join to 2nd hdc of rnd, fasten off. Counts: 40 hdc, 12 2tr-cluster, 4 ch-1 sp (56 total)
Round 6: Colorway 1: A, Parchment Colorway 2: C, Mauve Start in 3rd hdc after ch-1 sp OR slst into next 2 hdc, then ch 1 and sc in same hdc, *sc in hdc; [(2 sc) in 2tr-cluster; sc in 2 hdc] 2 times; (2 sc) in 2tr-cluster;
Round 7: Colorway 1: A, Parchment Colorway 2: C, Mauve Start in 3rd sc after any 2 FPdc OR ch 3 as a dc, *dc in 5 sc; (2 dc) in sc, ch 2; (2 dc) in sc; dc in 6 sc;
Round 8: Colorway 1: B, Sage Colorway 2: A, Olive Start in any ch-2 corner sp, *(7 tr) in ch-2 corner sp; sk FPdc AND 2 dc; hdc in 3LP of 6 dc; ch 1, EXT-puff in ch-2 sp, ch 1;
Round 9: Colorway 1: C, Coral Colorway 2: B, Bone Start in 1st tr of any (7 tr) group OR ch 2 (as starting of 1st 2dc-cluster of rnd)
Round 10: Colorway 1: A, Parchment Colorway 2: D, Merlot Start in ch-2 sp after BPhdc around EXT-puff, *(6 dc) in ch-2 sp; sk 3 BPhdc, (2 dc) in ch-1 sp; [sk 2dc-cluster, (2 dc) in ch-1 sp] 6 times;
Round 11: Colorway 1: B, Sage Colorway 2: C, Mauve Start around 1st dc after any 2nd set of (6 dc) group;
Round 12: Colorway 1: B, Sage Colorway 2: C, Mauve Note: do not sk any sc in this rnd.
Round 13: Colorway 1: A, Parchment Colorway 2: B, Bone Start in any ch-2 corner sp, *(2tr-cluster, tr, ch 2, tr, 2tr-cluster) in ch-2 corner sp; sk tr, (tr, 2tr-cluster) in ch-1 sp; [sk tr, (dc, 2dc-cluster) in ch-1 sp] 2 times; sk dc, (2 hdc) in ch-1 sp; sk dc, hdc in hdc AND sc;
Round 14: Colorway 1: C, Coral Colorway 2: B, Bone Start in ch-2 corner sp OR slst into next tr and ch-2 corner sp, then ch 3 (as 1st dc of rnd), *(2 dc, ch 2, 2 dc) in ch-2 corner sp; dc in 8 sts; hdc in 13 sts; dc in 8 sts*; REPEAT FROM * TO * 3 MORE TIMES; Join: slst to 1st dc of rnd OR invisible join to 2nd dc of rnd, fasten off.
Round 15: Colorway 1: B, Sage Colorway 2: A, Olive Note: I suggest going up a hook size for this rnd only so the 3LP of scs are a little larger for dc in 3LP in rnd;
Round 16: Start in ch-2 corner sp OR slst into next dc and ch-2 corner sc, then ch 1 and sc in ch-2 corner sp, *(sc, ch 2, sc) in ch-2 corner sp; sc in 3LP of 33 sts*; REPEAT FROM * TO * 3 MORE TIMES; Join: slst to 1st sc of rnd OR invisible join to 1st ch of rnd, fasten off.

Assembly Instructions

  1. Block the finished square to the specified dimensions: with a 4.5 mm hook expect approximately 11" blocked, with a 5.0 mm hook expect approximately 12" blocked; pin evenly and allow to dry flat.
  2. Weave in all loose ends from color changes on the back of the square using a yarn darning needle, hiding tails under nearby stitches and trimming flush.
  3. If joining multiple squares into a blanket, align squares so center motifs match and use your preferred join (slip-stitch join, whipstitch, or mattress stitch) worked into the back loops for a neat seam.
  4. Press and pin the square evenly when joining to avoid stretching one side; place pins at regular intervals and stitch through the same rounds on both squares for consistent joins.

Important Notes

  • All rounds that call for a standing start should begin with the standing stitch as written; substituting a chain start can leave a visible gap at the round start and affect edge regularity.
  • When the pattern specifies changing hook size for a single round, switch to the specified hook only for that round and return to your previous hook afterward to maintain the intended sequence of gauge transitions.
  • Round counts printed in the instructions include chain spaces where specified; consult the totals at the end of a round and count chain spaces as part of that total when verifying stitch numbers.
  • Do not skip the instruction that forbids skipping single crochet in the round that identifies that requirement; skip-free placement in that round preserves the stitch geometry relied upon in subsequent rounds.
  • Use stitch markers to mark repeat boundaries and corner spaces while you develop familiarity with the motif; markers reduce counting errors and make it simpler to find the start of a repeat when you need to double-check.

Thank you for choosing the Sage Advice Square. This small design blends sculptural petal work with tidy border shaping to create a versatile square that works well on its own or as part of larger projects. Enjoy experimenting with colours and substitutes, and may this square add a touch of handmade texture to your home. Happy crocheting.

Good to know

You ask, we answer

Blocked finished dimensions depend on the weight of yarn and the hook used: using the pattern's recommended worsted-weight cotton with a 4.5 mm hook and blocking yields approximately 11 inches (28 cm) square; using the same worsted yarn with a 5.0 mm hook and blocking gives about 12 inches (30.5 cm) square. These are blocked measurements taken after the square has been shaped and dried; unblocked measurements will be slightly smaller.

This pattern was written for worsted-weight cotton and original samples used named #4 cottons such as I Love This Cotton, Yarn Bee Pima Suprema, and Yarn Bee Cotton Et Lin. Choose a worsted-weight cotton with good stitch definition and a smooth plied structure to make the petal and puff textures read clearly and to block cleanly. If you substitute a different fibre or weight, expect changes in finished size and texture; consult the substitution notes for a tested DK-weight outcome.

Yes. Detailed descriptions and placement notes for the pattern's special stitches are collected in the Stitch Spotlight section of this document; use that section for step-by-step guidance on the double magic circle, the extended puff, the 2-dc/2-tr clusters and how to work into the third loop. If you prefer visual help, use the photographic round references provided in the publication alongside the Stitch Spotlight notes.

Yes. Squares block flat and are suitable for joining into blankets. Standard joining options that work well are single crochet join, slip-stitch join or a sewn mattress-stitch seam, depending on how visible you want the join line to be. For a flat, subtle connection use a mattress-stitch seam worked with a darning needle and matching yarn; for a decorative join that adds texture, choose single crochet in a contrast colour. Always block squares to final shape before joining, align corresponding round edges and use pins or clips to keep corners square while you join to ensure uniform tension along the seam.

This design is intended for crocheters who are comfortable moving beyond foundational stitches. Refer to the Level Description field for the full skill summary: the pattern expects a working knowledge of starting rings, clusters, post stitches and completing a round with a tidy join. An enthusiastic beginner who practices the special stitches on a small swatch and follows the Stitch Spotlight guidance may complete the square, but extra practice and time should be anticipated.

First pause and count stitches at the end of the round that produced the discrepancy; mark a repeat boundary with a removable stitch marker and recount section by section. Check that you have closed clusters and puffs exactly as written (clusters count as the number of cluster units shown in the round totals), confirm whether a stitch should be worked into a loop, front loop or the third loop as indicated, and verify that corner chain spaces were folded or left open according to the round note. If you still have a mismatch, unravel to the previous round where counts matched and rework the problematic round slowly, placing markers at repeat junctions. When in doubt about placement, consult the photographic round references and the Stitch Spotlight definitions to ensure each special stitch was executed and counted correctly.

Progress photo of Round 6 demonstrating placement of clusters and 3LP stitches near the petal edges
Join 100k+ crocheters

Get new free patterns, stitch tips and exclusive content in your inbox.