Crochetologist
Free Crochet Pattern
Beautiful Detailed Adorable

Rattle Deer Amigurumi Pattern

Beige brown rattle deer amigurumi head close-up
4.2Rating
8-10 HoursTime
IntermediateSkill
Highlights

What makes it special

Made with Love

An adorable friend to cherish, handcrafted with love to bring comfort and joy for years to come.

All-Day Adventure

An 8- to 10-hour journey that rewards steady focus, allowing you to savor each round, perfect the shaping, and sew the parts together with mindful care.

Intermediate Level

This pattern suits crocheters who enjoy amigurumi with careful shaping, color changes, and precise seaming, using magic rings, invisible decreases, and multi-part assembly. The project rewards patience and planning, offering a well-proportioned result that remains soft and durable for daily play and display.

Designed as a tiny companion that carries quiet joy and a gentle sense of whimsy, this rattle deer amigurumi becomes a keepsake for baby days and quiet evenings alike. The rattle inside the wooden ring provides a soft, familiar sound that invites touch and curiosity without overpowering the deer’s serene face. The finished toy sits neatly on a shelf, hides in a tote for travel, or rests beside a crib for daytime calm and nap-time rituals. Its warmth comes from simple materials and careful construction, not from flashy tricks, making it a thoughtful gift that grows with the family it blesses.

This pattern invites careful pacing—select soft cotton yarns, work in the round with a steady rhythm, and practice precise seaming to bring the character to life. For makers new to amigurumi who crave a meaningful project, this deer pattern offers a straightforward build, clear instructions, and the satisfaction of a well-sewn finish that holds up to daily handling.

About This Rattle Deer Amigurumi Pattern

The technique sheet for this project guides you through a multi-piece build that is approachable for crocheters at a comfortable intermediate level. Begin with a small circle worked in the round using a magic ring, then increase and decrease to shape a rounded head that reads friendly and balanced. From there, add the neck portion and the joining seam to the ring that will anchor the interior rattle. The ears and collar are created as separate pieces or a single band, depending on the chosen assembly, and the seam placements emphasize symmetry. For finishing, the pattern uses standard invisible joins and careful weaving of ends so the exterior surface remains uninterrupted and clean. The final step involves attaching the head to the ring and securing the entire figure so it holds its form while remaining soft to the touch. Quality finishing means the piece can be enjoyed without snagging and will survive repeated handling by little hands.

Deer head with horns attached to wooden ring

The pattern supports a structured, reward-rich build with a staged assembly: start with the core head, proceed to attach the neck, and then sew the remaining pieces in place. To keep symmetry, use markers at key join points and test-fitting before final seaming. The finishing sequence emphasizes clean ends and a smooth exterior. The design prioritizes safety with careful rattle encapsulation and a gentle silhouette with easy-to-follow steps. The finishing phase also includes a final inspection to ensure no tails or ends protrude that could snag, and a light press can restore any flattening from packing or shipping if you choose to gift it.

Stitches & Skills You'll Use

Stitches you’ll use are fundamental and reliable for a friend-shaped amigurumi project: a magic ring to start the head, continuous rounds to create a spherical shape, and single crochet for the main fabric. Increases and decreases are used in measured sequences to shape the muzzle, cheeks, and crown, with the aim of a soft, child-friendly outline. The muzzle is formed by targeted increases near the front, while the cheeks gain gentle contouring through a few rounds of increases followed by decreases that taper toward the neck. The ears are crocheted to form an outer curve and inner depth, then joined with careful seam placement so the face remains symmetrical. The neck transitions into the ring via a neat collar seam, giving a clean boundary between head and the rattle ring. The yarn color order is kept deliberate: MC is used for the main body, with CC introduced for decorative accents after the primary shape is established. The assembly steps require careful marking of key points on each piece—two ears and neck junctions—to ensure symmetry when the pieces are joined during the final sew-up. The invisible finishing technique uses small, tight whip stitches and plenty of the same-stage thread to secure ends inside the piece without showing on the exterior. The rattle mechanism sits within a wooden ring that is fully enclosed by the crocheted shell, leaving no access to the interior from the outside, meeting safety expectations for toys intended for babies and toddlers.

Color changes are kept minimal to preserve proportion; typically you switch to CC for detailing on the muzzle and ear insides, then return to MC for the main body. You’ll maintain a single color in progress for the bulk of the head to avoid color bleed, and you can switch only after the head has reached its final contour. The assembly phase is where your seamwork shines—aligning ears and neck junctions symmetrically, attaching the collar evenly, and threading ends in clean, invisible passes. For beginners learning seaming, take your time, use small mattress stitches or equivalent, and work over the seam line to minimize visibility on the outer surface. With patience, the result is a smooth, durable finish that remains inviting to touch and cuddle.

Even though the rounds may look intricate, the logic is straightforward: each section is built from the previous, and the silhouette evolves in a predictable way that yields a cohesive sculpture able to withstand daily play. It’s helpful to keep a single yarn color in progress for the head while bringing in CC later for accents, preserving clean color separation. A little planning goes a long way: test-fit the pieces before final sewing, adjust tension as needed, and then proceed to final assembly. The finished toy carries a light, comforting feel that is perfect for a baby’s early years and for family photo moments.

Why You'll Love This Rattle Deer Amigurumi Pattern

I absolutely love this pattern because it merges classic amigurumi technique with a playful, child-friendly finish. The rattle inside the ring adds a tiny magical surprise that fires imagination without overpowering the gentle face. I enjoy the rhythm of the rounds, the precision of the horn attachments, and the moment when the collar sits perfectly around the neck, giving the deer real personality. Each piece feels like a tiny sculpture, and the finished toy offers a tangible sense of accomplishment that makes gifting feel extra special. It’s the kind of project I return to for a calming, creative escape, and I’m thrilled to share it with fellow crochet enthusiasts who appreciate a thoughtful, durable keepsake.

Colour & Yarn Inspiration

Earthy tones form a timeless base: main color (MC) in warm beige with chocolate brown (CC) for accents; a soft gray for muzzle and inner ears adds depth without overpowering the charm. For a playful twist, swap MC to pale lilac or mint and keep CC as a contrasting shade; this yields a friendly, whimsical vibe while preserving the pattern’s approachable look. A rustic option uses olive green for the body with a cream muzzle and a darker brown for the horns, offering a natural, outdoors-inspired feel. The face remains the focal point, with the horns and collar standing out just enough to add character.

Test swatches matter because substitutions affect gauge. If you switch to sport-weight or DK yarn, adjust the hook size accordingly to preserve stitch density and overall proportions. A cotton-silk blend adds a subtle sheen that enhances soft features, while pure cotton provides a matte finish. Consider a touch of viscose for a gentle drape that still holds its shape. The final color story should feel cohesive with your space or gift recipient’s preferences, making the deer special and personal.

Final deer head mounted on wooden ring

Switch Things Up

Color palettes are a playful place to begin. Consider a pale mint with cream for a fresh spring feel, or a woodland-inspired mix of forest green and tan for a cozy, nature-inspired look. A two-tone approach with MC as the main body and CC for accents helps define the face features without overwhelming the gentle expression. If you’re short on time, simplify the horn work by making single-piece horns and skip any extra flat-head shaping; you’ll still retain the deer’s charm and a clean silhouette. For a festive version, add a small crocheted scarf in seasonal colors and attach a tiny bell to the collar for a cheerful touch. A soft blush on the cheeks or a tiny embroidery motif on the collar can add personality without complicating the pattern.

Metallic threads can be woven subtly into the horns or collar for a hint of shine that remains kid-friendly. If you prefer, swap the rattle for a soft cushion of beads encased in a crochet shell that remains securely closed with a stopper and a tight finish. You can also create a matching set by crocheting a companion woodland creature to form a coordinated gift—for example, a small fox or owl—so the set tells a tiny story as a group. Remember to keep color separation clear, so facial features stay legible and the toy looks balanced from every angle.

As you gain experience, you can add tiny crocheted leaves or acorns around the neck to evoke a woodland scene, or sew a small fabric bag to the ring to collect yarn bits when not in use. The key is to balance color choices, stitch density, and assembly so the final piece remains sturdy, cuddly, and perfectly gift-worthy. Enjoy the process and let your hands guide you toward a personalized interpretation that preserves the gentle, timeless appeal of the deer.

If you want to push your skills, try a subtle texture in the muzzle by using a knit-like or tuck-stitch variation that stays practical and safe for a baby toy, or explore a soft gradient by changing colors across a few rounds with a controlled color-change technique. The goal remains a kid-friendly, durable keepsake that holds up to daily play and cuddling while offering a touch of individual style.

Ways to Use & Gift It

Gifting this deer is a thoughtful welcome-to-the-world present or new-baby celebration. Wrap it in a soft cotton pouch or lay it on a tiny crocheted blanket for extra warmth. The rattle feature adds a sensory element that curious little hands enjoy discovering, making it a memorable heirloom that can be treasured for years. Pair the deer with a matching crochet prop set—such as a little leaf or acorn—to create a cohesive scene that grows with the child’s imagination. The handmade aspect adds sentimental value, elevating the gift beyond a simple toy.

For personalization, tailor the color palette to the nursery theme to create a harmonious room aesthetic. A neutral beige and brown deer blends easily with most decors, while a soft accent color provides a gentle pop. If gifting to new parents, include a brief care note on washing and storage to help maintain softness and shape. The narrative of craft behind the toy speaks volumes and elevates the moment from ordinary to cherished, sparking joy and imagination every day.

Common Mistakes & How to Fix Them

Losing your stitch count — place a marker at the start of each round. Working too loosely, which lets the stuffing show through the fabric. Forgetting to stuff firmly before closing a piece. Sewing parts on before pinning and checking the proportions.

Maker's Notes

When I made this, I used Vita Cotton Lily DK in beige and brown with a 2.5 mm hook. It took roughly 9 hours including assembly. I found neck shaping and horn attachment the trickiest parts; take time to align pieces symmetrically and stuff the head evenly to avoid a wobbly feel. Mark rounds to stay on track and test the rattle sound with the ring in place to ensure the mechanism stays secure. Beginners should practice the nose embroidery first on a scrap piece to get the right line thickness before sewing onto the head. Maintain steady tension throughout to avoid overstuffing the muzzle, which can distort the rounded shape you worked so hard to achieve.

I tried a substitution: I substituted Scheepjes Catona (DK) for Vita Cotton Lily with a 2.0 mm hook; the deer turned out slightly smaller (about 8.5 cm) and the muzzle density differed. Gauge remained close but required a few extra rounds in the neck to balance the head visually. The collar sat well with the adjusted neck length, and the horns attached securely with a tiny bit more tension in the join. Overall, substitution preserved the look and feel while altering scale slightly; feel free to adjust hook size to match the final size you desire. The interior rattle setup remained securely enclosed and safe with proper end finishes, even with the different fiber content.

Rattle Deer Amigurumi Pattern

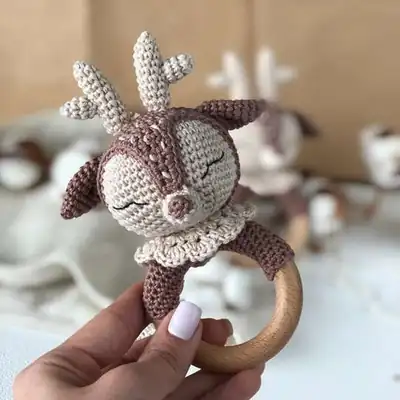
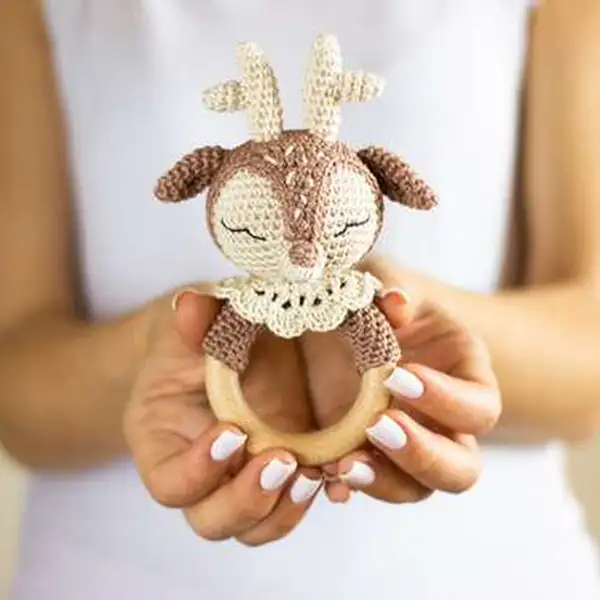
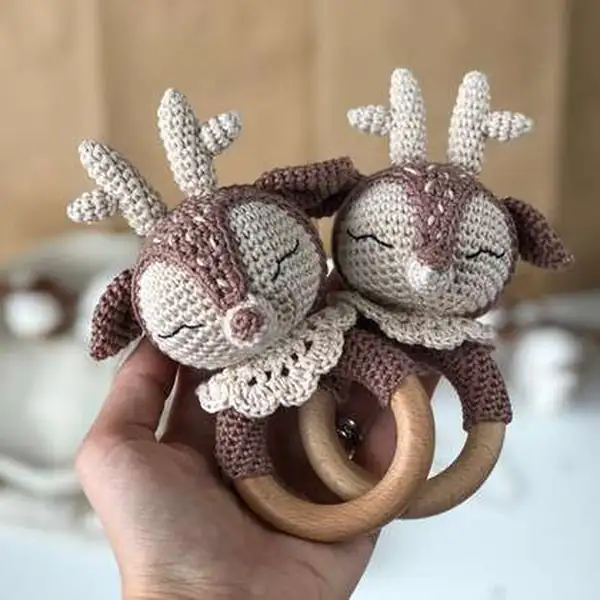
Make this adorable rattle deer amigurumi with our free crochet pattern—full round-by-round instructions, materials, and assembly tips. Start crocheting now!

Intermediate 8-10 Hours
Pattern at a glance
Skill level
Intermediate
Time to make
8-10 Hours
Hook size
2.0 mm (B) and 2.5 mm (C)
Yarn weight
DK / #3
Finished size
Approx. 9 cm tall / 3.5 in tall (including ring)
Gauge
26 sc x 25 rows = 4 in (10 cm)
Yarn used
MC beige ~87 yds / 80 m

Materials Needed

Main Fabric
  • 01
    2 hanks of Vita Cotton Lily 100% cotton, approx 50g per hank (1.75 oz/50g) totaling ~137yds/125m. Gauge: 26 sc x 25 rows = 4in (10cm); substitute yarns permitted if proportions remain.
  • 02
    MC yarn (beige) approx 87 yds / 80 m
  • 03
    CC yarn (brown) approx 30 yds / 27 m
  • 04
    Wooden ring approx 60-70 mm diameter
  • 05
    Rattle component approx 24-30 mm diameter
  • 06
    Stuffing (polyester)
  • 07
    Safety eyes (optional) or embroidery floss for eyes
  • 08
    Scissors, tapestry needle, sewing pins
Tools Required
  • 01
    Crochet hook 2.0 mm (B) and 2.5 mm (C)
  • 02
    Wooden ring 60-70 mm diameter
  • 03
    Rattle insert 24-30 mm diameter
  • 04
    Polyester stuffing
  • 05
    Scissors
  • 06
    Black embroidery floss or yarn
  • 07
    Tapestry needle

— Part 1 :

Round 4: - (inc, sc in next 2 sts) * 6 times (24)
Round 5: - (inc, sc in next 3 sts) * 6 times (30)
Round 6: - (inc, sc in next 4 sts) * 6 times (36)
Round 7: - (inc, sc in next 5 sts) * 6 times (42)
Round 8: - (inc, sc in next 6 sts) * 6 times (48)
Round 9: – 48sc (work even for 7 rnds)
Round 10: – 48sc (work even for 7 rnds)
Round 11: – 48sc (work even for 7 rnds)
Round 12: – 48sc (work even for 7 rnds)
Round 13: – 48sc (work even for 7 rnds)
Round 14: – 48sc (work even for 7 rnds)
Round 15: – 48sc (work even for 7 rnds)
Round 16: - (dec, sc in next 6 sts) * 6 times (42)
Round 17: - (dec, sc in next 5 sts) * 6 times (36)
Round 18: - (dec, sc in next 4 sts) * 6 times (30)
Round 19: - (dec, sc in next 3 sts) * 6 times (24)
Round 20: - (dec, sc in next 2 sts) * 6 times (18)
Round 21: - (dec, sc in next st) * 6 times (12)
Round 22: - (dec) * 6 times (6)

— Part 2 :

Round 1: sc in magic ring (6)
Round 2: sc in magic ring (6)
Round 3: sc in magic ring (6)
Round 4: sc in magic ring (6)
Round 5: sc in magic ring (6)
Round 6: sc in magic ring (6)

— Part 3 :

Round 2: - (inc) * 6 times(12)
Round 3: - (inc, sc in next st) * 6 times (18)

— Part 4 :

Round 1: sc into magic ring (6)
Round 2: sc into magic ring (6)
Round 3: sc into magic ring (6)
Round 4: sc into magic ring (6)
Round 5: sc into magic ring (6)
Round 6: sc into magic ring (6)

— Head :

Round 2: - (inc) * 6 times (12)
Round 3: - (inc, sc in next st) * 6 times (18)
Round 4: - (inc, sc in next 2 sts) * 6 times (24)
Round 5: - (inc, sc in next 3 sts) * 6 times (30)
Round 6: - (inc, sc in next 4 sts) * 6 times (36)
Round 7: - (inc, sc in next 5 sts) * 6 times (42)
Round 8: - (inc, sc in next 6 sts) * 6 times (48)
Round 9: – sc in every st (work even for 5 rnds) (48)
Round 10: – sc in every st (work even for 5 rnds) (48)
Round 11: – sc in every st (work even for 5 rnds) (48)
Round 12: – sc in every st (work even for 5 rnds) (48)
Round 13: – sc in every st (work even for 5 rnds) (48)
Round 14: - (dec, sc in next 6 sts) * 6 times (42)
Round 15: – sc in every st (work 1 rnd even) (42)
Round 16: - ch1, sc in next 6 sts, turn.
Round 17: - ch1, sc in next 6 sts, turn.
Round 18: - sc in next 5 sts starting from the 2nd st from the hook, turn.
Round 19: - sc in next 4 sts starting from the 2nd st from the hook, turn.
Round 20: - ch1, sc in next 4 sts, turn.
Round 21: - sc in next 3 sts starting from the 2nd st from the hook, turn.
Round 22: - sc in next 2 sts starting from the 2nd st from the hook, turn.
Round 23: - ch1, sc in next 2 sts, turn Sc in every st to end of upper head piece. Sl st in next st, fasten off leaving a long tail approx 25-27 in(65-70 cm) for sewing to the head. 5;
Round 24: - ch1, sc in next 2 sts, turn Sc in every st to end of upper head piece. Sl st in next st, fasten off leaving a long tail approx 25-27 in(65-70 cm) for sewing to the head. 5;
Round 25: - ch1, sc in next 2 sts, turn Sc in every st to end of upper head piece. Sl st in next st, fasten off leaving a long tail approx 25-27 in(65-70 cm) for sewing to the head. 5;

— Part 6 :

Round 1: sc into magic ring (5)
Round 2: sc into magic ring (5)
Round 3: sc into magic ring (5)
Round 4: sc into magic ring (5)
Round 5: sc into magic ring (5)

— Part 7 :

Round 2: - (inc)* 5 times (10)
Round 3: - sc in next 10 (work even for 3 rnds)(10)
Round 4: - sc in next 10 (work even for 3 rnds)(10)
Round 5: - sc in next 10 (work even for 3 rnds)(10)

— Part 8 :

Round 1: sc into magic ring (6)
Round 2: sc into magic ring (6)
Round 3: sc into magic ring (6)
Round 4: sc into magic ring (6)
Round 5: sc into magic ring (6)
Round 6: sc into magic ring (6)

— Part 9 :

Round 2: – inc, sc in next 5 sts (7)
Round 3: – sc in every st (work even for 2 rnds) (7)
Round 4: – sc in every st (work even for 2 rnds) (7)

— Part 10 :

Round 1: sc into magic ring (6)
Round 2: sc into magic ring (6)
Round 3: sc into magic ring (6)
Round 4: sc into magic ring (6)
Round 5: sc into magic ring (6)
Round 6: sc into magic ring (6)

— Part 11 :

Round 2: – (inc, sc in next 2 sts) * 2 times (8)
Round 3: – sc in every st (work even for 8 rnds) (8)
Round 4: – sc in every st (work even for 8 rnds) (8)
Round 5: – sc in every st (work even for 8 rnds) (8)
Round 6: – sc in every st (work even for 8 rnds) (8)
Round 7: – sc in every st (work even for 8 rnds) (8)
Round 8: – sc in every st (work even for 8 rnds) (8)
Round 9: – sc in every st (work even for 8 rnds) (8)
Round 10: – sc in every st (work even for 8 rnds) (8)

— Part 12 :

Round 1: sc into magic ring (6)
Round 2: sc into magic ring (6)
Round 3: sc into magic ring (6)
Round 4: sc into magic ring (6)
Round 5: sc into magic ring (6)
Round 6: sc into magic ring (6)

— Part 13 :

Round 2: - (inc, sc in next 2 sts) * 2 times (8)
Round 3: - (inc, sc in next 3 sts) * 2 times (10)
Round 4: - (inc, sc in next 4 sts) * 2 times (12)
Round 5: - (inc, sc in next 5 sts) * 2 times (14)
Round 6: – sc in every st (work even for 4 rnds) (14)
Round 7: – sc in every st (work even for 4 rnds) (14)
Round 8: – sc in every st (work even for 4 rnds) (14)
Round 9: – sc in every st (work even for 4 rnds) (14)

— Collar :

Round 1: sc in 2nd st from the hook, sc in next 20 sts, turn.
Round 2: ch4, dc in 1st st, [sk1, dc in next st, ch1, dc in the same st] 10 times, turn.
Round 3: ch2, 2 dc in next ch space, sc in next st, [5 dc in next ch space, sc in next st] 10 times, 3 dc in last post. The collar is ready. Sew it as it`s shown on the photo. 10;

Assembly Instructions

  1. Stuff each piece firmly before closing.
  2. Pin all parts in place and check the proportions against the photos.
  3. Sew parts on securely with matching yarn.
  4. Weave in all ends and shape the finished piece.

Important Notes

  • Work in a continuous spiral unless a round says otherwise.
  • Stitch counts are given at the end of each round — check them as you go.
  • Stuff firmly and evenly for a smooth finish.
  • Use a stitch marker to track the beginning of each round.

This rattle deer amigurumi is a little masterpiece that blends texture, whimsy, and craft. May your stitching be steady and your results bring smiles and warm memories. Happy crocheting to you and yours!

Good to know

You ask, we answer

The finished rattle deer stands about 9 cm tall when using the recommended yarn and hook size, with a small proportionally sized wooden ring creating the interior rattle housing.

Yes. You can use different yarn weights, but this will affect final size. To keep proportions correct, choose a hook size that maintains the same stitch density as the pattern uses for the designated yarn weight, and plan to adjust rounds accordingly.

Yes, basic knowledge of crochet stitches and techniques is recommended. The pattern is rated intermediate and relies on working in the round, single crochet, increases, decreases, simple joining, and careful finishing.

Most crocheters finish within 8–10 hours, depending on experience, pace, and how thoroughly you mark rounds and test fit pieces before final seaming.

Close-up of muzzle embroidery on deer
Join 100k+ crocheters

Get new free patterns, stitch tips and exclusive content in your inbox.