Crochetologist
Free Crochet Pattern
Beautiful Detailed Adorable

Race Track Mat Crochet Pattern

Finished oval race track crochet mat with green outer border and black track area amigurumi-style display
4.1Rating
5-7 HoursTime
IntermediateSkill
Highlights

What makes it special

Handmade Charm

A warm touch for your space that transforms ordinary corners into inviting nooks filled with handmade charm.

Weekend Treat

This pattern takes about five to seven hours depending on colour changes and finishing details, making it ideal for a focused couple-of-evenings project.

Intermediate Level

Perfect for crocheters comfortable with working in the round, increases and colour changes, this intermediate pattern uses double crochet shaping, yarn-carrying and finishing seam techniques for a neat mat.

If you love toy cars and handmade playthings, this race track mat invites a playful weekend of crochet and little-imagined races in your living room.

Its bold track lines, alternating kerb colours and stitched dashed centre lane create an instant focal point that children and collectors will both reach for at playtime and display with pride.

About This Race Track Mat Crochet Pattern

This project creates an oval race track play mat with an inner oval lane, decorative alternating red and white binding, a dashed center lane and a final single crochet edge; finished size is approx. 56 cm x 35 cm using worsted weight yarn and 3.5 mm & 4 mm hooks and multiple colour changes for the track details.

I designed this oval race track mat as a structured project that grows outward from a long starting chain into a flattened oval using consistent double crochet rounds and planned increases.

Working this pattern you will add increases at each end of the oval to create a smooth curve, swap colours on the last yarn over to make clean transitions, and carry unused yarn along the round for tidy alternating colour sections.

The result is a sturdy, washable play surface that uses simple stitches repeated thoughtfully so makers feel steady progress as the mat widens and the decorative border and center dashes bring the design to life.

Close-up of chain foundation and first rows showing long oval shaping for crochet race track mat

The step progression emphasizes repeatable round shaping and a measured approach to colour changes so you can maintain stitch counts and a flat working surface.

This layout also lets you scale the mat later by switching yarn weight and hook size while preserving the same increase ratios for the oval corners.

Stitches & Skills You'll Use

This pattern relies primarily on double crochet (dc) worked in the round to build the oval shape, combined with increases (INC) at the ends to produce smooth curves rather than abrupt angles. You will also use chain (ch) as the project foundation and slip stitch (sl st) joins to close each round neatly.

Colour work in this mat is managed by changing yarn on the last yarn over of a stitch to make crisp transitions between rounds; carrying the unused colour along the base of the stitches keeps the front tidy during the alternating red and white kerb section. Basic yarn-carrying technique and catching floats intermittently are essential skills used here.

The finishing details include a single crochet round worked with a slightly larger hook to create an even border and a simple embroidery-style lane created with a darning needle and contrasting yarn, which introduces non-crochet finishing but uses only straightforward stitching from front to back through existing spaces.

Why You'll Love This Race Track Mat Crochet Pattern

I absolutely love this pattern because it turns basic crochet techniques into a playful, practical object perfect for kids and collectors alike.

I enjoy the steady rhythm of working double crochet rounds while keeping an eye on the corner increases; watching the oval take shape is quietly addictive.

What thrills me most is the colourwork section where alternating red and white blocks create a classic racing kerb look without complicated surface crochet; it feels clever but achievable.

I also appreciate how the final dashed lane is woven with a darning needle, a small finishing step that transforms the mat into a recognisable track and invites imaginative play once completed.

Colour & Yarn Inspiration

The sample uses deep green, black, white, red and a yellow highlight to mimic classic racetrack colours; swapping the green for navy or charcoal gives a more neutral modern look, while pastel shades soften the design for a nursery. If you prefer a monochrome palette, use shades of grey and white with a single accent colour to maintain contrast while simplifying yarn choices.

Yarn fibre affects both drape and durability: choose acrylic worsted for easy washing and lower cost, or use a machine-washable wool blend for a warmer, slightly denser mat with excellent stitch definition. Changing to bulky weight yarn entirely transforms the mat into a plush play rug and reduces the time required to reach the same finished dimensions.

Backside close-up showing carried yarn and neat joins on the race track crochet mat

Switch Things Up

I like altering the size by swapping yarn weight and hooks: choose bulky weight yarn with a 5 mm hook for a chunky, floor-ready rug, or go lighter with DK yarn and a smaller hook for a mini play mat or car coaster.

If you prefer a different colour story, replace the green outer border with navy or grey and pair it with contrasting accent colours; changing the inner highlight from yellow to orange or teal completely transforms the aesthetic.

I sometimes add a name or number by embroidering small letters into the outer green field using duplicate stitch, which personalizes the mat without changing the construction of the rounds.

For a more vintage look try using natural wool yarn rather than acrylic; remember to adjust hook size to keep the same fabric density and to allow for washing instructions appropriate to the fibre.

If you want a reversible mat, choose to carry colour floats more carefully and work a slightly looser border so the wrong side is tidy enough for display; alternatively, crochet two panels and whipstitch them together with thin batting inside for a padded play surface.

I also experiment with the dashed lane by replacing the stitched dashes with narrow surface crochet lines done in single crochet for raised detail, which gives a tactile edge that small cars can bump over as they race around the track.

Swap the alternating red and white binding for a candy-stripe gradient if you prefer gradual colour shifts; carry three adjacent shades and change them every fourth stitch for a striped effect that still reads as a patterned border.

To create a themed set, design matching accessories like tiny crocheted starting flags, a pit-stop toolbox, or a little driver mat in the same colours using simple rectangles and single crochet edges, which keeps the mini-collection cohesive and playful.

For outdoor use, choose a weather-resistant yarn and a tight tension, then treat the finished mat with a fabric-friendly protector; this extends the mat’s utility to porches and playdates while keeping the construction unchanged.

Finally, if you enjoy sewing skills, add a non-slip mat backing by attaching a thin rubberized fabric to the underside; this prevents sliding during enthusiastic play and keeps the decorative top visible and secure.

Ways to Use & Gift It

This mat makes a thoughtful handmade gift for toddlers, birthday parties or holiday present bundles when paired with a small set of toy cars and a matching storage box. The finished piece reads as both a practical play surface and a decorative mat, so it fits into nurseries and playrooms without looking out of place.

For baby showers, choose soft, washable acrylics and present the mat rolled with a ribbon and a tiny car attached; for older children or collectors, wrap the mat flat so the kerb pattern and dashed lane are visible on first sight. Customized colours and embroidered initials further personalize the gift and make it a keepsake that gets used and admired.

Common Mistakes & How to Fix Them

Missing a stitch in the starting chain will offset all subsequent rounds; recount the initial chain and mark the first stitch before turning to avoid running short for patterned colour rounds. Forgetting to place increases evenly at each end of the oval causes rippling corners; mark the first increase stitch and use stitch markers to maintain symmetrical shaping on both ends. Changing colours before the last yarn over can create loose joins and snagged floats; always bring in the new colour on the last yarn over of the final stitch in the sequence for a tidy edge. Carrying the unused colour too tightly will pucker the fabric and distort the border; float the carried strand loosely at the base of the stitches and catch it only when necessary. Skipping the 4 mm single crochet finishing round makes the mat look unfinished and uneven; use the slightly larger hook for the final edge round to ease the border and balance tension. Weaving in ends only at the very end leaves long tails to manage and visible knots; weave ends as you go and secure colour joins to keep the back clean and flat.

Maker's Notes

When I tested the sample I used worsted weight acrylic yarn and worked the main rounds on a 3.5 mm hook, switching to a 4.0 mm hook for the final single crochet edge; the entire build took me roughly six hours over two focused sessions including finishing. The rounds that caused the most confusion for new makers were the early corner increase rounds where the pattern moves from straight sides into the end caps; placing stitch markers at the first increase point for each end solved most of the asymmetry issues. Another frequent stumbling point was the alternating red and white round where a single missed chain in the foundation chain produced a two-stitch shortage in the block sequence; I learned to recount the start chain and to mark the beginning stitch before closing the first round.

Colour changes are best made on the last yarn over of the previous dc — this keeps the join tidy and reduces tails on the right side — and I recommend weaving in ends as you go rather than leaving them to the end. For the dashed lane, practising the front-to-back weaving on a scrap made the finished dashes more even and faster to stitch when working on the mat itself.

I tried a substitution: To test the scaling guidance I made a sample in bulky weight yarn using a 5.0 mm hook for the main rounds and a 5.5 mm hook for the final edge; the mat grew noticeably larger and needed fewer rounds to reach a rug-sized footprint. The corner increase ratios translated well so the oval remained proportionate, but the chunky stitches softened the look of the stitched dashed lane, so I swapped to a thicker contrasting yarn for the dashes to keep them visible. The bulky version was quicker to make and produced a plush, durable surface suitable for floor play; however, it consumed substantially more yarn and the blocky border looked less crisp than the worsted sample, illustrating that fibre choice affects both final size and the sharpness of small details.

Race Track Mat Crochet Pattern

Make this oval race track crochet mat with our free crochet pattern — full round-by-round instructions, materials list and finishing tips for a fun play surface. Start today!

Intermediate 5-7 Hours
Pattern at a glance
Skill level
Intermediate
Time to make
5-7 Hours
Hook size
3.5 mm (E/4) for body rounds and 4.0 mm (G/6) for final edge; alternate 5.0 mm and 5.5 mm for bulky substitution
Yarn weight
Worsted / #4
Finished size
Approx. 56 cm x 35 cm / 22 in x 14 in
Gauge
Approximate gauge: 12 dc x 6 rows = 10 cm (4 in) in pattern stitch using 3.5 mm hook; maintain tight tension so stuffing or backing will not show.
Yarn used
Approx. total yarn: 625g (combined colours) ~ 1050 meters (estimate based on worsted weight coverage and sample size)

Materials Needed

Main Fabric
  • 01
    Worsted / Medium weight yarn (#4) Green - approximately 120g for centre and outer border
  • 02
    Worsted / Medium weight yarn (#4) Black - approximately 200g for main track area
  • 03
    Worsted / Medium weight yarn (#4) White - approximately 50g for inner ring and lane dashes
  • 04
    Worsted / Medium weight yarn (#4) Red - approximately 40g for alternating border accents
  • 05
    Small amounts of Yellow worsted weight - approximately 20g for inner highlight ring
Tools Required
  • 01
    Crochet hook size 3.5 mm (E/4)
  • 02
    Crochet hook size 4.0 mm (G/6)
  • 03
    Stitch markers
  • 04
    Darning needle for weaving in ends and sewing lane dashes
  • 05
    Scissors
  • 06
    Measuring tape or ruler for finished size checks
  • 07
    Approx. 1 metre of scrap white worsted yarn for lane dashes

— Materials needed :

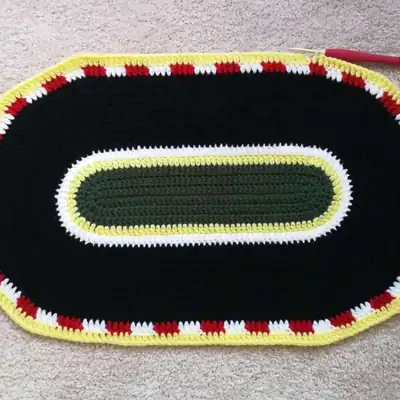
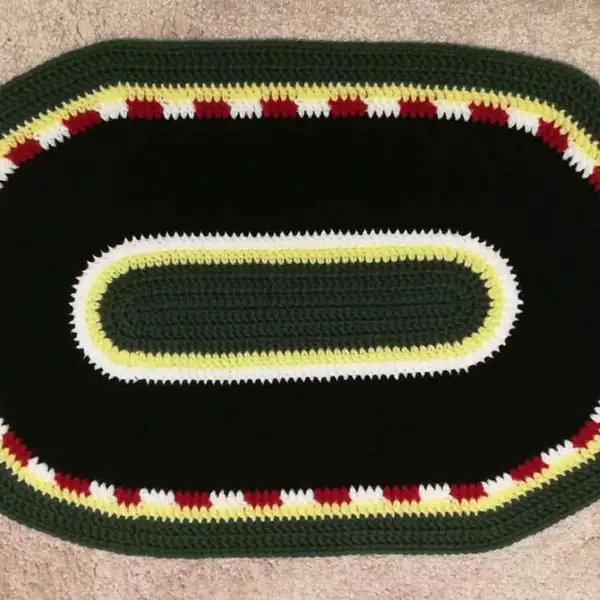
Round 3: 5 mm & 4 mm hook Stitch markers Darning needle Completed mat measures approx. 56cm x 35cm (22”x14”) ***For a larger mat size see note at end of pattern Abbreviation key (US) sc - single crochet dc - double crochet st/sts - stitch(es) INC - increase yo - yarn over;

— Part 2 :

Round 1: dc in second chain from hook, dc in each stitch along the chain until the last chain.
Round 2: Chain 2, dc in the same stitch as the chain and in each stitch until you reach the 4 end dc. Place 2 dc in each of the four end stitches., dc in each stitch until you reach the other end with 4 dc, place 2 dc in each of the four end stitches, slip stitch to the first dc of the round.
Round 3: Chain 2, dc in the same stitch as the chain. dc in each stitch across straight stretch, (dcINC, dc) x4, dc in each stitch across, (dcINC, dc) x4, ***on the last yo, of the last dc of the round, change your yarn to YELLOW***, sl st to the first dc of the round;
Round 4: Chain 2, dc in the same stitch as the chain. dc in each stitch across straight stretch, (dcINC, 2dc) x4, dcINC, dc across straight stretch, (dcINC, 2dc) x4, dcINC, ***on the last yo, of the last dc of the round, change your yarn to WHITE***, sl st to the first dc of the round;
Round 5: Chain 2, dc in the same stitch as the chain. dc in each stitch across straight stretch, (dcINC, 3dc) x4, dcINC, dc across straight stretch, (dcINC, 3dc) x4, dcINC, dc in each st until end of round, ***on the last yo, of the last dc of the round, change your yarn to BLACK***sl st to the first dc of the round;
Round 6: Chain 2, dc in the same stitch as the chain. dc in each stitch across straight stretch, (dcINC, 4dc) x4, dcINC, dc across straight stretch, (dcINC, 4dc) x4, dcINC, dc in each st until end of round, sl st to the first dc of the round;
Round 7: Chain 2, dc in the same stitch as the chain. dc in each stitch across straight stretch, (dcINC, 5dc) x4, dcINC, dc across straight stretch, (dcINC, 5dc) x4, dcINC, dc in each st until end of round, sl st to the first dc of the round;
Round 8: Chain 2, dc in the same stitch as the chain. dc in each stitch across straight stretch, (dcINC, 6dc) x4, dcINC, dc across straight stretch, (dcINC, 6dc) x4, dcINC, dc in each st until end of round, sl st to the first dc of the round;
Round 9: Chain 2, dc in the same stitch as the chain and in each stitch across straight stretch, (dcINC, 7dc) x4, dcINC, dc across straight stretch, (dcINC, 7dc) x4, dcINC, dc in each st until end of round, sl st to the first dc of the round;
Round 10: Chain 2, dc in the same stitch as the chain and in each stitch across straight stretch, (dcINC, 8dc) x4, dcINC, dc across straight stretch, (dcINC, 8dc) x4, dcINC, dc in each st until end of round, sl st to the first dc of the round;
Round 11: Chain 2, dc in the same stitch as the chain and in each stitch across straight stretch, (dcINC, 9dc) x4, dcINC, dc across straight stretch, (dcINC, 9dc) x4, dcINC, dc in each st until end of round, sl st to the first dc of the round;
Round 12: Chain 2, dc in the same stitch as the chain and in each stitch across straight stretch, (dcINC, 10dc) x4, dcINC, dc across straight stretch, (dcINC, 10dc) x4, dcINC, dc in each st until end of round, sl st to the first dc of the round;
Round 13: Chain 2, dc in the same stitch as the chain and in each stitch across straight stretch, (dcINC, 11dc) x4, dcINC, dc across straight stretch, (dcINC, 11dc) x4, dcINC, dc in each st until end of round, ***on the last yo, of the last dc of the round, change your yarn to RED or WHITE***, sl st to the first dc of the round;
Round 14: Use alternating red and white yarn every four stitches, carrying the unused colour along the round at the base of the stitches. Same as all the other colour changes, you’ll want to bring in the new colour on the last yo of the last dc of the sequence. Chain 2, dc in the same stitch as the chain and in each stitch across straight stretch, (dcINC, 12dc) x4, dcINC, dc across straight stretch, (dcINC, 12dc) x4, dcINC, dc in each st until end of round, ***on the last yo, of the last dc of the round, change your yarn to YELLOW***, sl st to the first dc of the round ***In sample shown above a stitch was missed in the beginning chain, leaving me two stitches short for the alternating colour round. Double checking stitch counts and using stitch markers will avoid this issue;) Photo above shows the backside of the Red and White round and the strand of unused colour being carried at the base of the stitches.
Round 15: Chain 2, dc in the same stitch as the chain and in each stitch across straight stretch, (dcINC, 13dc) x4, dcINC, dc across straight stretch, (dcINC, 13dc) x4, dcINC, dc in each st until end of round, ***on the last yo, of the last dc of the round, change your yarn to GREEN***sl st to the first dc of the round;
Round 16: Chain 2, dc in the same stitch as the chain and in each stitch across straight stretch, (dcINC, 14dc) x4, dcINC, dc across straight stretch, (dcINC, 14dc) x4, dcINC, dc in each st until end of round, sl st to the first dc of the round;
Round 17: Chain 2, dc in the same stitch as the chain and in each stitch across straight stretch, (dcINC, 15dc) x4, dcINC, dc across straight stretch, (dcINC, 15dc) x4, dcINC, dc in each st until end of round, sl st to the first dc of the round;
Round 18: with a 4mm hook, Chain 1, sc in each st, slip stitch to the first stitch in the round.

Assembly Instructions

  1. Weave in all ends after the final round using the darning needle, securing colour changes at their joins to prevent unraveling.
  2. Create the lane dividing dash by threading approximately 3 feet of white yarn on a darning needle and weaving from front to back through the spaces along the line between the fourth and fifth black rounds, spacing the dashes every two stitches until you meet the start, then tie off and weave in the tail.
  3. When changing colours for the red and white alternating round, carry the unused colour along the base of the stitches on the wrong side to keep the front tidy and avoid cutting multiple small tails.
  4. For the final edge, switch to the 4 mm hook and work single crochet in each stitch around, slip stitching to the first sc to join, which gives a firm, even border and balances the mat's tension.

Important Notes

  • Place a stitch marker at the first stitch of each increase group so you can find where to work the next increases without recounting long rows.
  • Bring in the new colour on the last yarn over of the last dc of the round to create a clean colour join and reduce visible tails on the right side.
  • Carry unused yarn along the round at the base of stitches for the alternating red and white segment and catch it every few stitches to maintain even tension.
  • Check stitch counts after each round and especially before the colour-alternating round, because a missed stitch in the beginning chain will leave the alternating sequence short.
  • Use a slightly larger hook for the finishing single crochet round if your stitches are tight; this prevents the border from pulling the mat inwards.

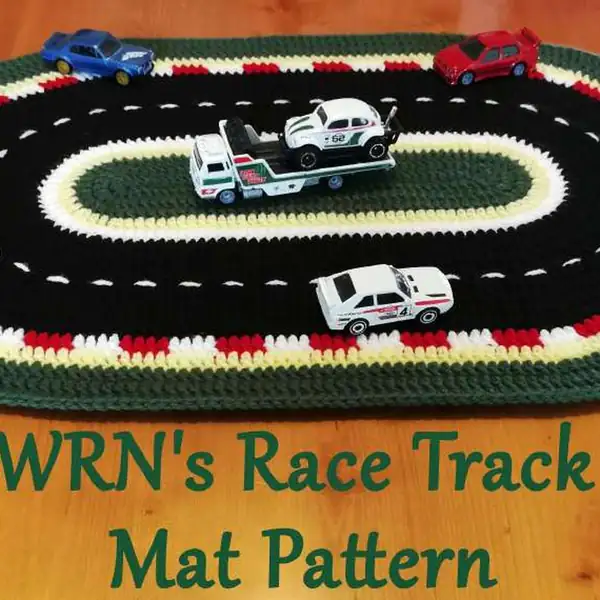
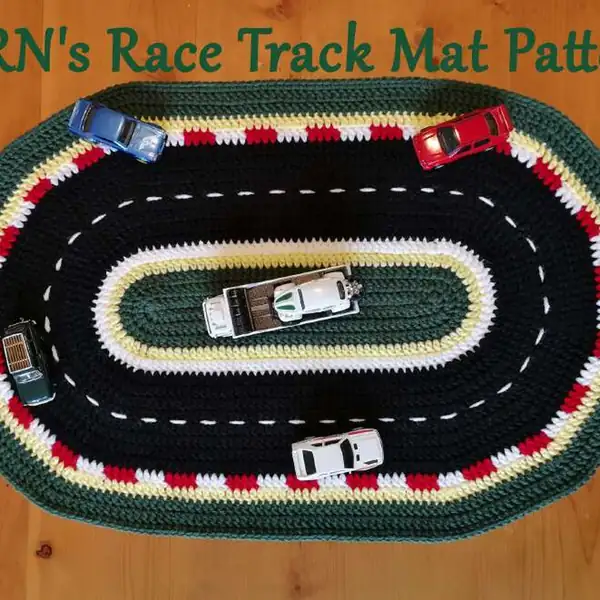
Thanks for choosing this Race Track Mat pattern — I hope it brings hours of play and a neat handmade accent to your home. This design was created to be playful, durable and simple to scale up when you want a larger surface. Happy crocheting and may many toy cars enjoy your new track!

Good to know

You ask, we answer

The finished mat measures approximately 56 cm x 35 cm (22 in x 14 in) when worked in worsted weight yarn with the recommended 3.5 mm hook for the body rounds and a 4.0 mm hook for the final edge, though individual tension will alter the exact dimensions.

Yes, you can change the finished size by switching yarn weight and hook size; using a bulky weight (5) yarn and a 5 mm hook for the main rounds, as suggested in the notes, expands the mat proportionally while preserving the same increase pattern at each end for shape.

The pattern is rated intermediate because it requires working in the round with increases at specific corner points and performing multiple clean colour changes; a confident beginner who understands double crochet, increases and carrying yarn could complete it with patience and stitch markers.

After completing the rounds, weave approximately three feet of white yarn on a darning needle and stitch the dashes from front to back through the gap between the fourth and fifth black rounds, spacing entries every two stitches and repeating until you return to the start, then secure and weave in the end.

Work the alternating colour round by bringing in the new colour on the last yarn over of the last dc of each sequence, carry the unused colour along the base of the stitches on the wrong side and use stitch markers to ensure the pattern remains aligned around the oval for consistent block sizes.

Most crocheters finish this race track mat in about five to seven hours depending on experience, yarn familiarity and time spent on colour changes and finishing touches such as weaving in ends and stitching the dashed lane, which are detail steps that add to the total time.

Detail of alternating red and white border blocks on the crochet race track mat
Join 100k+ crocheters

Get new free patterns, stitch tips and exclusive content in your inbox.