Crochetologist
Free Crochet Pattern
Beautiful Detailed Adorable

Pino Rhino Amigurumi Pattern

Pino rhino amigurumi in a soft basket, front view
4.3Rating
8-10 HoursTime
IntermediateSkill
Highlights

What makes it special

Made with Love

An adorable friend to cherish, handcrafted with love to bring comfort and joy for years to come.

All-Day Adventure

Requires 8-10 hours, perfect for a focused crochet session that yields a charming, huggable rhino ready for gifting.

Intermediate Level

This amigurumi pattern is best suited to crocheters who are comfortable with magic rings, round by round shaping, and precise assembly. It requires the ability to perform invisible decreases and careful seam work to finish a durable plush. While approachable, the project expects steady attention to detail and confidence handling multiple parts before final assembly. A maker who has completed a few amigurumi projects will find the sequence intuitive, with clear guidance on where to place each piece and how to preserve symmetry throughout the build.

Meet Pino, a compact rhino with a friendly face and a ready hug for anyone who needs a small dose of comfort. This crochet project centers on a durable amigurumi that can endure daily play, gentle squishes, and careful display. The pattern guides you through steady shaping, even stuffing, and careful finishing so the toy keeps its silhouette without collapsing under repeated hugs. The goal is not a quick craft but a finished friend whose presence feels steady and warm, suitable for gifting or keeping on a shelf as a keepsake. Each step is written to support a confident maker, from locating the starting point to choosing where to place the eyes and how to sew the limbs to the body. The journey emphasizes clarity, patience, and reliable construction to deliver a character that can be enjoyed for years.

About This Pino Rhino Amigurumi Pattern

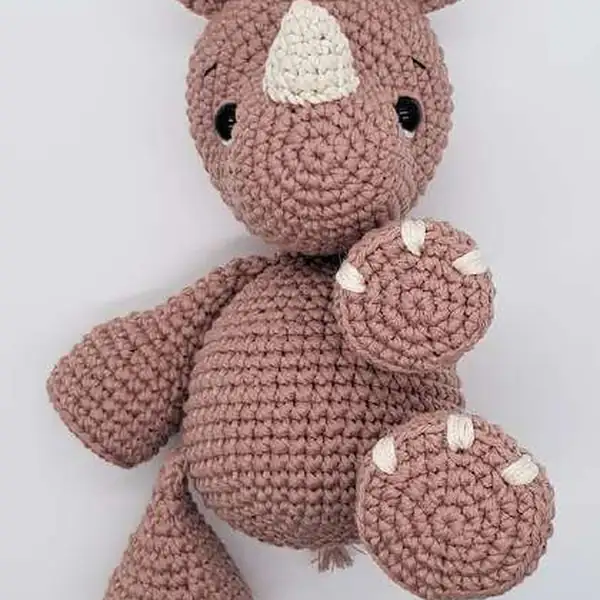
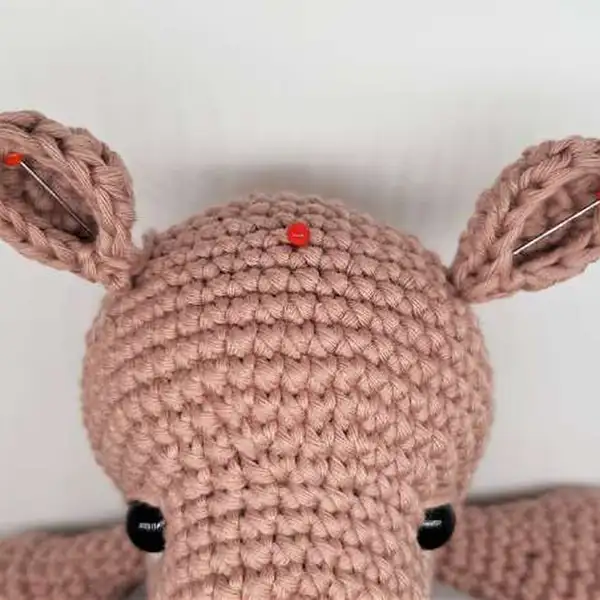
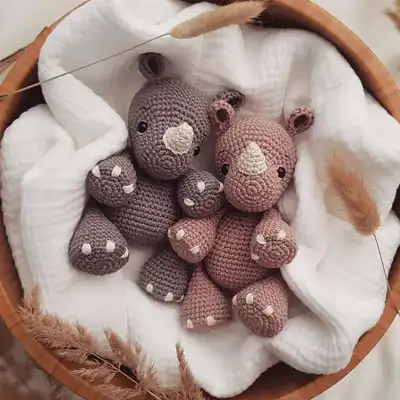
Pino is formed from distinct components—legs, arms, body, head, ears, tail, and horn—assembled into a cohesive, poseable toy. A constant color palette emphasizes a gentle silhouette and balanced proportions. The design introduces round by round shaping, with continuous rounds used for the main pieces to minimize join lines. You’ll begin limbs with a magic ring and anchor the first round with a starting tail, then mark the starting point with a stitch marker to prevent drift. Stuffing is added gradually and evenly to maintain a smooth contour and avoid flattening the seams. Eyes are placed carefully on the head and can be anchored with safety eyes or replaced with embroidery, depending on preference for a kid friendly or display oriented finish. Ears attach neatly to the head to maintain proportional balance, and the horn sits centered on the upper face to read as a light accent rather than a focal point. Finishing touches involve precise seam placement and careful sewing to ensure the limbs, head, and body align for a stable, cuddly toy. The pattern is designed to be forgiving with color changes and minor spacing differences, so you can adapt to your yarn choice while preserving the intended silhouette and proportions.

The making experience emphasizes clear round counts and steady tension. You’ll follow a stepwise path: construct the legs and arms first, then shape the body, then form the head and attach ears, and finally apply facial features. Gentle seaming and deliberate alignment help the toy hold its form while remaining flexible enough for posing. Thoughtful notes about stuffing and seam placement guide the maker toward a durable toy that can withstand repeated hugs and gentle play. Every piece supports the next, and the final appearance reflects careful planning and patient execution.

Two brown legs and arms of Pino laid out for assembly

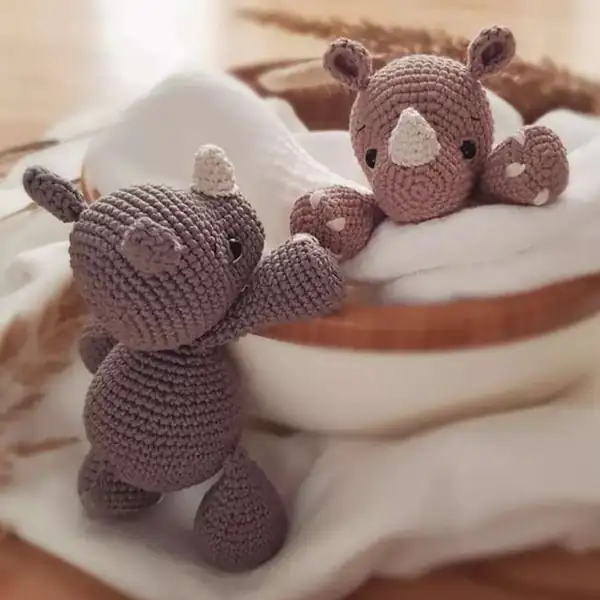
The making journey centers on stepwise progress and reliable methods. Start with the limbs—legs and arms—before moving to the torso, then shape the head and attach ears. The assembly relies on gentle seaming and deliberate alignment to maintain both stability and poseability, with the final figure able to hold a gentle pose without a rigid stance. This pattern aims for a durable toy suitable for daily hugs, while remaining approachable for a maker who has completed a few amigurumi projects. You’ll find notes about stuffing depth, seam placement, and the sequencing of parts throughout the instruction set, helping you understand how each component contributes to the whole. The final look emerges from careful planning and steady execution, with the character’s soft personality shaped by consistent tension and thoughtful assembly.

Stitches & Skills You'll Use

The stitches you’ll use include a starting magic ring for the limbs, a basic crochet stitch for volume, and increases to widen rounds. You will also work decreases to shape the head and body contours, with some rounds completed in back loop only to create clean edge lines. The invisible decrease method is introduced to maintain a smooth silhouette as openings close. You’ll crochet in continuous rounds and use a stitch marker to track the current round and prevent drift. During assembly, precise seaming and a measured approach to stuffing ensure each limb keeps its shape after being attached to the torso. Finishing touches include careful facial embroidery and a wire-free poseability that remains kid safe while adding character.

Color changes occur at round boundaries with minimal finishing work; keep tension even to avoid puckering. Ear shaping uses a slightly different stitch density to create a crisp edge that holds its form without stiffness. The horn is created as a small rounded piece that is lightly stuffed and attached between rounds 3 and 9 to sit above the eyes. The nails and tiny details are added with short, careful stitches that blend into the body color while reading as features.

Beginners should stay patient: the techniques here are common in amigurumi patterns, and confidence grows with repetition. Test fit each piece before final sewing and adjust to preserve symmetry. With steady practice, the rhino will gain a gentle expression that reflects Pino’s personality and the maker’s care.

Why You'll Love This Pino Rhino Amigurumi Pattern

This pattern offers a calm, approachable crafting experience that balances simple rounds with careful assembly to produce a toy with real character. The finished rhino feels special enough to gift and durable enough to become a daily companion, with a soft silhouette that remains readable from every angle. The small horn, ears, and eyes come together to give Pino personality without overpowering the gentle form. The color palette remains adaptable, allowing for mood or theme shifts while keeping the overall silhouette intact. The process rewards patience and careful timing, turning a skein of yarn into a tiny friend who can share smiles for years. The design is forgiving for experiments with yarn weight and tension, inviting makers to adjust and learn while preserving symmetry and proportion.

With a focus on clarity and repeatable steps, this pattern suits makers who want a sturdy toy that can handle hugs and gentle play, along with a sense of accomplishment at the end of a thoughtful stitching session. The result is a durable, endearing plush that can be gifted with confidence or enjoyed as a cherished keepsake.

Colour & Yarn Inspiration

Color ideas are a playful invitation to shape Pino’s mood and story. Try two browns for a natural look, or cool grays and creams for a modern vibe that suits contemporary nurseries. A two tone body with a lighter muzzle adds depth while preserving the friendly silhouette. For a whimsical touch, choose bright accents for the horn or ears, and consider a contrasting eye color via embroidery yarn to create a distinct expression. Subtle shading with a slightly darker shade around the limbs can emphasize contours without changing the overall feel. The choice of yarn weight influences the surface: a cotton blend yields crisper stitch lines, while a plush yarn softens the surface for extra cuddliness.

When substituting colors, aim for harmony and contrast that still read as a single character. If you want a rustic look, earthy tones with a matte finish work well; for a playful toy, bright hues and high contrast on the muzzle read as cheerful. The goal is a cohesive palette that highlights Pino’s friendly presence while remaining durable under play.

Horn and nails pieces prepared for finishing

Switch Things Up

Variation is welcome in this project, offering opportunities to personalize Pino while preserving the core silhouette. If you want to adjust the scale, try substituting a lighter or heavier yarn weight and selecting a hook size that yields a similar fabric density. When changing yarn, begin with a small swatch to compare gauge against the target dimensions and adjust the number of rounds accordingly. You can experiment with color placement by altering how you treat the muzzle, horn, or ears, as long as the proportions remain balanced. For a different look, try a two tone body with a lighter belly, but maintain a single color for the head to preserve the friendly profile. Substituting materials can affect how the toy sits; test different stuffing densities and tune the attachment points to maintain a stable stance.

Ways to Use & Gift It

Gifting Pino conveys handmade thoughtfulness for baby showers, birthdays, or new homes. Present the finished rhino wrapped with a soft cotton blanket and a handwritten note that highlights the pattern name and the joy of crocheting a one of a kind toy. Consider a small ensemble of outfits or accessories such as scarves or tiny hats that fit the scale and mood of the rhino, creating a miniature wardrobe. Include a tag describing the techniques used, from the magic ring to the final attaching steps, to inspire confidence in the maker. If the recipient enjoys fantasy or storytelling, add a crocheted carrot or a simple scarf as an imaginative prop for play. The process of making adds emotional resonance that grows with time.

Display options range from a tucked shelf to a nursery corner or a dedicated toy basket. A thoughtful presentation places Pino on a soft textile mat, perhaps accompanied by a short story about its adventures. You could also add a printable card with pattern highlights and care tips to help the recipient feel connected to the craft. If you want to extend the gift, include a spare skein of Eco Cotton in a coordinating color along with a small crochet hook, so the recipient can create a matching companion or customize the existing one.

Common Mistakes & How to Fix Them

Skipping round markers or miscounting rounds during the long torso sequence can throw off symmetry. Overstuffing limbs or the body creates stiff seams and distorts shaping, making the toy less cuddly. Allowing stretching or slack in seams before finishing can lead to read misalignment between head and torso. Neglecting to weave in ends as you go can leave visible ends that disrupt the final silhouette.

Maker's Notes

Testing began with Eco Cotton yarn and a 2.5 mm hook, dedicating a solid afternoon to the build. The legs and arms came together smoothly, while the body required careful attention to symmetry across rounds with longer totals. Keeping a steady pace and marking rounds helped prevent miscounts during the longer body sequences. The assembly phase felt delicate around the neck region where the head attaches, but pinning pieces and stitching gradually stabilized the shape. The horn proved the trickiest detail, so light stuffing and precise, small stitches were essential to avoid bulk. Overall, the project yielded a durable toy with a friendly expression and steady pose, suitable for daily hugs and gentle play.

I tried a substitution: Substituting a DK weight yarn with a 3.0 mm hook produced a taller, leaner rhino with a slightly different silhouette. To maintain balance, you would reduce stuffing density around the torso and adjust a few rounds on the head to preserve proportionality. The final toy remained sturdy and cuddly, though its scale differed from the original. If you work with a different weight, begin with a small swatch and compare the size to the target, then adjust the number of rounds or stitch counts to keep the intended finish intact.

Pino Rhino Amigurumi Pattern

Make this adorable Pino rhino amigurumi with our free crochet pattern—full materials list, clear round-by-round instructions, and assembly tips. Start crocheting today!

Intermediate 8-10 Hours
Pattern at a glance
Skill level
Intermediate
Time to make
8-10 Hours
Hook size
2.5 mm (B)
Yarn weight
Eco Cotton Worsted / DK weight
Finished size
Approx. 16 cm tall / 6.3 in
Gauge
Not specified; approximate gauge with 2.5 mm hook on Eco Cotton worsted yields about 8 sc per 2.5 cm square; use as a rough guide
Yarn used
Main color: 56 g (approx. 105 m); accent colors: 6 g for horn/nails; totals around 62 g (~110-120 m).

Materials Needed

Main Fabric
  • 01
    Eco Cotton by Gründl, 50 g skeins, approx. 105 m per skein; body color options include Pastell Schlamm (dark brown) or Mocca (light brown); 56 g total for the body
  • 02
    Natur Weiß (off white) for horn and nails, approx. 6 g
  • 03
    White cotton yarn remnants for eye details
  • 04
    Pair of safety eyes, 8 mm (2 pieces)
  • 05
    Black embroidery thread for eyebrows
Tools Required
  • 01
    Crochet hook size 2.5 mm (B)
  • 02
    Darning needle
  • 03
    Sewing needle
  • 04
    Embroidery needle (large eye)
  • 05
    Stitch markers
  • 06
    Fiberfill stuffing
  • 07
    Scissors
  • 08
    Pins for positioning
  • 09
    Fabric pencil or yarn waste for color changes (optional)

— Arm :

Round 1: 6 sc into MR (6)
Round 2: inc x 6 (12)
Round 3: (1sc, inc) x 6 (18)
Round 4: (2 sc, inc) x 6 (24)
Round 5: (3 sc, inc) x 6 (30)
Round 6: BLO 30 sc (30)
Round 7: 30 sc (30)
Round 8: 30 sc (30)
Round 9: 30 sc (30)
Round 10: (3 sc, dec) x 6 (24)
Round 11: 24 sc (24)
Round 12: (2sc, dec) x 6 (18)
Round 13: 18 sc (18)
Round 14: 18 sc (18)
Round 15: (1 sc, dec) x 6 (12)
Round 16: 12 sc (12)
Round 17: dec x 6 (6)
Round 18: 6 sc (6)
Round 19: 2 sc, this round is not crocheted until the end of the round. (When folding the opening the joints of round 5 and 6 should be parallel. Adjust the number of stitches if needed.) Fold the two sides of the arm together and crochet 2 sc across. Cut the yarn and weave in the yarn tail nicely. 4;

— Legs :

Round 1: 6 sc into MR (6)
Round 2: inc x 6 (12)
Round 3: (1 sc, inc) x 6 (18)
Round 4: (2 sc, inc) x 6 (24)
Round 5: BLO 24 sc (24)
Round 6: 24 sc (24)
Round 7: 24 sc (24)
Round 8: 24 sc (24)
Round 9: 24 sc (24)
Round 10: (2 sc, dec) x 6 (18)
Round 11: 18 sc (18)
Round 12: (1 sc, dec) x 6 (12)
Round 13: 12 sc (12)
Round 14: 12 sc (12)
Round 15: (2 sc, dec) x 3 (9)
Round 16: 9 sc (9)
Round 17: 9 sc (9)
Round 18: (1 sc, dec) x 3 (6)
Round 19: 2 sc, the round is not crocheted until the end of the round. (When folding the opening the joints of round 5 and 6 should be parallel. Adjust the number of stitches if needed.) Fold the two sides of the arm together and crochet 2 sc across. Cut the yarn and weave in the yarn tail nicely. 5;

— Leg :

Round 1: 6 sc into MR(6)
Round 2: inc x 6 (12)
Round 3: (1 sc, inc) x 6 (18)
Round 4: (2 sc, inc) x 6 (24)
Round 5: (3 sc, inc x 6 (30)
Round 6: (4 sc, inc) x 6 (36)
Round 7: (5 sc, inc) x 6 (42)
Round 8: (6 sc, inc) x 6 (48)
Round 9: 48 sc (48)
Round 10: 48 sc (48)
Round 11: 13 sc, crochet in the 1st leg with 2 sc, 24 sc, Crochet in the 2nd leg with 2 sc, 7 sc (48)

— Closing :

Round 25: (1 sc, dec) x 6 (12)

— Arms :

Round 12: 48 sc (48)
Round 13: 48 sc (48)
Round 14: 48 sc (48)
Round 15: (6 sc, dec) x 6 (42)
Round 16: 42 sc (42)
Round 17: 42 sc (42)
Round 18: (5 sc, dec) x 6 (36)
Round 19: (4 sc, dec) x 6 (30)
Round 20: 30 sc (30)
Round 21: 30 sc (30)
Round 22: (3 sc, dec) x 6 (24)
Round 23: (2 sc, dec) x (18)
Round 24: 7 sc, crochet in the 1st arm with 2 sc, 7 sc, crochet in the 2nd arm with 2 sc (18)

— Body :

Round 1: 6 sc into MR(6)
Round 2: inc x 6 (12)
Round 3: (1 sc, inc) x 6 (18)
Round 4: (2 sc, inc) x 6 (24)
Round 5: (3 sc, inc) x 6 (30)
Round 6: 30 sc (30)
Round 7: 30 sc (30)
Round 8: 30 sc (30)
Round 9: 30 sc (30)
Round 10: 4 sc, (inc, 1 sc) x 6, 14 sc (36)
Round 11: 5 sc, place first marker, (inc, 2 sc) x 5, inc, place second marker, 15 sc (42)
Round 12: 6 sc, (inc, 3 sc) x 6, 12 sc (48)
Round 13: 48 sc (48)
Round 14: 48 sc (48)
Round 15: 48 sc (48)
Round 16: 42 sc, crochet in the body with 5 sc, 1 sc (48)
Round 17: 48 sc (48)
Round 18: 48 sc (48)
Round 19: 48 sc (48)
Round 20: (6 sc, dec) x 6 (42)
Round 21: 42 sc (42)
Round 22: (5 sc, dec) x 6 (36)
Round 23: (4 sc, dec) x 6 (30)
Round 24: (3 sc, dec) x 6 (24)
Round 25: (2 sc, dec) x 6 (18)
Round 26: (1 sc, dec) x 6 (12)
Round 27: dec x 6 (6)

— Tail :

Round 1: 6 sc into MR (6)
Round 2: inc x 6 (12)
Round 3: 1 ch, 5 hdc, (2 dc in 1 st) x 2, 5 hdc (14)

— Horn (“Natur Weiß” – off white) :

Round 1: 6 sc into MR (6)
Round 2: 6 sc (6)
Round 3: (1 sc, inc) x 3 (9)
Round 4: inc x 3, 6 sc (12)
Round 5: 12 sc (12)

Assembly Instructions

  1. Attach head to body by aligning the neck opening and sewing in place with a firm whipstitch, ensuring the head sits upright relative to the body.
  2. Position arms on each side of the body between rounds 12-14, slightly angled forward for a natural pose; sew firmly in place with even tension.
  3. Sew legs to the bottom of the body, spacing them evenly; ensure symmetry and stability so the figure stands or sits well.
  4. Attach ears to the head centered around round 17, leaving about 12 stitches visible between them for balanced placement.
  5. Insert safety eyes between rounds 11 and 12, using the markers to ensure even alignment; secure eyes with backing pieces.
  6. Stuff the body gradually, then close opening in rounds 22-24; ensure density is consistent to avoid bulges or gaps.
  7. Attach the horn between rounds 3 and 9, oriented so the three increases sit above the muzzle; secure firmly with a few extra stitches.
  8. Embroider eyebrows between rounds 12 and 13 using black thread; ensure a slight slant to give a friendly expression.

Important Notes

  • Mark rounds with stitch markers at the start of each new section to prevent miscounts during color changes or shaping.
  • Stuff pieces gradually and evenly; overstuffing can distort shaping and tuck or flatten seams.
  • Weave in ends as you go for a clean finish and reduce finishing work after assembly.
  • Keep tension moderate and consistent to avoid stiff, blocky shapes or stretched stitches in the final toy.
  • Position arms and legs symmetrically; small adjustments in stitch counts can help perfect balance.

This gentle rhino invites calm, cozy crafting after a day of stitching. Each stitch marks a small celebration of care and patience, a quiet reminder that handmade gifts carry lasting memories. May your crochet journey be as joyful as the finished toy, and may Pino bring smiles to friends and family alike. You’ve earned the time to create something you truly love, and this little rhino is a perfect companion on that path. Happy crocheting and warm wishes for every future project.

Good to know

You ask, we answer

The finished rhino stands about 16 cm tall when crocheted with Eco Cotton and a 2.5 mm hook, with variations possible due to yarn tension and individual technique.

Yes, but final size and proportions will shift; you should adjust the hook size and the number of rounds to preserve shape and balance.

This is an intermediate pattern that requires basic knowledge of magic rings, single crochet, increases, decreases, and sewing parts together.

Expect about 8-10 hours for a careful build, including assembly and facial detailing; timeline varies with experience and pace.

Head and ears of Pino with safety eyes placed
Join 100k+ crocheters

Get new free patterns, stitch tips and exclusive content in your inbox.