Crochetologist
Free Crochet Pattern
Beautiful Detailed Adorable

Pig in a Granny Square Blanket Amigurumi Pattern

Peach pig amigurumi with multicolored granny-square blanket
4.2Rating
8-10 HoursTime
IntermediateSkill
Highlights

What makes it special

Made with Love

An adorable friend to cherish, handcrafted with love to bring comfort and joy for years to come.

All-Day Adventure

A multi-piece project that rewards patience with a sustained, satisfying build. Expect a full day of crochet as you assemble the body, ears, snout, and the vibrant blanket, then sew everything into a cohesive character.

Intermediate Level

This amigurumi pairs a magic-ring construction with simple increases and careful seaming, wrapped in a granny-square blanket that introduces color-changing work without demanding exotic stitches. It suits crocheters who are comfortable with rounds, color changes, and joining pieces. If you can balance tension and follow a single-row color change, you can reliably finish a piece that reads as a complete character with a companion textile surround. The project scales with yarn weight and hook size, but the fundamental skills—forming a rounded body, aligning features, and joining parts—remain the same. It is accessible to those who have completed basic amigurumi patterns and are ready to tackle a two-texture result that feels cohesive and complete.

This project invites you to welcome a cuddly character into a cozy scene: a pig stitched into a soft granny-square blanket. It’s a deliberately playful pairing that rewards careful placement, steady tension, and a love of color transitions. You’ll move through two textures in one design, savoring the rhythm of crocheted rounds and the satisfying snap of joining pieces. The finished piece functions as a small toy, a shelf companion, or a comforting nursery accent that speaks to the simple joy of handmade gifts.

About This Pig in a Granny Square Blanket Amigurumi Pattern

This design centers a soft pig figure framed by a bright granny-square blanket, letting you enjoy two textures in one project: the smooth rounds of the body and the cozy, chunky blanket. The body is worked in continuous rounds from the top down, with careful placement of eyes and a tiny snout to give the character instant personality. The blanket is built separately, then joined to cradle the pig, so you experience both stuffed sculpting and patchwork crochet in one piece. Color transitions are deliberate, with a warm peach body and three vibrant blanket colors that evoke a playful, handmade vibe.

Pig's face showing eyes and snout detail

As you crochet, you’ll navigate small techniques that feel incredibly satisfying when combined: the magic ring, consistent SC rounds, simple increases, and clean color changes. You’ll learn to place eyes between specific rounds for symmetry, and you’ll practice neat finishing with concealed ends and careful stuffing. The assembly steps require aligning the ears and snout so the final pose looks balanced; the result is an endearing, characterful toy that sits happily on a shelf or tucked into a blanket nest.

Stitches & Skills You'll Use

Stitches used include MR (magic ring), SC (single crochet), INC (increase), DEC (decrease), SC2tog (single crochet two together), SL ST (slip stitch), CH (chain), and FO (fasten off). The body is constructed in the round around a magic-ring foundation to avoid a hole at the start, then built with predictable increases to create a compact sphere. The blanket motifs are worked in rows to maintain straight edges and a clean join when the squares are stitched together. The ears and snout are formed with tight shaping and small stitches to yield rounded points and defined nostrils. Safety eyes are positioned to the side of the head between specific rounds for symmetry. Finishing touches involve weaving in every end, securing seams with whip stitches, and stuffing gradually to preserve the silhouette. The overall assembly uses careful alignment of ears and snout so the final pose feels balanced and friendly.

Why You'll Love This Pig in a Granny Square Blanket Amigurumi Pattern

This pattern balances whimsy with practical crochet technique. The pig’s body reads softly architectural, while the granny-square blanket wraps around it like a cozy cardigan, giving the piece a warm, storybook vibe. The moment when the eyes settle and the snout takes form marks the character’s readiness for a little adventure. The process rewards careful color changes and tidy seams, and the final result is a tangible keepsake that celebrates the maker’s attention to detail. The project invites experimentation with palette and proportion, offering a small but meaningful challenge that ends in a charming, huggable toy.

I designed it to be approachable for confident beginners who want a cohesive, two-texture project with clear steps and a gratifying payoff.

Colour & Yarn Inspiration

Try a warm peach body paired with a blanket in sunshine yellow, teal, and cocoa brown to evoke a bright, seaside vibe. For a softer look, swap to pale pink for the body and use lavender, mint, and ivory in the blanket. A bold option combines navy for the blanket with a coral pig to create a contemporary, high-contrast piece. If you want a nursery-friendly finish, choose pastel tones in the blanket—soft blues, pinks, and creamy whites—to achieve a calm, lullaby-like palette. Substitutions in yarn weight will alter density and silhouette: chunkier yarn will make the pig plumper and the square wrap looser, while finer yarn tightens both elements and highlights stitch definition. Darker shade transitions add depth, while lighter tones keep the design airy and playful. The method remains consistent; only the palette shifts mood and display potential.

Completed pig-in-blanket ornament ready for display

Switch Things Up

One of the most enjoyable aspects of this design is its adaptability. A peach pig can become a pink, lavender, or rose-toned friend simply by adjusting the body shade while keeping the same blanket palette. You can alter the blanket density by tweaking the number of dc clusters per square, creating a denser, warmer wrap or a lighter, breezier cover without changing the overall proportions. If you want a smaller piece, reduce the foundation chain of the blanket or decrease the number of squares used in the scarf-like wrap around the pig. Seasonal upgrades are easy: swap to holiday colors and add a tiny crocheted hat, scarf, or bow to the pig’s neck. For display, consider a simple hanger or ribbon to turn it into an ornament that can be enjoyed year-round. When teaching this project, use it as a live demonstration of color changes and joining seams, because the visual progress from separate elements to a complete character is very tangible. Subtle facial embroidery, such as a stitched smile or tiny cheeks, can be added to deepen personality without altering the basic techniques used.

Ways to Use & Gift It

Gift this pig-in-a-blanket to a new parent as a comforting bedtime companion that still feels playful and made with care. It’s also a thoughtful present for teachers, grandparents, or anyone who loves handmade items with a cozy, whimsical vibe. Include a short note describing the techniques used and the color story, turning the project into a keepsake that’s decorative and comforting. Display or wrap it with a soft ribbon and a mini yarn sampler so the recipient understands the craftsmanship behind the colors. A quick photo or story about the design can add sentiment when given as a keepsake. For a nursery or child's reading corner, position the pig on a shelf or in a small crib-side nest to foster imaginative play. When gifting to a student or beginner, include a scrap piece with color changes practiced so they can recreate or adapt the palette with confidence.

Common Mistakes & How to Fix Them

Overtightening around the eye sockets can distort the head shape; relax tension slightly and recheck stitch counts after placing eyes.

Inconsistent stuffing causes gaps at the joints; stuff gradually and test the face before sewing the head to the body.

Skipping color changes without locking the yarns leads to color bleed; secure joins at each transition and weave in ends properly.

Miscounting the blanket’s foundation results in lopsided squares; mark the corners and count rows consistently through the foundation rounds.

Maker's Notes

During testing, a DK-weight peach for the body paired with a three-color blanket (mustard yellow, teal, charcoal) produced balanced proportions and a friendly face. Eye placement was crucial; adjust before final sewing by placing the eyes between two rounds for symmetry. Slight forward tilt of the ears added character to the head. The blanket squares with three-dc clusters created a bold texture that framed the pig well and helped the two textures read clearly as separate elements. Timing stretched over a weekend for some testers, with a pause mid-project to verify symmetry and proportion. Beginners should practice the color join on a scrap piece to prevent mismatched edges in the final assembly. A steady pace aids accuracy in stuffing and seam placement.

I tried a substitution: Swapping to a lighter DK weight produced a slightly smaller overall piece, but the proportions remained harmonious when using a slightly larger 2.75 mm hook on the body. Testing a wool-blend for the blanket yielded a coarser texture that still read well but required more careful stuffing to maintain edge crispness. Safety eyes stayed securely in place after substitution when anchored with extra stitches. Substitutions can work well as long as tension is kept even and the stitch count per inch is adjusted to preserve the geometric integrity of the blanket squares. If you choose a very soft yarn, consider adding a light stabilizer under the blanket squares during assembly to maintain a tidy outer edge when the piece is finished.

Pig in a Granny Square Blanket Amigurumi Pattern

Make this adorable pig amigurumi tucked into a granny-square blanket with our free crochet pattern. Clear rounds, full materials, and finishing tips. Start today!

Intermediate 8-10 Hours
Pattern at a glance
Skill level
Intermediate
Time to make
8-10 Hours
Hook size
3.0 mm (US D/3)
Yarn weight
DK / #3
Finished size
Approx. 16 cm tall / 6.3 in
Gauge
Gauge is not important for this pattern
Yarn used
Main color total approx 230-280 g; blanket colors 20-40 g each

Materials Needed

Main Fabric
  • 01
    DK weight yarn (#3), Peach for body, approx 200-250 g total
  • 02
    Color A for blanket: Drops Safran in Strong Yellow
  • 03
    Color B for blanket: Turquoise
  • 04
    Color C for blanket: Dark Heather
  • 05
    Small amounts of 2-ply cotton for snout/ears: Light Coral
  • 06
    Chronicle of close color swaps worth trying for variety
Tools Required
  • 01
    Crochet hook size 3.0 mm (US D/3) for body
  • 02
    Crochet hook size 2.5 mm for blanket details
  • 03
    Crochet hook size 1.5 mm for ears/snouts
  • 04
    Stitch markers
  • 05
    Safety eyes 5-6 mm (2 pieces) or black thread for eyes
  • 06
    Yarn needle for sewing and weaving in ends
  • 07
    Scissors
  • 08
    Polyester stuffing
  • 09
    Pins for shaping
  • 10
    Whip stitch needle (optional for seams)

— Body ( Make 1) :

Round 1: Using 3mm hook and MC EITHER, ch 2 and then work 6 sc into 2nd ch from hook OR work 6 sc into a magic ring and then tighten;
Round 2: 2sc in each stitch around (12)
Round 3: *1sc in next stitch, 2sc in next stitch* repeat from *to*, around (18)
Round 4: *1 sc in next 2 stitches, 2sc in next stitch* repeat from * to* around (24)
Round 5: Sc in every stitch (24)
Round 6: Sc in every stitch (24)
Round 7: Sc in every stitch (24)
Round 8: Sc in every stitch (24)
Round 9: *Sc in next 3 stitches, 2sc in next stitch* repeat from * to* around (30)
Round 10: Sc in every stitch (30)
Round 11: Sc in every stitch (30)
Round 12: Sc in every stitch (30)
Round 13: Sc in every stitch (30)
Round 14: Sc in every stitch (30)
Round 15: Sc in every stitch (30)
Round 16: Sc in every stitch (30)
Round 17: Sc in every stitch (30)
Round 18: *Sc in next 3 stitches,sc2tog*, repeat from * to * (24)
Round 19: *Sc in next 2 stitches, sc2tog* repeat from *to* (18)

— Ears ( Make 2) :

Round 1: Using 1.5mm hook and SCL and leaving a long tail for sewing up. Chain 10, turn;
Round 2: Skip first stitch, sc in next 9 chains, ch 1, turn;
Round 3: Skip first stitch, sc in next 8 stitches, ch 1, turn;
Round 4: Skip first stitch, sc in next 7 stitches, ch 1, turn;
Round 5: Skip first stitch, sc in next 6 stitches, ch 1, turn.
Round 6: Skip first stitch, sc in next 5 stitches, ch 1, turn;
Round 7: Skip first stitch, sc in next 4 stitches, ch 1, turn;
Round 8: Skip first stitch, sc in next 3 stitches, ch 1, turn;
Round 9: Skip first stitch, sc in next 2 stitches, ch 1, turn;
Round 10: Skip first stitch, sc in next stitch, cut yarn (leaving a long end for sewing up and pull through loop to finish off and create point of triangle Stuff most of the body at this point, topping up as needed after the next row.

— Tail :

Round 20: * Sc in next stitch, sc2tog* repeat from * to * (12)
Round 21: *Sc2tog*, repeat from * to * (6)
Round 22: ; Fasten off and pass yarn tail through remaining stitches, pull up tightly and sew in end.

— Snout ( Make 1) :

Round 1: Using 1.5mm hook and SCL, Work 6 sc into a magic ring, tighten ring;
Round 2: 2 sc in each stitch around (12)
Round 3: Working in back loops, sc in each stitch (12)
Round 4: Sc in each stitch (12)

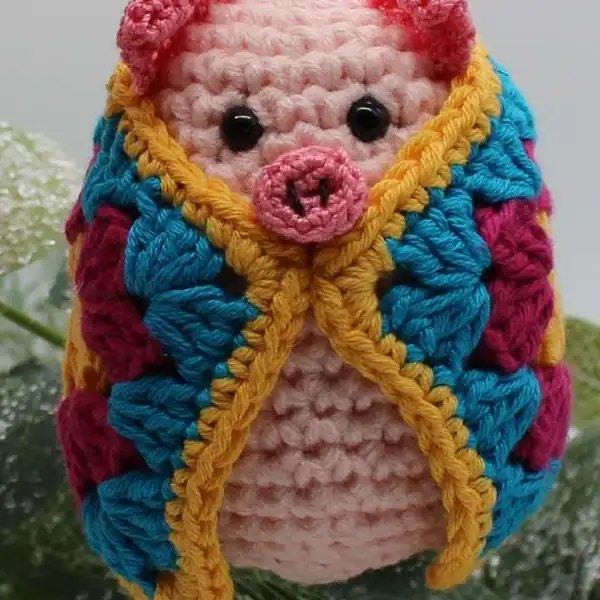
— Blanket (Make 1) :

Round 1: 2 dc in 4th ch from hook, *skip 2chains, in next chain work 3 dc* repeat from * to * until there are 3 ch left (6 dc3 clusters) skip 2 chains, in last chain work 3dc, ch2, 3dc, ch 2, 3dc. Continue working along opposite side of the initial chain *skip 2chains, dc 3 in next chain* repeat from * to * last 2 unworked chains. Skip these 2 chains and in final chain work 3 dc, ch 2, 3dc, ch2. Join with a slip stitch to initial chain to close the round.
Round 2: With right side facing, join C2 between any 2 3dc clusters on long side. Ch3 (counts as 1st dc), 2dc in same space. Work 3dc in every space between clusters. In each corner chain 2 space, work 3dc ch 2 3dc. Slip stitch to top of chain 3 to close the round;
Round 4: With right side facing, join C1 in any stitch along either long side, ch1 and then work 1sc in each stitch around. In each corner ch 2 space, work 1sc, ch 2 1sc. Fasten off and neaten ends. TO MAKE UP;

— To Make Up :

Round 1: Fold point of ear down to either corner and secure with a stitch, this makes the fold in the pigs ear.. Repeat with the other ear but fold to the opposite corner. You should have 2 symmetrical folded ears. Stitch the ears to either side of the top of the head positioning them between rows 2 and 5 (approx)
Round 2: Add a tiny bit of stuffing if desired and stitch the snout to the front of the head in between and one row down from the eyes. 3) wrap the blanket around your pig securing with pins if necessary and once you’re happy with the position stitch in place along the top edge and the 2 top corners. (as photo). I find invisible sewing thread ideal for this.. t;

Assembly Instructions

  1. Stuff each piece firmly before closing.
  2. Pin all parts in place and check the proportions against the photos.
  3. Sew parts on securely with matching yarn.
  4. Weave in all ends and shape the finished piece.

Important Notes

  • Work with a light hand when joining the blanket to the body to avoid distorting the head or body posture. If the seams look bulky, pick a finer yarn or a smaller hook for the joining sequence.

  • Weave in ends as you go to preserve clean edges on both the body and the blanket. A neat finish helps the two textures read clearly as separate elements.

  • Choose eyes and a nose that fit the overall scale; oversized features can throw the character off balance, while tiny features may disappear against the head’s circumference.

  • Test color transitions on a scrap piece before applying them to the finished project; it helps you anticipate how the colors will meet at the squares and around the toy’s curvature.

This pig-in-a-blanket project invites you to explore two textures and a playful color story. The result is a cuddly character with a vivid, cozy blanket that doubles as a visual centerpiece. It’s a project you’ll treasure gifting or keeping for your own shelves, a reminder that handmade joy can arrive in a bright, huggable package. May your crochet journey be full of warm moments and bright stitches as you bring this character to life, with the knowledge that each square and round contributed to a tiny, joyful scene worth sharing.

Good to know

You ask, we answer

The completed pig with blanket measures approximately 16-18 cm tall, depending on tension and yarn weight. If you want a larger display piece, use a bulkier yarn and a slightly larger hook, then adjust the foundation of the blanket by adding more squares while keeping the pig’s proportions in mind.

Yes. Different weights will change the scale. To maintain similar proportions, use a hook size corresponding to your yarn according to the yarn’s recommended gauge, and adjust the blanket’s number of squares to preserve the overall silhouette.

Yes, a basic comfort with working in the round, color changes, and simple seaming helps. The pattern provides round-by-round direction, but experience with color transitions and joining parts will make the process smoother and more confident.

Most crocheters finish in about 8-10 hours, though pace varies with experience and how precisely the parts are sewn. Plan two sessions if you’re newer to ensure accurate alignment of eyes, snout, and seams, and to avoid rushing the finishing steps.

Blanket squares forming a vibrant mosaic around the pig
Join 100k+ crocheters

Get new free patterns, stitch tips and exclusive content in your inbox.