Crochetologist
Free Crochet Pattern
Beautiful Detailed Adorable

Phone Bag with Pocket Pattern

Phone bag with pocket in warm brown yarn, front view amigurumi style
4.1Rating
5-7 HoursTime
Beginner FriendlySkill
Highlights

What makes it special

Handmade Charm

A warm touch for your space that transforms ordinary corners into inviting nooks filled with handmade charm.

Weekend Treat

Takes 5-7 hours, ideal for a weekend session to complete the project with a purposeful, satisfying finish.

Beginner Friendly Level

This pattern is ideal for beginners who want to practice working in the round, building a basic crocheted fabric, assembling a pocket, and learning straightforward joining techniques. The steps are laid out to promote steady progress without overwhelming the learner, offering a clear path from foundation chain to final assembly. The instructions focus on practical techniques that ordinary crocheters perform, such as maintaining even tension, aligning the pocket correctly, and securing ends as you go to minimize final finishing. The project demonstrates how small projects can teach core skills while producing a functional item worthy of daily use.

This project presents a compact phone bag that blends everyday practicality with handmade charm. The goal is a softly structured, crocheted vessel that keeps essentials organized without bulk, yet holds its shape through careful shaping and a tidy seam. The bag uses a dependable foundational chain and crocheted body that sits neatly against the body for comfortable carry. Materials are approachable, so beginners can complete the piece with confidence, while experienced crocheters can play with color and texture without losing the essential form. The finished item serves as a reliable daily carry and as a thoughtful handmade gift for friends and family who appreciate small, useful accessories.

About This Phone Bag with Pocket Pattern

The Phone Bag with Pocket pattern yields a compact rectangular bag with a dedicated pocket on one side for cards or receipts. A solid base holds its shape when carried, while a top opening remains accessible for quick retrieval. The strap system is adjustable, offering options for crossbody wear or handheld use. The construction blends a seamless crocheted body with a separate pocket piece, then joins everything neatly to form a practical accessory. The pattern highlights essential crochet techniques such as working in the round, increasing to form a flat, square base, and closing with an invisible join for a clean finish. You’ll learn to secure the pocket by attaching it with careful stitching and to fasten off when finishing sections, keeping ends tidy and hidden. The final assembly combines the pocket with the main body, exchanges the start of the strap, and secures both elements with sturdy, even stitching that preserves the crisp edges and compact look of the piece.

Pocket detail and strap attachment close-up on brown crochet bag

You’ll appreciate how the pocket integrates into the side of the bag, providing quick access without compromising the sleeker silhouette of the main compartment. The design remains forgiving for beginners yet rewarding for those who want precise shaping and tidy finishing techniques. The crocheted fabric holds its form naturally, thanks to consistent tension and deliberate stitch choices, while the joining steps are performed to keep edges neat and the seam nearly invisible from the outside. The finished item doubles as a stylish gift or a personal everyday carry, showcasing confidence in crocheted technique and care in construction. The pattern emphasizes practical stitching that ordinary crocheters perform, such as seaming edges, fastening off, and sewing on the pocket with alignment checks to preserve symmetry across the bag.

Stitches & Skills You'll Use

Stitch choices center around common crocheted fabrics that balance resilience with flexibility. The work uses a basic crocheting sequence that can be completed in the round to form a flat base, followed by shaping to create a square or rectangular body. A simple pocket is crocheted separately and then sewn in place with hidden stitches to preserve a smooth exterior. Finishing touches include a neat invisible join where sections meet, and a secure method for weaving in starting tails and ends. The overall texture remains even and compact, avoiding drape that could compromise the bag’s shape. This field describes what an ordinary crocheter can achieve, avoiding any claims about exclusive textures or stitches beyond standard practice.

Why You'll Love This Phone Bag with Pocket Pattern

This pattern blends practicality with handmade charm, delivering a clean silhouette and friendly stitches that grow confidence as progress is made. The pocket addition is clever and utilitarian, transforming a simple tote into a daily item that invites frequent use. The yarn and stitch choices emphasize texture without sacrificing structure, catching light in a way that highlights the crocheted fabric. The strap design feels comfortable over the shoulder and adapts to different body sizes or preferences, making the bag a trusted companion for errands, commutes, or casual outings. The project rewards careful finishing, with tidy ends and a dependable overall shape that holds up to repetitive use over time.

Colour & Yarn Inspiration

Neutral bases such as warm grays, oat, or creamy white pair well with virtually any outfit, while accent colors like teal, rose, or mustard bring a playful touch. For a monochrome look, choose a slightly variegated yarn that adds subtle depth without overwhelming the clean lines. Two tone combinations work nicely when the pocket is a contrasting shade, creating a visual anchor for the user’s hand. If gifting, consider the recipient’s favorite color or a hue that matches a signature bag or coat. Always test colorfastness before washing or wearing with light fabrics to avoid bleeding onto skin or clothing. The final look should emphasize tidy edges and a compact profile that remains true through daily use.

Magnetic button closure on strap with bag in background

Switch Things Up

Color and fabric weight adjustments offer a straightforward path to customization. Begin by selecting a colorway that complements wardrobe or the recipient’s style, and choose a yarn with a stable fiber that resists sag. The bag’s silhouette can be altered by changing the yarn weight and hook size; a slimmer version can be created with a lighter yarn and smaller hook, while a chunkier version benefits from a sturdier yarn and a slightly larger hook. The pocket can be stitched in with contrasting colors for a two tone look or kept monochrome for a minimalist effect. Beginning with a foundation chain of a chosen length sets the width, then the body is crocheted in a way that maintains a neat edge. The strap length can be adjusted by continuing the chain or by adding an extra anchor point, enabling a longer crossbody style or a compact wrist strap. The pocket placement can be shifted toward the side to add asymmetry while preserving balance. Consider finishing the edges with a light row of single crochet to define the opening, then weaving in all ends after the piece is assembled. Subtle embroidery or small charms on the pocket can personalize the bag without changing its structure.

Ways to Use & Gift It

For a practical friend who loves neat organization, present the Phone Bag with Pocket as a ready to use accessory that fits a phone, ID, and a few cards. For a teen or college student, customize with a two tone yarn combo and a longer strap for crossbody wear, turning the bag into a compact daily carry. For someone who travels light, choose a compact color mix and a thinner yarn to create a sleeker silhouette that slips into a backpack pocket. For a parent or caregiver, select a durable fiber that can withstand frequent handling and a strap length tuned for crossbody comfort during busy days. Gift packaging can include a small card that explains how to care for the crocheted fabric and how to re-tighten the strap if needed after washing, reinforcing the practical nature of the handmade item.

Common Mistakes & How to Fix Them

Choosing a yarn with too much drape can cause the bag to sag; select a slightly firmer fiber for better structure and stitch definition. Skipping stitch markers during rounds may lead to miscounted stitches; place markers at the start of each round and re-check counts often. Overstuffing the bag before sewing the pocket can distort shape; stuff gradually after assembling the main body and pocket to maintain symmetry. Not securing ends properly can leave loose tails peeking through; weave ends securely and trim close for a neat finish. Forgetting to fasten off before moving to the next section can create loose transitions; always fasten off and weave ends before continuing.

Maker's Notes

During construction, a polyester yarn with a 2 mm thickness and a 3.5 mm hook was used to prototype the bag. The project required approximately 6 hours from start to finish, including the pocket and strap assembly. The pocket alignment can challenge beginners; to mitigate this, align the pocket with the base rounds and secure it in place before final stitching. The invisible join technique proved essential for a clean exterior, preventing bulky edges from appearing along seams. When stuffing to test shape, avoid overpacking the main body as this can distort the opening and create strain at the top edge. If color changes are introduced, maintain consistent tension through rounds to prevent uneven rows. A starting tail length long enough to weave in ends helps reduce multiple trips to the starting area. A light blocking is optional and should be gentle to avoid flattening the crocheted texture while helping to define edges.

I tried a substitution: A DK weight yarn substituted for the original recommendation, using a 3.0 mm hook, yielded a bag that finished about 1.5 cm wider and taller. The larger size required a longer strap to maintain proportional balance with the pocket and opening. The pocket remained functional, and stitch density stayed comfortable for sewing and handling. The resulting fabric was slightly stiffer, which helped the structure but required a bit more care when shaping the top edge to prevent an abrupt line. Color shading differences emerged because of the different dye lot, reinforcing the importance of making a small swatch when using a new batch of yarn. The overall effect was still a valid variation of the pattern that remains practical and easy to adjust in future attempts.

Phone Bag with Pocket Pattern

Make this handy Phone Bag with Pocket pattern with our free crochet pattern—clear rounds, materials and assembly tips. Start stitching today!

Beginner Friendly 5-7 Hours
Pattern at a glance
Skill level
Beginner Friendly
Time to make
5-7 Hours
Hook size
3.5 mm
Yarn weight
2mm thickness polyester yarn
Finished size
Width = 11 cm / 4.33”; Height = 16 cm / 6.30”
Gauge
Gauge: Chain 15 = 8 cm / 3.15” long
Yarn used
Main color approximately 100 meters

Materials Needed

Main Fabric
  • 01
    Polyester yarn 2mm thickness or lightweight yarn +/- 100 meters
  • 02
    Crochet hook 3.5mm
  • 03
    Tapestry needle
  • 04
    Bag hook buckle – 33mm long (optional)
  • 05
    Magnetic Button – 14mm
  • 06
    Stitch marker
Tools Required
  • 01
    Crochet hook 3.5mm
  • 02
    Scissors
  • 03
    Tapestry needle
  • 04
    pins for positioning
  • 05
    Ruler or tape measure for quick checks

— Pocket :

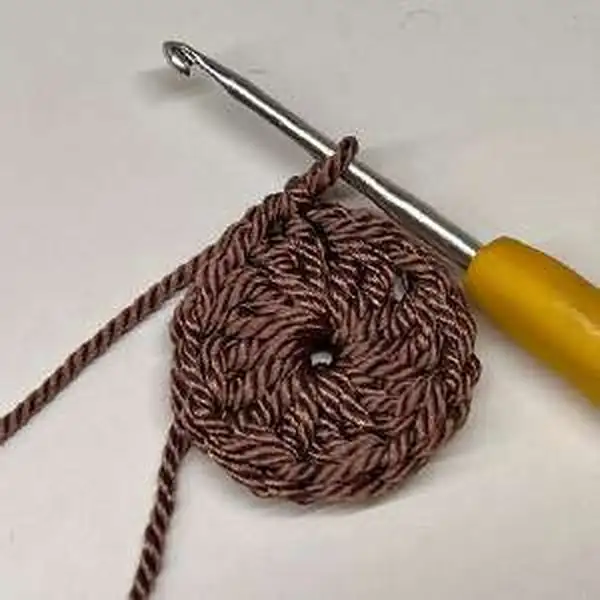
Round 1: Start with MR CH2, [DC2TOG, CH 1] X 8 times. SLST on top of CH 2.
Round 2: Working only in each of the CH 1-SP. SLST into next CH 1 SP, CH 2 [POPCORN into the CH 1-SP, CH3] x 8 times. SLST on top of the 1st POPCORN.
Round 3: SLST into next CH 3-SP, CH 2, DC3TOG into CH 3-SP & 6, [CH 2, *SC, CH 2, SC* into next CH 3-SP, CH 2, *DC3TOG, CH 3, DC3TOG* into next CH 3-SP] x 3 times, Photo;
Round 8: CH 2, *SC, CH 2, SC* into next CH 3-SP, CH 2, DC3TOG into the same CH 3-SP of the 1st DC3TOG, CH 3, SLST into top of the 1st DC3TOG., 11;

— Bag Body :

Round 4: SLST into next CH 2-SP, CH 2 count as 1st DC, 2 DC in to the same CH 2-SP, 3 DC in next 2 CH 2-SP,, *3 DC, CH 3, 3 DC* into CH 3-SP. [3 DC in to each of the next 3 CH 2-SP, *3 DC, CH 3, 3 DC* into CH 3-SP] x 3 times, SLST into top of CH 2 from the beginning.
Round 5: CH 1, 11 SC, 3 SC into CH 3-SP, [15 SC, 3 SC into CH 3-SP] x 3 times. 4 SC, SLST into the top of CH 1.
Round 6: CH 1, SLST on the both loops along the edge until the end. Use invisible join technique to join the round. Fasten off, cut the yarn and leave long yarn for sewing.

— Base :

Round 1: CH 22, DC into 3rd chain from hook, 18 DC, 3 DC into last CH. Working on the opposite side of the chain, 18 DC, 2 DC into last CH, SLST into 1st DC from the beginning. (42)
Round 2: CH 2, DC into the base of CH 2, 41 DC, SLST into top of CH 2 from the beginning. (42)
Round 3: CH 2, DC into the base of CH 2, 41 DC, SLST into top of CH 2 from the beginning. (42)
Round 4: CH 2, DC into the base of CH 2, 41 DC, SLST into top of CH 2 from the beginning. (42)
Round 5: CH 2, DC into the base of CH 2, 41 DC, SLST into top of CH 2 from the beginning. (42)
Round 6: CH 2, DC into the base of CH 2, 41 DC, SLST into top of CH 2 from the beginning. (42)
Round 7: CH 2, DC into the base of CH 2, 41 DC, SLST into top of CH 2 from the beginning. (42)
Round 8: CH 2, DC into the base of CH 2, 41 DC, SLST into top of CH 2 from the beginning. (42)
Round 9: CH 2, DC into the base of CH 2, 41 DC, SLST into top of CH 2 from the beginning. (42)
Round 10: CH 2, DC into the base of CH 2, 41 DC, SLST into top of CH 2 from the beginning. (42)
Round 11: CH 2, DC into the base of CH 2, 41 DC, SLST into top of CH 2 from the beginning. (42)
Round 12: CH 2, DC into the base of CH 2, 41 DC, SLST into top of CH 2 from the beginning. (42)
Round 13: CH 2, DC into the base of CH 2, 41 DC, SLST into top of CH 2 from the beginning. (42)
Round 14: CH 2, DC into the base of CH 2, 41 DC, SLST into top of CH 2 from the beginning. (42)
Round 15: CH 2, DC into the base of CH 2, 41 DC, SLST into top of CH 2 from the beginning. (42)
Round 16: CH 2, DC into the base of CH 2, 41 DC, SLST into top of CH 2 from the beginning. (42)
Round 17: CH 1, SLST along the edge of the bag. Use invisible join technique to join the round. Fasten off, cut the yarn and hide the yarn end inside the bag Bag strap closure;

— Strap :

Round 1: CH 18, SC into 2nd chain from hook, 15 SC, 3 SC into last CH. Working on the opposite side of the chain, 16 SC. (35) CH 1, turn.
Round 2: 16 SC, INC x 3 times, 15 SC (37). CH 1, turn.
Round 3: 16 SC, INC, 2 SC, INC, 17 SC (39). CH 1, turn.
Round 4: [SLST into the next ST, CH 1] repeat until the end of the strap. Fasten off, cut the yarn and leave long yarn for sewing. 35_)

Assembly Instructions

  1. Attach pocket to bottom center of bag by sewing through the back loops of the pocket opening for a neat seam.
  2. Place the pocket to the bottom center of the bag. Sew it to the bag through the back loops of the pocket. Feel free to stitch through the front to back for a strong seam.
  3. Sew the magnetic button inside of the strap so they match up to the magnet button on the bag.
  4. Sew the leather label to the above center of the pocket.
  5. Sew the shoulder strap on to the hook bucket. Push the ring gate to attach the strap to the bag.
  6. If you do not have the hook bucket, sew the strap direct to both sides of the bag.

Important Notes

  • Use stitch markers to keep track of your rounds, especially during color changes and shaping sections.

  • Stuff firmly but not too tightly for the best shape and structure - overstuffing can distort your work.

  • Pin all parts in place before sewing to ensure correct positioning and symmetry.

  • Weave in ends as you go to avoid a tedious finishing session at the end.

  • Work with consistent tension throughout for even, professional-looking results.

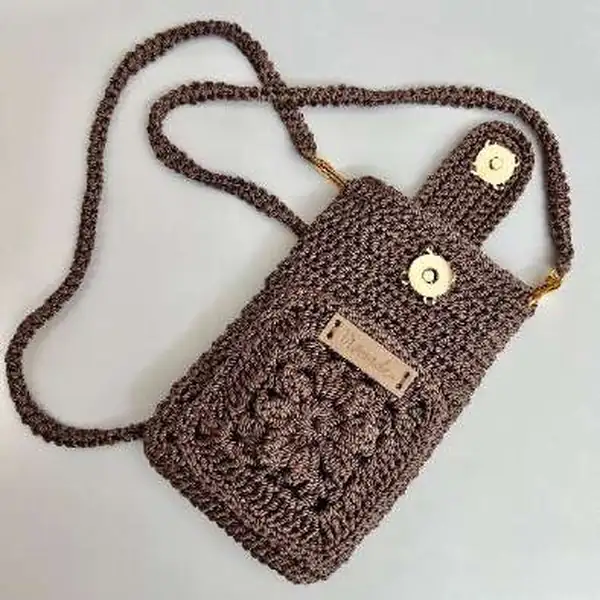
This is the finishing moment for the Phone Bag with Pocket. It celebrates patience and precision, translating simple stitches into a portable piece of everyday joy. The final step involves tidying every end with a careful weave and giving the bag a final check for symmetry. The bag should stand evenly on a flat surface, with the pocket aligned to the side so the main compartment remains unobstructed. The result is a durable accessory that travels well, whether tucked into a larger tote or worn as a crossbody. This handcrafted item can accompany errands, coffee runs, and spontaneous trips, serving as a reminder that small, thoughtful crafts can brighten daily routines. The gift of a finished bag carries the pride of a completed crochet project and the usefulness of a reliably organized pocket system.

Good to know

You ask, we answer

The finished phone bag measures approximately 11 cm wide by 16 cm tall when using the recommended yarn and hook size. The pocket adds a small amount of depth without overly enlarging the overall footprint, ensuring the bag remains easy to carry in a hand or over the shoulder.

Yes, you can, but varying yarn weights will affect both final size and stiffness. To maintain dimensions, use a proportionally larger hook for bulkier yarns and adjust the strap length accordingly so the bag keeps a comfortable fit across the body or against the hip.

This pattern is designed to be beginner friendly, with clear round by round instructions and straightforward assembly steps. Basic stitches such as single crochet and simple increases are enough to complete the project, along with attaching the pocket and joining sections.

Most crocheters complete the project in 5 to 7 hours, depending on pace and careful execution of the pocket and strap attachments. Time estimates assume steady work and a focus on starting tail management and end weaving as progress unfolds.

Shoulder strap being threaded through hook bucket on bag
Join 100k+ crocheters

Get new free patterns, stitch tips and exclusive content in your inbox.