Crochetologist
Free Crochet Pattern
Beautiful Detailed Adorable

Mussel Amigurumi Pattern

White pearl amigurumi close-up
4.1Rating
2-3 HoursTime
Beginner FriendlySkill
Highlights

What makes it special

Made with Love

Small, sweet, and gift-worthy creations that fit perfectly in the palm of your hand with detailed charm.

Bite-Sized Project

Finishes in 2-3 hours—perfect for an afternoon of tiny-treasure crochet, with a quick pearl and two seashells that fit in the palm of your hand.

Beginner Friendly Level

This pattern is written for confident beginners who know the basics of the magic ring, single crochet, and simple increases. The work involves shaping two small seashell pieces and assembling them with a central pearl, plus a minimal amount of surface embroidery. The rounds are short and the increases controlled to maintain a smooth, spherical pearl and a curved shell silhouette. The project emphasizes tidy finishing and secure stuffing without relying on fancy stitches or advanced texture tricks, ensuring a straightforward path to a polished, pocket-sized sculpture. The skill set centers on consistent tension, careful alignment, and precise joining to achieve a balanced final display piece.

Imagine a miniature underwater moment captured in plush, palm-sized form. This mussel amigurumi pattern invites you to craft a tiny scene: a delicate white pearl tucked between two curling blue seashells, like a secret gift from the sea. The project is designed to be tactile, meditative, and approachable, offering a clear path from foundation chain to a finished crocheted sculpture. The pearl begins with a foundation chain and short, snug rounds that form a compact orb, while the shells emerge through focused shaping and careful texture that remains approachable for crocheters at a beginner-to-intermediate level. The final piece sits comfortably in the hand, inviting a quiet, repetitive cadence of stitching, stuffing, and delicate finishing. This pattern rewards steady tension, neat joins, and a tidy seam line that vanishes into the surface when viewed from multiple angles. It is a suitable first coastal sculpture for anyone curious about amigurumi, providing a calm project with a tangible sense of accomplishment that can be enjoyed as a gift or a personal keepsake.

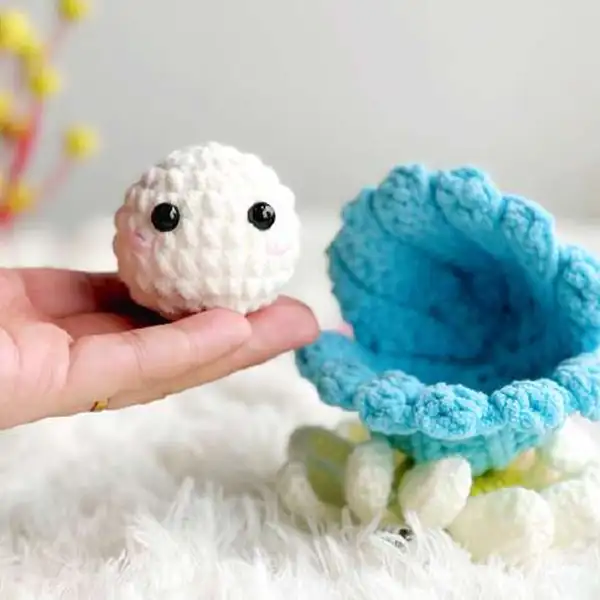
About This Mussel Amigurumi Pattern

The mussel display is designed as a compact ode to the sea: a crisp white pearl nestled between two bright blue shells. The creation begins with the pearl, using a magic ring to open the first round and a tight sequence of single crochet stitches to form a smooth, pliable sphere. A brief, controlled increase scheme shapes the ball before the final rounds close the piece, with a concealed starting tail anchoring the block. The seashells are crocheted separately with a back loop only technique to impart a delicate ridge along the curved edge, while maintaining a gentle surface texture conducive to even stuffing. The two shells are crafted to mirror each other in size and gentle curvature, then positioned around the pearl so the finished arrangement resembles a small, curved shell pair cradling a central bead. The assembly prioritizes secure joins and clean finishing so the final piece sits flat and balanced on a desk or shelf. The approach remains beginner-friendly by keeping round counts modest and changes minimal, while still delivering a maritime charm that reads as deliberate and complete. The pearl can be given a tiny facial feature through embroidery if desired, adding character without complicating the silhouette or the structural integrity of the shells.

From a making perspective, the rhythm arises from a steady sequence of rounds and a simple increases/decreases plan that defines the shells’ curvature and preserves the pearl’s position within the cradle. The project stays compact by limiting color changes to essential sections, reducing yarn management tasks and keeping transitions smooth between the pearl and the shells. Clean seams are designed to disappear into the surface with careful alignment, so the final piece looks seamless from multiple angles. The embroidery on the pearl remains minimal, intended to convey friendly personality with minimal sewing skill. The pattern balances a sense of coastal whimsy with practical, repeatable steps that can be completed in a single sitting or across a quiet weekend, depending on pace. The result is a tiny, tactile sculpture inviting touch and display, and ideal as a thoughtful gift or a small maritime ornament in daily life.

Blue seashell crochet piece in progress

This design stays clean and compact, with steps that fit neatly into an evening crochet session. The pearl and two seashells are small enough to carry in a project bag, yet visually satisfying enough to read as a complete scene when displayed. Subtle embroidery finishes the pearl’s face, providing character without demanding advanced sewing or stitching skills. The shells’ texture interacts with the smooth pearl to create a simple yet vivid contrast that makes the whole piece pop on a shelf or desk. The process favors steady pacing and clear sequencing, allowing a crocheter to complete the assembly with confidence in one or two sessions, depending on timing and focus. This project offers a gentle introduction to color alignment and finishing, remaining approachable for first-time amigurumi makers seeking a tangible victory with display value.

Stitches & Skills You'll Use

Stitches you’ll use include a magic ring to start the pearl, followed by a tight sequence of single crochet to build a compact sphere. Increases and decreases are kept conservative to preserve a smooth round shape. The seashells are worked in the back loop only to create a delicate ridge that echoes shell grooves while keeping the surface accessible for beginners. Construction seams are completed with slip stitches to secure pieces without creating bulky joins, and the embroidery on the pearl adds a tiny facial feature if desired. Finishing touches emphasize tidy tension, careful stuffing, and precise positioning of the pearl between the shell halves before the final securing stitches are tightened. Color changes are limited to essential sections to maintain a calm workflow and reduce tangling, making the project forgiving for new amigurumi makers.

Emphasis is placed on even tension across each round so stuffing remains concealed and the surface remains smooth. The pearl’s resting position is stabilized with subtle sewing that holds it centered between the shells while allowing slight movement for display. If color changes are used, they are planned to minimize running ends and to keep the surface uniform where the shell segments meet the pearl. The overall technique reflects standard amigurumi practice, avoiding any specialized stitches beyond foundational shaping and joining, ensuring a reliable result for crocheters at a beginner-to-intermediate level.

Why You'll Love This Mussel Amigurumi Pattern

This pattern distills a seaside moment into a pocket-sized treasure that travels easily from project bag to display shelf. The appeal lies in the way a pure white pearl can rest between two cobalt shells, creating strong contrast and a sense of miniature depth within a tiny fabric scene. The rounds stay straightforward, and the assembly relies on clean joins to keep the surface looking polished rather than bulky. The sculpture embodies a calm, tactile micro-scene that can be completed in a single sitting or over a quiet weekend, depending on pacing. The shell texture is achieved through careful use of a back loop only technique, providing a gentle ridge without adding complexity. The embroidery on the pearl remains minimal, offering a touch of personality while preserving the focus on form and balance. The outcome is a small coastal charm that reads as both endearing and durable for everyday display, suitable for gifting or personal enjoyment.

Colour & Yarn Inspiration

Color ideas center on pairing a pure white pearl with bright blue shells or mid-tone azure for contrast. For a softer look, ivory or ivory-tinged white shells combined with a pale sea-foam blue can read as a gentle coastal scene. A cool dusk palette can be achieved with deeper blues and a touch of slate or navy along the shell edges, while still preserving the pearl’s brightness. A warmer palette might pair creamy shells with a pale teal accent along seam lines, enhancing the ridge texture achieved by the back loop only technique. Embroidery on the pearl can use a thread that catches a hint of sheen to imitate a tiny gleam in the eye, without overpowering the simple silhouette. If a pastel mood is preferred, light lavender-tinted shells with a pale ivory pearl provide a soft, serene vignette that reads calm and delicate.

Finished mussel amigurumi with pearl nestled between shells

Switch Things Up

Personalize this mussel by swapping the shell blue for turquoise or a deeper azure to evoke different depths of the sea. A slightly whiter yarn with a satin or glossy finish on the pearl can give a soft pearlescent glow when light falls on the piece. Try a variegated seashell color to mimic sunlit stripes and watch the shell edges form varied curves while crocheting in BLO for texture. Scale the project up or down by adjusting yarn weight and hook size, but keep the overall technique the same to preserve the silhouette. Decorative stitches on the pearl—such as a tiny smile or tiny cheeks—add a friendly face without altering the shape. Mount the mussel on a small felt stand to display on a desk or in a shadow box for a coastal vignette. Consider a tiny trio—three shells with pearls—to form a mini sea cluster that can function as a soap-dish accent or a unique gift topper. For extra challenge, add a second pearl behind the shells and join them with a short finishing tail to resemble a clasp motif. Finally, document color experiments with photos to capture palettes for future ocean-themed amigurumi projects.

Ways to Use & Gift It

This miniature sea scene makes a thoughtful desk companion for colleagues and a charming gift for ocean lovers or students who appreciate tactile handmade objects. Its compact size eases gifting and shipping while delivering a polished display piece. Pair it with a small card about sea life to amplify sentiment. The piece travels well in a small project bag, making it suitable for a hand-crafted gift that arrives ready to display. It can be paired with a coastal-themed notebook or a tiny frame to create a cohesive desk vignette. The sculpture serves as a conversation piece on a mantel or bookshelf, offering a subtle touch of maritime whimsy that can be admired daily.

Common Mistakes & How to Fix Them

Not marking the start of rounds when switching colors can lead to misalignment; place a stitch marker at the beginning of each round to stay on track.

Overstuffing the pearl or shells can cause a stiff, bulky look; stuff gradually and shape gently to keep the surface smooth and to preserve the rounded silhouette.

Skipping stitches during increases or decreases creates lopsided shapes; count stitches after every round, especially during shaping, to maintain symmetry between the pearl and shells.

Forgetting to weave in ends early leaves loose tails; weave ends as you go to avoid a tedious finish and a scrappy look on the final piece.

Maker's Notes

In an initial run, the pearl used white worsted weight yarn with a 3.5 mm hook, followed by blue worsted weight yarn for the shells. The rounds for the pearl were completed in about two to three hours for a careful maker, with shell pieces taking a similar amount of time. The key learning was to maintain consistent tension to keep stuffing concealed and the surface smooth, especially around the pearl where the rounds are tight. The embroidery for the mouth began with a single pass of pink thread, yielding a gentle expression that remains removable if desired. The BLO texture on the shells proved forgiving for beginners, adding just enough ridge to read as shell without complicating the assembly. Turning points included aligning shell halves before sewing and ensuring the pearl sits snugly in the cradle to avoid shifting during display.

I tried a substitution: The substitution used a slightly lighter blue DK for the shell color, which softened the shell’s texture and made the curvature read as subtler. The pearl retained its rounded form, though required slightly less stuffing to maintain a smooth surface. The overall silhouette—the white pearl cradled between two symmetrical shells—remained intact, preserving the intended visual. Proportions stayed consistent because the same number of rounds and the same basic shaping steps were used, only the yarn weight and resulting fabric density changed. Gauge effects were minimal so long as a tight fabric was produced; the final piece still sits flat and balanced. When substituting yarns, it helps to re-check the round counts to ensure the two shells still align evenly and cradle the pearl properly.

Mussel Amigurumi Pattern

Make this mussel amigurumi with our free crochet pattern—complete rounds, materials list, and simple assembly tips. A tiny, gift-ready shell to brighten desks and shelves. Start today!

Beginner Friendly 2-3 Hours
Pattern at a glance
Skill level
Beginner Friendly
Time to make
2-3 Hours
Hook size
3.5 mm (E)
Yarn weight
Super Bulky / Category 6
Finished size
Approx. 4-6 cm tall
Gauge
Gauge not critical; tight fabric recommended to hide stuffing
Yarn used
Pearl (White): ~5-10 g; Seashells (Blue): ~15-25 g; Total ~20-35 g

Materials Needed

Main Fabric
  • 01
    Yarn: Worsted weight for Pearl (white) and Seashells (blue), approx 20-30 g total
  • 02
    Colors: White (Pearl) + Light Blue (Seashells)
  • 03
    Hook: 3.5 mm (E)
  • 04
    Stitch markers
  • 05
    Sewing needle
  • 06
    Safety eyes 8 mm (2 pieces) for Pearl
  • 07
    Polyester stuffing
  • 08
    Hot glue (optional) for securing eyes
  • 09
    Fiberfill for stuffing
  • 10
    MR: Magic Ring
Tools Required
  • 01
    Crochet hook size 3.5 mm (E)
  • 02
    Sewing needle for finishing
  • 03
    Scissors
  • 04
    Stitch markers
  • 05
    Polyester stuffing
  • 06
    Safety eyes 8 mm (2 pieces)
  • 07
    Hot glue gun (optional)

— Pearl :

Round 1: 6SC in a MR (6)
Round 2: 6INC (12)
Round 3: (SC, INC) 6 times (18)
Round 4: (2SC, INC) 6 times (24)
Round 5: 24SC (24)
Round 6: 24SC (24)
Round 7: 24SC (24)
Round 8: (2SC, DEC) 6 times (18)
Round 9: (SC, DEC) 6 times (12)
Round 10: 6DEC (6)

— Seashell ( Make 2) :

Round 1: 13Ch, turn: 7DC, HDC, SC, 2Slst, turn (11)
Round 2: Ch, 11Slst, turn (11)
Round 3: 3Ch, 8DC, HDC, SC, 2Slst, turn (12)
Round 4: Ch, 12Slst, turn (12)
Round 5: 3Ch, 9DC, HDC, SC, 2Slst, turn (13)
Round 6: Ch, 13Slst, turn (13)
Round 7: 2Ch, 9DC, HDC, SC, 2Slst, turn (13)
Round 8: Ch, 12Slst, turn (12)
Round 9: 2Ch, 8DC, HDC, SC, 2Slst, turn (12)
Round 10: Ch, 11Slst, turn (11)
Round 11: 2Ch, 7DC, HDC, SC, 2Slst (11)
Round 12: Thread the needle through the loops in pairs with a total of 3 pairs. When you have all 4 loops on the needle, pass the thread through all 4 loops to create one stitch.

— Part 3 :

Round 11: , adding 7 stitches. Begin joining from this point. Make 15 SLST Cut the yarn and finish product;

Assembly Instructions

  1. Attach Pearl to the center of the seashell assembly by sewing through the pearl base and anchoring to the shells.
  2. Sew the two Seashell pieces together with a small seam along their curved edges to form a compact mussel shell.
  3. Position the Pearl as the focal point between the shells and secure with light stitching so it doesn’t shift.
  4. Add eyes to the Pearl between rounds 4 and 5 with 5 stitches between them, then embroider a tiny mouth.
  5. Align the shells so their openings face outward and sew them to the base to create a tidy display.
  6. Weave in all loose ends and trim excess thread; ensure the shell pieces sit neatly when placed on a flat surface.

Important Notes

  • Always join pieces on a flat surface to check symmetry before final fastening, ensuring the pearl remains centered between the shells when joined.

  • Mark the center of the pearl for accurate eye placement and mouth embroidery, if you choose to add facial features, so the expression reads clearly from multiple angles.

  • Keep tension even when sewing to avoid distorting the shell edges; a consistent approach helps the shells lie flush against the pearl cradle.

  • Weave in tails as you go and secure knots well for a durable finish, reducing the chance of tails slipping and preserving the neat appearance of the surface.

This tiny mussel amigurumi acts as a charming desk companion, fitting in the palm for easy handling and gifting. Clean stitching and straightforward assembly keep the project accessible to beginners while delivering a complete, presentable finished piece. A subtle maritime mood makes it suitable for display on a small shelf or workspace, adding a sense of coastal whimsy to daily life. The piece lends itself to gentle, mindful stitching sessions that feel rewarding without becoming tedious. It stands up to display in a sunny window or a quiet desk corner, offering a tiny ocean moment that is both decorative and tactile.

Good to know

You ask, we answer

The finished mussel amigurumi measures approximately 4 to 6 cm tall and about 6 to 8 cm wide, depending on yarn weight and tension. The dimensions reflect the palm-sized goal and the compact curvature of the shells around a central pearl, ensuring a sturdy, display-ready sculpture that remains portable.

Yes, but size and texture will change. Use a hook that yields a tight fabric to ensure the surface stays smooth and stuffing remains concealed; larger yarns will produce a looser fabric and a slightly bigger finished piece, while thinner yarns yield a more delicate look with tighter rounds. Adjust your starting tail and ensure the pearl remains centered between the shells after assembly.

This pattern is beginner-friendly, suitable for someone comfortable with a magic ring, single crochet, and basic assembly. The steps are broken into small, manageable rounds, and the color changes are kept minimal to support a smooth workflow without requiring advanced techniques.

Yes, weave in ends securely and lightly stuff to maintain shapes, then embroider the mouth and add eyes if desired; ensure shells sit neatly. The finishing touches should focus on aligning the shells so the cradle is balanced and the pearl sits centered, with the seam lines smooth and nearly invisible on the final surface.

Two seashell pieces sewn together with pearl
Join 100k+ crocheters

Get new free patterns, stitch tips and exclusive content in your inbox.