Crochetologist
Free Crochet Pattern
Beautiful Detailed Adorable

Monster Frankenstein Amigurumi Pattern

green Frankenstein amigurumi head close up
4.1Rating
5-7 HoursTime
IntermediateSkill
Highlights

What makes it special

Made with Love

A goofy, lovable amigurumi monster that brings charm and smiles to any shelf or desk. This friendly Frankenstein vibes with stitched details and a soft, huggable body.

Weekend Treat

Takes 5-7 hours, offering a satisfying, focused session that fits nicely into a weekend crafting plan and yields a delightful, display-ready amigurumi.

Intermediate Level

This pattern is suited to crocheters who work in the round, use joining methods for limbs, and perform careful stuffing to maintain a tidy head and body. The project also requires basic color changes and seam work for a polished result, with a gentle challenge that sits between beginner and more experienced crocheters. The steps are straightforward, but attention to even tension and precise placement of limbs makes the difference between a cute toy and a truly expressive character.

Creativity loves a friendly monster that sits with a quiet grin, a small beacon of whimsy on a desk or shelf. This crochet pattern guides you to build a cheerful Frankenstein amigurumi that can become a personal gift or a bright home accent. Choose colorways that echo the recipient’s room or a playful theme, from vivid lime and emerald to warm moss and cream. The moment the final stitch is fastened off, a warm sense of achievement settles in, along with a tangible reminder that a handmade treasure came from your own hands. This project invites repeated making, color swaps, and little stories you can tell with each new version.

About This Monster Frankenstein Amigurumi Pattern

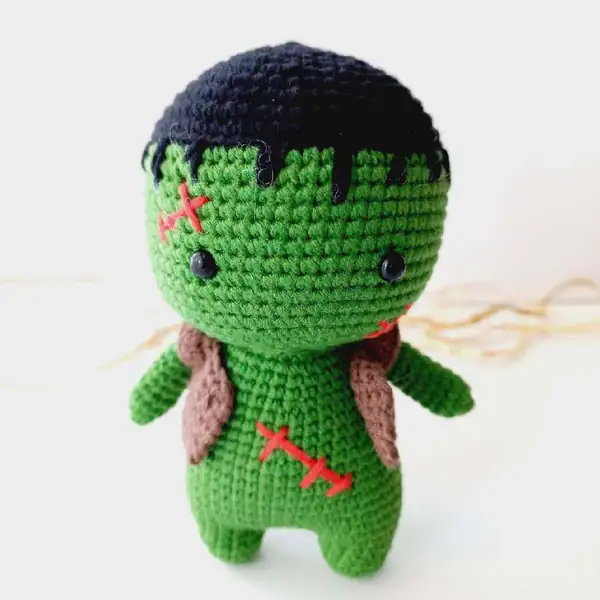
Monster Frankenstein this pattern builds from a few crocheted pieces: a round head, a short torso, two tiny legs, two arms, and a little sweater that sits over the shoulders. The construction prioritizes even stuffing and clean color transitions. The head is shaped with a gentle increase sequence to form a rounded skull, then a taper toward the neck. The body follows with a short torso that supports the arms and legs in proportion. The sweater is made as a separate crocheted piece and then opened along the back seam to slip around the torso, securing with small stitches. Accessories like glossy safety eyes and small stitched red marks provide expression without complicating finishing. The color changes are deliberate and controlled to keep transitions smooth and readable at small scales. Seaming and attachment are done with care to preserve form while preventing distortion when the toy is displayed.

Frankenstein tiny sweater detail crochet

The crochet journey begins with a starting tail spun into a tight center, forming the foundation for the head, which grows from a small circle into a rounded crown. The body follows with a short profile that presses the neck into place. The arms and legs are crocheted separately and joined to the torso with neat seams that keep proportions balanced. The final sweater is created as a separate piece, then placed around the shoulders and closed with tiny stitches along the back to secure its shape. Embroidery details or surface stitches for the scars are added after the main assembly, so the completed figure reads as a cohesive character rather than a patchwork of pieces. A brief color-change sequence helps create the signature skin-tone split without creating bulky joins at the back. The remaining finishing steps include attaching the head to the body with small, careful seams and positioning the eyes and mouth for a friendly expression.

Stitches & Skills You'll Use

Stitch Spotlight: The starting foundation chain forms a tight round for the head, with a single joined circle that remains even through subsequent rounds. Use a starting tail to close the circle without gaps, and work in joined rounds consistently so the diameter stays predictable. Color changes are planned to occur at the end of a round, using the color-switch technique immediately after pulling through the last stitch of the old color to avoid loose tails showing on the surface. The neck area is kept slender by working a few careful decreases, then resuming round counts that maintain a smooth transition to the torso. When positioning limbs, align the first attachment with the body centerline, insert stuffing evenly, and check symmetry before closing the seam. The eyes are placed by pinning first, then fastening with a few compact stitches so they don’t shift during play or display. The scar accents are added with bright red yarn through simple short stitches across the surface, not heavy embroidery that would bulk the silhouette. The hair is created by anchoring a few long strands at the crown and letting them drape; this yields a soft, flexible look instead of a stiff cap. Seams along the neck and shoulders are kept tight with whip stitches so the transition remains seamless. The embroidered mouth and cheeks are stitched after stuffing, ensuring placement is centered and proportionate. The sweater is worked as a separate piece and positioned around the torso, then secured with tiny stitches along the back seam to maintain a clean back profile. Color-blocking decisions are kept restrained to preserve readability at small scales, and final checks focus on even stuffing, secure attachments, and overall balance.

Why You'll Love This Monster Frankenstein Amigurumi Pattern

This pattern balances simplicity with character, yielding a toy that reads as friendly rather than frightening. The basic rounds and controlled increases build a sturdy head that holds its shape, while a small sweater and stitched details transform a straightforward amigurumi into a storytelling figure that can be personalized with color choices and scar placements. The project lends itself to customization, so color swaps produce entire new characters without changing the construction. The result is a compact, satisfying make that fits into weekend schedules and into small display spaces.

Colour & Yarn Inspiration

Begin with a bold lime body, paired with a deep black hair and vivid red scar accents to create high-contrast detail for photos. A mossy green sweater helps soften the overall look, while charcoal gray or navy yarn can offer a more subdued monster vibe. For a friendlier aesthetic, switch to safe, larger black beads for eyes and use a warm brown for hair to introduce warmth. For a playful look, pair a pastel green body with a purple sweater and pink scarf to bring whimsy to the character. Different fiber choices affect texture and drape; cotton blends give crisper stitches while acrylic blends yield a plush finish. A fuzzy or brushed-finish yarn adds tactile interest. Changing the scar color to lighter or darker shades alters the mood without changing the pattern structure.

frankenstein amigurumi with accessories

Switch Things Up

Switch things up with a family of Frankensteins that share a basic silhouette but tell different stories through accessory choices and scar placement. A bulkier yarn with a larger hook yields a chunkier, cuddle-worthy version with proportions that shift but charm remains. Add a tiny felt bolt or cape to give personality and a playful display presence. For a softer look, replace black hair with a rounded embroidered mouth and omit the hair entirely; expression becomes gentler while the form stays the same. Embroidered freckles or small buttons can tailor the figure to a favorite character or gift message. Explore different eye styles, from large safety eyes to small stitched beads, to adjust mood without changing the pattern. Keep notes on changes to size, tension, and color so you can reproduce the exact result later. Consider a two-tone body or a layered sweater to create depth while maintaining the same overall shape. A short scarf or cape can introduce seasonal variants that suit gifts or decor.

Ways to Use & Gift It

This Frankenstein amigurumi makes a charming birthday surprise for a creative child or crochet-loving friend. Its compact size makes it suitable for a desk, a shelf, or a small display space, and a brief backstory can accompany the toy to spark imagination. Include a note about the character and the red scars that give it personality, and consider a tiny set of interchangeable outfits such as a cape, hoodie, or scarf for a mini fashion show. Pair it with a handmade card and a skein of coordinating yarn to create a two-in-one gift that invites a new project. The piece also functions as nursery decor or a tactile toy for early exploration of textures and colors. A handmade starter kit can accompany the gift to inspire future crochet adventures.

Common Mistakes & How to Fix Them

Losing your stitch count — place a marker at the start of each round. Working too loosely, which lets the stuffing show through the fabric. Forgetting to stuff firmly before closing a piece. Sewing parts on before pinning and checking the proportions.

Maker's Notes

During testing, a light DK weight yarn paired with a small hook produced a tight, neat fabric and consistent dimensions. Keep stuffing evenly distributed to maintain a circular head and smooth body shape; overstuffing can push stitches apart and create distortion around the seams. Color changes around the head can be tricky for beginners, so plan the order of changes and mark rounds to track progress. Safety eyes were positioned between specific rounds to achieve a friendly expression while staying secure. The project took approximately five hours spread over two sessions for a crocheter with basic experience; time varies with pace and familiarity with color changes.

I tried a substitution: Substituting a slightly thicker DK yarn with a 2.25 mm hook produced a figure about 1.5 centimeters taller, with proportion changes in the facial area and eyes. Hair and scar embroidery were adjusted to compensate for the new proportions, but the overall character remained recognizable. Restoring the original 2.0 mm hook and the original yarn brought back the intended proportions and left the limbs flexible for posing. For a bulkier toy, consider a superwash wool blend, keeping in mind it will alter washing and drape. The pattern tolerates small scale and proportion shifts without compromising the overall silhouette, so you can experiment with confidence.

Monster Frankenstein Amigurumi Pattern

Make this quirky Monster Frankenstein amigurumi with our free crochet pattern—complete rounds, materials, and assembly tips. Start crocheting today for a fun, cuddly toy.

Intermediate 5-7 Hours
Pattern at a glance
Skill level
Intermediate
Time to make
5-7 Hours
Hook size
2.0 mm (D/3)
Yarn weight
DK / #3
Finished size
Approx. 9-12 cm tall
Gauge
Gauge not critical; 8 rounds x 8 cm approx on 2.0 mm hook using DK weight yarn
Yarn used
Main color approx. 60 g; accent colors 10 g total

Materials Needed

Main Fabric
  • 01
    Alize Cotton Gold 126
  • 02
    Alize Cotton Gold 493
  • 03
    Alize Cotton Gold 60
  • 04
    -2,00 mm or a hook that fits your yarn
  • 05
    -Polyester Fiberfill
  • 06
    -6 mm safety eyes
Tools Required
  • 01
    Crochet hook size 2.0 mm (D/3) or size to meet your yarn
  • 02
    Scissors
  • 03
    Yarn needle for sewing
  • 04
    Stitch markers
  • 05
    Polyester stuffing
  • 06
    Pins for assembly
  • 07
    Safety eyes 6 mm (2 pieces)

— HEAD :

Round 1: 6 sc in magic ring (6)
Round 2: (inc) x6 (12)
Round 3: (sc, inc) (18)
Round 4: (inc, 2 sc) x6 (24)
Round 5: (3 sc, inc) x6 (30)
Round 6: 2 sc, inc, (4 sc, inc) x5, 2 sc (36)
Round 7: (5 sc, inc) (42)
Round 8: 3 sc, inc, (6 sc, inc) x5, 3 sc (48)
Round 9: (7 sc, inc) x6 (54)
Round 10: 4 sc, inc, (8 sc, inc) x5, 4 sc (60)
Round 11: sc around (60) *change to green yarn;
Round 12: BLO Sc around (60)
Round 13: Sc around (60)
Round 14: Sc around (60)
Round 15: Sc around (60)
Round 16: Sc around (60)
Round 17: Sc around (60)
Round 18: Sc around (60)
Round 19: Sc around (60)
Round 20: Sc around (60)
Round 21: Sc around (60)
Round 22: Sc around (60)
Round 23: Sc around (60)
Round 24: (3 sc, dec) x12 (48)
Round 25: (2 sc, dec) x12 (36)
Round 26: 2 sc, dec, (4 sc, dec) x5, 2 sc (30)
Round 27: (3 sc, dec) x6 (24)
Round 28: sc around (24)

— LEG :

Round 1: 7 sc in magic ring (7)
Round 2: (inc) x7 (14)
Round 3: sc around (14) *make 2 pieces. *After making the first leg, cut the thread. When making the second leg, do not cut the thread and continue to the body.
Round 4: sc around (14) *make 2 pieces. *After making the first leg, cut the thread. When making the second leg, do not cut the thread and continue to the body.
Round 5: sc around (14) *make 2 pieces. *After making the first leg, cut the thread. When making the second leg, do not cut the thread and continue to the body.
Round 6: ch4, join the first leg with the sc. Crochet on the first leg: 2 sc, (inc, 5 sc) x2, working on the chain: inc, 2 sc, inc, crochet on the second leg: (5 sc, inc) x2, 2 sc, working on the chain: 4 sc (42)
Round 7: (13 sc, inc) x3 (45)
Round 8: sc around (45)
Round 9: sc around (45)
Round 10: sc around (45)
Round 11: sc around (45)
Round 12: sc around (45)
Round 13: (13 sc, dec) x3 (42)
Round 14: sc around (42)
Round 15: sc around (42)
Round 16: sc around (42)
Round 17: (5 sc, dec) x6 (36)
Round 18: sc around (36)
Round 19: sc around (36)
Round 20: sc around (36)
Round 21: (4 sc, dec) x6 (30)
Round 22: sc around (30)
Round 23: sc around (30)
Round 24: sc around (30)
Round 25: (3 sc, dec) x6, slst (24)

— ARM :

Round 1: 6 sc in magic ring (6)
Round 2: (sc, inc) x3 (9)
Round 3: sc around (9)
Round 4: sc around (9)
Round 5: sc around (9)
Round 6: sc around (9)
Round 7: sc around (9)
Round 8: sc around (9)
Round 9: sc around (9)
Round 10: sc around (9)
Round 11: sc around (9)

— SWEATER :

Round 1: Ch 25, (sc, inc) x12 (36) ch1, turn;
Round 2: (2 sc, inc) x12 (48) ch1, turn;
Round 3: Sc around (48) ch1, turn;
Round 4: 7 sc, ch3, skip 10 sc, 14 sc, ch3, skip 10 sc, 7 sc, ch1, turn;
Round 5: Sc around (34) ch1, turn. Cut the yarn and hide.
Round 6: Sc around (34) ch1, turn. Cut the yarn and hide.
Round 7: Sc around (34) ch1, turn. Cut the yarn and hide.

Assembly Instructions

  1. Attach head to body by inserting the neck portion (rounds 21-25) into the opening at the top of the body, then sew securely using whipstitch.
  2. Position arms on either side of the body between rounds 12-14, angling slightly forward for a natural pose, and sew in place.
  3. Sew legs to the bottom of the body, spacing them evenly and ensuring they're firmly attached for stability.
  4. Attach ears to the top of the head at rounds 6-8, spacing them about 8-10 stitches apart for symmetry.
  5. Add any facial features or accessories according to the pattern, using photos as reference for accurate placement.

Important Notes

  • Use stitch markers to keep track of your rounds, especially during color changes and shaping sections.
  • Stuff firmly but not too tightly for the best shape and structure - overstuffing can distort your work.
  • Pin all parts in place before sewing to ensure correct positioning and symmetry.
  • Weave in ends as you go to avoid a tedious finishing session at the end.
  • Work with consistent tension throughout for even, professional-looking results.

This cuddly Frankenstein amigurumi blends color, texture, and whimsy into a pocket-sized friend. The finished figure invites hugs, storytelling, and display, and the simple construction emphasizes reliable shaping and sturdy finishing. May your needles click with joy as you craft this character, and may the result bring smiles and spark imagination in equal measure.

Good to know

You ask, we answer

The finished amigurumi measures about 9 to 12 centimeters tall when using the recommended yarn and hook size.

Yes, you can use different yarn weights, but the final size will change; adjust the hook and check gauge if possible.

This pattern is rated intermediate; basic crochet stitches, starting tail handling, and simple assembly are expected for best results.

Most crocheters finish in about 5 to 7 hours, with time varying by experience and pace.

safety eyes and scar stitches on amigurumi
Join 100k+ crocheters

Get new free patterns, stitch tips and exclusive content in your inbox.