Crochetologist
Free Crochet Pattern
Beautiful Detailed Adorable

Mini Flower Basket & Flowers Pattern

Decorative mini flower basket with sunflowers and lavender crochet flowers
4.8Rating
5-7 HoursTime
IntermediateSkill
Highlights

What makes it special

Handmade Charm

A warm touch for your space that transforms ordinary corners into inviting nooks filled with handmade charm.

Weekend Treat

Finishes in 5-7 hours—perfect for an afternoon of mindful crochet and a little weekend kreativity.

Intermediate Level

This pattern suits intermediate crocheters who enjoy tiny detailing and a multi-part project. It uses magic ring starts, color changes, wire-stem work, and careful seaming to create a sweet bouquet-filled basket. The techniques are well within reach for makers who have practiced basic increases and working in the round, with the reward of a cohesive, display-ready piece at the finish.

A compact two-part crochet project that pairs a sturdy woven-style basket with a bouquet of tiny crocheted flowers. The piece begins with a foundation chain and builds upward in rounds to form a snug container, then presents a hand-assembled bouquet that nests inside. When stuffed and neatly seamed, the display piece sits happily on a desk or windowsill.

The color options range from spring pastels to rich earthy tones, letting you tailor the bouquet to any season or room. The finished piece makes a thoughtful desk accent or a lightweight, handmade gift that travels well and holds its shape with careful stuffing.

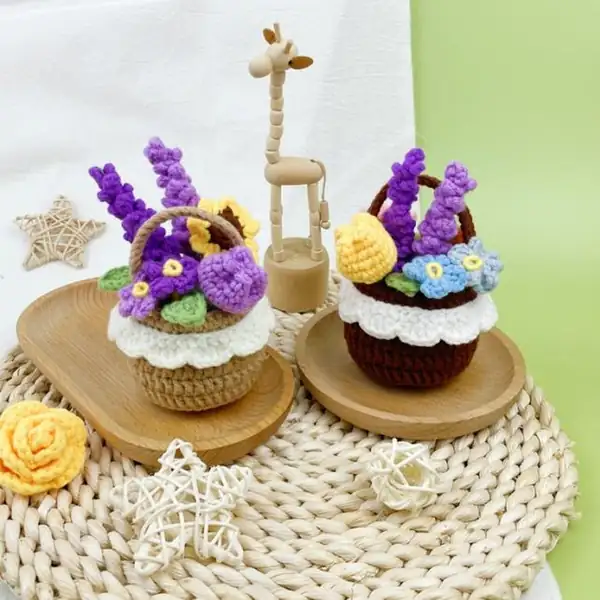
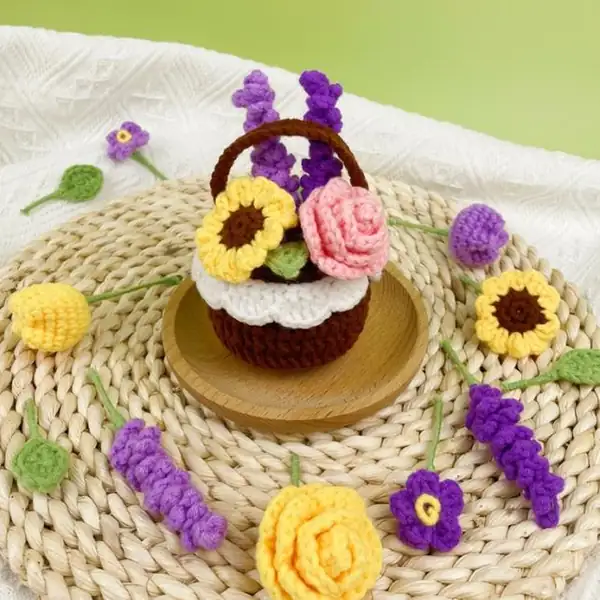
About This Mini Flower Basket & Flowers Pattern

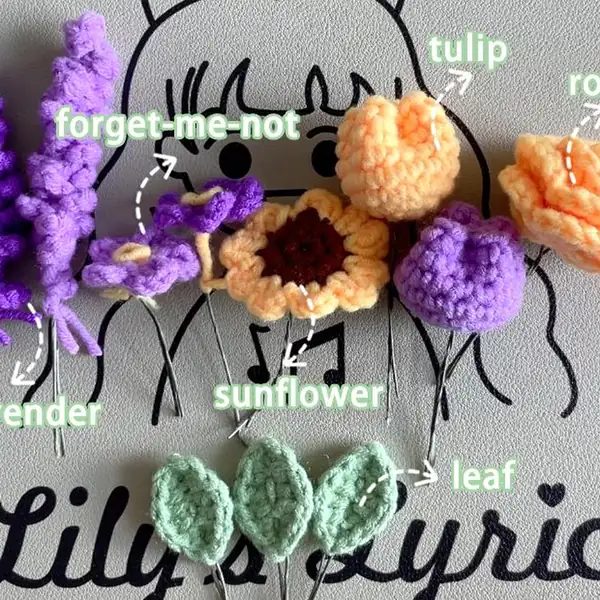
The Mini Flower Basket & Flowers pattern divides the project into three components that are crocheted separately and then joined with a neat seam. The basket portion consists of a Cover, a Lace rim, and a Body that create a compact, lattice-like container with a decorative edge. The flowers are individual motifs: tiny leaves, small blossoms, and a handful of bloom shapes that resemble a garden filled with variety. Each flower motif includes shaping steps to form petals or leaves, and a minimal wire insertion helps the stems hold a natural bend without compromising the stitches.

Assembly is deliberate but straightforward: the three basket sections are joined to create a cohesive container, and the bouquet motifs are arranged inside with careful placement so the final bouquet reads as a balanced cluster rather than a random assortment. A starting tail is used to begin the basket pieces, followed by a foundation chain that establishes the base diameter. The body grows in rounds, maintaining a consistent gauge so the finished opening fits the bouquet snugly. The rim is crocheted in a lace-like edge that adds a touch of elegance without requiring any specialized stitches beyond what a typical crocheter would use for a finishing round. The stems are anchored with a subtle wire system that keeps them poseable and helps maintain the bouquet’s shape over time. The entire project is designed to be completed in stages, with all flowers created first, then the basket sections, and finally the assembly. This approach keeps the project approachable while still feeling cohesive and satisfying when the bouquet is finally nestled into the basket.

Close-up of woven basket edge and lace detail for the mini bouquet

Working this pattern teaches you to coordinate multiple components into a single, decorative display. You’ll practice working in the round with small rounds for the basket base, create decorative edges around the opening, and shape tiny petals and leaves for the floral motifs. The instructions emphasize maintaining consistent stitch tension to keep the basket lining and the outer shell even, aligning petals so they look natural, and anchoring flowers with subtle stems that bend when posed. The pattern also introduces careful seam alignment, which helps the final display read as a unified piece rather than several separate elements. It’s a gentle step beyond simple motifs, offering enough variety to stay engaging while remaining accessible for someone who loves a weekend project. The overall effect is a miniature garden that looks complete on first glance, yet rewards close inspection with the attention to detail that comes from combining several crocheted elements into one scene. The approach encourages planning ahead for color changes and placement, which makes the finishing process feel deliberate and satisfying rather than rushed.

Stitches & Skills You'll Use

Key techniques in this pattern include working in the round from a foundation chain, using a magic ring to start the central hub of the basket, and performing consistent increases to maintain a smooth, evenly shaped opening. The basket body and base rely on basic stitches—primarily single crochet and half double crochet—to build a sturdy structure, while the lace rim uses a simple sequence of chain stitches and slip stitches around the edge to create an airy, decorative finish. The flowers are crocheted motifs with standard shaping steps that form petals and leaves. If you choose to wire the stems, you’ll insert a fine, pliable wire through a prepared channel in the flower motif and then secure it with a little extra yarn to keep the wiring invisible from the outside. Finishing includes stuffing the basket evenly so the sides stay straight, then seaming the components with a clean, invisible join that hides the seam line from view. Throughout, you’ll keep tension steady to ensure the basket opening remains consistently circular, which is crucial for the bouquet to fit snugly and sit upright. The project emphasizes precise color changes to keep blooms distinct and the overall composition balanced, a practical exercise in planning your color workflow before you begin the assembly sequence.

Why You'll Love This Mini Flower Basket & Flowers Pattern

I appreciate how this pattern blends whimsy with craft-skill progression in a way that remains within reach for many crocheters while delivering a highly satisfying result. The moment the basket begins to form and the flowers take on tiny petals with bendable stems is especially rewarding. The bouquet’s color story can be tailored to any mood—pastel springtime, bold tropical tones, or muted earthy hues—making it a versatile gift or decor piece. The rounds provide a calm, rhythmic flow that many crocheters find meditative, and the finishing touches—such as securing stems and weaving in ends—produce a sense of professional polish. The project culminates in a compact display that feels like a miniature garden, ready to be gifted or showcased with pride.

Colour & Yarn Inspiration

Color ideas are limited only by your imagination. For a springy vibe, pair mint greens and pale pinks with sunny yellow sunflowers. For a more earthy look, use tan, cream, olive green, and deep burgundy for a rustic bouquet. You can also experiment with variegated yarns for a soft, painterly effect on both the basket and the flowers.

Substituting different hues can change the mood dramatically: cool blues and purples evoke a calm, oceanic feel; warm corals and yellows radiate sunshine and cheer. If you’re making this as a gift, consider the recipient’s room colors or favorite flowers to tailor the bouquet precisely to their taste. The key is to balance the basket’s neutral base with the bright accents of the flowers, creating a cohesive, charming display that remains versatile as decor over time.

Finished bouquet with basket in a cute display

Switch Things Up

I love how this pattern invites customization. Start by swapping basket colors to match a room’s palette, or create a seasonal bouquet using different flower hues. You can adjust the number of flowers to fit the basket’s opening, or add a tiny fabric ribbon for a final charming touch.

If you want a sturdier display, you can reinforce the base with a slightly firmer stitch density or add a lightweight stabilizer inside the basket before weaving the last rounds. For a more delicate look, choose a lighter yarn and a finer gauge for a daintier silhouette.

Try different facial features or tiny felt accessories to give your bouquet personality; embroidered accents on the petals can be a whimsical detail for kids’ rooms. You can also experiment with different stems—curled, straight, or even wired with flexible joints—to achieve a varied bouquet dynamic.

To keep projects moving, prepare your components in stages: complete all flowers first, then work on the basket sections, and finally assemble. If you plan to gift this, consider attaching a small hand-written note tucked under the handle for a personal touch.

Wire length, color of stems, and petal shapes can all be tweaked to create a unique collection. The joy lies in playing with texture, color, and scale while preserving the charm of the miniature garden. The result is not only a delightful display but also a testament to patience and imagination in crochet artistry.

Ways to Use & Gift It

This Mini Flower Basket makes a thoughtful gift for teachers, new homeowners, or a friend who loves fresh blooms but doesn’t have a garden. It’s compact enough to sit on a desk or windowsill, serving as an ever-present reminder of handmade care.

As a gift, it’s perfect for housewarming or birthday celebrations. You can customize the colorway to reflect the recipient’s favorite hues and include a small note about the bouquet’s flowers. The basket is sturdy enough to hold small trinkets or candy, turning it into a charming little present that doubles as decor. It’s a sweet, whimsical piece that will brighten any space without requiring significant maintenance. You’ll be gifting more than a crocheted item—you’ll be sharing the joy of a handmade garden in miniature.

Common Mistakes & How to Fix Them

Common missteps include using a basket opening that is too loose for the planned bouquet, which makes the display wobble. To avoid this, check your gauge at the base and adjust your foundation chain and starting rounds to match the intended opening diameter.

Allowing stuffing to pile unevenly can create a bulge on one side of the basket. When stuffing, distribute evenly and press gently from the outside to achieve a uniform shape before joining the pieces.

Inconsistent tension during color changes can produce abrupt transitions. Plan your color-change sequence in advance and keep a steady hand as you switch hues, using joins that sit neatly along the inside of the rim for a clean finish.

When wiring stems, failing to hide the wire can leave a metallic line visible through the petals. Wrap the wire with yarn and place it within the core of the flower motif to keep the outer surface smooth.

Seaming too tightly can distort the basket’s opening. Use a gentle, nearly invisible seam and align edges with a light touch to preserve the round shape of the top edge.

Maker's Notes

During testing, a 3.0 mm hook with DK-weight yarn was used for the basket and #2 yarn for the flowers. The project typically takes around 6 hours when split across two sessions. Beginners often struggle with keeping the basket opening consistent as rounds expand; placing a few markers at key intervals helps maintain symmetry. Wiring the flower stems requires patience: wrap the wire with a small length of yarn to hide the metal as you slide it through the final petals. Allowing the bouquet to dry a bit between assembly and final placement helps the stems hold their shape. The lace edge proved to be the most challenging segment for some testers, so take time to maintain even stitches and a tidy edge for a refined finish.

I tried a substitution: I substituted DK-weight cotton for the main basket yarn and used a 3.5 mm hook. This increased the basket height by about 1 cm and loosened the texture slightly, which can give a more relaxed silhouette. The flowers held their shape, but the stems required extra wire to stay upright. When switching to a lighter 4-ply yarn for the flowers and keeping the 3.0 mm hook, the petal edges defined more crisply, though the bouquet appeared slightly smaller overall. In each case, stuffing density and seam alignment were adjusted to preserve the bouquet’s overall balance. The key takeaway is to test a small 4-6 round swatch before starting the basket to ensure the stitch count and gauge align with your chosen materials. This helps avoid ending up with a final size that doesn’t fit your bouquet and basket together.

Mini Flower Basket & Flowers Pattern

Download this free crochet pattern for the Mini Flower Basket & Flowers. Includes materials, assembly tips, and complete round-by-round instructions to create a charming home decor piece.

Intermediate 5-7 Hours
Pattern at a glance
Skill level
Intermediate
Time to make
5-7 Hours
Hook size
3.0 mm (C/2)
Yarn weight
DK / #3
Finished size
Approx. 9 cm tall / 3.5 in
Gauge
Not critical; approximately 6 dc in 4 cm square using 3.0 mm hook
Yarn used
Basket yarn total: 120-180 g; Flower yarn total: 60-100 g; Total main-color usage approximately 180-280 g

Materials Needed

Main Fabric
  • 01
    Lace yarn in your chosen colours
Tools Required
  • 01
    3.0 mm crochet hook
  • 02
    Stitch markers
  • 03
    Yarn needle
  • 04
    Fibrefill stuffing
  • 05
    Scissors
  • 06
    Safety eyes (optional)

— Closing :

Round 2: Abbreviation ch chain st stitch ss slip stitch sc single crochet hdc half double crochet dc double crochet inc increase dec decrease flo front loop only blo back loop only sk skip (…) work all stitches in the same stitch x[…] repeat instructions in brackets x times turn Turn the work around and work back into the stitches in the opposite direction. (put wire on) Put wire on at the beginning of a round and crochet with wire for this round. Step-by-step picture tutorial of (put wire on)

— Hand :

Round 1: After inserting the hook into the first stitch, put the wire on the hook and under the working yarn.
Round 2: Yarn over and pull through the stitch, and the wire will be caught by yarn. 3. Crochet with wire for this whole round. * You may temporarily bend the extra wire down, so your hand won’t be bothered.

— Basket Cover :

Round 1: 14dc in magic loop 14st;
Round 2: 14dc inc 28st;
Round 3: 14[dc, dc inc] 42st - Basket Lace 3.0mm hook | #3 yarn;

— Body :

Round 1: 45ch, 44sc, turn 44st;
Round 2: 11[ch, dc, dc inc, dc, ch, ss] 66st - Basket Body 3.0mm hook | #3 yarn;

— Basket Lace :

Round 1: 14dc in magic loop 14st;
Round 2: 14dc inc 28st;
Round 3: 14[dc, dc inc] 42st;
Round 4: 42dc blo 42st;
Round 5: 21[dc, dc flo] 42st Sew the basket lace on the edge of Round 8 before starting Round 9.
Round 6: 21[dc, dc flo] 42st Sew the basket lace on the edge of Round 8 before starting Round 9.
Round 7: 21[dc, dc flo] 42st Sew the basket lace on the edge of Round 8 before starting Round 9.
Round 8: 21[dc, dc flo] 42st Sew the basket lace on the edge of Round 8 before starting Round 9.
Round 9: 42sc 42st Crochet the basket cover and the body together while crocheting Round 9, or sew them together after you finish Round 9. Stuffing the basket body halfway through sewing.

— Leaf :

Round 1: 32ch, (put wire on) 31sc 31st - Mini Leaf 2.0mm hook | #2 Green yarn;

— Basket Body :

Round 1: 7ch, (put wire on) sc, hdc, 2dc, hdc, (3sc), hdc, 2dc, hdc, sc 13st - Mini Lavender 2.0mm hook | #2 yarn;

— Basket Handle :

Round 1: 26ch, 10[sc, 3ch, ss-in the 3rd ch], 10[sc, 4ch, ss-in the 4th ch], 5[sc, 5ch, ss-in the 5th ch] Wrap the fabric around a wire with the right side facing out. - Mini Forget-Met-Not 2.0mm hook | #2 yarn;

— Flower :

Round 1: 5[3ch, dc, 3ch, ss] in magic loop Make a stamen 1. Wrap yarn around a wire about 1cm. 2. Bend it into a circle. 3. Insert the wire into the center of the flower.

— Mini Leaf :

Round 1: 6sc in magic loop 6st;
Round 2: 6inc 12st Make one each with brown and green yarn.
Round 3: 11[(3ch, dc, 3ch), ss] Make the 2 round pieces’ wrong sides facing each other, work into any 2 parallel stitches of them, and crochet Round 3 with yellow yarn. Insert a wire in the center of the flower. - Mini Rose 2.0mm hook | #2 yarn;

— Mini Lavender :

Round 1: 28ch, work into the 4th chain-12[(3dc), ch, sk], (3dc), turn 51st;
Round 2: 13[ch, dc, dc inc, dc, ch, ss] 78st Roll the fabric into the shape of a rose, and keep it in shape by sewing. Insert a wire in the center of the flower.

— Mini Forget-Met-Not :

Round 1: 6sc in magic loop 6st;
Round 2: 6inc 12st;
Round 3: 6[sc, inc] 18st;
Round 4: 18sc 18st Leave some yarn and sew a cross on the last round. Insert a wire in the center of the flower.
Round 5: 18sc 18st Leave some yarn and sew a cross on the last round. Insert a wire in the center of the flower.
Round 6: 18sc 18st Leave some yarn and sew a cross on the last round. Insert a wire in the center of the flower.
Round 7: 18sc 18st Leave some yarn and sew a cross on the last round. Insert a wire in the center of the flower.
Round 8: 18sc 18st Leave some yarn and sew a cross on the last round. Insert a wire in the center of the flower.

Assembly Instructions

  1. Stuff each piece firmly before closing.
  2. Pin all parts in place and check the proportions against the photos.
  3. Sew parts on securely with matching yarn.
  4. Weave in all ends and shape the finished piece.

Important Notes

  • Work in a continuous spiral unless a round says otherwise.
  • Stitch counts are given at the end of each round — check them as you go.
  • Stuff firmly and evenly for a smooth finish.
  • Use a stitch marker to track the beginning of each round.

This little bouquet basket is a dream for any crocheter who loves tiny details and charming home decor. It’s a warm, thoughtful project that yields a playful yet refined result. May your weekend be filled with yarn and creativity.

Good to know

You ask, we answer

The finished basket is compact, measuring roughly 8-9 cm tall with a similar width, designed for a small desk display or shelf bouquet.

Yes, but changing weight will influence the final size and appearance. Use an appropriate hook to maintain stitch definition and achieve a silhouette similar to the original.

This pattern is rated Intermediate; familiarity with a magic ring, color changes, basic increases/decreases, and simple assembly is helpful.

Most crocheters finish in about 5-7 hours, depending on experience and how meticulously you position and wire the stems for poseable flowers.

Yes—wrap the wire with a small length of yarn before inserting it into the stem rounds, and keep the wire straight during construction to avoid distorting stitches.

Absolutely. You can crochet additional flower motifs in similar sizes and arrange them around the basket rim, balancing the overall composition with the existing placement.

Assorted crocheted flowers including forget-me-nots and tulips
Join 100k+ crocheters

Get new free patterns, stitch tips and exclusive content in your inbox.