Crochetologist
Free Crochet Pattern
Beautiful Detailed Adorable

Mini Baby Doll Amigurumi Pattern

Close-up of skin-tone head of amigurumi baby doll
4.8Rating
12-15 HoursTime
IntermediateSkill
Highlights

What makes it special

Made with Love

An adorable friend to cherish, handcrafted with love to bring comfort and joy for years to come.

Multi-Day Project

An immersive project that unfolds across several sessions, blending tiny parts into a cuddly baby doll with expressive eyes and soft, poseable limbs.

Intermediate Level

This pattern suits crocheters who already work in the round and want to practice tiny detailing, including the magic ring, increases and decreases for shaping, color changes, careful seaming, and expressive facial features. It is accessible to crafters who have completed simple amigurumi projects and want to refine precision in small parts, while remaining forgiving for those building confidence with tight, consistent tension. The instructions emphasize steady progress, careful counting, and methodical assembly to produce a durable, charming figure that can be posed and cherished without requiring advanced or exotic stitches.

Small in scale, mighty in charm, this palm-sized amigurumi doll arrives as a keepsake you can cradle in one hand and still place on a shelf. The project unfolds like a tiny biography: a beginning circle, careful shaping of limbs, and a final set of seams that vanish into the body. It is designed for crocheters who enjoy precision in tiny parts, meticulous finishing, and a soft, portable reward at the end of each session.

The journey from yarn choices to final pose involves measured steps, a calm rhythm, and a sense of quiet accomplishment that grows with every completed piece. This pattern invites patience and steady practice, turning simple yarn into a character with personality and warmth.

About This Mini Baby Doll Amigurumi Pattern

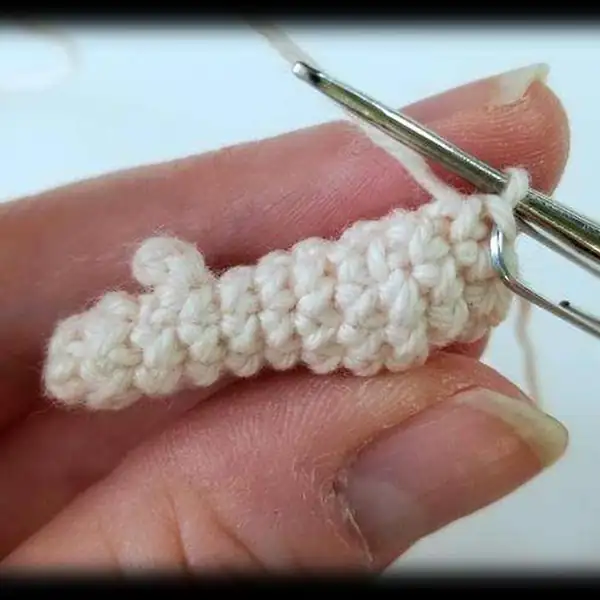
This palm-sized amigurumi doll begins as a single, portable idea and grows into a cuddly companion you can carry anywhere. The design emphasizes clean lines, balanced proportions, and a gentle silhouette that remains friendly and approachable for all ages. Each limb is crocheted separately, then joined to a torso in a thoughtful sequence that minimizes bulk at the joins while preserving durability.

The head is built with round, even increments to maintain a soft curvature, and the body is shaped with careful increases and decreases to create a natural stance. Finishing relies on snug stuffing that keeps form without stiffness, and secure seams that fuse parts into a single piece rather than a collection of detached elements. Facial features are scaled to the doll’s size and placed with precision to convey a calm, curious expression rather than a dramatic gesture.

Eye placement is deliberate, with spacing calibrated to maintain symmetry and a gentle gaze. Color changes for clothing or shading are integrated into the surface so transitions read as natural rather than abrupt blocks. The pattern stresses a measured pace: work a section, check shape, adjust tension if needed, and move on to the next piece.

The final seam work is designed to be as invisible as possible, with joining threads tucked away and ends woven in along the contours to minimize bulk. The result is a compact, poseable friend whose limbs hold a gentle pose without sagging, a figure small enough to travel in a tote yet sturdy enough to stand on a small shelf. The project is not a one-night sprint but a sequence of deliberate steps that reward careful counting, accurate placement, and steady, consistent stitching.

Materials are kept approachable: a soft fingering-weight yarn, a slim hook, a selection of safety eyes or embroidery options, and a starting tail long enough to anchor each piece securely. The finished doll serves as a keepsake for a child or a thoughtful gift for a friend or family member, turning a simple yarn object into a memory you can hold and cherish.

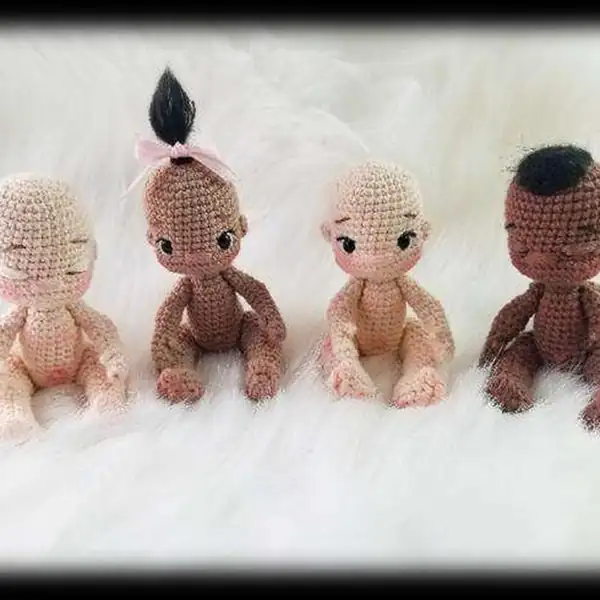
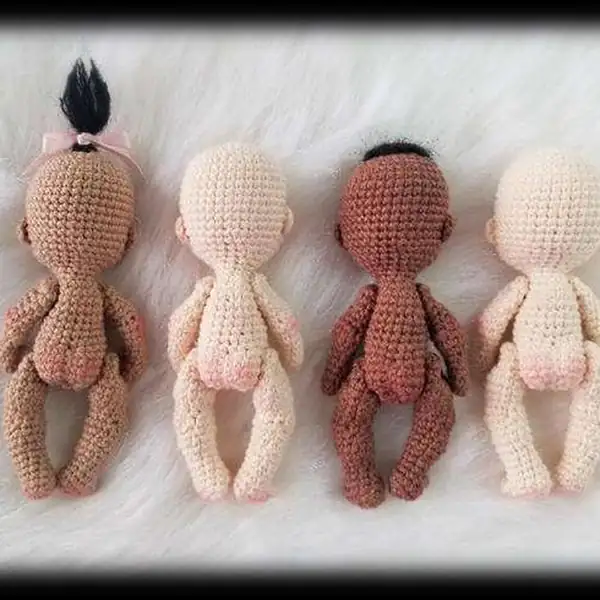
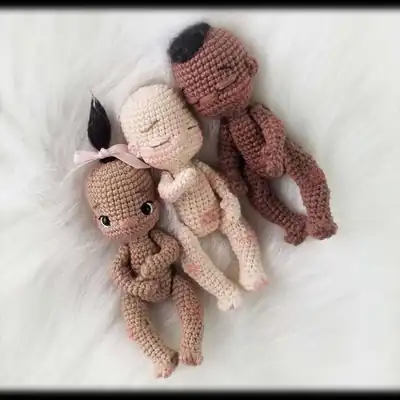
This pattern guides you to build a complete baby doll from several crocheted parts that are joined as you go, resulting in a cohesive, cuddly character. Work is conducted in the round from a starting circle, with a magic ring establishing a firm center for the head and limbs. Color changes are introduced in small, controlled segments to reflect skin tone or clothing accents without creating bulky transitions.

Increases and decreases are applied with intention to sculpt the head, torso, and limbs, and the finish relies on careful stuffing and secure seams to keep the figure solid and smooth. Each section is designed to be worked as a standalone unit before joining, allowing you to pause, admire progress, and return with fresh eyes. The assembly sequence minimizes visible seams by sewing from the inside out and aligning joints with the body’s natural curves.

Facial features are added with measured placement and a gentle touch, so the expression remains soft and welcoming. Hair is kept understated or styled in a simple way that complements the face, preserving the doll’s calm, friendly aesthetic. The pattern emphasizes consistency: check stitch counts, use markers to track rounds, and verify symmetry before moving to the next piece.

A starting tail must be secured and woven in as part of the finishing; this helps anchor each part and reduces wobble at the joints. The instructions are written to be clear and repeatable, so crocheters who have practiced the basics can produce a tidy, proportional doll without needing advanced or exotic techniques. You will be guided through each major step—head creation, torso shaping, limb forming, facial detailing, and final assembly—so the journey remains logical and achievable rather than rushed or opaque.

The overall aim is a knit-free, crocheted companion that balances charm with practicality, ensuring you can recreate the same soft, approachable character every time.

Open eyes option with facial detailing in progress

Progress comes in gentle steps and thoughtful assembly, so you can admire the doll taking shape as you sew on ears and limbs. Color accents and tiny accessories add personality without overpowering the simple form. The pattern emphasizes accurate placement: eyes, mouth, and blush lines should be spaced consistently to maintain a pleasant facial proportion.

Limbs are formed to be proportionate to the torso and head, with shaping that yields a natural, approachable posture. Joining seams are executed with careful alignment to avoid skewing the doll’s stance, and the head remains well-supported during this phase to prevent flattening of facial regions. After the major pieces are joined, you can add a few optional touches—tiny hats, scarves, or a blanket—that scale with the doll without crowding its silhouette.

When you decide to add hair, a small cap or fringe made from light yarn can be anchored gently to the head so it stays in place during play. The finishing steps include final stuffing adjustments, securing the starting tails, and weaving in any loose ends along the interior curves to ensure nothing interferes with the doll’s smooth exterior. The overall approach remains calm and methodical, encouraging you to work at a comfortable pace and pause to check alignment and proportion before proceeding.

Optional accessories are designed to complement the character rather than overpower it, allowing you to customize the doll’s wardrobe and scene without altering the fundamental crochet technique. The pattern remains accessible to crocheters who enjoy building small, detailed figures in stages, using standard stitches and straightforward joining methods that yield durable, charming results.

Stitches & Skills You'll Use

The most impactful factor in a polished amigurumi is how the pieces connect and hold their shape. Mark rounds at regular intervals to prevent drift, then count stitches meticulously before proceeding to increases or decreases. When the neck or shoulder areas are stitched, maintain even tension to avoid bulges or sag.

Use a simple, clean seam technique to join limbs to the torso—align edges precisely, then sew in small, tight passes that pull the fabric together without creating visible lines. Place eyes or embroidered features with exact spacing to preserve symmetry; measure twice, place once. Stuffing should be firm but pliable, with attention paid to the cheeks and crown so the face remains rounded and not flat.

Secure the starting tails as part of the interior to reduce bulk and keep the exterior smooth. If you choose to embroider facial features, use a fine needle and short stitches to prevent thick lines that overwhelm the tiny face. The end result is a calm, well-proportioned figure whose joints hold their pose and whose surface reads as a single, crocheted fabric rather than a collection of separate pieces.

Why You'll Love This Mini Baby Doll Amigurumi Pattern

The pattern rewards careful planning and patient execution, harnessing small details to create a larger, heartfelt result. The process invites you to customize skin tones and facial expressions to craft a unique friend for any story. The sequence—from shaping the head to forming the limbs and finally joining everything—reads like assembling a tiny narrative, with each piece contributing to a coherent character.

The doll’s gentle pose and soft features encourage pride in the care invested during every stage, turning a simple crochet project into a meaningful keepsake. By focusing on the basics—rounds, shaping with increases and decreases, secure seaming, and simple facial detailing—the pattern emphasizes achievable goals and steady progress rather than rapid completion. This approach makes the finished piece approachable for newcomers while still offering enough nuance for experienced crocheters seeking a disciplined, repeatable workflow.

The result is a poseable, cuddly companion whose personality emerges from careful color decisions, measured stitches, and thoughtful assembly, turning a set of components into a single, emotive character that can travel, cuddle, and comfort.

Colour & Yarn Inspiration

Begin with a soft skin-tone palette and add gentle blush with a tiny amount of pink; for a playful look, pair a peach skin tone with pastel clothing colors.

Experiment with hair accents in mohair or a contrasting color for a pop—think dark brown, black, or even silver for a whimsical touch. Substituting fingering yarn with sport or DK can alter the doll’s scale and feel, so adjust the hook size accordingly for best results.

Finished baby doll with tiny accessories

Switch Things Up

Customizing skin tones and hair opens a world of variation: choose yarn colors to reflect a different heritage or vibe.

Eye styling options range from safety eyes to embroidered details, with placement adjusted to convey different expressions.

Varying yarn weight changes scale and feel; adjust hook size and proportions accordingly.

Wiring or stiffening options can be explored for poseability, but keep the effect subtle to preserve the doll’s soft look.

Tiny outfits and accessories can be added later to tell a story and showcase character without overwhelming the silhouette.

Ways to Use & Gift It

Gift the finished baby doll as a cherished keepsake for a new parent or grandchild, tucked into a tiny tote or nursery shelf for daily smiles.

Common Mistakes & How to Fix Them

Skipping stitch markers when color changes are involved can lead to misaligned rounds and uneven seams. Overstuffing the limbs or head can cause distortion in shape and stiffness that hinders posing. Not weaving in ends as you go tends to create a tedious finishing session with visible loose threads. Neglecting to check gauge or stitch counts mid-way can result in mismatched piece sizes that interrupt symmetry. Seams sewn with uneven tension may create visible lines and bulk where parts meet. Placing eyes too close or too far apart disrupts facial balance and expression. Ignoring the starting tail or failing to anchor it securely can allow parts to shift over time. Rushing through the final assembly without verifying alignment leads to a lopsided pose or gaps at joins.

Maker's Notes

Using fingering yarn with a 1.5 mm hook yields a doll that stands about 12.5 cm tall. Accurate eye placement and neat seam lines dramatically improve expression. Beginners often struggle with invisible decreases near the neck; mark the first stitch and count carefully as rounds progress.

The head rounds demand steady stuffing to maintain facial volume and prevent flattening. Safety eyes require careful alignment; if embroidery is chosen, a finer needle reduces bulky lines. Planning color changes ahead helps maintain smooth transitions on the face and limbs.

To keep the surface smooth, weave ends in as you go, rather than letting them accumulate at the end. Gauge checks at key intervals prevent mismatched piece sizes, ensuring the final doll looks balanced.

I tried a substitution: I swapped fingering yarn for a light DK with a 2.0 mm hook on one test, and the result grew to roughly 9 cm taller with a softer texture. Proportion adjustments were necessary to maintain balance in the neck and limb segments. The final piece appeared more elongated than the original; to compensate, reduced stuffing toward the end and tightened the final rounds. The substitution demonstrated how yarn weight and hook size dramatically influence silhouette and stiffness, underscoring the importance of recalibrating the proportions when changing materials. Despite the change, the doll remained approachable and cuddly, proving the method is robust across common yarn families once gauge is maintained.

Mini Baby Doll Amigurumi Pattern

Download this free crochet pattern to make a tiny baby doll amigurumi. Clear rounds, materials, and assembly tips. Start crocheting today!

Intermediate 12-15 Hours
Pattern at a glance
Skill level
Intermediate
Time to make
12-15 Hours
Hook size
1.5 mm (A)
Yarn weight
Fingering / #1
Finished size
Approx. 12.5 cm / 5 in tall
Gauge
Gauge not critical; use tight fabric; 6 sc in 2 in with 1.5 mm hook as reference
Yarn used
Main color 30 g (approx 120 m); accent colors 10 g total

Materials Needed

Main Fabric
  • 01
    Fingering weight yarn (#1), in skin-tone colors
  • 02
    Small amounts of Mohair (optional for hair)
  • 03
    Color accents for clothing and features
Tools Required
  • 01
    Crochet hook size 1.5 mm (A)
  • 02
    Yarn needle for sewing
  • 03
    Stitch markers
  • 04
    Polyester stuffing
  • 05
    Pins for assembly

— Part 1 :

Round 1: 6 sc in mr (6)
Round 2: (INC) x6 (12)
Round 3: (1sc, INC) x6 (18)
Round 4: (1sc, INC, 1sc) x6 (24)
Round 5: (3sc, INC) x6 (30)
Round 6: (2sc, INC, 2sc) x6 (36)
Round 7: 36sc;
Round 8: 36sc;
Round 9: 36sc;
Round 10: 36sc;
Round 11: 36sc;
Round 12: 36sc;
Round 13: 8sc, inv DEC, 16sc, inv DEC, 8sc (34)
Round 14: 10sc, (INC) x5, 4sc, (INC) x5, 10sc;
Round 15: 2sc, inv DEC, 36sc, inv DEC, 2sc (42)
Round 16: 7sc, inv DEC, 24sc, inv DEC, 7sc (40)
Round 17: (inv DEC, 4sc) x6, inv DEC, 2sc (33)
Round 18: (inv DEC, 2sc) x7, inv DEC, 3sc (25)
Round 19: (1sc, inv DEC) x8, 1sc (17)
Round 20: (inv DEC, 1sc) x5, 2sc (Starting neck)
Round 21: 12sc;
Round 22: 12sc;
Round 23: (INC) x12 (24)
Round 24: 24sc;
Round 25: 24sc;
Round 26: 24sc;
Round 27: 2sc, inv DEC, (4sc, inv DEC) x3, 2sc (20)
Round 28: 20sc;
Round 29: 20sc;
Round 30: 2sc, INC, (4sc, INC) x3, 2sc (24)
Round 31: 23sc, INC (25)
Round 32: INC, 1sc, (INC) x2, 21sc (28)
Round 33: 28sc;
Round 34: 28sc;
Round 35: (2sc, inv DEC) x7 (21)
Round 36: (1sc, inv DEC) x7 (14)
Round 37: (inv DEC) x7 (7)

— Tail :

Round 1: 5sc in mr Do not join. Leave tail and position approximately 2-3sc away from corners of eyes. Sew to head in a LYING FLAT POSITION, sewing down the front half of the ear, keeping rounded side less attached (like a real ear.) Left Leg (Note: Additional Photo Tutorial for Rnds 1-4 on pgs. 18-20) Start with Ch 5;

— Part 3 :

Round 1: Starting in 2nd ch from hook, 2sc, INC, 3sc in next ch (across end of row of chains), (now working opposite side) 2sc, INC (11)
Round 2: 5sc in next st, 9sc, 1slst (Note: heel will start to form) (15)
Round 3: Note: place a marker in the back loops of each of the next 2 stitches you will be working into (these are stitches from the previous round), to make finding them easier in the next step, [FLO – (1hdc, 1slst) in next stitch] x2, Bobble stitch, 1sc* (tacks down the bobble), 9sc, inv DEC (16)
Round 4: (Skipping toes and working on the inside of the foot) (1sc in next marked back loop) x2, 1sc (working into stitch just past the bobble), 1sc, inv DEC, 7sc (12)
Round 5: (inv DEC) x2, 8sc (10)
Round 6: inv DEC, 8sc (9)
Round 7: 4sc, INC, 4sc (10)
Round 8: 6sc, INC, 3sc (11)
Round 9: 5sc, INC, 5sc (12)
Round 10: 4sc, INC, 2sc, inv DEC, 1sc, inv DEC (11)
Round 11: 4sc, BLO – (5sc), 2sc (11)
Round 12: (INC) x2, 2sc, 5slst, 2sc (13)
Round 13: 6sc, 5sc in front loops from Rnd 11 (from BLO sts), 2sc (back on current row) (Fig. 28;

— Part 4 :

Round 29: (13)

— Part 5 :

Round 14: 1sc, (inv DEC) x2, 3sc, inv DEC, 3sc (10)
Round 15: 1sc, INC, 5sc, INC, 2sc (12)
Round 16: 7sc, INC, 1sc, INC, 2sc (14)
Round 17: INC, 3sc, INC, 9sc (16)
Round 18: 16sc;
Round 19: 16sc;
Round 20: (2sc, inv DEC) x4 (12)
Round 21: (1sc, inv DEC) x4 (8)

— Part 6 :

Round 36: Leave a long tail and set aside. Fig. 27 Fig. 28 Fig. 29 Fig. 30 Fig. 31 Fig. 32 Fig. 33 Fig. 34 Curve of the leg from Front View Leg bend Fig. 35 Fig. 36 First sc in front loops of lower row;

— Part 7 :

Round 1: Starting 2nd ch from hook, 2sc, INC 3sc in next ch (across end of row of chains)
Round 6: (now working opposite side) 2sc, INC (11)

— Part 8 :

Round 2: 5sc in next st 9sc, 1 slst (15)
Round 9: [FLO – (1hdc, 1slst) in next st] x2 (Showing back side with yarn markers in the 2 back loops)

— Closing :

Round 18: Start Bobble stitch (five loops on hook) (see pg. 15) Bobble stitch (continued), (yarn over and pull through all five loops) Bending the bobble stitch over Start 1sc (poke tip of hook into next st, yarn under and pull up a loop) Finish 1sc (pull the sc tight behind the bobble, tacking it down in place) 9sc, inv DEC (16)

— Part 10 :

Round 4: You will now work into the 2 marked exposed back loops 1sc in first exposed back loop (now remove marker) 1sc in second exposed back loop (now remove marker)

— Part 11 :

Round 1: Starting in 2nd ch from hook, 2sc, INC, 3sc in next ch (across end of row of chains), (now working opposite side) 1sc, INC, 5sc in next ch (original starting chain) (15)

— Part 12 :

Round 22: 1sc (working into stitch just past the bobble) (Continuing around the outside of the foot) 1sc, inv DEC 7sc (12)

— Part 13 :

Round 2: 11sc, bobble stitch (see pg. 15), 1sc (tacks down the bobble), Note: place a marker in the back loops of each of the next 2 stitches you will be working into (these are stitches from the previous round), to make finding them easier in the next step, [FLO - (1hdc, 1slst) in next stitch] x2 (17)
Round 3: 1slst, 7sc, inv DEC, 2sc, (skipping toes and working on the inside of the foot) (1sc in next marked back loop) x2 (Note: Rnd 3 ends here) (13)
Round 4: skip next st*, 8sc, (inv DEC) x2 (10)
Round 5: 8sc, inv DEC (9)
Round 6: 4sc, INC, 4sc (10)
Round 7: 3sc, INC, 6sc (11)
Round 8: 5sc, INC, 5sc (12)
Round 9: 12sc (12)
Round 10: inv DEC, 1sc, inv DEC, 2sc, INC, 4sc (11)
Round 11: 4sc, BLO – (5sc), 2sc (11)
Round 12: (INC) x2, 2sc, 5slst, 2sc (13)
Round 13: 6sc, 5sc in front loops from Rnd 11 (from BLO sts), 2sc (back on current row) (13)
Round 14: 1sc, (inv DEC) x2, 3sc, inv DEC, 3sc (10)
Round 15: 1sc, INC, 5sc, INC, 2sc (12)
Round 16: 7sc, INC, 1sc, INC, 2sc (14)
Round 17: INC, 3sc, INC, 9sc (16)
Round 18: 16sc (16)
Round 19: 16sc (16)
Round 20: (2sc, inv DEC) x4 (12)
Round 21: (1sc, inv DEC) x4 (8)

— Part 14 :

Round 6: Ch 5;

— Part 15 :

Round 1: Starting 2nd ch from hook, 2sc, INC 3sc in next ch (across end of row of chains) (now working opposite side) 1sc, INC 5sc in next st (15)
Round 2: 11sc;
Round 9: Start Bobble stitch (five loops on hook) (see pg. 15) Bobble stitch (continued), (yarn over and pull through all five loops) Bending the bobble stitch over;
Round 15: Start 1sc (poke tip of hook into next st) (yarn under and pull up a loop) Finish 1sc by pulling the sc tight behind the bobble, tacking it down in place) Place a marker in each of the next 2 back loops, to make finding them easier in the next step [FLO – (1hdc, 1slst) in next st] x2 (17)

— Part 16 :

Round 3: 1 slst;

— Part 17 :

Round 24: 7sc inv DEC, 2sc (ending up right before the bobble) You will now work into the 2 marked exposed back loops (there will be a gap to span, so keep tension consistent) 1sc in first exposed back loop (now remove marker) 1sc in second exposed back loop (now remove marker)

— Part 18 :

Round 3: ends here (13)
Round 4: skip next st (skip first stitch in the round (slst from previous round) based on your marker) First stitch 8sc, inv DEC x2 (10)

— Part 19 :

Round 1: 6sc in mr (6)
Round 2: 6sc;
Round 3: 6sc;
Round 4: (thumb) ch 3, slst in 2nd ch from hook, slst in next ch, (continuing the round) 1 sc in next sc, 5sc (Fig.

— Part 20 :

Round 76: (6)

— Part 21 :

Round 5: sk thumb, 6sc (6)
Round 6: 2sc, INC, 3sc (7)
Round 7: 4sc, INC, 1sc, INC (9)
Round 8: 9sc (9)
Round 9: BLO – (5slst), 4sc (9)
Round 10: 5sc in front loops from Rnd 9 (from BLO sts), 4sc (back on current row) (9)
Round 11: 1sc, inv DEC, 6sc (8)
Round 12: 1sc, INC, 3sc, INC, 2sc (10)
Round 13: 10sc;
Round 14: 10sc;
Round 15: 10sc;

— Part 22 :

Round 1: 6sc in mr;
Round 2: 6sc;
Round 3: 6sc;
Round 4: 2sc, (thumb) ch3, slst in 2nd ch from hook, slst in next ch, 1sc in next sc, 3sc;
Round 5: 2sc, sk thumb, 4sc (6)
Round 6: 2sc, INC, 3sc (7)
Round 7: 4sc, INC, 1sc, INC (9)
Round 8: 9sc (9)
Round 9: BLO – (5slst), 4sc (9)
Round 10: 5sc in front loops from Rnd 9 (from BLO sts), 4sc (back on current row) (9)
Round 11: 1sc, inv DEC, 6sc (8)
Round 12: 1sc, INC, 3sc, INC, 2sc (10)
Round 13: 10sc;
Round 14: 10sc;
Round 15: 10sc;

Assembly Instructions

  1. Attach head to body by inserting the neck portion (rounds 21-25) into the opening at the top of the body, then sew securely using whipstitch.
  2. Position ears on either side of the head between rounds 6-9, angling slightly forward for a natural look, and sew in place.
  3. Sew arms to the sides of the body between rounds 12-14, ensuring symmetry and a gentle downward bend for a child-like pose.
  4. Sew legs to the bottom of the body, spacing them evenly and ensuring they're firmly attached for stability.
  5. Attach hair or mohair accents at the crown, if using, and secure with a few small stitches so they stay in place.

Important Notes

  • Use stitch markers to keep track of your rounds, especially during color changes and shaping sections.
  • Stuff firmly but not too tightly for the best shape and structure—overstuffing can distort your work.
  • Pin all parts in place before sewing to ensure correct positioning and symmetry.
  • Weave in ends as you go to avoid a tedious finishing session at the end.
  • Work with consistent tension throughout for even, professional-looking results.

This tiny doll is more than a toy—it's a wearable, heartfelt keepsake that grows with the child and holds memories stitched into every seam. May your stitches bring warmth to every snuggle and spark joy in your home. May your creativity flourish as you customize colors and accessories for a one-of-a-kind friend. Happy crocheting!

Good to know

You ask, we answer

The finished amigurumi stands about 12.5 cm tall when using fingering weight yarn and a 1.5 mm hook.

Yes, you can use different yarn weights, but this will affect the final size. Use an appropriate hook to achieve a tight, crocheted fabric and check gauge to keep proportions correct.

This pattern is described as intermediate; basic exposure to foundation chain, single crochet in rounds, increases and decreases, and seaming is recommended for best results.

Estimated completion ranges from about 10 to 18 hours, depending on speed and how meticulously you finalize details.

Left leg being crocheted and shaped
Join 100k+ crocheters

Get new free patterns, stitch tips and exclusive content in your inbox.