Crochetologist
Free Crochet Pattern
Beautiful Detailed Adorable

Mike Wazowski Amigurumi Pattern

Front view of finished Mike Wazowski amigurumi in green with layered eye and yellow horns
4.6Rating
2-3 HoursTime
Beginner FriendlySkill
Highlights

What makes it special

Made with Love

An adorable friend to cherish, handcrafted with love to bring comfort and joy for years to come.

Bite-Sized Project

Plan two to three hours to stitch this small stuffed character, including assembly and simple embroidery for the eye detail.

Beginner Friendly Level

Ideal for crocheters learning amigurumi rounds, this pattern uses magic ring, single crochet, increases, decreases, half double crochet and basic seaming to teach shaping and simple color changes.

There is a special joy in crocheting something that looks like a character from a favorite movie but fits in the palm of your hand; this Mike Wazowski amigurumi brings that delight into a compact, cheerful form. It is perfect for makers who want a quick, satisfying project to brighten a desk, shelf, or gift box and for anyone who remembers the grin of a round, single-eyed friend from a beloved story.

This little toy is ideal as a last-minute handmade gift or a thoughtful token for a fan; it also makes a fun practice piece for learning precise shaping and tidy finishing. The process rewards measured motion—short rounds, careful stuffing and a few stitches of embroidery—so you enjoy clear progress every time you pick it up.

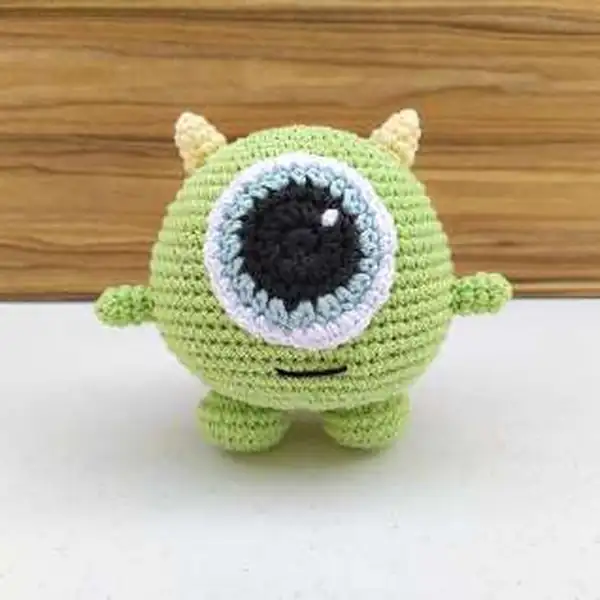
About This Mike Wazowski Amigurumi Pattern

Make a pocket-sized Mike Wazowski amigurumi using 2 mm mercerized cotton thread and a 2.0 mm crochet hook. This pattern creates one rounded body with attached feet, two small feet, two short hands, two yellow horns and a layered eye worked in black, blue and white for the iris and pupil. The design uses single crochet rounds, increases, decreases and a few half double crochet stitches in the eye to shape the pupil and rim.

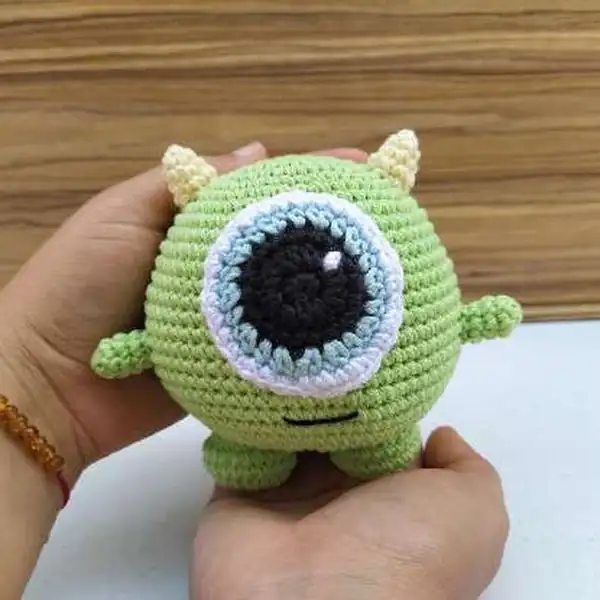
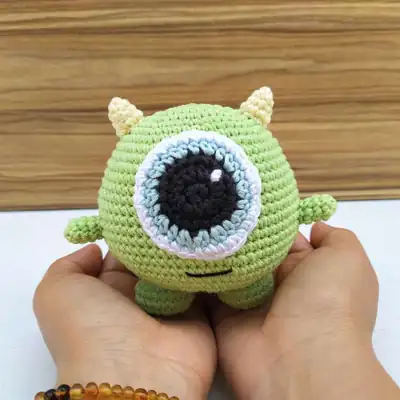
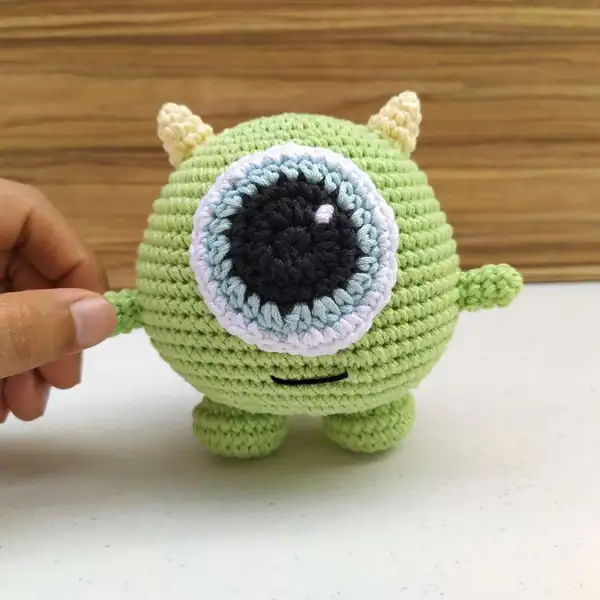
Finished toy measures approximately 11 cm tall when made with the recommended materials and tight amigurumi tension. Instructions are provided round-by-round for the body, feet, hands, horns and eye, plus step-by-step joining and embroidery directions to place the eye and embroider the small mouth detail.

This pattern is written for makers who enjoy working in continuous rounds and shaping a compact, spherical toy through carefully placed increases and decreases. You will work the body as one main piece in spirals, then crochet small separate feet, hands and horns that are sewn into place to create the finished character form. The eye is constructed as a layered round using color changes and a single half double crochet round to create the iris rim, then attached by sewing onto the front of the body starting on a specified round for correct centering. Assembly focuses on placing small parts symmetrically so the face remains balanced; I describe exact joining points and how to hide tails for a tidy finish.

The instructions avoid complicated toy engineering and instead guide you step-by-step through shaping, stuffing and finishing so each stage remains approachable. You will be prompted when to stuff, how firmly to pack the filling to hold the round form without showing through the stitches, and how to close small openings with a wool needle for a neat, durable result. The joining steps use simple whipstitch or ladder sew techniques explained in plain language for confident finishing.

Close-up of layered eye detail on the Mike Wazowski crochet amigurumi showing black pupil and blue rim

Working this pattern gives a steady rhythm of short rounds that build a compact silhouette, which is satisfying and quick to stitch. Detailed notes clarify when to switch colors for the eye and how to position small pieces so the final personality reads clearly from the front.

Stitches & Skills You'll Use

The stitches you will use are straightforward and focused: magic ring to start a tidy center, single crochet for all main shaping, increases to expand rounds, and decreases to close the sphere. The eye includes a half double crochet round to form a slightly raised rim that frames the iris, and color changes in the eye create a layered effect that reads clearly at small scale.

Beginners will work in the round throughout, practicing counting and maintaining even tension so the sphere remains smooth; learning to execute an invisible decrease and secure color changes cleanly will help the toy hold its shape and look professional. Simple seaming skills—whipstitch or ladder stitch—are used to attach feet, hands and horns neatly, and basic embroidery stitches add the mouth and the tiny white highlight in the eye for character.

These skills combine to form a short toolkit for amigurumi work: consistent single crochet tension, confident increases and decreases, clean color changes, and tidy finishing with a wool needle. Each technique is introduced in context so you build one small skill at a time while seeing direct results in the finished toy.

Why You'll Love This Mike Wazowski Amigurumi Pattern

I absolutely love this pattern because it captures a lot of character with very few pieces and I enjoy projects that grow quickly in a single sitting. When I make this toy I feel rewarded by the instant change in shape as increases make a smooth sphere and decreases pull the body into a cute base for the feet. I always smile at how much personality the layered eye adds with just a couple of color rounds and a tiny embroidered highlight.

Sewing the small limbs in place feels meditative to me and the finished size is perfect for gifting or keeping on a shelf as a cheerful accent.

Colour & Yarn Inspiration

Green remains the obvious choice for the main body to keep the character recognizable, but trying a soft mint or lime green thread gives a fresh, modern look while preserving silhouette and charm. The eye contrast depends on clear dark pupil color and lighter concentric rounds, so keep a deep black for the pupil and experiment with sky blue, aqua or pale gray for the iris to change expression subtly without altering stitch counts.

For yarn fiber, mercerized cotton provides a clean stitch definition and slight sheen that highlights the round form; swapping to a cotton-acrylic blend softens the sheen and adds a cushier hand. Use similar-weight threads to keep proportions intact; if you change both fiber and color, do a small test swatch and adjust hook size to maintain the tight amigurumi tension required for stuffing to remain hidden.

Back view of small green Mike Wazowski amigurumi showing horn placement and round body

Switch Things Up

I like to change colors for a softer look by swapping the main green to a pastel mint, which transforms the expression without altering construction.

You can scale the whole pattern by switching yarn weight; a bulkier yarn on a larger hook yields a chunkier, more huggable toy while finer thread creates a delicate miniature.

I often add a loop at the top before finishing to make a keychain version; insert a small metal ring and secure the finishing tail inside the body.

Try embroidering thicker brows or a different mouth shape to give the character an alternate mood and personality through simple stitch changes.

I sometimes stitch on tiny felt patches instead of crocheting the horns for a flatter, appliqued look that is quicker to attach.

For a standing display, reinforce each foot by sewing a small circle of felt inside before attaching so the base becomes more stable on flat surfaces.

Use metallic thread for the eye highlight if you want a shimmering catchlight that shows from different angles without changing rounds.

Make a pair by changing only the iris color to create matching companions with complementary tones for a coordinated set.

I recommend trying a small safety joint if you want poseable arms; insert a short piece of craft wire into the hand before closing to experiment safely.

Combine tiny accessories like a crocheted scarf or a felt badge to personalize gifts and mark special occasions with little, handmade touches.

Ways to Use & Gift It

This compact Mike Wazowski amigurumi makes a charming stocking stuffer, a cute desk companion for a coworker, or a small birthday gift for a friend who loves animated characters. Because the finished toy is under about 11 cm tall, it fits in gift boxes and can be tucked into lunch bags or suitcase pockets as a travel companion, and two or three in different eye colors become a playful set for a child’s shelf display.

For special occasions, consider pairing the amigurumi with a handwritten note or a tiny handcrafted accessory such as a crocheted scarf or miniature felt badge; the personalization makes the present feel uniquely handmade. If you make several, wrap each in tissue and ribbon for party favors or use them as charming additions to a themed gift basket for a movie night or a fan’s collection.

Common Mistakes & How to Fix Them

Skipping the magic ring tightening step makes the beginning hole too large; pull the starting tail snug and weave it into the first rounds before working the next round. Stuffing too early and too firmly causes lumpy shaping and visible stuffing through cotton thread; stuff gradually, filling a little after every few shaping rounds for a smooth round surface. Missing a stitch during an increase round changes the stitch count and alters shaping; count your increases at the end of each increase round to confirm the total matches the pattern. Changing color without securing ends neatly creates loose tails that show on the eye rim; leave a two-inch tail and weave it in through several stitches before cutting to lock the color change. Using inconsistent tension between rounds makes the sphere wobble and sit unevenly; relax your grip and touch the previous rounds to match gauge, especially when switching to half double crochet in the eye. Sewing limbs on without pins can result in crooked placement; use pins to mark left and right and compare placement visually before stitching any limb permanently.

Maker's Notes

When I made this Mike Wazowski using 2 mm mercerized cotton and a 2.0 mm hook it took me about three focused hours from first magic ring to finishing embroidery, including stuffing and joining. I found rounds with multiple increases (rounds 2–9 on the body) were straightforward yet easily miscounted if I worked without a marker; new makers often stumble when the stitch count jumps quickly, so I recommend placing a marker at the start of every round. Beginners also tend to overstuff early; I advise stuffing gradually from round 24 onward and checking shape frequently.

The layered eye required careful color changes on rounds 2–5 of the eye section; secure ends as you switch colors to avoid loose tails. Sewing the eye onto round 8 of the body aligned the feature perfectly for me, and I used pins to position before any permanent stitches.

I tried a substitution: I tested this pattern using a DK-weight cotton blend on a 3.5 mm hook as a substitution to see how scale would change; the result measured approximately 14 cm tall instead of 11 cm, with slightly softer stitch definition and a looser fabric that required firmer stuffing to hold shape. The larger version felt squishier and the eye details read a bit less crisp, but it made a cuddly, chunkier toy suitable for younger children; I recommend decreasing hook size or choosing the original 2.0 mm thread for a compact, well-defined amigurumi.

Mike Wazowski Amigurumi Pattern

Make this tiny Mike Wazowski with our free crochet pattern; full round-by-round instructions, materials list and assembly tips included to get you stitching today.

Beginner Friendly 2-3 Hours
Pattern at a glance
Skill level
Beginner Friendly
Time to make
2-3 Hours
Hook size
2.0 mm (B/1)
Yarn weight
2 mm mercerized cotton thread (fine fingering/lace-style)
Finished size
Approx. 11 cm / 4.3 in tall
Gauge
Approximately 20 sc x 12 rounds = 5 cm square when crocheted tightly with 2.0 mm hook and mercerized cotton; work tightly so stuffing does not show.
Yarn used
Approx. 40 g total (about 80 m / 88 yd) across all colors, with roughly 30-40 g green and small amounts for accents.

Materials Needed

Main Fabric
  • 01
    2 mm Yarn 100% Mercerized Cotton - Green (main body), approximately 30-40 g
  • 02
    2 mm Yarn 100% Mercerized Cotton - Yellow (horns), approximately 5-10 g
  • 03
    2 mm Yarn 100% Mercerized Cotton - Black (eye pupil and mouth), approximately 5 g
  • 04
    2 mm Yarn 100% Mercerized Cotton - Blue (eye iris), approximately 5-8 g
  • 05
    2 mm Yarn 100% Mercerized Cotton - White (eye highlight and rim), approximately 5 g
Tools Required
  • 01
    Crochet hook size 2.0 mm (B/1)
  • 02
    Stitch marker
  • 03
    Pins for positioning
  • 04
    Wool needle for joining and embroidery
  • 05
    Polyester stuffing
  • 06
    Scissors

— BODY :

Round 1: - Magic ring 8 sc (8 sc)
Round 2: inc (16 sc)
Round 3: inc (16 sc)
Round 4: inc (16 sc)
Round 5: inc (16 sc)
Round 6: inc (16 sc)
Round 7: inc (16 sc)
Round 8: inc (16 sc)

— BODY :

Round 3: - (1 sc, 1 inc) x 8 (24 sc)
Round 4: - (2 sc, 1 inc) x 8 (32 sc)
Round 5: - (3 sc, 1 inc) x 8 (40 sc)
Round 6: sc in each of the 40 sc (40 sc)
Round 7: - (4 sc, 1 inc) x 8 (48 sc)
Round 8: - (5 sc, 1 inc) x 8 (56 sc)
Round 9: - (6 sc, 1 inc) x 8 (64 sc)
Round 14: - (15 sc, 1 inc) x 4 (68 sc)
Round 17: - (16 sc, 1 inc) x 4 (72 sc)
Round 20: - (17 sc, 1 inc) x 4 (76 sc)
Round 25: - (2 sc, 1 dec) x 19 (57 sc)
Round 26: - (1 sc, 1 dec) x 19 (38 sc)
Round 27: - (2 sc, 1 dec) x 9, 1 dec (28 sc)
Round 28: - (2 sc, 1 dec) x 7 (21 sc)
Round 29: - (1 sc, 1 dec) x 7 (14 sc)
Round 30: dec (7 sc)

— FEET :

Round 1: - Magic ring 8 sc (8 sc)
Round 2: inc (16 sc)
Round 3: inc (16 sc)
Round 4: inc (16 sc)
Round 5: inc (16 sc)
Round 6: inc (16 sc)
Round 7: inc (16 sc)
Round 8: inc (16 sc)

— FEET :

Round 3: - (1 sc, 1 inc) x 8 (24 sc)
Round 6: dec (12 sc)
Round 7: dec (12 sc)
Round 8: dec (12 sc)
Round 9: dec (12 sc)
Round 10: dec (12 sc)
Round 11: dec (12 sc)
Round 12: dec (12 sc)

— HANDS :

Round 1: - Magic ring 6 sc (6 sc)

— HORNS :

Round 1: - Magic ring 6 sc (6 sc)
Round 2: sc in each of the 6 sc (6 sc)
Round 3: - (1 sc, 1 inc) x 3 (9 sc)
Round 4: sc in each of the 9 sc (9 sc)

— EYE :

Round 1: - Magic ring 8 sc (8 sc)
Round 2: inc hdc (16 hdc)
Round 3: inc hdc (16 hdc)
Round 4: inc hdc (16 hdc)
Round 5: inc hdc (16 hdc)
Round 6: inc hdc (16 hdc)
Round 7: inc hdc (16 hdc)
Round 8: inc hdc (16 hdc)

— EYE :

Round 3: - (3 sc, 1 inc) x 4 (20 sc)
Round 4: - (1 hdc, 1 inc) x 10 (30 hdc)
Round 5: - (2 sc, 1 inc) x 10 (40 sc)

Assembly Instructions

  1. Join the eye to the body starting on round 8, centering the layered eye so the top of the eye falls three rounds below the top most stitches, then sew evenly around the rim to secure.
  2. Position the two feet at the bottom edge of the body and sew each foot to the body with matched spacing; use pins to ensure the feet sit symmetrically before stitching.
  3. Attach the two hands on either side of the body between rounds 12 and 14, angling them slightly forward and sewing securely with several passes to prevent looseness.
  4. Sew the two yellow horns to the top back portion of the head, spacing them approximately eight to ten single crochet stitches apart for balance.
  5. Embroider the white highlight detail in the eye using the white-colored yarn, then weave and hide the tail inside the body for a tidy finish.
  6. Embroider the mouth on the lower front of the body using the black-colored yarn, keeping stitches short and centered between the feet.

Important Notes

  • Work with tight amigurumi tension so stuffing does not show through the cotton thread and the finished surface remains smooth.
  • Use stitch markers to mark the start of rounds if you work in joined spirals so you can track increases and decreases precisely.
  • Pin parts in place before sewing to check symmetry and proportion, adjusting positions until the face reads well from the front.
  • Weave in ends as you go when changing colors for the eye to avoid long tails interfering with assembly.
  • Close small openings with a wool needle and hidden suture technique for a neat, durable finish.

Thank you for choosing this Mike Wazowski amigurumi pattern; it was designed to be fast to crochet while delivering a characterful finished toy. I hope this tiny friend brings a smile into your home and becomes a favorite on your shelf or a thoughtful handmade gift. Happy stitching and enjoy every round as it transforms into a playful, hand-stitched companion!

Good to know

You ask, we answer

The finished amigurumi measures approximately 11 cm tall when made with 2 mm mercerized cotton thread and a 2.0 mm crochet hook; size will vary slightly with different yarn and tension.

Yes; you can substitute a heavier or lighter yarn but the finished size and stitch tension will change, so adjust hook size and expect differences in final dimensions and texture.

This pattern is rated Beginner Friendly and assumes you know the magic ring, single crochet, increases, decreases and basic sewing; some color changes in the eye require simple switching techniques.

Most makers complete this small amigurumi in about two to three hours, including assembly and embroidery, though beginners may take slightly longer to finish neat joins and placement.

Use pins to position each horn and limb, then sew through several stitches with a wool needle using a back-and-forth stitch to reinforce attachment and weave tails inside the body for security.

Use polyester fiberfill added gradually while shaping to preserve the smooth spherical form; avoid overstuffing which can distort stitch definition in mercerized cotton.

Side view of the Mike Wazowski amigurumi showing one hand extended and symmetrical placement of limbs
Join 100k+ crocheters

Get new free patterns, stitch tips and exclusive content in your inbox.