Crochetologist
Free Crochet Pattern
Beautiful Detailed Adorable

Lighthouse Stacking Toy Amigurumi Pattern

Light grey lighthouse base with stacked rings in progress
4.8Rating
3-5 HoursTime
Beginner FriendlySkill
Highlights

What makes it special

Made with Love

An adorable friend to cherish, handcrafted with love to bring comfort and joy for years to come.

Bite-Sized Project

Finishes in 2-4 hours—perfect for an afternoon of creative relaxation.

Beginner Friendly Level

This project is suitable for beginners who want to practice basic amigurumi techniques. It focuses on round-by-round increases, working in the round, color changes, and careful stuffing to maintain clean, friendly shapes. The steps are incremental, with a clear progression from a sturdy starting circle to a full tower, making it an approachable entry point for crocheters building confidence with framed, three-dimensional projects.

This project invites you to build a cheerful, stackable lighthouse using simple crochet skills. Its color-blocked rings form a bright miniature beacon that doubles as decor, a hands-on toy, and a storytelling prop for imaginative play. The piece grows with you, offering a satisfying rhythm of rounds, careful shaping, and neat finishing that any maker can celebrate when the tower takes shape.

About This Lighthouse Stacking Toy Amigurumi Pattern

Crafted in soft cotton yarn, this lighthouse stands in the 8–9 inch (about 20–23 cm) range when made with the recommended weight and hook size, a size that fits easily into little hands and onto small shelves. The construction begins with a foundation chain that completes a tight starting circle, then progresses through a series of rotational rounds that form stacked, color-blocked cylinders. Each ring is crocheted separately, allowing color changes to occur ring by ring, and then joined with a compact seam that preserves smooth exterior lines while keeping the interior space ready for light stuffing.

The base provides a stable footprint, the mid sections create height, and a conical roof caps the structure with a cheerful finish. The stuffing is light and even, just enough to help the rings keep their rounded silhouettes without losing the ability to be knocked gently and re-stacked. The finished piece can live on a shelf as a nostalgic seaside scene or serve as a kid-friendly toy that invites stacking, counting, and creative storytelling.

The design emphasizes clean transitions between colors, straightforward increases to shape cylinders, and careful attention to seam alignment so that the tower remains upright during eager play. Every element—color, proportion, and join—works together to offer a dependable, approachable project that yields a bright, tactile keepsake.

This lighthouse is composed of distinct color-blocked cylinders that stack to form the tower. Each ring is crocheted separately, then joined with careful, nearly invisible seams to maintain rounded, friendly curves. The base and a vertical segment act as a backbone, while successive rings convey height and a seascape vibe through color shifts.

Clean lines and simple increases keep the work accessible to crocheters building confidence with round-by-round construction. The interior is lightly stuffed to hold shape, yet remains pliable enough for play. The top roof is a finishing flourish that preserves proportion from bottom to peak, ensuring the toy reads clearly as a lighthouse even at a quick glance.

The color changes are designed to be straightforward, encouraging beginners to practice color control without overwhelming transitions, and the overall silhouette stays faithful to a child-friendly, sculptural form.

Colored lighthouse rings stacked with yellow interior

As you crochet, the rings anchor the tower and the roof anchors the silhouette. The color changes are intentionally placed at ring boundaries, so colorwork remains predictable and easy to track as you progress. Assembly is straightforward: you join the rings with clean seams and then top with the roof section, keeping proportions consistent so the stack feels stable during play.

This project also doubles as a thoughtful gift that blends craft with storytelling: a tiny seaside beacon that carries both a tactile and imaginative appeal. The pattern invites you to pause, admire your progress, and return to fill out the final rings with a satisfying sense of completion. The result is a compact sculpture that reads as a lighthouse and a toy the moment a child reaches for it.

Stitches & Skills You'll Use

Begin with a magic ring to form a reliable starting circle, ensuring tight, even rounds in the first ring and a solid foundation for the rest of the piece. Crochet using single crochet for the majority of rounds, with deliberate increases and decreases to shape the cylinders that form each ring. Where you want a subtle topography without altering the silhouette, work in the back loop only (BLO) or front loop only (FLO) as you alternate rings, always returning to full-stitch technique at the start of each new ring so the surface remains smooth.

At the color-change boundary, begin the next ring with a fresh color and maintain consistent tension to keep the stuffing hidden and the exterior surface even. Weave in the ends as you go to minimize finishing work later, and take time to keep the seam between rings nearly invisible through careful alignment and small, tight stitches. The rings should align in height so that the tower stacks cleanly and the overall form remains upright after repeated handling.

The project also introduces basic stuffing techniques: insert light filling gradually, adjusting as you add rounds so the base stays stable and the top tapers smoothly. Mark the starting point after each color change so you can verify that all rings have the correct round count and the assembly proceeds with consistent spacing. A final light touch of finishing work—tucking in tails and reinforcing seam joins—helps ensure the lighthouse remains durable through hours of stacking, building, and imaginative play.

For new crocheters, the pattern breaks the build into approachable milestones: begin with a sturdy foundation circle, complete the first stacked ring, then replicate and attach additional rings, and finish with a roof that caps the height while preserving proportion. Each milestone reinforces progress and confidence in round-by-round construction, turning a sequence of simple steps into a cohesive and satisfying finished piece.

Why You'll Love This Lighthouse Stacking Toy Amigurumi Pattern

I absolutely adore how this lighthouse blends a playful aesthetic with straightforward technique. The rhythm of rounds, the gentle color shifts, and the satisfying build from the heavy base to the delicate roof all feel like a tiny voyage you can finish in a weekend. I love watching makers gain confidence as their towers rise higher with every few stitches, hands steadying with repetition and care.

This pattern invites creative experimentation while delivering clear, achievable results that yield a bright, tactile toy perfect for gifting or display.

Colour & Yarn Inspiration

Consider a classic seaside palette: ivory, light grey, navy, and sunshine yellow for a clean, fresh look; or mix coral, teal, and white for a modern, energetic vibe. If you substitute a lighter yarn weight, the final height will shift, but the silhouette remains recognizable and proportionate.

Try variegated yarns on individual rings to introduce texture and depth without changing the basic construction. Avoid very bulky or highly textured yarns that could blur ring separations and undermine stacking stability.

Final lighthouse with roof and top ornament

Switch Things Up

Color palettes can dramatically alter the character of the lighthouse. Try blues and whites for a seaside look, or embrace bold primaries for a playful, toy-like vibe. The structure stays the same; the colors determine mood and storytelling potential.

Experiment with the height by varying ring counts and adjusting stuffing. A taller tower reads differently on a shelf and can emphasize the sense of height in a miniature seascape, while a shorter version invites closer inspection and a different balance with surrounding decor.

Swap the yellow interior for a warm amber to mimic a glowing lantern glow when the lighthouse is stacked, or introduce a variegated strand for subtle color shifts without changing the construction. The glint of a variegated strand adds interest without complicating the ring-separation or stacking stability.

Pro tip: add a tiny crocheted flag at the top or a miniature anchor charm at the base. Such small embellishments personalize the piece, turning it into a thoughtful, handmade gift with extra meaning.

To engage kids, consider a small “lighthouse keeper’s guide” booklet that describes each ring’s color and height. This interactive element invites counting, sequencing, and storytelling, extending the learning value of the project.

Display ideas: build three or four lighthouses in differing heights and arrange them in a vertical stack on a shelf. This creates a playful sculpture that invites curiosity and conversation about color, proportion, and craft.

Ways to Use & Gift It

The lighthouse makes a charming gift for birthdays, baby showers, or teacher appreciation; it’s a tactile present that invites a child to participate in the process and learn counting as they stack.

Pair it with a tiny skein of complementary yarn and a short handwritten note describing the colors and the order of the rings. This personal touch elevates the handmade feel and makes the gift feel especially thoughtful and complete.

Common Mistakes & How to Fix Them

Miscounting rounds and failing to mark the beginning of color sections can lead to uneven rings; verify counts after every round and use a marker to track the start of each color block. Inconsistent stuffing creates visible lumps or flat spots; fill gradually, keeping even pressure so the rings stay round and the base remains stable. Loose stitches around the base edge can cause wobble; maintain a snug, steady tension and check the circumference against the earlier rounds to ensure uniformity. Rings with unbalanced heights disrupt alignment; keep a consistent number of stitches per ring and align rings as you stack to preserve the tower’s upright stance.

Maker's Notes

When this lighthouse was tested, a DK weight yarn in white, light grey, red, and yellow was paired with a 3 mm hook. The rounds were clear and easy to follow, and the structure held up well after repeated test stacks. A key observation for beginners was that stuffing too early softened edges; delaying stuffing until the last few rounds helped preserve crisp circular shapes.

Consistent tension around the base was crucial to prevent wobble due to the larger rings near the bottom. Aligning color changes and keeping a steady pace produced a clean, cohesive final piece that stacked smoothly and remained sturdy during playful use.

I tried a substitution: Trying a slightly heavier DK yarn with a 3.5 mm hook produced a taller, bulkier lighthouse that shifted balance and made stacking less stable. Returning to the original weight and 3 mm hook restored the intended proportions, preserving the light, playful silhouette and ensuring rings fit snugly together for reliable stacking. Substituting yarn weight without adjusting hook size and stuffing can lead to subtle, but noticeable changes in height and stability that affect the overall feel of the finished piece.

Lighthouse Stacking Toy Amigurumi Pattern

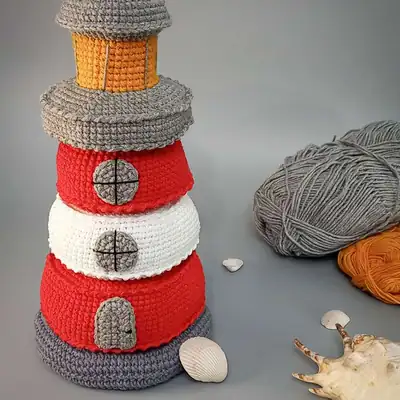
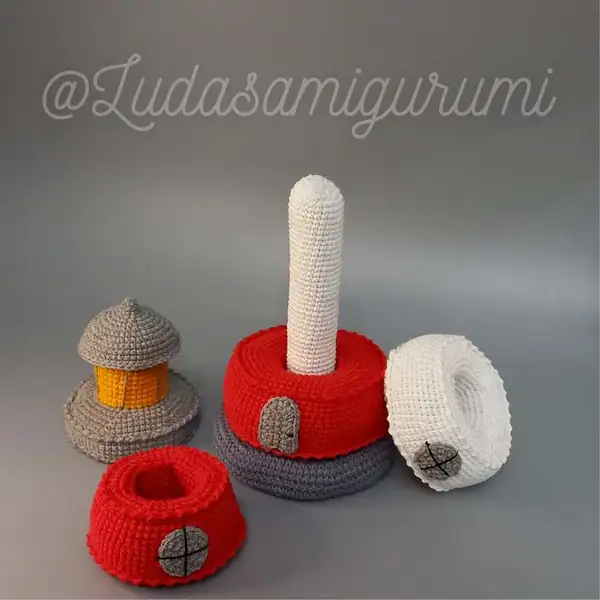
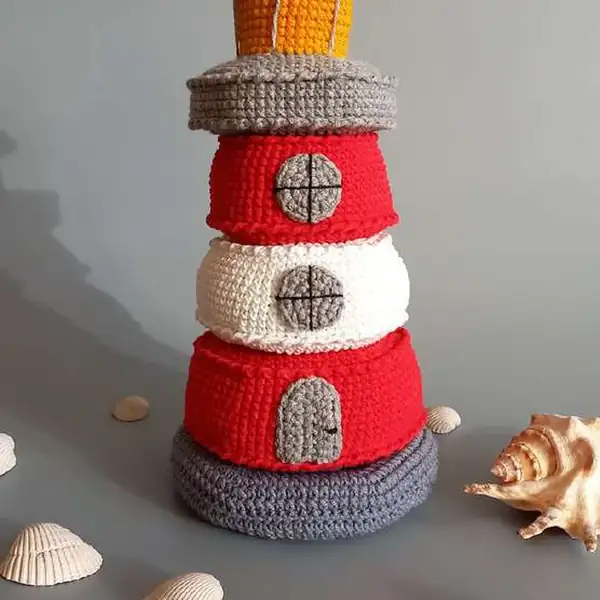
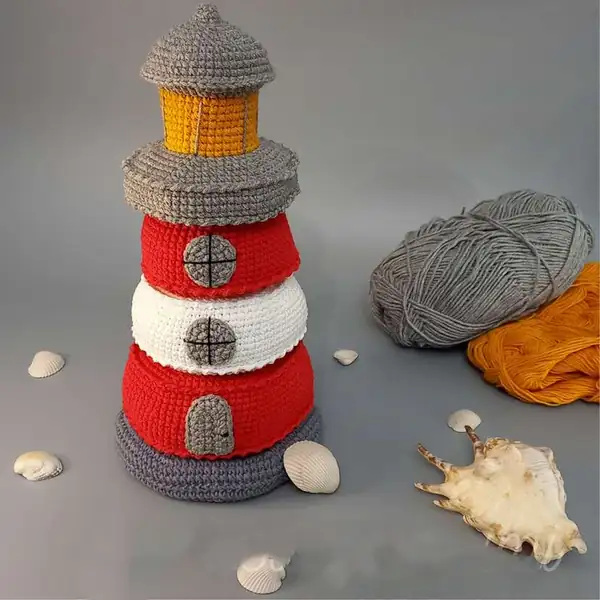
Make this adorable lighthouse with our free crochet pattern. Includes complete rounds, materials, and assembly tips. Start crocheting today for a charming stacking toy!

Beginner Friendly 3-5 Hours
Pattern at a glance
Skill level
Beginner Friendly
Time to make
3-5 Hours
Hook size
3 mm (C/2)
Yarn weight
DK / #3
Finished size
Approx. 22 cm tall / 8.7 in
Gauge
Not critical for this project; aim for tight, even SC rounds to avoid gaps between rings.
Yarn used
Approx. 180 g total: White 30 g, Light Grey 40 g, Red 60 g, Yellow 50 g

Materials Needed

Main Fabric
  • 01
    White - Alize Cotton Gold 55
  • 02
    Light grey - Alize Cotton Gold 200
  • 03
    Red - Alize Cotton Gold 56
  • 04
    Yellow - Alize Cotton Gold 216
  • 05
    Hook: 3 mm (or in accordance with the yarn you use)
  • 06
    Fiberfill for stuffing, scissors, tapestry needle fr sewing.
Tools Required
  • 01
    Crochet hook size 3 mm
  • 02
    Yarn needle for sewing
  • 03
    Scissors
  • 04
    Stitch markers
  • 05
    Polyester stuffing

— Tail :

Round 1: 6 sc in MR (6)
Round 2: 6 inc (12)
Round 3: (1 sc; inc)*6 (18)
Round 4: (2 sc; inc)*6 (24)
Round 5: (3 sc; inc)*6 (30)
Round 6: FLO (4 sc; inc)*6 (36)
Round 7: (5 sc; inc)*6 (42)
Round 8: 3 sc; inc; (6 sc; inc)*5; 3 sc (48)
Round 9: (7 sc; inc)*6 (54)
Round 10: 4 sc; inc; (8 sc; inc)*5; 4 sc (60)
Round 11: FLO (9 sc; inc)*6 (66)
Round 12: 5 sc; inc; (10 sc; inc)*5; 5 sc (72)
Round 13: (11 sc; inc)*6 (78)
Round 14: 6 sc; inc; (12 sc; inc)*5; 6 sc (84)
Round 15: (13 sc; inc)*6 (90)
Round 16: 90 sc (90) cut the yarn, leave a long tail for sewing. POLE Crochet with white color, fill with stuffing as you go;
Round 17: 90 sc (90) cut the yarn, leave a long tail for sewing. POLE Crochet with white color, fill with stuffing as you go;

— Pole :

Round 1: 6 sc in MR (6)
Round 2: 6 inc (12)
Round 3: (1 sc; inc)*6 (18)
Round 4: (2 sc; inc)*6 (24)
Round 5: 24 sc (24)
Round 6: 24 sc (24)
Round 7: 24 sc (24)
Round 8: 24 sc (24)
Round 9: 24 sc (24)
Round 10: 24 sc (24)
Round 11: 24 sc (24)
Round 12: 24 sc (24)
Round 13: 24 sc (24)
Round 14: 24 sc (24)
Round 15: 24 sc (24)
Round 16: 24 sc (24)
Round 17: 24 sc (24)
Round 18: 24 sc (24)
Round 19: 24 sc (24)
Round 20: 24 sc (24)
Round 21: 24 sc (24)
Round 22: 24 sc (24)
Round 23: 24 sc (24)
Round 24: 24 sc (24)
Round 25: 24 sc (24)
Round 26: 24 sc (24)
Round 27: 24 sc (24)
Round 28: 24 sc (24)
Round 29: 24 sc (24)
Round 30: 24 sc (24)
Round 31: 24 sc (24)
Round 32: 24 sc (24)
Round 33: 24 sc (24)
Round 34: 24 sc (24)
Round 35: 24 sc (24)
Round 36: 24 sc (24)
Round 37: 24 sc (24)
Round 38: 24 sc (24)
Round 39: 24 sc (24)
Round 40: 24 sc (24)
Round 41: 24 sc (24)
Round 42: 24 sc (24)
Round 43: 24 sc (24)
Round 44: 24 sc (24)
Round 45: 24 sc (24)
Round 46: 24 sc (24)
Round 47: 24 sc (24)
Round 48: 24 sc (24)
Round 49: 24 sc (24)
Round 50: (3 sc; inc)*6 (30)

— Large Ring :

Round 1: 36 ch, sl st in 1st ch (36) continue to work in rounds;
Round 2: 1 ch; 36 sc; sl st (36) turn the work inside out and continue in rounds;
Round 3: 1 ch; 36 sc; sl st (36) turn the work inside out and continue in rounds;
Round 4: 1 ch; 36 sc; sl st (36) turn the work inside out and continue in rounds;
Round 5: 1 ch; 36 sc; sl st (36) turn the work inside out and continue in rounds;
Round 6: 1 ch; 36 sc; sl st (36) turn the work inside out and continue in rounds;
Round 7: 1 ch; 36 sc; sl st (36) turn the work inside out and continue in rounds;
Round 8: 1 ch; 36 sc; sl st (36) turn the work inside out and continue in rounds;
Round 9: 1 ch; 36 sc; sl st (36) turn the work inside out and continue in rounds;
Round 10: 1 ch; 36 sc; sl st (36) turn the work inside out and continue in rounds;
Round 11: 1 ch; 36 sc; sl st (36) turn the work inside out and continue in rounds;
Round 12: BLO (5 sc; inc)*6 (42)
Round 13: 3 sc; inc; (6 sc; inc)*5; 3 sc (48)
Round 14: (7 sc; inc)*6 (54)
Round 15: 4 sc; inc; (8 sc; inc)*5; 4 sc (60)
Round 16: (9 sc; inc)*6 (66)
Round 17: 5 sc; inc; (10 sc; inc)*5; 5 sc (72)
Round 18: (11 sc; inc)*6 (78)
Round 19: 6 sc; inc; (12 sc; inc)*5; 6 sc (84)
Round 20: (13 sc; inc)*6 (90)
Round 21: BLO (13 sc; dec)*6 (84)
Round 22: 84 sc (84)
Round 23: 84 sc (84)
Round 24: 84 sc (84)
Round 25: 84 sc (84)
Round 26: 6 sc; dec; (12 sc; dec)*5; 6 sc (78)
Round 27: 78 sc (78)
Round 28: 78 sc (78)
Round 29: 78 sc (78)
Round 30: 78 sc (78)
Round 31: BLO (11 sc; dec)*6 (72)
Round 32: 5 sc; dec; (10 sc; dec)*5; 5 sc (66)
Round 33: (9 sc; dec)*6 (60)
Round 34: 4 sc; dec; (8 sc; dec)*5; 4 sc (54)
Round 35: (7 sc; dec)*6 (48)
Round 36: 3 sc; dec; (6 sc; dec)*5; 3 sc (42)
Round 37: (5 sc; dec)*6 (36) fill with stuffing, cut the yarn, leave a tail for sewing. Sew round 37 with round 1. There are two ways to make pretty edges of the rings - in rounds 21 and 31 in the front loops make slip stitch round or reverse crochet (crab stitch) round.

— Base (Make 2 Parts) :

Round 21: (1 rev;skip 1 sc)*45 (45)

— Large Ring :

Round 31: (1 rev;skip 1 sc)*39 (39)

— Middle Ring :

Round 21: 90 sl st (90)

— Small Ring :

Round 31: 78 sl st (78)

— Middle Ring :

Round 1: 36 ch, sl st in 1st ch (36) continue to work in rounds;
Round 2: 1 ch; 36 sc; sl st (36) turn the work inside out and continue in rounds;
Round 3: 1 ch; 36 sc; sl st (36) turn the work inside out and continue in rounds;
Round 4: 1 ch; 36 sc; sl st (36) turn the work inside out and continue in rounds;
Round 5: 1 ch; 36 sc; sl st (36) turn the work inside out and continue in rounds;
Round 6: 1 ch; 36 sc; sl st (36) turn the work inside out and continue in rounds;
Round 7: 1 ch; 36 sc; sl st (36) turn the work inside out and continue in rounds;
Round 8: 1 ch; 36 sc; sl st (36) turn the work inside out and continue in rounds;
Round 9: 1 ch; 36 sc; sl st (36) turn the work inside out and continue in rounds;
Round 10: 1 ch; 36 sc; sl st (36) turn the work inside out and continue in rounds;
Round 11: 1 ch; 36 sc; sl st (36) turn the work inside out and continue in rounds;
Round 12: BLO (5 sc; inc)*6 (42)
Round 13: 3 sc; inc; (6 sc; inc)*5; 3 sc (48)
Round 14: (7 sc; inc)*6 (54)
Round 15: 4 sc; inc; (8 sc; inc)*5; 4 sc (60)
Round 16: (9 sc; inc)*6 (66)
Round 17: 5 sc; inc; (10 sc; inc)*5; 5 sc (72)
Round 18: (11 sc; inc)*6 (78)
Round 19: BLO (11 sc; dec)*6 (72)
Round 20: 72 sc (72)
Round 21: 72 sc (72)
Round 22: 72 sc (72)
Round 23: 72 sc (72)
Round 24: 5 sc; dec; (10 sc; dec)*5; 5 sc (66)
Round 25: 66 sc (66)
Round 26: 66 sc (66)
Round 27: 66 sc (66)
Round 28: 66 sc (66)
Round 29: BLO (9 sc; dec)*6 (60)

— Small Ring :

Round 1: 36 ch, sl st in 1st ch (36) continue to work in rounds;
Round 2: 1 ch; 36 sc; sl st (36) turn the work inside out and continue in rounds.
Round 3: 1 ch; 36 sc; sl st (36) turn the work inside out and continue in rounds.
Round 4: 1 ch; 36 sc; sl st (36) turn the work inside out and continue in rounds.
Round 5: 1 ch; 36 sc; sl st (36) turn the work inside out and continue in rounds.
Round 6: 1 ch; 36 sc; sl st (36) turn the work inside out and continue in rounds.
Round 7: 1 ch; 36 sc; sl st (36) turn the work inside out and continue in rounds.
Round 8: 1 ch; 36 sc; sl st (36) turn the work inside out and continue in rounds.
Round 9: 1 ch; 36 sc; sl st (36) turn the work inside out and continue in rounds.
Round 10: 1 ch; 36 sc; sl st (36) turn the work inside out and continue in rounds.
Round 11: 1 ch; 36 sc; sl st (36) turn the work inside out and continue in rounds.
Round 12: BLO (5 sc; inc)*6 (42)
Round 13: 3 sc; inc; (6 sc; inc)*5; 3 sc (48)
Round 14: (7 sc; inc)*6 (54)
Round 15: 4 sc; inc; (8 sc; inc)*5; 4 sc (60)
Round 16: (9 sc; inc)*6 (66)
Round 17: BLO (9 sc; dec)*6 (60)
Round 18: 60 sc (60)
Round 19: 60 sc (60)
Round 20: 60 sc (60)
Round 21: 60 sc (60)
Round 22: 4 sc; dec; (8 sc; dec)*5; 4 sc (54)
Round 23: 54 sc (54)
Round 24: 54 sc (54)
Round 25: 54 sc (54)
Round 26: 54 sc (54)
Round 27: BLO (7 sc; dec)*6 (48)
Round 28: 3 sc; dec; (6sc; dec)*5; 3 sc (42)
Round 29: (5 sc; dec)*6 (36) fill with stuffing, cut the yarn, leave a tail for sewing. Sew round 29 with round 1. 5;
Round 32: 4 sc; dec; (8 sc; dec)*5; 4 sc (54)

— Closing :

Round 31: (7 sc; dec)*6 (48)
Round 32: 3 sc; dec; (6 sc; dec)*5; 3 sc (42)
Round 33: (5 sc; dec)*6 (36) fill with stuffing, cut the yarn, leave a tail for sewing. Sew round 33 with round 1. TOP Crochet with grey color;

— Top :

Round 1: 6 sc in MR (6)
Round 2: 6 inc (12)
Round 3: (1 sc; inc)*6 (18)
Round 4: (2 sc; inc)*6 (24)
Round 5: (3 sc; inc)*6 (30)
Round 6: (4 sc; inc)*6 (36)
Round 7: 1 ch; 36 sc; sl st (36) turn the work inside out and continue in rounds.
Round 8: 1 ch; 36 sc; sl st (36) turn the work inside out and continue in rounds.
Round 9: 1 ch; 36 sc; sl st (36) turn the work inside out and continue in rounds.
Round 10: 1 ch; 36 sc; sl st (36) turn the work inside out and continue in rounds.
Round 11: 1 ch; 36 sc; sl st (36) turn the work inside out and continue in rounds.
Round 12: 1 ch; 36 sc; sl st (36) turn the work inside out and continue in rounds.
Round 13: 1 ch; 36 sc; sl st (36) turn the work inside out and continue in rounds.
Round 14: 1 ch; 36 sc; sl st (36) turn the work inside out and continue in rounds.
Round 15: BLO (5 sc; inc)*6 (42)
Round 16: 3 sc; inc; (6 sc; inc)*5; 3 sc (48)
Round 17: (7 sc; inc)*6 (54)
Round 18: 4 sc; inc; (8 sc; inc)*5; 4 sc (60)
Round 19: (9 sc; inc)*6 (66)
Round 20: 5 sc; inc; (10 sc; inc)*5; 5 sc (72)
Round 21: BLO 72 sc (72)
Round 22: 72 sc (72)
Round 23: 72 sc (72)
Round 24: 72 sc (72)
Round 25: BLO 5 sc; dec; (10 sc; dec)*5; 5 sc (66)
Round 26: (9 sc; dec)*6 (60)
Round 27: 4 sc; dec; (8 sc; dec)*5; 4 sc (54)
Round 28: (7 sc; dec)*6 (48)
Round 29: 3 sc; dec; (6 sc; dec)*5; 3 sc (42)
Round 30: (5 sc; dec)*6 (36) fill with stuffing, change to yellow color;
Round 31: FLO 36 sc (36)
Round 32: 36 sc (36) change to grey color;
Round 33: 36 sc (36) change to grey color;
Round 34: 36 sc (36) change to grey color;
Round 35: 36 sc (36) change to grey color;
Round 36: 36 sc (36) change to grey color;
Round 37: 36 sc (36) change to grey color;
Round 38: 36 sc (36) change to grey color;
Round 39: FLO (5 sc; inc)*6 (42)
Round 40: 3 sc; inc; (6 sc; inc)*5; 3 sc (48) cut the yarn, hide a tail, fill with stuffing. 6 ROOF Crochet with grey color;

— Roof :

Round 1: 6 sc in MR (6)
Round 2: 6 sc (6)
Round 3: 6 inc (12)
Round 4: 12 sc (12)
Round 5: 12 inc (24)
Round 6: 24 sc (24)
Round 7: (1 sc; inc)*6 (36)
Round 8: 36 sc (36)
Round 9: (2 sc; inc)*6 (48)
Round 10: 48 sc (48) connect the roof with the top of lighthouse with one single crochet round (48 sc), fill with stuffing as you go. In rounds 21/25 in the front loops make one slip stitch round (72slst) or reverse crochet (crab stitch) round (36 rev).
Round 11: 48 sc (48) connect the roof with the top of lighthouse with one single crochet round (48 sc), fill with stuffing as you go. In rounds 21/25 in the front loops make one slip stitch round (72slst) or reverse crochet (crab stitch) round (36 rev).
Round 12: 48 sc (48) connect the roof with the top of lighthouse with one single crochet round (48 sc), fill with stuffing as you go. In rounds 21/25 in the front loops make one slip stitch round (72slst) or reverse crochet (crab stitch) round (36 rev).

— Door :

Round 1: 8 ch (8)
Round 2: 7 sc (7)
Round 3: 1 ch, 6 sc; 3 sc in one; 6 sc; turn (15)
Round 4: 1 ch, 6 sc; 3 inc; 6 sc; turn (18) cut the yarn leave a tail for sewing. WINDOWS (make.3) Crochet with grey color;

— Door :

Round 1: 6 sc in MR (6)
Round 2: 6 inc (12)
Round 3: (1 sc; inc)*6 (18) cut the yarn leave a tail for sewing. Sew the door and windows to a rings (blocks). That's it! Your lighthouse is finished. Congratulations! The only thing is left to do is to find a good lighthouse keeper;

Assembly Instructions

  1. Attach base parts by sewing the two BASE pieces together at the back loops of rounds 6 and 11, then stuff gradually as you go and close the openings.
  2. Sew the Pole to the base by threading through the base at the area indicated in the photos and anchor firmly before continuing.
  3. Join the Large Ring to the Pole and to the Base at the required heights; ensure the ring layers align and are evenly stuffed.
  4. Sew Door and Windows onto the appropriate rings, spacing them; secure edges with small whipstitches to prevent snagging during play.
  5. Stack the remaining rings in order, then add the Top, Roof, and any finishing touches; fasten off and weave in the final ends.

Important Notes

  • Mark color changes with a stitch marker or a small, removable tag to keep rounds precise and easy to track across color transitions.
  • Stuff the rings evenly to avoid flat spots and to preserve the rounded silhouette throughout the stack.
  • Weave in ends as you go to minimize a heavy finishing session and to maintain a neat surface across all rings.
  • Maintain a steady pace to ensure consistent tension across all rings and across the color changes, which helps keep the surface smooth.
  • Carefully align the rings when stacking to keep the lighthouse upright and stable during display and play. A gentle test stack after completing the top rings confirms balance before finalizing.

This stacking lighthouse is a joyful project that grows with you. Build it piece by piece, celebrate each completed ring, and savor the sense of accomplishment as the tower rises. It’s a giftable treasure that invites storytelling and imaginative play, a tiny beacon for creativity in any room. May your crocheting journey glow as bright as a lighthouse on a calm evening. Happy crocheting!

Good to know

You ask, we answer

The finished lighthouse stands about 22 cm tall when made with the recommended yarn and hook size, yielding a compact yet satisfying height that fits well on shelves and play surfaces.

Yes, you can, but changing yarn weight will affect the final size and proportions. If you switch yarn weights, adjust the hook size accordingly and recalculate stuffing to maintain round shapes and stable stacking.

Yes. The pattern emphasizes round-by-round progression, straightforward color changes, and basic amigurumi techniques that are accessible to new crocheters while still offering a satisfying build for more experienced makers.

Most crocheters complete it in about 3–5 hours, depending on pacing, experience, and how many color changes are included during the build.

Close-up of door and window placement on rings
Join 100k+ crocheters

Get new free patterns, stitch tips and exclusive content in your inbox.