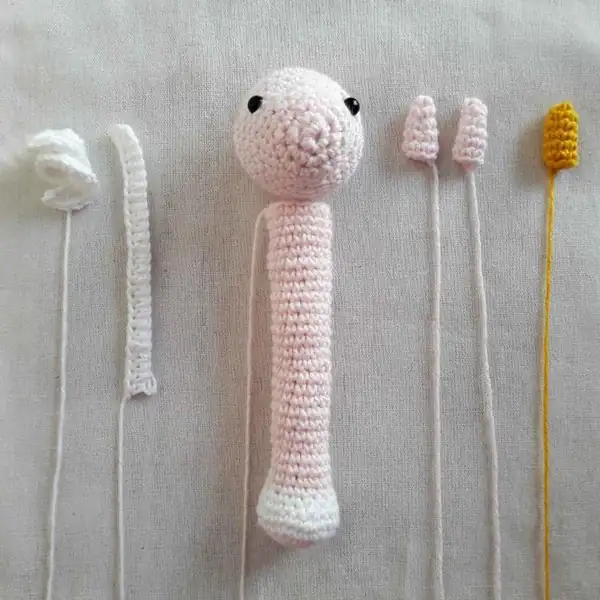
Free crochet amigurumi pattern for Bunny, Giraffe, and Unicorn rattles. Easy rounds, tips, and assembly; perfect for gifting or nursery decor. Start crocheting today!
— Head :
Round 1: 6sc in magic ring (6)
Round 2: (inc) repeat 6 times (12)
Round 3: (sc in next st, inc) repeat 6 times (18)
Round 4: (sc in next 2 sts, inc) repeat 6 times (24)
Round 5: (sc in next 3 sts, inc) repeat 6 times (30)
Round 6: (sc in next 5 sts, inc) repeat 5 times (35)
Round 7: sc in each st (35)
Round 8: sc in each st (35)
Round 9: sc in each st (35)
Round 10: sc in each st (35)
Round 11: (sc in next 3 sts, dec) repeat 7 times (28)
Round 12: (sc in next 2 sts, dec) repeat 7 times (21)
Round 13: (sc in next st, dec) repeat 7 times (14), fasten off and stuff. Insert safety eyes between rnd 8 and rnd 9 and 8 stitches between each eye.
— Tail :
Round 1: 6sc in magic ring (6)
Round 2: (inc) repeat 6 times (12)
Round 3: (sc in next st, inc) repeat 6 times (18)
Round 4: (sc in next 2 sts, inc) repeat 6 times (24)
Round 5: sc in each st (24)
Round 6: (sc in next 3 sts, dec) repeat 4 times, sc in next 4 st (20)
Round 7: (sc in next 2 sts, dec) repeat 5 times (15)
Round 8: sc in each st (15)
Round 9: (sc in next 4 sts, dec) repeat 2 times, sc in next 3 st (13)
Round 10: sc in each st (13). Fasten off and leave tail for sewing and stuff.
Round 11: sc in each st (13). Fasten off and leave tail for sewing and stuff.
Round 12: sc in each st (13). Fasten off and leave tail for sewing and stuff.
Round 13: sc in each st (13). Fasten off and leave tail for sewing and stuff.
Round 14: sc in each st (13). Fasten off and leave tail for sewing and stuff.
Round 15: sc in each st (13). Fasten off and leave tail for sewing and stuff.
Round 16: sc in each st (13). Fasten off and leave tail for sewing and stuff.
Round 17: sc in each st (13). Fasten off and leave tail for sewing and stuff.
Round 18: sc in each st (13). Fasten off and leave tail for sewing and stuff.
Round 19: sc in each st (13). Fasten off and leave tail for sewing and stuff.
Round 20: sc in each st (13). Fasten off and leave tail for sewing and stuff.
Round 21: sc in each st (13). Fasten off and leave tail for sewing and stuff.
Round 22: sc in each st (13). Fasten off and leave tail for sewing and stuff.
Round 23: sc in each st (13). Fasten off and leave tail for sewing and stuff.
Round 24: sc in each st (13). Fasten off and leave tail for sewing and stuff.
Round 25: sc in each st (13). Fasten off and leave tail for sewing and stuff.
Round 26: sc in each st (13). Fasten off and leave tail for sewing and stuff.
Round 27: sc in each st (13). Fasten off and leave tail for sewing and stuff.
Round 28: sc in each st (13). Fasten off and leave tail for sewing and stuff.
Round 29: sc in each st (13). Fasten off and leave tail for sewing and stuff.
Round 30: sc in each st (13). Fasten off and leave tail for sewing and stuff.
Round 31: sc in each st (13). Fasten off and leave tail for sewing and stuff.
Round 32: sc in each st (13). Fasten off and leave tail for sewing and stuff.
Round 33: sc in each st (13). Fasten off and leave tail for sewing and stuff.
— Body :
Round 1: 6sc in magic ring (6)
Round 2: (inc) repeat 6 times (12)
Round 3: (sc in next st, inc) repeat 6 times (18)
Round 4: (sc in next 1 st, dec) repeat 6 times (12)
Round 5: sc in each st (12), fasten off and leave tail for sewing.
Round 6: sc in each st (12), fasten off and leave tail for sewing.
Round 7: sc in each st (12), fasten off and leave tail for sewing.
Round 8: sc in each st (12), fasten off and leave tail for sewing.
Round 9: sc in each st (12), fasten off and leave tail for sewing.
Round 10: sc in each st (12), fasten off and leave tail for sewing.
— Ears :
Round 1: 6sc in magic ring (6)
Round 2: (inc) repeat 6 times (12)
Round 3: (sc in next st, inc) repeat 6 times (18)
Round 4: (sc in next 2 sts, inc) repeat 6 times (24)
Round 5: (sc in next 3 sts, inc) repeat 6 times (30)
Round 6: (sc in next 5 sts, inc) repeat 5 times (35)
Round 7: sc in each st (35)
Round 8: sc in each st (35)
Round 9: sc in each st (35)
Round 10: sc in each st (35)
Round 11: (sc in next 3 sts, dec) repeat 7 times (28)
Round 12: (sc in next 2 sts, dec) repeat 7 times (21)
Round 13: (sc in next st, dec) repeat 7 times (14), fasten off and stuff. Insert safety eyes between rnd 7 and rnd 8. Leave 8 stitches between each eye.
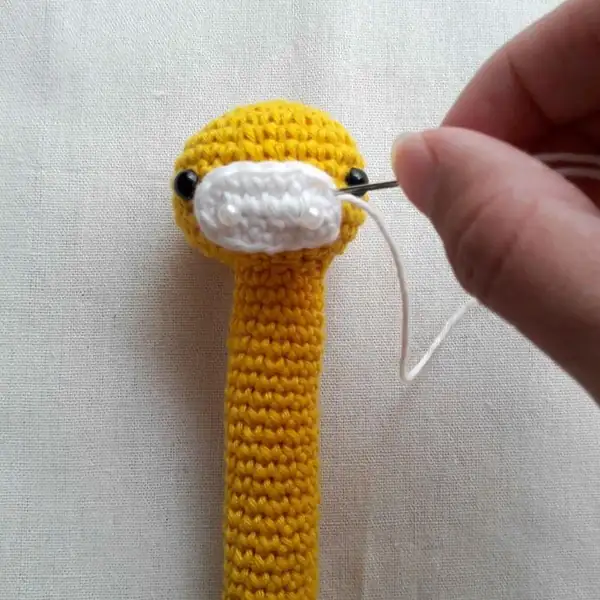
— Mouth :
Round 1: 6sc in magic ring (6)
Round 2: (inc) repeat 6 times (12)
Round 3: (sc in next st, inc) repeat 6 times (18)
Round 4: (sc in next 2 sts, inc) repeat 6 times (24)
Round 5: sc in each st (24)
Round 6: (sc in next 3 sts, dec) repeat 4 times, sc in next 4 st (20)
Round 7: (sc in next 2 sts, dec) repeat 5 times (15)
Round 8: sc in each st (15)
Round 9: (sc in next 4 sts, dec) repeat 2 times, sc in next 3 st(13)
Round 10: sc in each st (13). Fasten off and leave tail for sewing and stuff.
Round 11: sc in each st (13). Fasten off and leave tail for sewing and stuff.
Round 12: sc in each st (13). Fasten off and leave tail for sewing and stuff.
Round 13: sc in each st (13). Fasten off and leave tail for sewing and stuff.
Round 14: sc in each st (13). Fasten off and leave tail for sewing and stuff.
Round 15: sc in each st (13). Fasten off and leave tail for sewing and stuff.
Round 16: sc in each st (13). Fasten off and leave tail for sewing and stuff.
Round 17: sc in each st (13). Fasten off and leave tail for sewing and stuff.
Round 18: sc in each st (13). Fasten off and leave tail for sewing and stuff.
Round 19: sc in each st (13). Fasten off and leave tail for sewing and stuff.
Round 20: sc in each st (13). Fasten off and leave tail for sewing and stuff.
Round 21: sc in each st (13). Fasten off and leave tail for sewing and stuff.
Round 22: sc in each st (13). Fasten off and leave tail for sewing and stuff.
Round 23: sc in each st (13). Fasten off and leave tail for sewing and stuff.
Round 24: sc in each st (13). Fasten off and leave tail for sewing and stuff.
Round 25: sc in each st (13). Fasten off and leave tail for sewing and stuff.
Round 26: sc in each st (13). Fasten off and leave tail for sewing and stuff.
Round 27: sc in each st (13). Fasten off and leave tail for sewing and stuff.
Round 28: sc in each st (13). Fasten off and leave tail for sewing and stuff.
Round 29: sc in each st (13). Fasten off and leave tail for sewing and stuff.
Round 30: sc in each st (13). Fasten off and leave tail for sewing and stuff.
Round 31: sc in each st (13). Fasten off and leave tail for sewing and stuff.
Round 32: sc in each st (13). Fasten off and leave tail for sewing and stuff.
Round 33: sc in each st (13). Fasten off and leave tail for sewing and stuff.
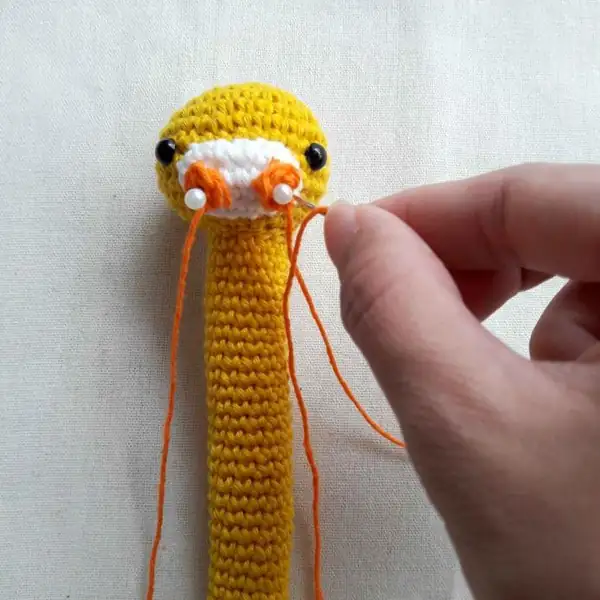
— Nostrils :
Round 1: 4 sc in magic ring (4)
Round 2: (sc in next st, inc) repeat 2 times (6)
Round 3: sc in each st (6) fasten off and leave tail for sewing.
Round 4: sc in each st (6) fasten off and leave tail for sewing.
Round 5: sc in each st (6) fasten off and leave tail for sewing.
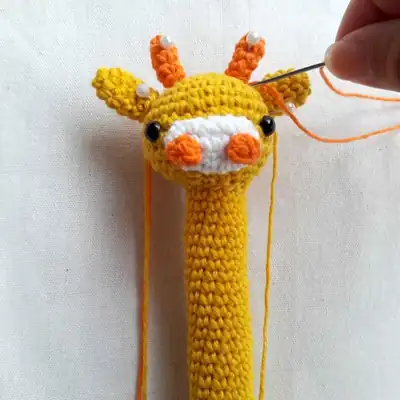
— Horns :
Round 1: 4 sc in magic ring (4)
Round 2: sc in each st (4). Fasten off and leave tail. Stuff carefully.
Round 3: sc in each st (4). Fasten off and leave tail. Stuff carefully.
Round 4: sc in each st (4). Fasten off and leave tail. Stuff carefully.
— Front Rolling Mane :
Round 1: 6sc in magic ring (6)
Round 2: (inc) repeat 6 times (12)
Round 3: (sc in next st, inc) repeat 6 times (18)
Round 4: sc in each st (18)
Round 5: sc in each st (18)
Round 6: (sc in next 2 sts, inc) repeat 6 times (24)
Round 7: (sc in next 3 sts, inc) repeat 6 times (30)
Round 8: (sc in next 9 sts, inc) repeat 3 times, sc in next 3 sts (33)
Round 9: sc in each st (33)
Round 10: sc in each st (33)
Round 11: sc in each st (33)
Round 12: sc in each st (33)
Round 13: (sc in next 5 sts, dec) repeat 4 times, sc in next 5 st (29)
Round 14: (sc in next 4 sts, dec) repeat 4 times, sc in next 5 st (25)
Round 15: (sc in next 3 sts, dec) repeat 5 times (20)
Round 16: (sc in next 2 sts, dec) repeat 5 times (15)
Round 17: (sc in next st, dec) repeat 5 times (10), start stuffing;
Round 18: dec in each st (5), fasten off. Insert safety eye between rnd 7 and 8. Leave 8 stitches between each eye;
— Mane :
Round 1: 6sc in magic ring (6)
Round 2: (inc) repeat 6 times (12)
Round 3: (sc in next st, inc) repeat 6 times (18)
Round 4: (sc in next 2 sts, inc) repeat 6 times (24)
Round 5: sc in each st (24)
Round 6: (sc in next 3 sts, dec) repeat 4 times, sc in next 4 st(20)
Round 7: (sc in next 2 sts, dec) repeat 5 times (15)
Round 8: sc in each st (15)
Round 9: (sc in next 4 sts, dec) repeat 2 times,, sc in next 3 st (13)
Round 10: sc in each st (13). Fasten off and leave tail for sewing and stuff.
Round 11: sc in each st (13). Fasten off and leave tail for sewing and stuff.
Round 12: sc in each st (13). Fasten off and leave tail for sewing and stuff.
Round 13: sc in each st (13). Fasten off and leave tail for sewing and stuff.
Round 14: sc in each st (13). Fasten off and leave tail for sewing and stuff.
Round 15: sc in each st (13). Fasten off and leave tail for sewing and stuff.
Round 16: sc in each st (13). Fasten off and leave tail for sewing and stuff.
Round 17: sc in each st (13). Fasten off and leave tail for sewing and stuff.
Round 18: sc in each st (13). Fasten off and leave tail for sewing and stuff.
Round 19: sc in each st (13). Fasten off and leave tail for sewing and stuff.
Round 20: sc in each st (13). Fasten off and leave tail for sewing and stuff.
Round 21: sc in each st (13). Fasten off and leave tail for sewing and stuff.
Round 22: sc in each st (13). Fasten off and leave tail for sewing and stuff.
Round 23: sc in each st (13). Fasten off and leave tail for sewing and stuff.
Round 24: sc in each st (13). Fasten off and leave tail for sewing and stuff.
Round 25: sc in each st (13). Fasten off and leave tail for sewing and stuff.
Round 26: sc in each st (13). Fasten off and leave tail for sewing and stuff.
Round 27: sc in each st (13). Fasten off and leave tail for sewing and stuff.
Round 28: sc in each st (13). Fasten off and leave tail for sewing and stuff.
Round 29: sc in each st (13). Fasten off and leave tail for sewing and stuff.
Round 30: sc in each st (13). Fasten off and leave tail for sewing and stuff.
Round 31: sc in each st (13). Fasten off and leave tail for sewing and stuff.
Round 32: sc in each st (13). Fasten off and leave tail for sewing and stuff.
Round 33: sc in each st (13). Fasten off and leave tail for sewing and stuff.
— Part 10 :
Round 1: 3 sc in magic ring (3)
Round 2: (sc in next st, inc) (4)
Round 3: (sc in next 2 sts, inc), sc in next st (5)
Round 4: (sc in next 3 sts, inc), sc in next st (6)
Round 5: sc in each st (6). Fasten off and leave tail for sewing.
Round 6: sc in each st (6). Fasten off and leave tail for sewing.
— Part 11 :
Round 1: 4 sc in magic ring (4)
Round 2: (sc in next st, inc) repeat 2 times (6)
Round 3: sc in each st (6)
Round 4: sc in each st (6)
Round 5: sc in each st (6)
Round 6: sc in each st (6)
This trio of companions embodies handmade warmth and playful design, inviting you to stitch with patience, enjoy the rhythm of rounds, and celebrate the small triumphs of neat seams and friendly faces. Your finished figures will brighten a nursery and become cherished companions for years to come, a tangible representation of skill growing with you. May your needles click with joy as you create something timeless and comforting. May your hands find calm in each stitch.