Crochetologist
Free Crochet Pattern
Beautiful Detailed Adorable

Lemon Granny Square Crochet Pattern

Completed lemon granny square with yellow rind, white surface-stitched segments and green leaf amigurumi-style square
4.0Rating
2-4 HoursTime
IntermediateSkill
Highlights

What makes it special

Cozy & Cuddly

A warm touch for your space that transforms ordinary corners into inviting nooks filled with handmade charm.

Bite-Sized Project

This is a 2-4 hour project for a single square, including the small sewn leaf and surface crochet for the citrus segments.

Intermediate Level

This intermediate-level pattern is suited to crocheters comfortable with magic ring starts, working in the round, treble and half-treble stitches, back/front loop work, surface crochet and simple sewing for attaching a leaf.

There is something quietly joyful about a small handmade square that looks like a slice of sunshine, and this Lemon Granny Square does exactly that. It is the kind of quick, cheerful stitch project you make when you want to give a friend a bright, personal token or add a splash of summer colour to your home.

This pattern is perfect for makers who love playful motifs and short, satisfying rounds; it suits an afternoon when you want to create something pretty and useful, and it leaves you with a finished piece that feels both crafty and deliberate — a tiny, portable burst of handmade warmth.

About This Lemon Granny Square Crochet Pattern

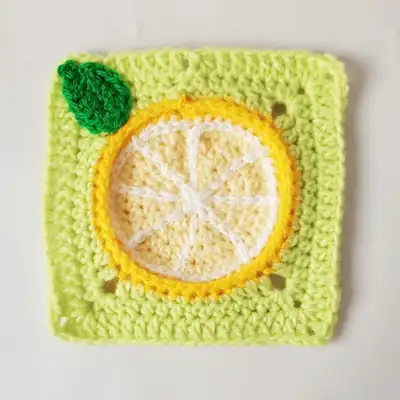
A bright lemon-themed granny square made in DK weight yarn, finished at approximately 13 cm (5 in) square. Pieces: central lemon circle, yellow rind round, white surface-stitched segments, green leaf, and surrounding pistachio square border. Materials used in the pattern: Paintbox Yarns Simply DK Buttercup Yellow (1 ball), Budget Yarns DK Lemon (1 ball), Budget Yarns DK Pistachio (1 ball), small amount Stylecraft Special DK Kelly Green (or dark green alternative).

Recommended hook: 4 mm (G-6). The finished square is ideal for blankets, cushions, scarves or summer table decor and includes a small sewn leaf and surface crochet instructions for the lemon segments.

This pattern guides you as you build a small, decorative granny square by working a central circular lemon motif into a square border. You will make a layered circular centre in two yellow shades, add a contrasting pistachio square round, and finish with a tiny knitted-style leaf sewn to the upper edge; the pattern walks you through stitch placement so the circle sits centered inside the square.

Piecing and finishing are gentle, hands-on tasks: surface crochet creates the white segments over the lemon, then ends are woven and the leaf is sewn into place to stabilise the motif. The instructions identify where to join colour changes, where to work into front or back loops, and how to place the leaf so your square looks polished and cohesive when joined into larger projects.

Working these elements together emphasises neat tension and consistent stitch counts so the circular motif remains centred and the square edges sit flat; sewing the leaf and weaving ends are the final steps that give the square its finished, professional appearance.

Close-up of the central lemon circle showing treble and half-treble stitches and neat surface crochet segments on the granny square

The pattern delivers clear, numbered rounds for the lemon circle, a small border sequence in pistachio, and a short leaf pattern to sew on.

Your finished square can be used alone as a coaster or combined with others to make larger items such as cushions or a summer blanket.

Stitches & Skills You'll Use

This pattern uses a handful of foundational crochet techniques that combine to make the lemon motif pop. You will work a magic ring to begin the central circle, then use treble crochet (Tr) and half treble (Htr) in UK terms to build the round shape, with increases that keep the circle flat. These are the shaping tools that create the lemon body.

The instructions rely on working in the round and joining with slip stitches to maintain tidy round starts, plus occasional working into the front or back loop only (FLO/BLO) to achieve a raised edge for the rind. There is also a short chain picot used in the leaf tip to produce a small pointed finish.

Why You'll Love This Lemon Granny Square Crochet Pattern

I absolutely love this pattern because it turns a simple granny square into a playful citrus motif that brightens any project. I enjoy how the layered circle and surface crochet segments add a textile drawing to the square, making each stitch feel purposeful. The little leaf is a tiny finishing flourish that always delights me when it sits neatly over the rind.

I find the mix of rounds, colour changes and a final hand-sewn detail very satisfying and quick to make for gifts.

Colour & Yarn Inspiration

For a fresh, zesty look use the stated palette of buttercup and lemon yellows with pistachio for the square background and a richer Kelly green for the leaf; the contrast gives the lemon motif good separation and makes surface crochet lines readable. Using DK weight cotton will make the segments crisp and the square durable for coasters or table decor.

If you want a softer aesthetic, swap the bright yellows for pale buttercream and apricot shades and choose a muted sage background to create a vintage-inspired square. Alternatively, try tonal variations—ombre yarns or variegated DK for the centre—so each lemon appears unique and painterly when combined in a blanket.

Two assembled lemon granny squares laid out to show colour variation and possibility for joining into a blanket

Switch Things Up

I like to change the central lemon colour to a soft peach for a subtler fruit motif, which makes a gentle, vintage-style square ideal for baby blankets.

For a bolder look I replace the pistachio border with a deep teal and add one extra round of trebles to create a wider frame around the lemon motif.

I sometimes omit the leaf and stitch a tiny embroidered flower at the corner instead for a floral variation that feels less literal and more decorative.

If you want a keyring or bag charm version, work the motif in fingering weight yarn and a 2.5 mm hook, then back with felt and add a split ring for portability.

I also experiment with textured yarns for the rind round and then work the surface crochet with smooth cotton to make the white lines stand out distinctly.

When making a blanket, alternate lemon squares with plain pistachio squares or mix citrus colours in a checkerboard to make a lively summer afghan.

Try embroidering seeds or freckles on the lemon centre using a satin stitch to add a tiny painted detail that changes the whole expression of the square.

Another option is to add small seed beads into the picot on the leaf tip for a hint of sparkle when used as a coaster or ornament.

For a festive twist, make the central circle in white, use yellow for the rind and red for the background to create a stylised holiday ornament square.

If you enjoy colourwork, carry two contrast colours up the side and slip-stitch them together to create an inset stripe border for a modern reinterpretation of this classic square.

Ways to Use & Gift It

These lemon squares make lovely, small gifts when presented as a set; stitch a cluster of four and frame them in a simple cushion cover for a summery housewarming present, or string several together with ribbon for a bright, seasonal bunting perfect for kitchen or garden parties.

As single items they're ideal as coasters or hot mat toppers for tea-lovers, and adding a hanging loop transforms a finished square into a cheerful kitchen ornament or fridge magnet backing. Pack several stitched squares as a DIY kit with yarn remnants and hooks for a thoughtful, handmade gift that invites someone else to start a project.

Common Mistakes & How to Fix Them

Starting the central circle too loosely will flatten the lemon; keep the magic ring snug and tensioned so the initial stitches draw into a neat round and maintain the correct stitch count. Working the pistachio round into the wrong loop (working into the front loop instead of the back loop) will close the wrong groove; always join into the exposed back loop from the specified earlier round when instructed. Skipping the slip stitch join at the end of a round causes a gap and misaligned starting point; finish each round with the correct sl st into the top of the beginning chain to preserve stitch placement. Making the 3 ch picot too tight or too loose alters the leaf tip shape; make the picot with a relaxed tension and test the stitch before fastening off to achieve the neat, raised point. Failing to weave in the short colour-change tails securely creates loose loops during washing; weave ends under surrounding stitches and secure with a tapestry needle to hide and lock them in place. Not counting stitches after increase rounds will distort the square edge; recount after each established round so the corner chain-2 spaces and stitch totals match the stated stitch counts.

Maker's Notes

When I made this square I used the specified DK yarn and a 4 mm hook and completed a single square in roughly three hours including surface crochet and sewing the leaf. I worked slowly through rounds 1–5 to keep the circle flat and paid special attention in round 8 to joining the pistachio into the back loops; beginners can stumble where the instructions ask you to work into the back loop of the earlier round, so pause and check that the previous round's back loop is exposed. Surface crochet lines also took me extra time to space evenly across the circle, so practising on a scrap circle reduces frustration.

I tried a substitution: I tested a substitution using a slightly heavier DK-like aran yarn with a 4.5 mm hook to see how the square scaled up; the result was a chunkier, more textured motif about 1.5 cm larger per side with slightly more pronounced ridges in the rind round. Surface crochet still read clearly but the leaf sat a touch bulkier; the substitution works well for cozier cushions but reduces the number of squares obtainable per ball of yarn.

Lemon Granny Square Crochet Pattern

Make this sunny Lemon Granny Square with our free crochet pattern — full round-by-round instructions, surface crochet tips and materials list. Start crafting now!

Intermediate 2-4 Hours
Pattern at a glance
Skill level
Intermediate
Time to make
2-4 Hours
Hook size
4 mm (G-6)
Yarn weight
DK / #3
Finished size
Approx. 13 cm / 5 in square
Gauge
18 stitches x 8 rows = 4" x 4" (10 cm x 10 cm) when working in the round with DK yarn and a 4 mm hook; adjust tension to ensure no stuffing or gaps if converting to amigurumi-style applications.
Yarn used
Approx. 120-180 g total (around 360-540 m) depending on yarn brand and how many squares you plan; this pattern uses small portions of three DK balls per square.

Materials Needed

Main Fabric
  • 01
    Paintbox Yarns Simply DK Buttercup Yellow - 1 ball (DK weight)
  • 02
    Budget Yarns DK Lemon - 1 ball (DK weight)
  • 03
    Budget Yarns DK Pistachio - 1 ball (DK weight)
  • 04
    Stylecraft Special DK Kelly Green (or dark green alternative) - small amount for leaf and detail
Tools Required
  • 01
    Crochet hook 4 mm (G-6)
  • 02
    Scissors
  • 03
    Tapestry needle for weaving and sewing
  • 04
    Stitch marker (optional)

— Part 1 :

Round 1: In MR Ch 2 (counts as a stitch), 8Htr into the ring. Pull the ring closed and join to the top of the Ch 2 with a sl st. (9)
Round 2: Ch 2 (counts as a st), 1Htr in the base of the Ch 2, 2Htr in each st around, join to the top of the Ch 2 with a sl st. (18)
Round 3: Ch 2 (counts as a st), 1Htr in the st at the base of the Ch 2, 1Htr in next st. *2Htr in next st, 1Htr* repeat from * to * around, join with sl st to the top of the beginning Ch 2. (27)
Round 4: Ch 2 (counts as a st), 1Htr in st at the base of the Ch 2, 1Htr in next 2 stitches. *2Htr, 1Htr, 1Htr* repeat from * to * around. Join with a sl st to the top of the beginning Ch 2. (36)
Round 5: Ch 2 (counts as a st), 1Htr in st at the base of the Ch 2, 1Htr in next 3 stitches. *2Htr in next st, 1Htr, 1Htr, 1Htr* repeat from * to * around, join with sl st into the top of the beginning Ch 2. FO (45)
Round 6: Join bright yellow into any stitch on the circle. Ch 1 (does not count as a st) Dc in the same st and Dc in each st around, sl st to Ch1.
Round 7: Ch 1 (does not count as a st) 1Dc in each stitch around in FLO. Join to Ch 1, FO. (45)
Round 8: Join pistachio to BL of any stitch on the Lemon circle from round 6 (not the last round worked but the round prior to this you will have back loops exposed. Ch 1 (does not count as a st), 1Dc in same space as Ch 1, 1Dc, *1Htr, 2Tr, Ch 2, 2Tr, 1Htr, 5Dc*. Repeat from * to * twice more. 1Htr, 2Tr, Ch2, 2Tr, 1Htr, 3Dc, sk last st, join to the first Dc. (4 ch 2 spaces and 44 stitches made).
Round 9: Ch 2 (counts as a st), 1 Htr in each st to the corner Ch2 space [2Tr, Ch2, 2Tr] in corner space, repeat around the square, 1Htr in each stitch and [2Tr, Ch2, 2Tr] in corner space. Join to top of beginning Ch2 with a sl st. (4 Ch2 spaces and 60 stitches)
Round 10: Ch 3 (counts as a st), 1Tr in each st to the corner Ch 2;

Assembly Instructions

  1. Sew the small crocheted leaf into place on the square near the top edge, positioning it so the tip overlaps the yellow rind by one to two stitches and sew through the base of the leaf securely.
  2. Use surface crochet with white yarn to create the lemon segments: stitch across the centre horizontally, vertically and twice diagonally, spacing the lines evenly so they divide the circle into six segments.
  3. Weave in all yarn ends neatly on the wrong side of the square, burying ends under adjacent stitches so they do not show on the right side.
  4. When joining multiple squares into a blanket or cushion, block squares gently if needed to square edges, pin pieces in position, and slip stitch or mattress stitch through edge loops for an even join.
  5. After finishing, press lightly with a warm iron through a damp cloth or pin to shape the leaf and ensure the circular centre sits flat before final joining into a larger project.

Important Notes

  • Gauge is described in the pattern as 18 stitches and 8 rows for a 4"x4" swatch; if making multiple squares keep the same yarn and hook for uniform sizing.
  • Work the pistachio round into the back loops of the specified earlier round to create the raised border effect described in the instructions.
  • Surface crochet lines should be sewn with a single strand of white and kept taut but not stretched to avoid puckering the circular motif.
  • When changing colours, fasten off and weave in ends as you go to prevent a tangle of short yarn tails on the wrong side of the work.
  • Pin parts in place before sewing the leaf so you can adjust the angle and spacing, then use small, neat stitches to secure it flat against the square.

Thank you for choosing this Lemon Granny Square pattern; your support helps small designers keep creating quality patterns. I hope this square sparks sunny projects in your home and inspires playful colour combinations when you join multiple squares. Make something bright today and pass on the handmade charm to someone special.

Good to know

You ask, we answer

The finished square measures approximately 13 cm x 13 cm (about 5 in x 5 in) when made using DK weight yarn and a 4 mm hook, which gives the circular motif enough detail while keeping the square compact for blankets or cushions.

Yes, you can substitute yarn weight and adjust the hook accordingly but expect the finished size to change; a bulkier yarn with a larger hook will produce a larger, squishier square while a finer yarn will yield a smaller, more delicate motif that may need tighter surface crochet to show the segments.

Surface crochet is an accessible skill and the pattern provides simple guidance on where to place the white segment lines; beginners should practice on a scrap circle first to get comfortable with keeping the tension even and following straight lines across the centre before working on the finished square.

Each square uses only a small portion of each 100g ball; estimating exact totals depends on how many full rounds and the leaf you include, but with the listed yarn amounts you can expect to produce several squares before needing extra yarn for larger blankets or cushions.

Absolutely; these squares were designed to be joined. When making multiples keep the same hook and yarn for consistent gauge, block squares if necessary, and use your preferred joining method such as slip stitch, single crochet join or mattress stitch to create a neat seam.

The pattern is written in UK terms; for example, UK Double Crochet (Dc) equals US Single Crochet (sc) naming differs, UK Treble (Tr) corresponds to US Double Crochet (dc), and UK Half Treble (Htr) corresponds to US Half Double Crochet (hdc). Refer to the abbreviation list for full guidance.

Detail of the small crocheted leaf sewn to the upper edge of the lemon granny square
Join 100k+ crocheters

Get new free patterns, stitch tips and exclusive content in your inbox.