Crochetologist
Free Crochet Pattern
Beautiful Detailed Adorable

Hippo Lovey Amigurumi Pattern

Blue gray hippo lovey with head and lovey panel shown front view amigurumi
4.9Rating
5-7 HoursTime
Beginner FriendlySkill
Highlights

What makes it special

Made with Love

An adorable friend to cherish, handcrafted with love to bring comfort and joy for years to come.

Weekend Treat

Expect to finish this lovey in around five to seven hours depending on your pace because it combines a single stuffed head with simple flat lovey shaping and small details.

Beginner Friendly Level

A beginner-friendly lovey that teaches magic ring, half double crochet, continuous spirals, simple increases and decreases, and basic seaming while remaining accessible to new crocheters.

This hippo lovey is the kind of handmade companion that becomes part of a child's world, soft in hand and reassuring at nap time. It’s perfect for makers who want to crochet a gift that is equal parts plush toy and small blanket, blending the intimacy of a stuffed head with the practicality of a lovey panel.

Designed for comfort and simple finishes, the pattern invites you to make something to tuck into a stroller, carry in a diaper bag, or place beside a sleeping infant, offering a warm handmade calm at the end of busy days.

About This Hippo Lovey Amigurumi Pattern

This Hippo Lovey creates a plush comfort companion with a soft chenille-style body and a cuddly hippo head attached to a lovey blanket. The project includes head, ears, arms, two legs and the lovey detail, crocheted in continuous spirals for a seamless finish. Materials used in the sample are Himalaya Dolphin Baby 100g/120m (100% micropolyester) color #80325 (Gray) and #80320 (Dark gray), a 5 mm crochet hook, black 16 mm safety eyes, fiberfill, and black embroidery thread.

The finished lovey measures approximately 45 cm using the recommended materials and tools, and the pattern offers photo-assisted assembly steps for accurate placement of facial features and limbs.

When you make this pattern you follow clear, photographed steps that show how separate pieces join into a single lovey silhouette; the layout focuses on working in spirals so seams are invisible and shaping remains smooth.

The process of stitching the head, creating paired ears and arms, and then connecting simple tubular legs to a flat lovey panel gives steady progress and satisfying milestones: you see a face, then limbs, then the whole toy taking form.

The assembly section walks you through pinning positions and using small running stitches or whipstitch joins so the final seams sit neatly; the pattern balances shaping with very approachable stitch counts to keep each stage calm and manageable.

Close-up of hippo head showing safety eyes and snout amigurumi

This pattern emphasizes patient finishing: press the safety eyes slightly into the fabric and embroider brows and nostrils with small, even stitches for expression and durability.

Main finishing tips are given with close-up photographs so you can mirror the placements and achieve a professional-looking toy without advanced sewing experience.

Stitches & Skills You'll Use

The Hippo Lovey uses a short, focused stitch list so you can concentrate on shaping and finishing: magic ring to start small circular pieces, single crochet and half double crochet for dense, plush fabric, increases and decreases for smooth shaping, and working in continuous spirals to hide seams.

Invisible decreases are not required in this pattern; instead the decrease method is a standard two-stitch decrease suited to plush chenille yarn, and the arms and legs are formed using half double crochet sections that are folded and worked through two layers for crisp edges.

Final hand-skills include basic seaming, using a darning needle to close small openings and to weave in ends, and simple embroidery stitches for brows and nostrils, which give the hippo its expression without complicated surface techniques.

Why You'll Love This Hippo Lovey Amigurumi Pattern

I absolutely love this Hippo Lovey because it blends the tactile pleasure of plush chenille yarn with the emotional comfort of a classic lovey and the pattern yields a piece that is both snuggly and stable. I take real pleasure in the head-shaping sequence, which creates a sweet hippo expression using simple increases, decreases and careful stuffing. I enjoy that the project finishes quickly enough to make as a heartfelt gift yet contains small precise steps—like embroidering brows—that let me practice neat hand-sewing.

I also appreciate patterns that include photo guidance for tricky placements because that visual reassurance keeps me confident while attaching ears, arms and the head to the lovey panel.

Colour & Yarn Inspiration

For classic nursery palettes, pair the main body with neutral trim: a soft gray body and darker gray paw tips read as elegant and understated, while a pastel mint or blush body gives a modern, gentle finish for gender-neutral nurseries.

If you prefer high-contrast details, use a vivid accent color for the paws and ears to create visual interest on photographs and to help tiny fingers find tactile points; natural fibers or acrylic blends change drape and sheen, so choose a yarn with the soft hand you want for a lovey intended for daily cuddling.

Finished hippo lovey laid flat showing knitted chenille texture amigurumi

Switch Things Up

I like to imagine different colorways for the lovey: try a warm peach body with cream details for a soft nursery palette instead of the gray shown.

If you want a smaller version, I recommend using DK weight yarn with a 3.5 mm hook and adjusting tension to create a mini lovey for a keychain or small hand to hold.

To make a larger, cuddlier lovey I sometimes use a bulkier chenille yarn and a 6 mm hook, which gives a plush, oversized finish perfect for toddlers who love heavy textures.

I sometimes replace safety eyes with embroidered eyes for a fully baby-safe version; use a strand of embroidery cotton and small, repeated stitches to build an eye shape that sits flat against the fabric.

For seasonal variation I’ll add a tiny detachable scarf or a crocheted heart sewn to the lovey’s chest so the piece becomes a themed gift for holidays or birthday wrapping.

Try adding contrasting toe or paw pads by switching to the dark gray color for the ends of arms and feet to create visual anchors and a two-tone look that reads well in photos.

If you enjoy mixed media, sewing on a tiny felt bow or crocheting a small party hat gives the hippo personality without altering the base pattern structure.

Swap in different embroidery shapes for the brows and nostrils to change the hippo’s expression from playful to sleepy while using the same puzzle of stitches the pattern provides.

To make the lovey more tactile for sensory play, I sometimes stitch a small loop of ribbon at the edge of the lovey so babies can grasp something different than the plush yarn surface.

For gift sets, I create matching accessories such as a tiny blanket edge, a small rattle, or a coordinating hat worked in the same yarn so the lovey reads as part of an ensemble without altering the main construction.

Ways to Use & Gift It

Make a Hippo Lovey as a new-baby gift that pairs well with a small board book and a soft hat; its lightweight lovey panel makes it ideal for gifting inside a small basket along with bath essentials or baby-safe teethers for a complete welcome package.

Create a matching sibling set with different colored edging so each child has a personalized lovey, or craft a single special lovey for a sleep-training milestone, presenting the finished toy as a reward for bravery at bedtime to make the moment memorable.

Common Mistakes & How to Fix Them

Placing safety eyes too high or too low will make the face look uneven; mark the positions with pins between the recommended rounds and check symmetry before securing the eyes. Stuffing the head too firmly creates a rigid shape that loses hippo charm; add fiberfill gradually and shape with your fingers for a soft, rounded profile. Crocheting with inconsistent tension will cause the lovey panel edges to ripple; keep a relaxed, steady tension and occasionally measure the panel against a template. Skipping the step of folding and crocheting through two layers for ears or hands will produce loose edges; follow the instructions to crochet through both layers and secure with a long tail for sewing. Forgetting to thread the yarn tail through the remaining stitch loops when closing small openings can cause gaps; use a darning needle to weave the tail through outside loops and pull tight to close cleanly. Sewing parts on without pinning causes misaligned limbs; always pin pieces in the recommended rounds and view the lovey from multiple angles before stitching.

Maker's Notes

When I made the sample lovey I used Himalaya Dolphin Baby chenille yarn and a 5 mm hook and the full project took me about six hours across two short sessions. I found the magic ring starts easiest when using a slightly looser tension on the first round so the ring can be closed flat; beginners often struggle most with keeping even height at the point where the snout joins the head, and counting the rounds carefully during the head increases prevents misplacement of the safety eyes. The arms and legs are forgiving because they remain unstuffed, but folding and joining the ear pieces requires patience; I recommend working the ear fold and then sewing the tail inside with a darning needle while checking the picture guide to match the shape.

Overall the pattern stitched up quickly and the photo sequence helped me match placements precisely without reworking.

I tried a substitution: I tested the lovey using Estako Velvet Chenille as a single substitution and found the final piece slightly thicker and a touch fuzzier than the original sample; the finished lovey measured close to 47 cm instead of the design's 45 cm and the head felt denser, which softened the facial definition slightly but increased cuddliness. Using that substitute required only a minor adjustment of stuffing amount for the head and did not necessitate any stitch count changes, so the pattern translated well with the larger, plush yarn while producing a chunkier overall feel.

Hippo Lovey Amigurumi Pattern

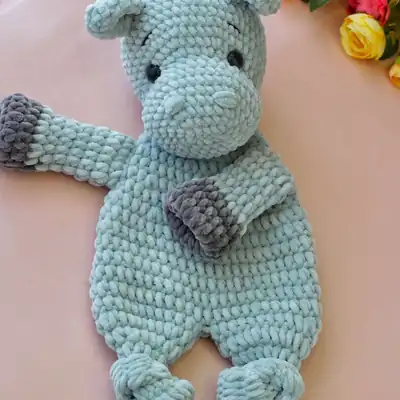
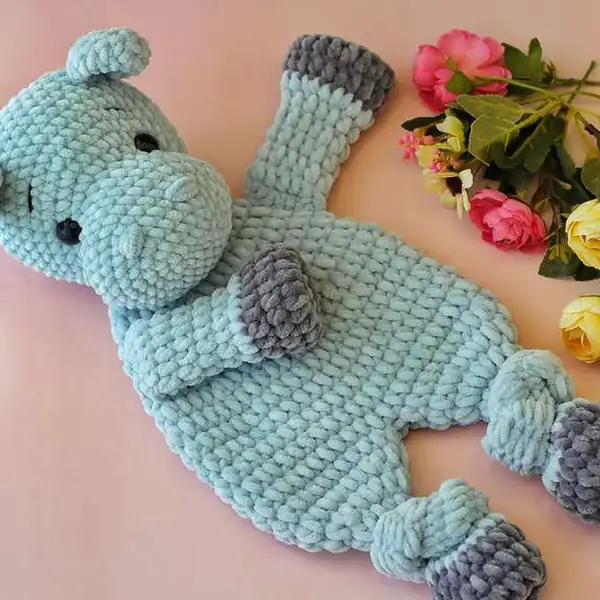
Download this free crochet pattern for a cuddly Hippo Lovey amigurumi — full round-by-round instructions, materials list and assembly photos. Start your handmade gift today.

Beginner Friendly 5-7 Hours
Pattern at a glance
Skill level
Beginner Friendly
Time to make
5-7 Hours
Hook size
5.0 mm (H/8)
Yarn weight
Bulky / #5 (chenille plush style)
Finished size
Approx. 45 cm / 17.7 in long
Gauge
Approximate gauge: 8 sc x 8 rows = 5 cm / 2 in in chenille yarn using 5 mm hook; tight tension recommended so stuffing does not show.
Yarn used
Approximately 200-250 g total of chenille-style yarn (varies by color and brand), about 240-300 meters total.

Materials Needed

Main Fabric
  • 01
    Himalaya Dolphin Baby 100g/120m (100% micropolyester) color #80325 (Gray)
  • 02
    Himalaya Dolphin Baby 100g/120m (100% micropolyester) color #80320 (Dark gray)
  • 03
    Suggested substitute: Estako Velvet Chenille (chenille blanket yarn)
  • 04
    Suggested substitute: Premier Parfait Chunky (bulky chenille-style yarn)
  • 05
    Suggested substitute: Hobbii Baby Snuggle (soft plush yarn)
  • 06
    Small amounts of black embroidery thread for brows and nostrils
  • 07
    Fiberfill for stuffing the head
Tools Required
  • 01
    Crochet hook size 5 mm
  • 02
    Black safety eyes 16 mm (2 pieces)
  • 03
    Fiberfill for stuffing
  • 04
    Black embroidery thread
  • 05
    Darning needle or yarn needle for sewing and closing openings
  • 06
    Sewing pins for positioning pieces
  • 07
    Scissors

— Head :

Round 1: Start in second chain from the hook: sc in next 4 st, 3 sc into the last chain, (turn the crocheting and on the other side of foundation chain work) sc in next 3 st, 2 sc into the last loop [12];
Round 2: inc in next st, sc in next 3 st, inc in next 3 st, sc in next 3 st, inc in next 2 st [18];
Round 3: 1 sc, inc, 3 sc, (1 sc, inc) repeat 3 times, 3 sc, (1 sc, inc) repeat 2 times [24];
Round 4: 2 sc, inc, 3 sc, (2 sc, inc) repeat 3 times, 3 sc, (2 sc, inc) repeat 2 times [30];
Round 5: 3 sc, inc, 3 sc, (3 sc, inc) repeat 3 times, 3 sc, (3 sc, inc) repeat 2 times [36];
Round 6: 36 sc [36];
Round 7: 36 sc [36];
Round 8: 3 sc, dec, 3 sc, (3 sc, dec) repeat 3 times, 3 sc, (3 sc, dec) repeat 2 times [30];
Round 9: 30 sc [30];
Round 10: 5 sc, inc in next 5 st, 20 sc [35];
Round 11: inc, 3 sc, inc, 2 sc, inc, 4 sc, inc, 2 sc, inc, 3 sc, inc, 15 sc [41];
Round 12: 7 sc, inc, 2 sc, inc, 4 sc, inc, 2 sc, inc, 22 sc [45];
Round 13: 45 sc [45];
Round 14: 45 sc [45];
Round 15: 45 sc [45];
Round 16: 45 sc [45];
Round 17: 45 sc [45];
Round 18: 45 sc [45];
Round 19: (13 sc, dec) repeat 3 times [42];
Round 20: 42 sc [42];
Round 21: (5 sc, dec) repeat 6 times [36];
Round 22: (4 sc, dec) repeat 6 times [30];
Round 23: (3 sc, dec) repeat 6 times [24];
Round 24: (2 sc, dec) repeat 6 times [18];

— Ears (make 2) :

Round 1: 5 sc in magic ring [5];
Round 2: (inc) repeat 5 times [10];
Round 3: (1 sc, inc) repeat 5 times [15];
Round 4: 15 sc [15];
Round 5: 15 sc [15];

— Part 3 :

Round 25: (1 sc, dec) repeat 6 times [12];
Round 26: (dec) repeat 6 times [6];

— Arms (make 2) :

Round 1: 6 hdc in magic ring [6];
Round 2: (inc) repeat 6 times [12];
Round 3: (1 hdc, inc) repeat 6 times [18];
Round 4: 18 hdc in each stitch around [18] – 2;
Round 5: 18 hdc in each stitch around [18] – 2;
Round 6: (1 hdc, dec) repeat 6 times [12];
Round 7: 12 hdc in each stitch around [12] – 5;
Round 8: 12 hdc in each stitch around [12] – 5;
Round 9: 12 hdc in each stitch around [12] – 5;
Round 10: 12 hdc in each stitch around [12] – 5;
Round 11: 12 hdc in each stitch around [12] – 5;

— Part 5 :

Round 1: 6 hdc in magic ring [6];
Round 2: (inc) repeat 6 times [12];
Round 3: (1 hdc, inc) repeat 6 times [18];
Round 4: 18 hdc in each stitch around [18];
Round 5: 18 hdc in each stitch around [18];
Round 6: (1 hdc, dec) repeat 6 times [12];
Round 7: (2 hdc, dec) repeat 3 times [9];
Round 8: 9 hdc in each stitch around [9];
Round 9: 9 hdc in each stitch around [9];
Round 10: 9 hdc in each stitch around [9];
Round 11: 9 hdc in each stitch around [9];
Round 12: 9 hdc in each stitch around [9];
Round 13: 9 hdc in each stitch around [9];
Round 14: 9 hdc in each stitch around [9];
Round 15: 9 hdc in each stitch around [9];
Round 16: 9 hdc in each stitch around [9];
Round 17: 9 hdc in each stitch around [9];
Round 18: 9 hdc in each stitch around [9];
Round 19: 9 hdc in each stitch around [9];
Round 20: (2 hdc, inc) repeat 3 times [12];
Round 21: (1 hdc, inc) repeat 6 times [18];
Round 22: (2 hdc, inc) repeat 6 times [24];
Round 23: Connecting the legs with a 1 hdc, go on with 23 hdc around the first leg and 24 hdc around the second leg [48].
Round 24: 48 hdc in each stitch around [48] – 2;
Round 25: 48 hdc in each stitch around [48] – 2;
Round 26: 48 hdc in each stitch around [48] – 4;
Round 27: 48 hdc in each stitch around [48] – 4;
Round 28: 48 hdc in each stitch around [48] – 4;
Round 29: 48 hdc in each stitch around [48] – 4;
Round 30: (6 hdc, dec) repeat 6 times [42];
Round 31: 42 hdc in each stitch around [42];
Round 32: (5 hdc, dec) repeat 6 times [36];
Round 33: 36 hdc in each stitch around [36];
Round 34: (4 hdc, dec) repeat 6 times [30];
Round 35: 30 hdc in each stitch around [30];
Round 36: (3 hdc, dec) repeat 6 times [24];
Round 37: (2 hdc, dec) repeat 6 times [18];

Assembly Instructions

  1. Attach the ears between rounds 16 and 17 of the head, spacing them 8 stitches apart; secure with stitch pins, then sew each ear through the base using a whipstitch and weave in ends.
  2. Sew the hippo head to the lovey panel between rounds 13 and 14, keeping the head centered and ensuring the eyes point straight ahead; baste lightly, check positioning, then finish with secure stitches.
  3. Position and sew the arms between rounds 31 and 35 on each side of the body, angle them slightly forward for a hugging pose, and invisibly anchor the long thread tails through the body.
  4. Make the nostrils by marking two points between rounds 4 and 5 on the snout with pins spaced 3 stitches apart, and stitch 3–4 short stitches between the pins with embroidery thread to create subtle nostril dimples.
  5. Embroider brows using black embroidery thread between rounds 13 and 14, marking points 8 stitches apart for symmetrical placement and referring to the pictures for exact spacing.
  6. If a hole remains between the legs after joining, close it by sewing the gap with matching yarn and a blunt needle, then weave in all ends to secure the join.

Important Notes

  • Work all pieces in continuous spirals unless the pattern explicitly instructs otherwise to avoid visible seam lines on the toy.
  • Stuff the head gradually and lightly so the outer chenille texture stays plush and the face retains gentle curvature without bulging.
  • Fold small details like ears and hands and crochet through two layers to form defined shapes that sew on cleanly and resist fraying.
  • Use pins to align parts before sewing so you can adjust placement and symmetry without committing stitches prematurely.
  • Weave in ends and hide tails inside the head or body to prevent snags and keep the lovey safe for gentle handling.

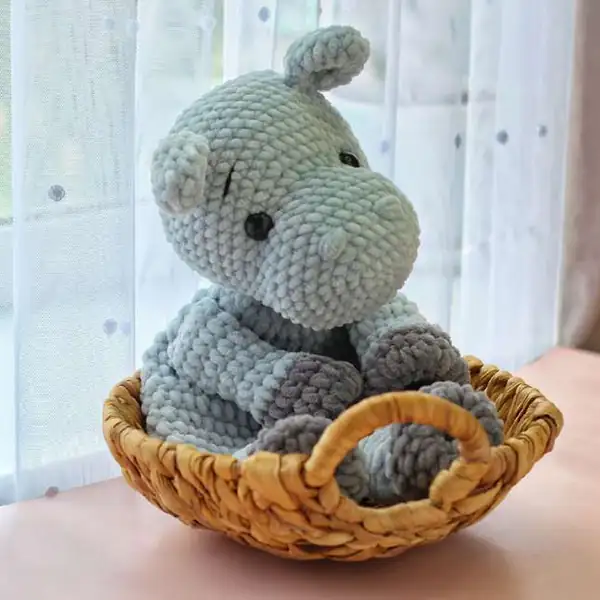
Thank you for making the Hippo Lovey and supporting small-design makers; I hope this pattern becomes a beloved bedtime companion for a child in your life. Follow the photos and take your time with finishing — the small details are what make handmade toys memorable and long-lasting. Enjoy the calming rhythm of chenille yarn and the rewarding moment when the finished lovey becomes a soft friend.

Good to know

You ask, we answer

The finished lovey measures approximately 45 cm tall when made with the recommended Himalaya Dolphin Baby yarn and a 5 mm hook; using different yarns or hook sizes will change the final dimensions.

Yes, most chenille and micropolyester yarns used in this pattern are machine washable on a gentle cycle, but check yarn care instructions and use a laundry bag or hand-wash for extra protection to preserve the soft texture and safety eyes.

This pattern is labeled beginner friendly and guides you through basic stitches, continuous spirals, and simple seaming, but newcomers should be comfortable with the magic ring and working in the round for best results.

No, the arms and legs in this lovey are worked mostly unstuffed and folded to create flat appendages, which keeps the lovey lightweight and soft for cuddling.

For babies under three years, consider embroidering eyes instead of using safety eyes and ensure all sewn parts are securely attached and yarn ends are woven in deeply to prevent choking hazards.

Yes, you can substitute smaller eyes or use embroidered features; if you change eye size position the eyes relative to the rounds shown in the pattern and double-check spacing before fastening them.

Arms and feet detail showing dark gray paw tips on hippo lovey amigurumi
Join 100k+ crocheters

Get new free patterns, stitch tips and exclusive content in your inbox.