Crochetologist
Free Crochet Pattern
Beautiful Detailed Adorable

Hennifer Chicken Crochet Coaster Set Pattern

Finished Hennifer chicken crochet coaster set laid out with a mug
4.4Rating
12-15 HoursTime
IntermediateSkill
Highlights

What makes it special

Handmade Charm

A warm touch for your space that transforms ordinary corners into inviting nooks filled with handmade charm.

Multi-Day Project

This project spans 12-15 hours across several sessions, because it threads four coasters, two egg coasters, and the assembly work into a complete chicken-themed kitchen set.

Intermediate Level

This pattern suits crocheters who enjoy color changes, shaping, and multi-piece assembly, combining straightforward stitches with careful finishing to create a playful chicken coaster set that reads as polished and complete.

Step into a kitchen-friendly world where whimsy and practicality share a cozy table. The Hennifer Chicken Crochet Coaster Set invites crocheters to create four cheerful farmyard coasters, a tiny chicken head centerpiece, and a nest-inspired mat, all in warm, approachable colors. The project emphasizes friendly shapes and straightforward construction, making a satisfying endeavor for evenings at home or a bright group gathering with yarn and hooks at the ready.

About This Hennifer Chicken Crochet Coaster Set Pattern

Meet the Hennifer Chicken Crochet Coaster Set: a playful collection designed for everyday use that doesn’t sacrifice charm. The four chicken comb coasters form a cheerful display, each finished with a crisp edge that hints at tiny feathered detailing. You’ll also crochet a pair of egg coasters that nestle beside a nest-like mat, creating a complete, cohesive vignette for a kitchen or coffee nook.

The pieces are crafted using worsted-weight yarns, with thoughtful shaping to keep the forms light and approachable rather than overly complex. The set is modular, so you crochet each piece separately, then assemble with simple joining methods. Expect a satisfying progression from round to round, with clear benchmarks as you complete each piece.

The result is a hand-crafted display that reads polished and joyful, with a touch of whimsy that makes it a lovely gift or a bright touch in your own home. The project emphasizes accessible techniques, steady construction, and a finish that holds up to daily use, dishware clinks, and casual display alike.

The Hennifer Chicken Crochet Coaster Set is designed to brighten a table with a playful farm motif while staying practical for everyday use. The four chicken comb coasters form a repeating, friendly silhouette, finished with an edging that evokes delicate feathering without requiring texture-specific stitches. Each piece is crocheted separately before being joined to form a coordinated display.

The egg coasters introduce shell-like color changes, and a nest-inspired mat grounds the set with a broader, warm surface for mugs or teapots. The pattern relies on familiar, approachable techniques: starting with a circle or magic circle, building through simple rounds, and using basic increases and decreases to shape the forms. Finishing steps include securing components with a light seam and weaving tails away from the polished edges.

Simple assembly steps connect the head, beak, wattles, and feet to the body elements, resulting in a cohesive set that looks integrated despite being worked piece by piece. The design leans into colorwork across several elements, while maintaining the ease of standard crocheted construction. This combination yields results that feel intricate and polished without requiring advanced or uncommon stitches.

Close-up of chicken comb coaster edge with contrasting yarn

What sets this pattern apart is its balance of character design with practical home decor. Each piece is worked separately and designed to sew together neatly for a cohesive look. Color transitions across the egg shells and the nest mat add visual interest, yet the underlying technique remains accessible to crocheters who enjoy color changes and simple shaping.

The modular approach means you can tailor the project to fit a table size or a display space, and you can choose to complete just one component as a quick gift or proceed to finish the full set for a charming countertop display. The result is a complete, playful set that works well as a thoughtful hostess gift, a cheerful kitchen addition, or a decorative project that you can customize with your preferred color palette.

Stitches & Skills You'll Use

The technique core here is building from a magic circle with careful increases to form the rounded coasters, then moving through a sequence of single crochet rounds and selective increases to maintain a smooth outer edge. You’ll also practice simple color changes for the egg shell and nesting mat, plus the shaping steps that form the chicken head and headpiece. The pattern uses invisible decreases where possible to keep seams clean and unobtrusive, and it relies on turning chains to approximate first-dc turns in the round where the designer’s method deviates from a standard round. Assembly involves basic sewing and whipstitching to join components, followed by a subtle edge scallop to mimic a feathered fringe. The result is a set that feels professionally finished yet remains comfortably approachable for intermediate crocheters.

In addition to the basic stitches, you’ll encounter foundation chain work for the feet and toes, which introduces a little extra technique without stepping beyond familiar ground. The egg shells require you to work with two strands of yarn in tandem, an effective trick for maintaining a dense, shell-like structure. The project also emphasizes careful placement during assembly—positioning the head, beak, wattles, and legs so the final display looks balanced and lively rather than lopsided. Overall, you’ll gain confidence in combining small, repeating shapes into a coordinated set that can be personalized with color accents and optional embroidered eyes.

Finally, the pattern’s closure steps reinforce accurate finishing: you’ll fasten off securely and weave in tails before attaching pieces, ensuring each component contributes to a durable, long-lasting set that stands up to regular use on a kitchen table or coffee corner.

Why You'll Love This Hennifer Chicken Crochet Coaster Set Pattern

This pattern balances whimsy with technique in a way that feels inviting rather than complicated. The chicken head centerpiece anchors the collection with personality, while the repeating coaster shapes provide a cohesive rhythm that guides the eye from piece to piece. Working with several color choices and multiple hook sizes keeps the process engaging without tipping into overwhelm, and the final assembly gathers all components into a complete display.

The satisfaction comes from progressing through each rounded stage, watching the shapes take on a friendly, cartoon-like stance, and knowing that the finished set can be gifted or used daily with equal delight. The sense of accomplishment grows with careful finishing, secure seams, and a durable feel that makes the pieces trustworthy for regular use on a kitchen table, coffee corner, or dining surface. Color pairings invite experimentation, and the finishing touches—such as the optional embroidered eyes or a tiny felt beak—offer opportunities to add texture while staying within the realm of standard crocheted finishes.

The project rewards patience and planning, turning a simple group of pieces into a connected scene that sparkles with charm on a countertop or tray.

Colour & Yarn Inspiration

Color ideas that harmonize with this pattern include warm, earthy tones such as almond, Topaz, and Forest; add playful accents with soft sky blue for egg shells or minty greens for the mat. Substituting a lighter shade for the head and a darker shade for the comb preserves the design’s contrast and character.

Yarn substitutions can subtly alter texture and size; a lighter DK weight yields smaller coasters, while a bulky worsted gives a heftier, cozy feel. If two-strand colorwork is used for the egg shells, ensure strands are similarly thick to prevent edge distortion. Exploring cotton blends for crisper edges or wool blends for a plush finish can create a different tactile experience while preserving the same cheerful look.

Nest mat under a mug on a wooden table

Switch Things Up

You can customize this pattern by swapping the main color palette to reflect a season or favorite bird. Try a light, pastel egg-shell set for spring or deep, earthy tones for a rustic kitchen vibe.

Experiment with yarn textures: cotton blends yield crisper stitches for a modern look, while wool blends give a softer, plush feel to the mats and coasters. If you want a sturdier product, tighten your tension and use a slightly smaller hook; for a looser drape, loosen the tension and opt for a bigger hook.

Consider adding tiny embroidered eyes or a felt beak to introduce texture and character. Pair the coaster set with a matching mug or a handmade mug cozy for a cohesive gift set that feels thoughtful and complete.

For display inspiration, create a small wooden tray that mirrors the egg-shell nesting motif; it provides a charming backdrop that elevates the entire set. Let color and finishing details guide your choices so you can craft a one-of-a-kind display that reflects your style.

Ways to Use & Gift It

Gift idea: this little chicken coaster set makes a perfect host gift or housewarming present. Package the four coasters in a small crate or decorative box with a handwritten note about the color choices and a few care tips for keeping the crochet pieces looking fresh.

Display idea: place the mat under a mug or teapot on a wooden tray; the nest vibe ties into a cozy kitchen theme, while the egg coasters offer a whimsical alternative to standard cork. It’s a thoughtful gift that doubles as decor, inviting the recipient to reuse and enjoy it daily.

Common Mistakes & How to Fix Them

Losing your stitch count — place a marker at the start of each round. Working too loosely, which lets the stuffing show through the fabric. Forgetting to stuff firmly before closing a piece. Sewing parts on before pinning and checking the proportions.

Maker's Notes

When I tested this pattern, I used worsted-weight acrylic for the main rounds and then adjusted with a larger hook for the egg shells and mat to achieve the desired density. The process took about 12 hours spread across several sessions, with careful breaks to count rounds and mark color changes. Beginners faced questions about the two-strand method for the egg shells and the assembly of the head with beak; I suggested using stitch markers and pinning pieces before sewing to ensure correct alignment.

The most challenging moment was achieving even, gentle edge scallops on the coasters, which required maintaining consistent tension across increases and double-checking stitch counts at each turning point.

I tried a substitution: I substituted DK weight yarn for the main body and used a 4.0 mm hook for the center pieces; the coasters finished slightly smaller but retained their intended silhouette and charm. The two-strand approach for the egg shells remained dense and sturdy, with only a minimal adjustment to tension needed to compensate for the lighter weight. The final look remained cohesive with the other elements in the set, validating the pattern’s flexibility with common yarn substitutions.

Hennifer Chicken Crochet Coaster Set Pattern

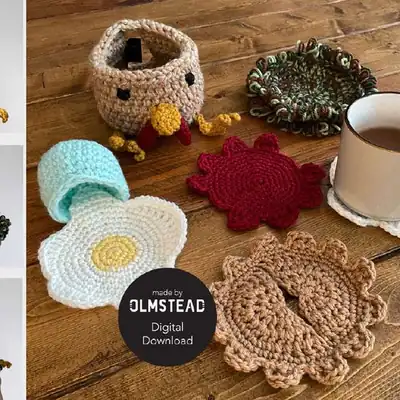
Make the Hennifer Chicken Crochet Coaster Set with our free crochet pattern. Includes complete rounds, materials, and assembly tips. Start crocheting today!

Intermediate 12-15 Hours
Pattern at a glance
Skill level
Intermediate
Time to make
12-15 Hours
Hook size
5.5 mm (I) / 6.5 mm (K) / 5.0 mm (H)
Yarn weight
Worsted / #4
Finished size
Egg coasters: approx. 14 cm (5.5 in) diameter; Mat: approx. 18 cm (7 in) diameter
Gauge
Gauge not critical; use recommended hooks and yarns; adjust hook size if adjusting final size
Yarn used
Approximately 900 g total yarn across all colors (rough estimate; varies with color choices and substitutions)

Materials Needed

Main Fabric
  • 01
    Worsted / DK yarn in your chosen colours
Tools Required
  • 01
    5 mm crochet hook
  • 02
    Stitch markers
  • 03
    Yarn needle
  • 04
    Fibrefill stuffing
  • 05
    Scissors
  • 06
    Safety eyes (optional)

— Instructions :

Round 1: Create MC, 6 sc into MC (6)
Round 2: 2 sc into each st around (incr) (12)
Round 3: *Sc into next st, 2 sc into next (incr)*; repeat around (18)
Round 4: *Sc into next 2 sts, 2 sc into next (incr)*; repeat around (24)
Round 5: Sc into next 2 sts, 2 sc into next (incr), *sc into next 3 sts, 2 sc into next (incr)*; repeat around ending in 1 sc (30)
Round 6: *Sc into next 4 sts, 2 sc into next (incr)*; repeat around (36)
Round 7: Sc into next 3 sts, 2 sc into next (incr), *sc into next 5 sts, 2 sc into next (incr)*; repeat around ending in 2 sc (42)
Round 8: *Sc into next 6 sts, 2 sc into next (incr)*; repeat around (48)
Round 9: *Sc into next 5 sts, ch 1, turn. Sc into 4 sts, ch 1, turn.

— Chicken Comb / Coaster :

Round 1: Create MC, chain 2, 6 dc into MC (7 (6) + ch 2) To make the turning chain: ch 2, insert hook into 2nd ch from hook, pull up a loop. Turn your work to continue completing a dc.
Round 2: Insert hook into space below your st and pull up a loop, yarn over, pull through 2 loops, yarn over, pull through 2 loops (this st now counts as your first dc). *2 dc into the next sp*; repeat to end (12 (11) + 1 turning ch).
Round 3: Repeat the same steps as beginning of Round 2 (make a turning ch and 1 dc into the same sp). Then, *dc into next sp, 2 dc into next sp (incr)*; repeat around (17 (16) + 1 turning ch)
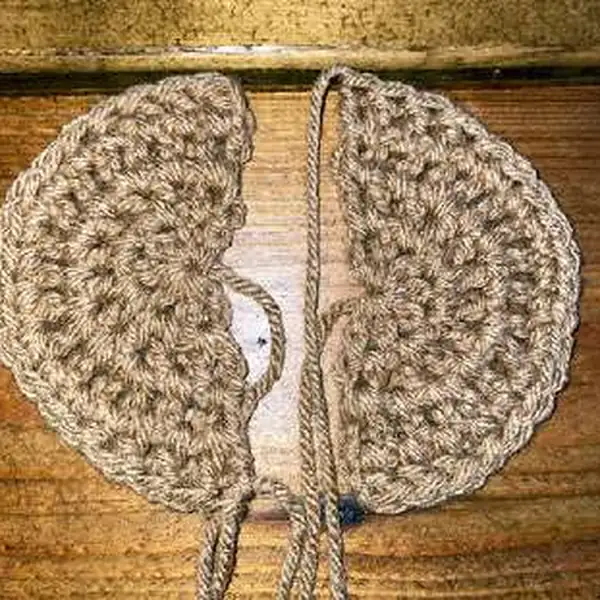
Round 4: Repeat the same steps as beginning of Round 2 (make a turning ch and 1 dc into the same sp). Then: Dc into next 2 sps Hdc into the next sp *Sc into the next 2 sps, 2 sc into the next (incr)*; repeat 1 more time Sc into the next 2 sps Hdc into the next sp Dc into the next 2 sps 2 dc into the last sp (20 (19) + 1 turning ch) Fasten off your first half circle. Repeat Rounds 1-4 for your second half circle. After round 4 we will continue to Round 5 to join them together.
Round 5: In the next 2 rounds, insert the hook into proper stitch placement (not the space below) Continuing the yarn from your second half circle, *Sc into the next 3 sts [on the first half circle we made], 2 sc into the next st (incr)*; repeat 4 times. Sc into the next 2 sts, 2 sc into the next You should now be joining the opposite side of the half circle. Continue going around. *Sc into the next 3 sts, 2 sc into the next st (incr)*; repeat 4 times. Sc into the next 2 sts, 2 sc into the next (48)
Round 6: We will now make a scalloped edge using a similar technique as the Chicken Comb coaster. This will require us to turn the work a few times. We will end up with 6 scallops on each side of the circle. *Sc into the next 4 sts, ch 1, turn. Sc together (decr) 2 times, ch 1, turn. Sc together.

— Tail :

Round 1: Repeat steps from Chicken Comb Coaster. Change yarn colour to white at the end of Round 3 using a sl st. In the next round, we will begin to make the uneven, rounded edges. Follow along closely.
Round 2: Repeat steps from Chicken Comb Coaster. Change yarn colour to white at the end of Round 3 using a sl st. In the next round, we will begin to make the uneven, rounded edges. Follow along closely.
Round 3: Repeat steps from Chicken Comb Coaster. Change yarn colour to white at the end of Round 3 using a sl st. In the next round, we will begin to make the uneven, rounded edges. Follow along closely.
Round 4: Repeat steps from Chicken Comb Coaster. Change yarn colour to white at the end of Round 3 using a sl st. In the next round, we will begin to make the uneven, rounded edges. Follow along closely.
Round 5: Repeat steps from Chicken Comb Coaster. Change yarn colour to white at the end of Round 3 using a sl st. In the next round, we will begin to make the uneven, rounded edges. Follow along closely.
Round 6: Repeat steps from Chicken Comb Coaster. Change yarn colour to white at the end of Round 3 using a sl st. In the next round, we will begin to make the uneven, rounded edges. Follow along closely.
Round 7: Repeat steps from Chicken Comb Coaster. Change yarn colour to white at the end of Round 3 using a sl st. In the next round, we will begin to make the uneven, rounded edges. Follow along closely.
Round 8: Repeat steps from Chicken Comb Coaster. Change yarn colour to white at the end of Round 3 using a sl st. In the next round, we will begin to make the uneven, rounded edges. Follow along closely.
Round 9: Sc into next 4 sts, hdc into the next st, dc into the next, 2 tc into the next st, dc into the next, hdc into the next, sc into the next 2 sts, sl st into the next st. Hdc into the next st, 2 dc into the next st, tc into the next 4 sts, dc into the next 3 sts, hdc into the next st, sc into the next st, sl st into the next st Sc into the next 3 sts, 2 sc into the next st, sc into the next 5 sts, hdc into the next st, dc into the next 2 sts, 2 tc into the next st, dc into the next st, hdc into the next 3 sts, sl st into the next;
Round 10: Hdc into the next st, sc into the next st, sl st into the next 2 sts, hdc into the next 2 sts, 2 dc (incr) into the next 3 sts, 2 hdc (incr) into the next st, sl st into the next 3 sts Sc into the next, 2 sc (incr) into the next 2 sts, hdc into the next, 2 sc (incr) into the next 6 sts, sc into the next st, sl st into the next 2 sts Sc into the next 8 sts, ch 1, turn. Sc together (decr), sc into the next 3 sts, sc together (decr), ch 1, turn. Sc into the next 5 sts, ch 1, turn. Sc together (decr), sc in next st, sc together (decr), ch 1, turn. Sc together (decr), sl st in same st, fasten off leaving ~10” tail. We will use this tail to sew the coaster into the egg shell. Sew in any other loose ends. EGG SHELL: BOTTOM (make 1) - Use 5.5 mm hook To make the bottom & top of the egg shell, use 2 strands of yarn at the same time and a 5.5 mm hook. Your crochet tension for the egg shell (bottom & top) should be quite tight as we want it to hold its shape once complete.

— Shell :

Round 1: Create MC, 6 sc into MC (6)
Round 2: 2 sc into each st around (incr) (12)
Round 3: *Sc into next st, 2 sc into next (incr)*; repeat around (18)
Round 4: *Sc into next 2 sts, 2 sc into next (incr)*; repeat around (24). Flip your work inside out so you are working the rounds from the outside.
Round 5: Sc around (24).
Round 6: Sc around (24).
Round 7: Sc around (24).
Round 8: Sc around (24).
Round 9: Sc around (24).
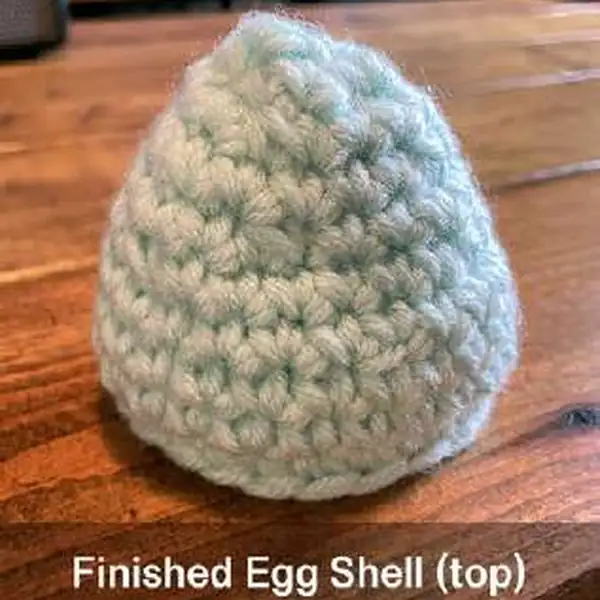
Round 10: *Sc in the next 3 sts, sc together (decr)*; repeat 4 times total, ending in sc in last 4 sts (20). Fasten off and sew in any loose ends. EGG SHELL: TOP (make 1) - Use 5.5 mm hook Use 2 strands of yarn at the same time and a 5.5 mm hook. We will be starting from the opening end (bigger part) of the egg and working towards the top. Colour: Skylight If you do not have 2 skeins of yarn in the same colour, cut a strand of yarn measuring approximately 48-feet for the second piece of yarn.

— Egg Coaster :

Round 1: Ch 24, sl st to beg first ch to close loop (24)
Round 2: Sc in each st around (24)
Round 3: Sc in each st around (24)
Round 4: Sc in each st around (24)
Round 5: Sc in each st around (24)
Round 6: *Sc into next 6 sts, sc together (decr)*; repeat around (21)
Round 7: *Sc into next 5 sts, sc together (decr)*; repeat around (18). Flip your work inside out so you are working the rounds from the outside.
Round 8: *Sc into next 4 sts, sc together (decr)*; repeat around (15)
Round 9: *Sc into next 3 sts, sc together (decr)*; repeat around (12)
Round 10: Sc together 3 times. Fasten off and use tail to sew remaining top of the egg closed. Sew in any remaining loose ends.
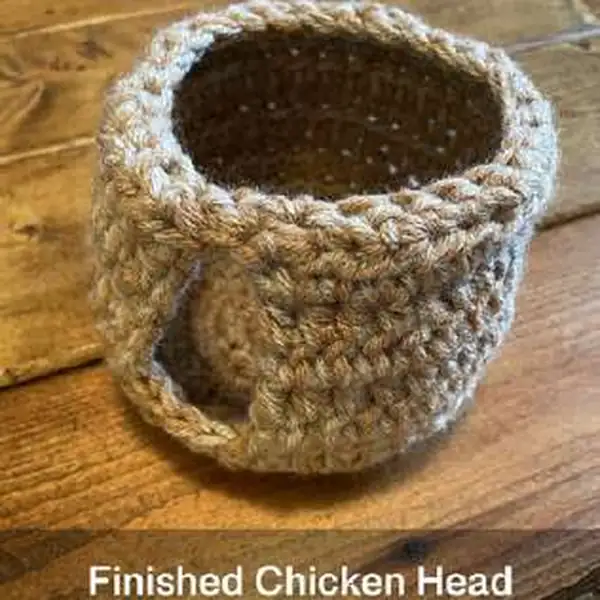
— Head :

Round 1: Create MC, ch 2 (counts as hdc). 9 hdc into the MC. Join with sl st into top of ch 2 to close round (10).
Round 2: Ch 2 (counts as hdc). Hdc into same st. 2 hdc (incr) in each st around. Join with sl st into top of ch 2 to close round (20).
Round 3: Ch 2 (counts as hdc). Hdc into same st. *2 hdc (incr) in next st. Hdc in next st* repeat around ending with 1 hdc. Join with sl st into top of ch 2 to close round (30).
Round 4: Ch 2 (counts as hdc). Hdc into same st. *2 hdc (incr) in next st. Hdc in next 2 sts* repeat around ending with 1 hdc. Join with sl st into top of ch 2 to close round (40).
Round 5: Ch 1. Hdc in each st around. Join with sl st into ch 1 to close off round (40).
Round 6: Ch 1. Hdc in each st around. Join with sl st into ch 1 to close off round (40).
Round 7: Ch 1. Hdc in next 36 sts, ch 1, turn.
Round 8: Hdc in each 36 sts, ch 1, turn.
Round 9: In Round 9 & Round 11: insert your hook below the regular stitch location and catch the stitch below. Otherwise you will end up with a visible horizontal line running along the head. Hdc in each 36 sts, ch 1, turn.
Round 10: Hdc in each 36 sts (insert hook in normal st location). Ch 1, turn.
Round 11: Hdc in each 36 sts (insert hook below regular st location as you did in round 9). Ch 1, turn.
Round 12: We will close the gap at the top of the head in this round and stitch all the way around. Hdc in each st, when you get to the opening / gap, ch 1 and sc into the first st on the other side. Then sc together (dec) once. *Sc in next 2 sts, sc together (decr)*; repeat around. When you get to the opening again, sc into the ch 1 where the gap is, and another sc into the next st. Then sl st into the next st. Fasten off and sew in any loose ends.

— Egg Shell: Bottom :

Round 1: Ch 12, sl st to first ch 1 (12)
Round 2: *Sc into the next 4 sts, sc together (decr)*; repeat twice (10)
Round 3: Sc in each st around. Turn piece inside out and work the rounds from the outside.
Round 4: *Sc into the next 3 sts, sc together (decr)*; repeat twice (8)
Round 5: *Sc into the next 2 sts, sc together (decr)*; repeat twice (6)
Round 6: Sc together 2 times. Fasten off. Sew onto head directly opposite from the vertical opening (see more images on pg 13). CHICKEN WATTLES (make 2) - Use 5 mm hook Colour: Claret;

— Egg Shell: Top :

Round 1: Create MC, 4 sc into MC (4)
Round 2: *Sc into the next st, 2 sc into the next*; repeat around (6)
Round 3: Sc into each st around. Turn piece inside out and work the rounds from the outside. (6)
Round 4: Sc into each st around. Turn piece inside out and work the rounds from the outside. (6)
Round 5: *Sc together (decr)* repeat 3 times. Fasten off leaving approximately 10” tail to sew onto head. Sew onto head just slightly below the left & right side of the beak. CHICKEN FEET (make 2) - Use 5 mm hook Colour: Gold;

— BOTTOM OF FOOT :

Round 1: Create a MC, ch 2 (counts as first dc), 3 dc into MC (4). Ch 1, turn.
Round 2: Sc across (4). Ch 1, turn.
Round 3: We will now make the first toe. *Sc into next st, chain 4. Sc into second ch from hook, and into next 2 sts down the chain. Sc in bottom of chain (make sure to grab both yarns)*; repeat another 2 times to make 3 toes total. LEG: Make 2 Colour: Gold The legs are made using a stitch called Foundation Chain.

— Chicken Head :

Round 1: Make 6 foundation chains. Fasten off leaving ~10” tail to sew it onto the bottom of the foot. ASSEMBLING THE FEET Using a yarn needle, sew the foundation chain to the bottom of the foot using a whipstitch. Make sure the toes are facing / curling away from the leg.

— Eyes :

Round 1: Create MC, 6 sc into MC (6)
Round 2: 2 sc into each st around (incr) (12)
Round 3: *Sc into next st, 2 sc into next (incr)*; repeat around (18)
Round 4: *Sc into next 2 sts, 2 sc into next (incr)*; repeat around (24)
Round 5: *Sc into next 3 sts, 2 sc into next (incr)*; repeat around (30)
Round 6: *Sc into next 4 sts, 2 sc into next (incr)*; repeat around (36)
Round 7: Using a loop stitch, *sc in next 5 sts, 2 sc in next st (increase)* repeat around (42)
Round 8: Using a loop stitch, *sc in next 6 sts, 2 sc in next st (increase)* repeat around (48)

Assembly Instructions

  1. Stuff each piece firmly before closing.
  2. Pin all parts in place and check the proportions against the photos.
  3. Sew parts on securely with matching yarn.
  4. Weave in all ends and shape the finished piece.

Important Notes

  • Gauge matters for a uniform display across all pieces; aim for consistent tension throughout to keep the coasters, eggs, and mat aligned in size.
  • Block or lightly press the pieces after weaving in tails if you prefer crisper edges; avoid aggressive washing that could distort the stuffing or shaping.
  • Securely fasten off at the end of each component and weave in tails to prevent fraying or loosening with daily use on a table or tray.
  • When using two strands for colorwork, keep strand thickness consistent and avoid pulling too tightly where colors meet to prevent edge distortion.
  • If you plan to embroider eyes or add a felt beak, do so after assembly to maintain the clean finish of the crocheted edges.

This charming Hennifer Chicken Crochet Coaster Set will brighten any kitchen and coffee nook. Each piece is crafted with simple stitches and careful assembly, offering a delightful project for gift-giving or personal enjoyment. You’ll end with a cohesive, lively set that adds character to everyday coffee breaks. Enjoy crocheting these cozy little hens and their eggy friends, and savor the sense of accomplishment that comes with a handmade gift. May your mornings be warmer and your afternoons brighter.

Good to know

You ask, we answer

Egg coasters measure about 14 cm (5.5 in) in diameter, the mat about 18 cm (7 in) in diameter, and the chicken head centerpiece sits atop the mat as a focal point.

Yes, but final sizes will change. If you switch yarn weights, adjust your hook size and tension to keep the rounds and edges neat.

The project is intermediate, requiring basic stitches and color changes. Some assembly and careful finishing are needed to achieve a polished result.

Most crocheters complete the full set in about 12 to 15 hours, with longer sessions commonly used for colorwork and final assembly.

Egg shell and egg coaster pair on a wooden surface
Join 100k+ crocheters

Get new free patterns, stitch tips and exclusive content in your inbox.