Crochetologist
Free Crochet Pattern
Beautiful Detailed Adorable

Heart Keychain Amigurumi Pattern

peach crocheted heart keychain held in hand showing front of finished amigurumi heart
4.1Rating
1-2 HoursTime
Beginner FriendlySkill
Highlights

What makes it special

Made with Love

Small, sweet, and gift-worthy creations that fit perfectly in the palm of your hand with detailed charm.

Quick Make

A quick make that typically fits into an hour or two, ideal for a handmade gift or a last-minute craft session when you want an instant, satisfying finish.

Beginner Friendly Level

Perfect for a confident beginner, this pattern uses magic ring starts, working in the round, single crochet, simple increases and decreases, and basic seaming to join the two halves.

There is something quietly joyful about small gifts that slip easily into pockets and palm-sized places; this heart keychain pattern captures that feeling with tiny stitches and big charm.

If you love thoughtful, instant presents that show care without a long deadline, this sweet heart is perfect for filling those little gifting moments and making practical objects feel handmade and treasured.

About This Heart Keychain Amigurumi Pattern

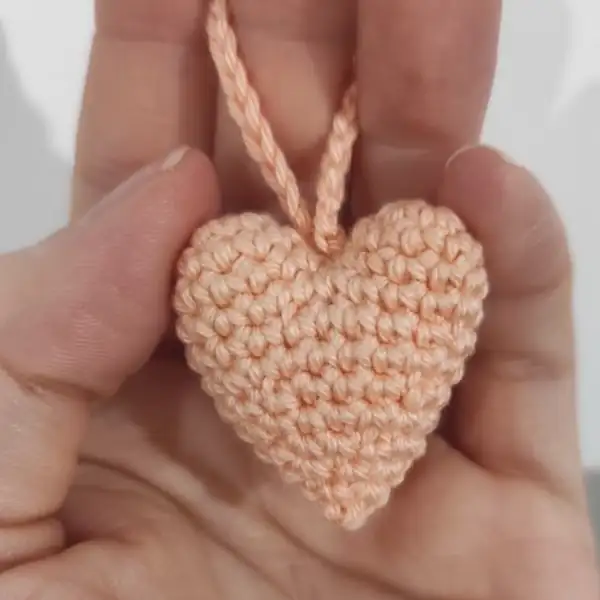
This small heart keychain is worked in two identical halves and finished as a tiny stuffed charm that measures approximately 4 cm / 1.6 in tall. Materials used in the pattern are St. George Tango yarn (approx. 30 meters), a 2 mm crochet hook, embroidery needle, polyester fiberfill stuffing, a stitch marker and scissors.

The pattern uses amigurumi techniques worked in the round with a magic ring start, single crochet stitches, planned increases and decreases and simple finishing to join the halves and create a loop for a key ring. The instructions are written round-by-round so you can stitch one half then the second half and close the heart neatly without cutting the yarn between halves. This design is compact, lightweight and ideal for keychains, zipper pulls or tiny gift tags that travel easily in pockets or bags.

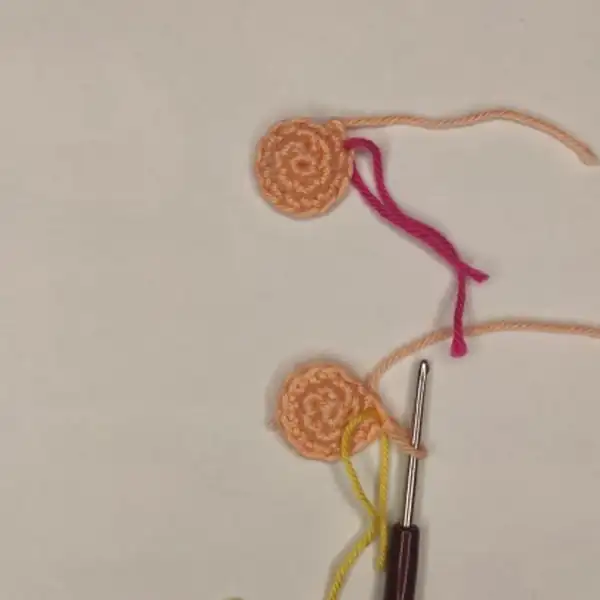
When you pick up this pattern you will stitch two small domed halves that come together to create a classic heart silhouette, then finish with a braided loop for a key ring.

The working rhythm alternates short increases and steady single crochet rounds so you can feel progress quickly as each half grows into shape.

Sewing the halves together and closing the final opening is part of the meditative finishing process; gentle, even stuffing and careful closing determine the final firmness and smooth profile of the heart.

This pattern encourages small, precise work that sharpens tension control and neat finishing, and it is written so you can make multiple colorways without changing the stitch structure.

two small crocheted heart halves in progress on a hook demonstrating starting rounds and shaping

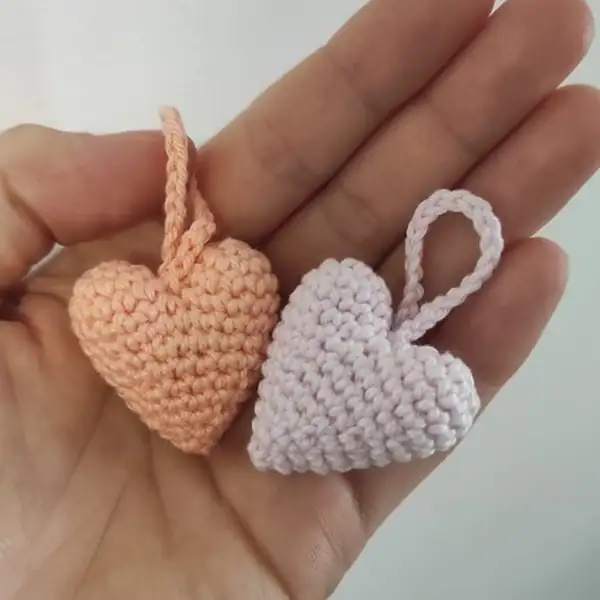
This second description highlights that the pattern is compact and travel-friendly, letting you carry a near-complete heart in your project bag for pockets of stitching time.

The instructions are intentionally short and clear, so you can make single or several hearts in an evening and practice shaping with increases and decreases while producing a useful finished item.

Stitches & Skills You'll Use

This project focuses on a handful of foundational amigurumi stitches and techniques that are friendly for beginners: the magic ring, single crochet, increases and decreases, and simple seaming with a yarn needle. The magic ring creates a tight center for each half so no hole is left in the finished heart, and single crochet establishes a dense fabric that hides the stuffing effectively.

Increases are used to sculpt the rounded top of the heart while decreases shape the tapered bottom; practicing these will improve your shaping skills instantly. You will also use a basic chain to create the loop for a key ring, which is an easy way to add functionality without complex finishing.

Finally, seaming two halves is a useful finishing skill that translates to many small amigurumi projects; tidy whipstitches and gradual stuffing ensure a clean silhouette and durable assembly for everyday use.

Why You'll Love This Heart Keychain Amigurumi Pattern

I absolutely love this pattern because it turns tiny amounts of yarn into a meaningful, finished keepsake very quickly. I enjoy the satisfying rhythm of a magic ring followed by tidy single crochet rounds that shape clean, symmetrical halves. Finishing the heart by joining two halves is always rewarding; the small scale makes seaming techniques feel approachable and immediately impactful.

I value patterns that let me experiment with color in a single sitting, and this keychain design invites playful palettes while remaining simple to execute. Making these hearts is a mindful craft that produces instant, giftable results every time.

Colour & Yarn Inspiration

Because the pattern uses very little yarn a little experimentation goes a long way: soft pastels create a delicate, vintage vibe while saturated jewel tones make the heart feel modern and bold. For a cohesive set, choose a tonal palette of three shades of the same color family so each charm reads as a variation on a theme and looks lovely grouped together.

Consider using cotton or mercerized acrylic for a subtle sheen and crisp stitch definition, or pick a soft wool blend for a warmer, pillowy surface; the fiber choice affects both hand feel and how clean the decreases appear, so try a swatch if you plan to vary materials dramatically.

two finished heart keychain amigurumi pieces in peach and white displayed together to show size comparison

Switch Things Up

I like to change the size of this keychain by swapping yarn and hook so I can create a micro charm or a larger ornament quickly.

Using fingering weight yarn with a 1.5 mm hook will make an extra petite heart perfect for delicate jewelry or tiny zipper pulls.

Switching to a sport or DK weight yarn with a 3.0 mm hook produces a chunkier heart that doubles as a bag charm or small ornament.

I sometimes braid the chain loop from three narrow strands rather than crocheting a chain to add texture and a handcrafted look.

For a festive version I sew tiny seed beads or a small button to the front before fully closing the seam for a bit of sparkle.

If you want a more cuddly feel, stuff with a bit more fiberfill and use a softer, plied yarn to make the surface appear plusher.

Try tonal variegated yarn for a subtle gradient across the heart or contrast the loop color for a punchy accent that frames the shape.

Embroidered initials or tiny felt appliques make these hearts into personalized gift tags or keepsakes for special occasions and celebrations.

I sometimes add a short ribbon bow at the top when giving these as party favors to introduce a different material and finish.

Finally, experiment with decorative stitches such as a surface slip-stitch line to outline the heart and change the visual profile without altering core shaping rounds.

Ways to Use & Gift It

This tiny heart makes an ideal pocket-sized token to include with a handwritten note, slipped into a lunchbox, or tied to a bouquet for a personal touch that says you cared enough to make something by hand. A set of matching hearts in different colors can be bundled as a small sampler gift for craft-loving friends or used as party favors to leave guests with a meaningful memory.

For a practical twist, attach the heart to a house key or school zipper for a daily reminder of affection, or use multiple hearts as decorative markers on gift wrap and place cards for events where inexpensive, handmade keepsakes add warmth and personality.

Common Mistakes & How to Fix Them

Skipping a stitch marker when working in the round will make it hard to identify round starts; place a marker at the first stitch of each round to keep your counts accurate. Pulling too tight on the magic ring can distort the first rounds and make the center hole too small; keep a relaxed tension on the starting loop and adjust the ring before stitching the first round. Overstuffing the halves before joining them can create a bulbous, lumpy heart shape; stuff with small amounts incrementally until the profile looks smooth and even. Cutting the yarn between halves will complicate joining and leave extra ends to weave; follow the instruction to make two halves without cutting to create a clean, continuous seam. Skipping stitch counts during increases and decreases can throw off the shaping and final stitch total; count stitches at the end of each round to catch errors early and fix them before continuing. Rushing the seaming step often results in asymmetry between the halves; pin or align the halves carefully and use small, even whipstitches to close the heart neatly.

Maker's Notes

When I made the sample I used the St. George Tango yarn called for in the pattern with a 2 mm hook and completed the full heart from first magic ring to finished loop in around 50 minutes. I stuffed the halves lightly and found that beginners tend to struggle most at keeping even tension in the first few rounds and at matching both halves for identical shape.

Counting stitches immediately after each round saved me time by catching a missed increase early, and working slowly while joining the halves produced a smoother seam and better finished silhouette. Allow extra time for the finishing steps rather than rushing the final closing.

I tried a substitution: I tried the pattern with a slightly thicker fingering vs light sport yarn on the same 2 mm hook and discovered the finished heart became noticeably firmer and measured about 4.5 cm tall, indicating that small yarn changes alter size and density even when the hook remains unchanged.

Heart Keychain Amigurumi Pattern

Make a tiny heart keychain with this free crochet amigurumi pattern — full round-by-round instructions, materials list, and assembly tips. Start today!

Beginner Friendly 1-2 Hours
Pattern at a glance
Skill level
Beginner Friendly
Time to make
1-2 Hours
Hook size
2.0 mm
Yarn weight
Light / Fingering
Finished size
Approx. 4 cm / 1.6 in tall
Gauge
Approximate gauge: 18 sc x 20 rounds = 5 cm square when worked tightly with a 2 mm hook so stuffing does not show
Yarn used
Approx. 30 grams / 30 meters of St. George Tango (main color) per heart

Materials Needed

Main Fabric
  • 01
    St. George Tango yarn, approx. 30 meters (main color)
  • 02
    Small amounts of contrast yarn optional for decorative loops or accents
Tools Required
  • 01
    Crochet hook 2 mm
  • 02
    Embroidery needle
  • 03
    Polyester fiberfill stuffing
  • 04
    Stitch marker
  • 05
    Scissors
  • 06
    Key ring or split ring (optional)

— Part 1 :

Round 1: 6 sc in mr (6)
Round 2: inc x 6 (12)
Round 3: 12 sc (12)
Round 4: 6 sc on the second half, 12 sc the first;
Round 5: 24 sc (24)
Round 6: (4 sc, dec) x 4 (20)
Round 7: 20 sc (20)
Round 8: ( 3 sc, dec) x 4 (16)
Round 9: 16 sc (16)
Round 10: ( 2 sc, dec) x 4 (12)
Round 11: ( 1 sc, dec) x 4 (8)
Round 12: ( 2 sc, dec) x 2 (6)

Assembly Instructions

  1. Align the two crocheted halves with their outer rounds matched and use the working yarn tail to whipstitch around the edge, inserting small even stitches to join the halves securely.
  2. Stuff the heart lightly through the opening before completing the last quarter of the seam, adding small amounts of fiberfill until the heart reaches a smooth, firm profile.
  3. After closing the seam, thread the long tail through the top center between the two halves with an embroidery needle and pull it up to the top to prepare for the loop.
  4. Using the crochet hook, chain 20 from the pulled yarn tail, then finish off and insert the tail between the two halves so that the chain forms a loop for a key ring; secure and weave in ends completely.
  5. Trim any excess yarn and tuck all tails inside the heart to keep the outside neat and ready for a key ring or decorative attachment.

Important Notes

  • Work with consistent tension so the small stitches sit closely and the stuffing does not show through the fabric.
  • Make both halves back-to-back without cutting the yarn between them to simplify joining and minimize loose ends.
  • Use a small amount of stuffing and add it gradually; the finished heart should be firm but not overstuffed to maintain a smooth shape.
  • If you change yarn weight or hook size, test a sample first because the finished dimensions will change significantly with different gauges.
  • Weave in all tails securely and hide them inside the heart to prevent tangling when attached to keys or bags.

Handmade hearts are small inventions of care that travel easily and make everyday objects feel personal. This pattern is designed to fit into pockets, project bags and gifting moments so you can deliver a tiny keepsake quickly and with pride. Enjoy the calm of small stitches and the bright reward of a finished charm ready to be loved and used.

Good to know

You ask, we answer

The finished heart measures approximately 4 cm tall when made with the recommended St. George Tango yarn and a 2 mm crochet hook; small variations may occur with tension.

Yes, you can substitute different yarn weights, but the finished size will change; using thicker yarn and a larger hook will produce a chunkier charm while thinner yarn will create a smaller, more delicate heart.

Basic familiarity with the magic ring, single crochet, increases and decreases is helpful since the pattern is aimed at confident beginners and uses simple shaping techniques worked in the round.

On average this quick make takes between one and two hours for an individual heart, depending on your pace and whether you make several in a single session to streamline the process.

Bring the long tail through the top center between the two halves, chain the required length, finish off, and place the tail back between the halves before closing so the loop is anchored and hidden.

Spot clean gently with a damp cloth for minor dirt, avoid machine washing to preserve shape, and keep the heart away from rough abrasion or heavy moisture to maintain its appearance.

closeup of a crocheted heart being held to show side profile and stuffing before closing the seam
Join 100k+ crocheters

Get new free patterns, stitch tips and exclusive content in your inbox.