Crochetologist
Free Crochet Pattern
Beautiful Detailed Adorable

Granny Square Bag Pattern

Close-up of granny square bag crochet texture
4.0Rating
4-6 HoursTime
Beginner FriendlySkill
Highlights

What makes it special

Handmade Charm

A versatile, handmade bag that complements living spaces and everyday outfits with timeless crochet charm.

Bite-Sized Project

Finishes in a few thoughtful sessions, making it ideal for a relaxed afternoon crochet that yields a sturdy, stylish bag ready for gifting or personal use.

Beginner Friendly Level

This project is well suited to a confident beginner who wants to practice basic granny-square construction, simple joining, and clean finishing. It introduces continuous rounds, careful seam work, and precise hand-tied finishing to assemble the panels into a cohesive tote. The method emphasizes checking tension and alignment as you go, with an approachable pace that makes it possible to complete the bag in a few sessions. The techniques stay within the realm of standard crochet practice and do not rely on any specialized stitches or textures beyond the familiar granny-square motif, joining methods, and a straightforward base construction.

This breezy tote is designed for everyday use, combining the classic charm of granny-square crochet with a clean, modern silhouette. The project favors approachable construction, but rewards careful joining and precise finishing with a bag that holds its shape and wears beautifully over time. Materials lean toward natural textures: a crocheted cord for the body, sturdy leather handles at the top, and a simple, practical lining that can be added if you wish. The approach is friendly to confident beginners while offering thoughtful details for seasoned crocheters who enjoy a polished, ready-to-use accessory. The result is a roomy tote that looks pulled-together with casual outfits and holds up to the rhythms of daily life—from trips to the market to beach days and library runs.

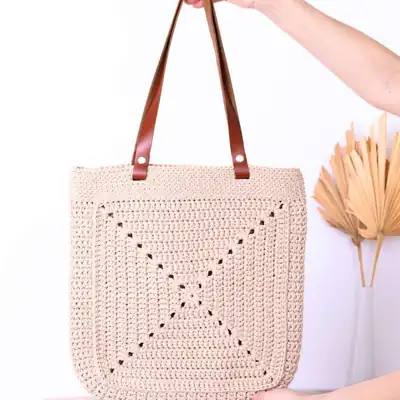
About This Granny Square Bag Pattern

The Granny Square Bag is built from multiple crocheted motifs that become panels when joined. Each square begins with a magic ring, then expands in rounds to form a classic granny-square motif. The motifs are joined along the edges to create two larger panels that form the front and back of the tote. A third piece serves as the bottom, created by merging squares into a flat square panel to provide a stable base. The sides are created by extending the squares into a rectangular layout, then joining this rectangle to the front and back to form a bag with depth. foundation chain-like foundation chain equivalents are used in the early rounds, but all work remains crocheted, not crocheted. The top edges are kept even by aligning the outermost rounds during assembly, and the handles are attached at the upper edge with multiple passes to secure weight distribution. The color choices emphasize the texture rather than bold contrasts, allowing the stitches to speak for themselves. Consistency in tension across squares ensures edges stay even and corners align, which is essential for a neat, square silhouette when the bag is finished. Finishing steps include weaving in ends securely on the wrong side and giving the bag a light steam to set its shape without distorting the fabric. The overall effect is a roomy tote with a calm, natural look suitable for daily errands, library visits, or a seaside stroll.

Bag with leather handles laid flat

As you work through each square, you’ll refine your muscle memory for how a granny-square motif builds from a small ring into a square that sits flat. The pattern guides you from one square to the next, then shows you how to align edges so the final tote sits flat and true when assembled. Finishing emphasizes clean ends and strong attachment of handles, with the goal of a long-lasting bag. The process rewards patience and attention to detail, yielding a sturdy tote that maintains its form when loaded with books or groceries. The method is adaptable to different yarn weights and handle styles, offering a compact, scalable project with big results that still feels handmade. You’ll learn to judge tension, count stitches reliably, and place joins so the exterior looks continuous rather than pieced. This approach yields a durable bag that remains useful as a daily carryall across seasons and outfits.

Stitches & Skills You'll Use

The project centers on standard granny-square technique and careful joining. Each motif is started with a magic ring and built in rounds, then joined to neighbors along designated edges to form a flat, rectangular panel. The joins use slip stitches to create a seam that lies flat on the outside, while maintaining the texture of the crocheted fabric on the inside. Edges are kept straight by aligning the final rounds before joining the panels, which reduces bulk and helps the tote keep a consistent square shape. The base panel is created by merging a group of squares into a single square, then attaching it to the bottom of the front and back panels to stabilize the bag. The finish includes weaving in ends on the wrong side, using a light pressure to avoid distorting the fabric, and optionally steam-setting the shape to encourage the panels to stay aligned. The technique is accessible to a wide range of crocheters and does not rely on any specialized stitches or obscure methods. The result is a robust but flexible fabric that maintains structure without stiffness, allowing the bag to open to a comfortable width while remaining easy to carry.

Why You'll Love This Granny Square Bag Pattern

The appeal of this tote rests in its practical, modular nature and the results you can achieve with widely available materials. The modular granny-square motif makes customization straightforward, so a single pattern can grow into a family of related bags. The texture of the crocheted cord paired with leather handles elevates a simple tote into a durable everyday companion, capable of withstanding daily wear and carrying varied loads. Finishes are designed to look professional without requiring advanced finishing techniques, making it approachable for confident beginners while still offering satisfaction to experienced crocheters who value neat edges and sturdy construction. The design sits comfortably within a wardrobe that favors natural tones and timeless silhouettes, letting the tote pair with anything from denim to linen. The moment you pick up the finished piece, you’ll feel the blend of classic crochet technique and practical design—an instant sense of reliability, usefulness, and handmade charm. It’s a project that invites you to slow down, count carefully, and enjoy the rhythm of rounds as you watch individual motifs knit into a cohesive, usable object.

Switch Things Up

I love exploring color-blocked squares to add personality to the bag while keeping the structure intact. Swap one color per square or create a subtle gradient for a modern, understated look.

Experiment with different leather handle styles; braided straps add a rustic touch, while slim, streamlined handles provide a contemporary edge. You can also vary the number of squares to adjust width and height, balancing the panels to suit your typical load and carrying length.

Consider adding a small interior zipper pocket or a discreet snap closure sewn into one side panel to secure small items. A light lining in a coordinating color gives the interior a polished feel and adds durability for daily wear.

Finally, explore seasonal twists by aligning color choices with trends—soft pastels for spring, rich navies and tans for summer, or warm burgundies for autumn. Each variation preserves the granny-square aesthetic while giving the bag a distinct character for the season.

Ways to Use & Gift It

This tote makes a thoughtful gift for someone who loves handmade accessories or for a teacher who appreciates practical, stylish items. Wrap it with a slim ribbon and tuck in a small crochet project as a personal touch. It can also be offered as a community craft-in gift, where each participant decorates their own panel before assembling a shared bag. The neutral palette ensures it complements most outfits, turning a simple tote into a chic daily essential. For a housewarming, slip in a few fresh market goodies to showcase its strength and versatility as a reusable carryall. The tote’s calm, natural aesthetic invites daily use and long-lasting appreciation as a handmade treasure.

Display it in a sunlit corner or near the entryway to remind the recipient of your thoughtful craft each time they reach for their keys. Because the project is quick to finish, you could easily make one for a sister, coworker, or neighbor as a meaningful, personal gift. The recipient will notice the careful alignment of squares and the sturdy handle attachments, which reflect the care invested in material choices and finishing touches.

Common Mistakes & How to Fix Them

Skipping stitch markers at color changes can lead to misaligned rounds; place a marker at the start of every round to stay on track. Not stuffing evenly causes sagging or misshapen panels; stuff gradually and check symmetry as you go. Tension being too tight creates stiff edges and obvious seams; maintain a comfortable, steady grip throughout. Failing to weave in ends can cause fraying or unraveling; secure every tail and trim close to the fabric. Joining squares with uneven edges results in a warped rectangle; trim edges evenly before assembly. Overstretching yarn when attaching handles can distort the shape; relax tension for the final passes.

Maker's Notes

During a test run, a 3 mm polyester cord paired with a 5 mm hook was used. Completion time for a four-square set, joining, and panel assembly spanned several sessions, with careful work on join lines helping to keep edges even during the base construction. Begin shaping with a calm, even grip as you start the magic ring to avoid uneven circles. The base is the trickiest part because it defines the overall silhouette; keep the corner stitches neat and square to prevent wobbly edges. If you’re new to this technique, practice a few squares first to build intuition for tension and edge alignment before committing to the full bag. Finishing with a light press helps set the shape without distorting the stitches, and weaving in ends gradually as you go reduces the risk of a long end-weaving session at the end of the project.

I tried a substitution: Substituting a DK-weight cotton cord with a lighter feel influenced the overall height and weight distribution of the bag. The final tote appeared taller and slightly more flexible, but the squares remained well aligned and the base maintained a stable shape. The handle attachments required minor repositioning to balance the load, though the overall aesthetic stayed cohesive. Heavier or glossier cords can increase drape and soften the edges, while a stiffer cord preserves a crisper outline. If a synthetic blend with more sheen is used, the finished bag reflects light more, producing a contemporary look that can still harmonize with the natural tone of the crochet fabric.

Granny Square Bag Pattern

Make this stylish granny square bag with our free crochet pattern—full round-by-round instructions, materials and tips. Start crocheting today for a durable, handmade tote.

Beginner Friendly 4-6 Hours
Pattern at a glance
Skill level
Beginner Friendly
Time to make
4-6 Hours
Hook size
5.0 mm (H/8)
Yarn weight
Cord / #3-4
Finished size
Approx. 38 cm tall / 36 cm wide (15 in x 14 in)
Gauge
Not critical; aim for even stitches and consistent tension to maintain flat panel edges
Yarn used
350 meters total cord (approximate; varies with tension and yarn used)

Materials Needed

Main Fabric
  • 01
    Worsted / DK yarn in your chosen colours
Tools Required
  • 01
    4 mm crochet hook
  • 02
    Stitch markers
  • 03
    Yarn needle
  • 04
    Fibrefill stuffing
  • 05
    Scissors
  • 06
    Safety eyes (optional)

— First Granny Square :

Round 1: Description corner 2 Make a Magic Ring. Step by step guide for making a Magic Ring (MR) can be found on page 14.
Round 3: into the corner just behind: (1sc, ch1, 1dc), [ 7dc, in the corner: (2dc, ch2, 2dc) ]*3, 7dc, in the corner: (2dc, ch1, sl st) (44)
Round 4: into the corner just behind: (1sc, ch1, 1dc), [ 11dc, in the corner: (2 dc, ch2, 2 dc) ]*3, 11dc, in the corner: (2 dc, ch1, sl st) (60)
Round 5: into the corner just behind: (1sc, ch1, 1dc), [ 15dc, the corner: (2dc, ch2, 2dc) ]*3, 15dc, in the corner: (2dc, ch1, sl st) (76)
Round 6: into the corner just behind: (1sc, ch1, 1dc), [19dc, in the corner: (2dc, ch2, 2dc) ]*3, 19dc, in the corner: (2dc, ch1, sl st) (92)
Round 7: into the corner just behind: (1sc, ch1, 1dc), [ 23dc, in the corner: (2dc, ch2, 2dc) ]*3, 23dc, in the corner: (2dc, ch1, sl st) (108)
Round 8: into the corner just behind: (1sc, ch1, 1dc), [ 27dc, in the corner: (2dc, ch2, 2dc) ]*3, 27dc, in the corner: (2dc, ch1, sl st) (124)
Round 9: into the corner just behind: (1sc, ch1, 1dc), [ 31dc, in the corner: (2dc, ch2, 2dc) ]*3, 31dc, in the corner: (2dc, ch1, sl st) (140)

— Second Granny Square :

Round 1: start from the second ch from the hook: 10 sc, ch1, turn (10)
Round 2: skip 1 stitch, 8 sc, inc, ch1, turn (10)
Round 3: skip 1 stitch, 10 sc, ch1, turn (10) Take note, the last 10th sc in each rounds must be crocheted a little on the side Do not cut the end of the cord 6 skip 29 28 26 inc 8 sc cut off;

— Third Granny Square :

Round 2: 10th sc Side of the bag 9th sc;

Assembly Instructions

  1. Attach the first Granny Square to the second at a corner seam using a slip stitch, keeping the RS facing outward.
  2. Join squares into a long strip by aligning edges and sewing with a mattress stitch for an invisible seam.
  3. Position the assembled side panels so the corners align evenly, then sew across the top and bottom edges, forming a rectangular shell.
  4. Sew the base panel to the bottom edge of the bag, ensuring neat, even stitching and secure corners.
  5. Attach the leather handles to the upper edge at evenly spaced intervals, using small metal rivets or sturdy needle-and-thread technique.
  6. Weave in all ends securely from the inside, then gently steam the bag to set the shape and relax the stitches.
  7. If desired, add a small interior pocket by sewing a simple rectangle between two panels before closing the sides.

Important Notes

  • Use stitch markers to keep track of your rounds, especially during joining and when aligning edges for a clean rectangle.
  • Stuff lightly while shaping the base to maintain a stable form without distorting the squares' alignment.
  • Weave in ends as you go to avoid a tedious finishing session; secure tails on the RS for a neat look.
  • Work with consistent tension across panels to prevent puckering at the joints; test a small sample before starting the full bag.

This timeless granny square bag pattern invites you to slow down and enjoy the process, focusing on precise square alignment and sturdy finishing. The gentle texture and natural tones pair with almost anything in your wardrobe, making it a standout everyday piece. You can personalize the tote with a custom color palette, adding extra panels or pockets if you wish to expand function. Enjoy the small, satisfying steps from foundation ring to final seam, and revel in a bag that will age with you beautifully. Happy crocheting and may your stitches bring you calm, confidence, and a touch of handmade joy.

Good to know

You ask, we answer

A 4 mm hook with Worsted / DK yarn gives a dense fabric that holds its shape and hides the stuffing.

Yes — it uses a small set of common stitches and gives a stitch count at the end of every round, so it is easy to follow even if you are newer to amigurumi.

Absolutely. Use a larger hook and heavier yarn for a bigger piece, or go smaller for a mini — just keep your gauge tight.

Place a marker at the first stitch of each round and move it up as you go; check the count printed at the end of each round.

Side view of tote showing square panels
Join 100k+ crocheters

Get new free patterns, stitch tips and exclusive content in your inbox.