Crochetologist
Free Crochet Pattern
Beautiful Detailed Adorable

Goodnight Set Amigurumi Pattern

Two pastel bunny dolls with sleepers ready for bedtime amigurumi scene
4.1Rating
12-15 HoursTime
IntermediateSkill
Highlights

What makes it special

Made with Love

Delightful animal designs with sweet details that capture the essence of your favorite woodland and farmyard friends.

Multi-Day Project

Takes 12-15 hours, spread across several sessions, to complete the full Goodnight Set and its coordinating pieces.

Intermediate Level

This is an intermediate-level crochet project that requires confidence in working in the round, executing color changes, performing discreet shaping, and performing careful seaming to connect components cleanly. The set’s modular design makes it approachable for crocheters who have mastered basic increases and decreases and can manage small- to medium-sized pieces with consistent tension. It offers a balance of techniques that challenge without overwhelming, making it a rewarding choice for crafters seeking a polished, display-ready result while expanding their repertoire with a wearable display project that grows a confident skill set.

Welcome to the Goodnight Set, a handcrafted trio designed to cradle a bedtime routine in soft, crocheted form. This collection centers on a gentle storytelling atmosphere: a sleepy Bunny Toy that wears a Night Cap, tucked into a Basket Bed with a snug Pillow, and complemented by a cozy Granny Square Blanket. The project unfolds through a series of small, well-defined components that join to form a cohesive scene you can display on a nursery shelf or gift as a complete bedtime vignette. The work invites patience, precision, and a satisfying rhythm of rounds, color shifts, and careful finishing that result in a durable, huggable ensemble ready for snuggles and quiet moments before sleep.

Designed for makers who enjoy turning simple shapes into a little world, this set rewards tidy seaming, measured color changes, and thoughtful assembly. Each piece is crocheted with tight, even tension to maintain shape and resilience during play. The finished display offers a gentle focal point that invites storytelling, bedtime routines, and long-term keepsake value. Whether you’re stitching for a family gift or adding a nursery display, the Goodnight Set carries a mood of warmth and comfort that resonates with bedtime rituals.

About This Goodnight Set Amigurumi Pattern

Goodnight Set gathers a small family of crocheted components into a coordinated narrative. Each piece begins with a stable foundation and progresses through a series of rounds or rows that build shape with dependable stitches. The Sleeper and Bunny Toy components are designed to fit within the Basket Bed, while the Night Cap adds a finishing touch that completes the bedtime look. A Pillow sits inside the Basket Bed, providing a soft anchor for the Bunny Toy when displayed. The Granny Square Blanket offers a colorful counterpoint that can be joined to the basket or laid across the bed’s interior for added warmth in the scene. Tailored color choices keep the overall silhouette clean and legible, helping the shapes remain clearly defined even with small-scale crochet work.

Connecting pieces via simple seams and modest finishing details keeps the set approachable for experienced beginners and satisfying for seasoned crocheters. The techniques emphasize precise joining and tidy color transitions, so the final display is sturdy enough for gentle play yet refined enough to sit proudly on a display shelf. The modular design also supports customization—swap colorways per component to reflect a nursery theme or a child’s favorite palette while preserving consistent construction across the set. This approach yields a cohesive collection that reads as a single scene rather than a handful of independent pieces.

Basket bed with bunny sleeper and a tiny pillow

Its modular design invites palette experimentation while preserving a uniform construction approach. By keeping the same basic shapes and proportion across Sleeper head, Bunny Toy body, Basket Bed, Pillow, Cap, and Blanket, the maker can interchange colors and tiny details without altering the fundamental geometry. This results in a playful world where each component can be customized for personality while still fitting together as a single tableau.

Color swaps and subtle texture choices across parts allow for a range of aesthetics—from gentle pastel bedtime vibes to brighter, more playful displays. The pattern is structured to accommodate variations without compromising the integrity of the assembly, so you can tailor the set to suit a nursery’s decor or a child’s preferences, then recreate the exact same assembly with confidence if you choose to make multiple sets as gifts.

Stitches & Skills You'll Use

The core of this set rests on a straightforward toolkit of crocheted techniques. A standard single-crochet fabric provides the base for the Bunny Toy head and body, the Sleeper, and the Basket Bed walls. Increases and decreases shape the head and limbs, while a few well-placed stitches form the ears and cap brim without adding bulk. The Pillow is created with a compact, rounded profile achieved through gentle shaping and careful turning methods. The Granny Square Blanket is built from small, square motifs joined with a simple whip stitch or join-as-you-go technique that keeps the borders neat and the color transitions smooth. Each component relies on even tension to maintain a consistent fabric density, ensuring that seams lie flat and that pieces sew together cleanly without gaps or puckers. The finishing work emphasizes securing all ends, smoothing surfaces, and carefully aligning parts before final assembly, so the display reads as a cohesive unit rather than a collection of separate pieces.

When placing the pieces, the Bunny Toy’s head and body are joined with a neck seam that reads as a natural connection rather than an arbitrary join. The Cap sits snugly atop the head, with a shallow brim that helps stabilize the silhouette. The Basket Bed’s sides rise to cradle the Bunny and blanket, providing a sense of enclosure that invites gentle interaction. The Granny Square Blanket, with its repeating square motifs, acts as a soft counterpoint to the solid forms of the toy and basket, enhancing the overall coziness of the scene. Throughout, the technique remains grounded in basic crochet principles, keeping the project accessible while delivering a polished, display-ready result.

Why You'll Love This Goodnight Set Amigurumi Pattern

This collection builds a gentle bedtime landscape by weaving together several small crocheted pieces that snugly fit into one scene. The process encourages careful color coordination, neat joining, and tidy finishing, all of which contribute to a result that feels both comforting and collectible. The satisfaction comes from watching the components take shape, then fitting them together to form a coherent display that can be enjoyed for story time or treasured as a keepsake. Crafting the Bunny Toy with its Night Cap, nesting it into the Basket Bed, and layering the Granny Square Blanket around the pillow creates a tactile story you can hold and display for years to come. The ensemble is designed to be durable enough for gentle play yet delicate enough to be a cherished decorative piece, making it a thoughtful gift for new parents and a comforting companion for little ones at bedtime.

Colour & Yarn Inspiration

Pastel tones—soft pinks, pale blues, mint greens, and creamy neutrals—create a gentle, soothing bedtime atmosphere. For a brighter option, saturate the colors used on the Granny Square Blanket and the Sleeper’s accents to establish a lively, story-worthy vignette that still reads as cohesive. Substituting lighter colors on the Granny Square Blanket can brighten the overall look while darker tones on the Bunny Toy head provide strong contrast for facial features and definition.

Yarn substitutions influence texture most on large surface areas like the Sleeper’s blanket and the Basket Bed’s sides. A slightly heavier yarn yields a chunkier, cozier appearance, while a lighter weight gives a delicate, airy feel. When choosing yarn for the Basket Bed, aim for a yarn with good stitch definition so the sides hold their shape and the color changes in the blanket remain crisp. The color plan should be consistent across all pieces to maintain unity, even as you swap individual colors to personalize the set. Consider testing a mini swatch from the intended colors before starting to confirm that the chosen yarns knit together visually and texturally as planned.

Granny square blanket laid out with a bunny toy

Switch Things Up

Color and texture opportunities abound across the Goodnight Set, inviting you to tailor the look while keeping the construction straightforward. Start by swapping colors between ears and head for contrast against the Sleeper and the Bunny’s fur, then choose a different palette for the Night Cap to emphasize the head’s silhouette. Stripes on the Sleeper or solid blocks of color for the Bunny Toy head can dramatically shift the mood without altering the stitch count or shaping. Consider scaling the set with different yarn weights to produce a smaller, more portable version or a chunkier, cuddlier display that reads as a statement piece on a shelf.

Face details can be customized with safety eyes or embroidered features to give each character its own personality. Small fabric scraps or felt accents can be added as hats, bonnets, or tiny accessories that complement the main pieces. A touch of wire embedded in the limbs may offer poseability for display—take care to limit stiffness and ensure it remains child-safe. Reordering the assembly sequence can help when trying new elements: complete the easier components first to validate scale before committing to the more complex parts. You can alter the Granny Square Blanket’s color order to create a gradient block instead of a patchwork mosaic, or maintain a traditional look with a regular color rhythm that echoes the other pieces.

For a different display approach, consider substituting the stuffing with a slightly denser blend for the head and torso to introduce more weight and a more durable feel under handling. Conversely, a lighter stuffing creates a softer, squishier vibe that enhances poseability. If desired, you can omit buttonhole openings in the Bunny Toy’s legs for a sleeker finish or keep them as part of the character design for a playful detail. Documenting a color chart as you work helps you reproduce the exact palette in future projects and makes substitutions easier next time.

Ways to Use & Gift It

The Goodnight Set makes a thoughtful nursery gift that combines décor with a comforting friend for story time. Present the Bunny Toy and Night Cap tucked into the Basket Bed with the Granny Square Blanket laid beneath as a complete scene, then add a favorite bedtime book for a cohesive bedtime bundle.

Pair the set with a softly colored blanket and a plush book-led reading routine to create a cohesive, multi-sensory gift. Consider including a small note about care and cleaning to reassure new parents about gentle handling and long-lasting results. The display-ready quality also makes the set a charming keepsake for grandparents or caregivers who want to celebrate a child’s early years with something tangible and durable.

Common Mistakes & How to Fix Them

Unbalanced tension that causes seams to gape or surfaces to pucker around joins.

Skipping marker placement on rounds where color changes occur, leading to misalignment during assembly.

Overstuffing the Bunny Toy head or limbs, which distorts shapes and makes seams bulky.

Cutting loose ends too late in the process, resulting in a crowded finishing stage with difficult concealment.

Maker's Notes

During development, a range of yarns and hook sizes were evaluated to determine the most reliable density for the toy, cap, and basket. A finer cotton was chosen for the head and ears to preserve delicate shaping, while a slightly heavier weight was used for the Basket Bed walls to hold their form. The Sleeper’s blanket benefits from a balanced fabric density that remains soft yet sturdy when knit into rounds. The head and torso require careful stuffing to retain a gentle silhouette without creating flat spots in the final display. A 1.5 mm hook produced intricate detail for the smallest parts, with a 2.0 mm hook used for the larger bodies to preserve smooth texture. The total time to completion across all components typically ranges from 12 to 14 hours for an experienced maker, with longer durations possible for first-time color changes and finishing work. Beginners may benefit from marking rounds and counting stitches as they go to minimize confusion during early assembly steps, especially when transitioning between the Bunny Toy head, neck, and limbs. A tidy workspace with a dedicated container for yarn tails and a separate area for completed parts helps prevent tangling and misplacing components during the process. The Granny Square Blanket section relies on consistent tension and careful alignment when joining squares to ensure the final fabric lies flat and evenly across the surface of the completed display. Overall, the project rewards patient pacing, steady rhythm, and disciplined finishing for the most satisfying result.

I tried a substitution: Substituting a DK weight yarn with a 2.0 mm hook for the Granny Square Blanket yielded slightly smaller squares, necessitating an extra round per module to maintain the intended border width. The final blanket remained plush, but the overall height of the finished pieces shifted by approximately 1–2 cm. In response, the pattern can be adjusted by adding rounds to the affected motifs or by selecting a yarn with a similar Yardage per Gram to preserve the target scale. For those seeking the closest reproduction of the original dimensions, it is best to adhere to the specified weight and hook size and to compensate with matching rounds when joining components. Substituting a slightly heavier yarn in the Basket Bed sides can increase the structure and reduce the risk of sagging in display positions, while keeping the overall silhouette aligned with other parts. If a lighter weight is used for the Bunny Toy head, anticipate gentler shaping and a softer overall feel, which can be desirable for a more cuddly effect when the Bunny is posed in the Basket Bed. Across substitutions, measure critical dimensions periodically to ensure the final assembled scene maintains the intended height, width, and balance among the components.

Goodnight Set Amigurumi Pattern

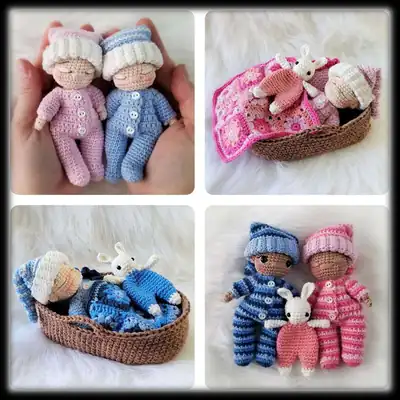
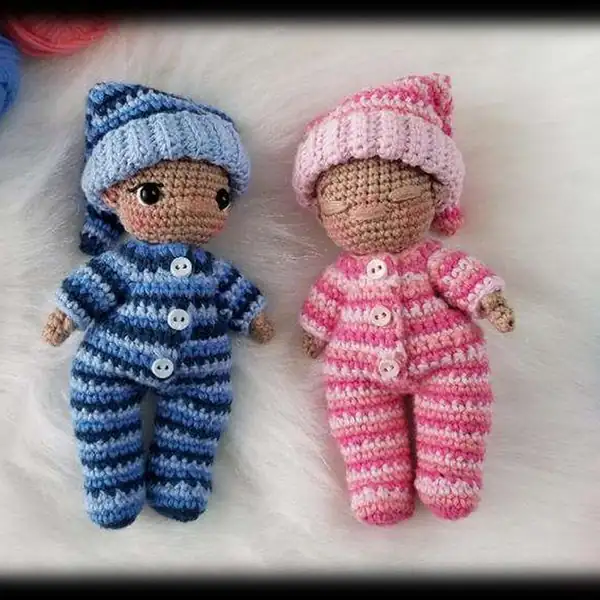
Make the Goodnight Set with our free crochet amigurumi pattern—complete rounds, materials, and assembly tips. Start crocheting and build a cuddly bedtime crew today!

Intermediate 12-15 Hours
Pattern at a glance
Skill level
Intermediate
Time to make
12-15 Hours
Hook size
1.5 mm (A/2) and 2.0 mm (B) for most components; 3.25-3.75 mm (D-F) for Basket Bed/looser sections
Yarn weight
8/4 (super fine weight) yarn
Finished size
Approx. 20 cm tall (bunny); overall set size varies with display
Gauge
Gauge not specified; approximate tension based on 8/4 yarn and 1.5-2.0 mm hooks, ensure stitches are tight enough to avoid gaps
Yarn used
Approx. 350-500 m total main-color yarn; multiple colors required for arms, cap, sleeve, and blanket

Materials Needed

Main Fabric
  • 01
    8/4 (super fine weight) yarn in colors
  • 02
    Bright pink
  • 03
    Light coral
  • 04
    Pink
  • 05
    White or natural white
  • 06
    Light Brown
  • 07
    Brown
  • 08
    Navy Blue
  • 09
    Blue
  • 10
    Light Blue
  • 11
    Stitch markers or paper clips
  • 12
    Tapestry needle
  • 13
    3 - tiny white buttons (6mm)
  • 14
    2 - 3mm black eyes (for bunny)
  • 15
    Craft glue
Tools Required
  • 01
    Size 1.5mm hook
  • 02
    Size 2.0mm hook
  • 03
    Size 3.25mm-3.75mm hook
  • 04
    Stitch markers or paper clips
  • 05
    Tapestry needle
  • 06
    Scissors
  • 07
    Yarn needle for sewing

— Closing :

Round 2: mm black eyes (for bunny) Craft glue Abbreviations Rnd Round mr magic ring ch chain sc single crochet dc double crochet INC increase DEC decrease inv DEC invisible decrease slst slip stitch sk skip sp space BLO back loops only (…)x repeat the indicated number of times I used Hobbii Rainbow Cotton 8/4 in Pink (45), Light Coral (50), Candy Floss (93), Natural White (02), Light Brown (06), Brown (07), Prussian Blue (92), Blue Sky (70), and Light Sky Blue (71)
Round 3: mm black eyes (for bunny) Craft glue Abbreviations Rnd Round mr magic ring ch chain sc single crochet dc double crochet INC increase DEC decrease inv DEC invisible decrease slst slip stitch sk skip sp space BLO back loops only (…)x repeat the indicated number of times I used Hobbii Rainbow Cotton 8/4 in Pink (45), Light Coral (50), Candy Floss (93), Natural White (02), Light Brown (06), Brown (07), Prussian Blue (92), Blue Sky (70), and Light Sky Blue (71)

— Leg :

Round 1: Starting in 2nd ch from hook, 3 sc, 3 sc across end in next ch, (now working opposite side) 2sc, INC (10)
Round 2: INC, 2 sc, INC, 3 sc in next sc, INC, 2 sc, INC, 3 sc in (18)
Round 3: 18 sc;
Round 4: 18 sc;
Round 5: 6 sc, (inv DEC) x3, 6sc;
Round 6: 15 sc;
Round 7: 15 sc;
Round 8: 15 sc;
Round 9: 15 sc;
Round 10: 15 sc;
Round 11: INC, 7 sc, INC, 6 sc;
Round 12: 17 sc;
Round 13: 17 sc;
Round 14: 17 sc;
Round 15: ch1, (join to Leg 1 with a sc, just slightly back from center so that legs are slightly turned out) - 17 sc (around Leg 1), 1sc in back bump of ch, 17 sc (around Leg (36)
Round 16: 36 sc;
Round 17: 36 sc;
Round 18: 36 sc;
Round 19: (shortened): BLO 3 sc, (skipping all other sc in this round, and changing to Rows), ch 1, turn (remove marker)

— Head :

Round 19: 36 sc, 3 sc in front loops (exposed from previous (39)
Round 20: 39 sc, ch1, turn;
Round 21: 37 sc, ch 1, sk next sc, 1 sc, ch 1, turn (39)
Round 22: sk next sc, 2 sc in ch1 space (creating button hole) (37)
Round 23: 37 sc, ch1, turn;
Round 24: 6 sc, (DEC, 8 sc) x2, DEC, 9 sc, ch 1, turn (34)
Round 25: 14 sc, DEC, 5 sc, DEC, 9 sc, ch1, sk next sc, 1 sc, ch 1, turn;
Round 26: sk next sc, 2 sc in ch 1 space (creating button hole) (32)
Round 27: 32 sc, ch 1, turn (32)
Round 28: 4 sc, DEC, 1 sc, ch 6, sk next 4 sc, 4 sc, DEC, 4 sc, ch 6, sk next 4 sc, 1 sc, DEC, 4 sc, ch1, turn;
Round 29: 2 sc, DEC, 2 sc, (1 sc in front loop of next ch) x2, DEC across front loops of next 2 ch, (1 sc in front loop of next ch) x2, DEC, 5 sc, DEC, (1 sc in front loop of next ch) x2, DEC across front loops of next 2 ch, (1 sc in front loop of next ch) x2, 2 sc, DEC, ch 1, sk next sc, 1 sc, ch 1, turn (27)
Round 30: sk next sc, 2 sc in ch 1 space (creating button hole), 2 sc, DEC, 3 sc, DEC, 5 sc, DEC, 3 sc, DEC, 4 sc (23)

— Ears (Make 2) :

Round 1: 1 sc in corner, (1 sc in next ch) x6, 1 sc in corner, ch 1, turn;

— Arm :

Round 1: 8 sc (across the 8 sc from Row 1), 5 sc across the bottom of arm opening, place (13)
Round 2: 13 sc;
Round 3: 13 sc;
Round 4: 13 sc;
Round 5: 11 sc, inv DEC;
Round 6: 12 sc Finish off with invisible join. Sew in ends. Sew on 3 (6mm) buttons to match up with button holes. Fig. 13 Fig. 14 Fig. 15 Fig. 16 Fig. 17 Fig. 18;

— Arms (Make 2) :

Round 1: Starting in 2nd ch from hook, 8 sc, ch 1, turn (8)
Round 2: BLO 8 sc, ch 1, turn (35 rows) (8)
Round 3: BLO 8 sc, ch 1, turn (35 rows) (8)
Round 4: BLO 8 sc, ch 1, turn (35 rows) (8)
Round 5: BLO 8 sc, ch 1, turn (35 rows) (8)
Round 6: BLO 8 sc, ch 1, turn (35 rows) (8)
Round 7: BLO 8 sc, ch 1, turn (35 rows) (8)
Round 8: BLO 8 sc, ch 1, turn (35 rows) (8)
Round 9: BLO 8 sc, ch 1, turn (35 rows) (8)
Round 10: BLO 8 sc, ch 1, turn (35 rows) (8)
Round 11: BLO 8 sc, ch 1, turn (35 rows) (8)
Round 12: BLO 8 sc, ch 1, turn (35 rows) (8)
Round 13: BLO 8 sc, ch 1, turn (35 rows) (8)
Round 14: BLO 8 sc, ch 1, turn (35 rows) (8)
Round 15: BLO 8 sc, ch 1, turn (35 rows) (8)
Round 16: BLO 8 sc, ch 1, turn (35 rows) (8)
Round 17: BLO 8 sc, ch 1, turn (35 rows) (8)
Round 18: BLO 8 sc, ch 1, turn (35 rows) (8)
Round 19: BLO 8 sc, ch 1, turn (35 rows) (8)
Round 20: BLO 8 sc, ch 1, turn (35 rows) (8)
Round 21: BLO 8 sc, ch 1, turn (35 rows) (8)
Round 22: BLO 8 sc, ch 1, turn (35 rows) (8)
Round 23: BLO 8 sc, ch 1, turn (35 rows) (8)
Round 24: BLO 8 sc, ch 1, turn (35 rows) (8)
Round 25: BLO 8 sc, ch 1, turn (35 rows) (8)
Round 26: BLO 8 sc, ch 1, turn (35 rows) (8)
Round 27: BLO 8 sc, ch 1, turn (35 rows) (8)
Round 28: BLO 8 sc, ch 1, turn (35 rows) (8)
Round 29: BLO 8 sc, ch 1, turn (35 rows) (8)
Round 30: BLO 8 sc, ch 1, turn (35 rows) (8)
Round 31: BLO 8 sc, ch 1, turn (35 rows) (8)
Round 32: BLO 8 sc, ch 1, turn (35 rows) (8)
Round 33: BLO 8 sc, ch 1, turn (35 rows) (8)
Round 34: BLO 8 sc, ch 1, turn (35 rows) (8)
Round 35: BLO 8 sc, ch 1, turn (35 rows) (8)
Round 36: BLO 8 sc, ch 1, turn (35 rows) (8)

— Legs (Make 2) :

Round 1: (2 sc in next ridge) x18 (see below), place marker (36)
Round 2: 36 sc;
Round 3: 36 sc;
Round 4: 36 sc;
Round 5: (7 sc, inv DEC) x4;
Round 6: 32 sc;
Round 7: 32 sc;
Round 8: 32 sc;
Round 9: (6 sc, inv DEC) x4;
Round 10: 28 sc;
Round 11: 28 sc;
Round 12: (5 sc, inv DEC) x4;
Round 13: 24 sc;
Round 14: 24 sc;
Round 15: (4 sc, inv DEC) x4;
Round 16: 20 sc;
Round 17: 20 sc;
Round 18: (3 sc, inv DEC) x4;
Round 19: 16 sc;
Round 20: 16 sc;
Round 21: (2 sc, inv DEC) x4;
Round 22: 12 sc;
Round 23: 12 sc;
Round 24: (1 sc, inv DEC) x4;
Round 25: 8 sc;
Round 26: 8 sc;
Round 27: 8 sc;

— Sleeper :

Round 1: Starting in 2nd ch from hook, 8 sc, ch 1, turn (8)
Round 2: INC, 6 sc, INC, ch 1, turn;
Round 3: INC, 8 sc, INC, ch 1, turn;
Round 4: INC, 10 sc, INC, ch 1, turn;
Round 5: 14 sc, ch 1, turn;
Round 6: 14 sc, ch 1, turn;
Round 7: 14 sc, ch 1, turn;
Round 8: 14 sc, ch 1, turn;
Round 9: 14 sc, ch 1, turn;
Round 10: 14 sc, ch 1, turn;
Round 11: 14 sc, ch 1, turn;
Round 12: 14 sc, ch 1, turn;
Round 13: 14 sc, ch 1, turn;
Round 14: 14 sc, ch 1, turn;
Round 15: 14 sc, ch 1, turn;
Round 16: 14 sc, ch 1, turn;
Round 17: 14 sc, ch 1, turn;
Round 18: 14 sc, ch 1, turn;
Round 19: 14 sc, ch 1, turn;
Round 20: 14 sc, ch 1, turn;
Round 21: 14 sc, ch 1, turn;
Round 22: 14 sc, ch 1, turn;
Round 23: 14 sc, ch 1, turn;
Round 24: 14 sc, ch 1, turn;
Round 25: 14 sc, ch 1, turn;
Round 26: DEC, 10 sc, DEC, ch 1, turn;
Round 27: DEC, 8 sc, DEC, ch 1, turn (10)
Round 28: DEC, 6 sc, DEC, ch 1 (place marker) (8)

— Night Cap :

Round 1: BLO 74 sc;
Round 2: 74 sc;
Round 3: 74 sc;
Round 4: 74 sc;
Round 5: 74 sc;
Round 6: 74 sc;
Round 7: 74 sc;
Round 8: 74 sc;
Round 9: (starting this round from center of the bottom side of the basket bed) 16 sc, ch 8, sk 5 sc, (80)
Round 10: 16 sc, 10 sc in ch 8 space, 32 sc, 10 sc in ch 8 space, 16sc (84)

— Pillow :

Round 1: 7 sc in mr;
Round 2: (INC) x7;
Round 3: (1 sc, INC) x7;
Round 4: (2 sc, INC) x7;
Round 5: (3 sc, INC) x7;
Round 6: (4 sc, INC) x7;
Round 7: (5 sc, INC) x7;
Round 8: (6 sc, INC) x7 Finish with invisible join. Sew in ends. Take both circles, and match up corners with back side facing back side. Continue to Rnd 9. Rnd 9: Change to Navy Blue yarn (or desired color) on first circle. 56 sc around through both layers, stopping around 48 sc to lightly stuff pillow with fiber fill.
Round 10: (ch 2, 2 dc) in first sc (ch 2 counts as first dc), ((3 dc) in next sc) x55;
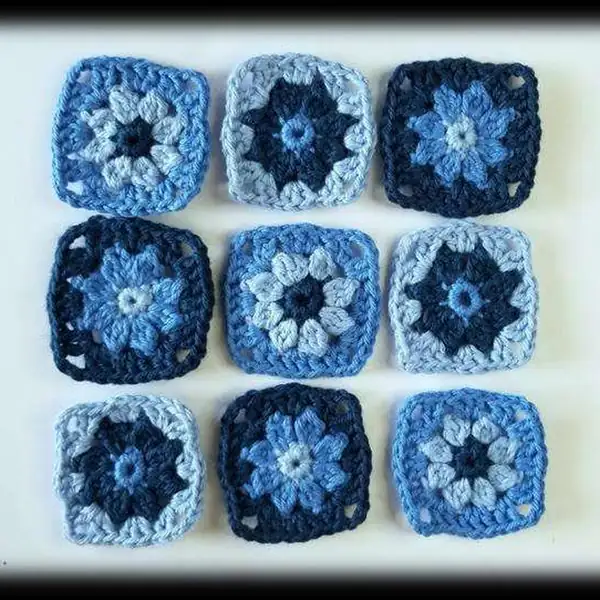
— Petal :

Round 1: 8 sc in mr, join with slst, cut yarn Join Yarn 2 color choice;
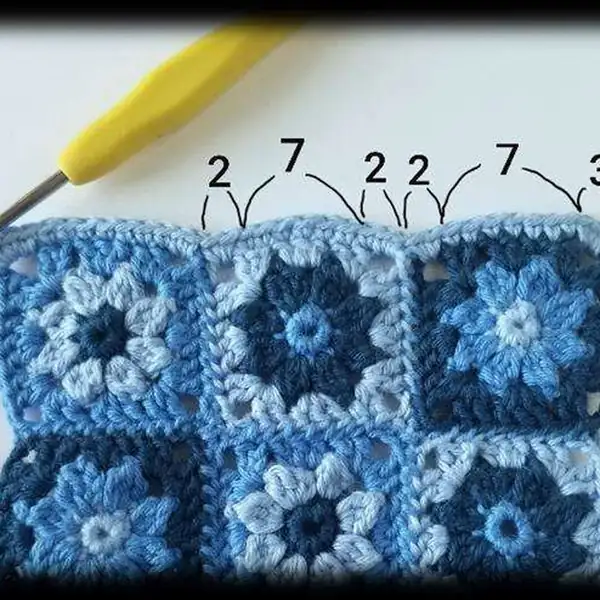
Round 2: Join with slst to one sc of Rnd 1. Make first petal, followed by 7 more petals. First petal: Ch 2, yarn over (as if making a dc), insert into same sc, yarn over and pull up a loop. Yarn over and pull through first 2 loops on hook. Repeat yarn over (as if making a dc), insert into same sc, yarn over and pull up a loop. Yarn over and pull through first 2 loops on hook. Yarn over and pull through all 3 loops on hook. Ch 2. Fig. 32 Fig. 33;
Round 3: Join with slst to one ch 2 space of Rnd 2. (Ch3 (counts as first dc), 1 dc, ch 3, 2 dc) in first ch 2 space, (3 dc) in next ch 2 space, *[(2 dc, ch 3, 2 dc) in next ch2 space, (3 dc) in next ch 2 space], repeat from * 2 more times, join with slst, cut yarn. Sew in all ends. Make 3 different color arrangements as shown, 3 squares of each, for a total of 9 squares Lay out squares in a 3x3 grid as shown. It looks best if the squares with a medium color for round 3 forms the diagonal through the middle.

— Basket Bed Base :

Round 1: 6 sc in mr;
Round 2: INC x6;
Round 3: (1 sc, INC) x6;
Round 4: (2 sc, INC) x6;
Round 5: 24 sc;
Round 6: 24 sc;
Round 7: 24 sc;
Round 8: 24 sc;
Round 9: 24 sc;
Round 10: (2 sc, inv DEC) x6;
Round 11: (1 sc, inv DEC) x6;
Round 12: BLO 12 sc (12)

— Basket Bed Side Walls :

Round 1: Starting in 2nd ch from hook, 3 sc, 3 sc across end in next ch, (now working opposite side) 2 sc, (2 sc, 2 dc) in next ch (12)
Round 2: INC, 3 sc (sk rest of round)

— Legs :

Round 1: 12 sc, place marker;
Round 2: (2 sc, INC) x4;
Round 3: (3 sc, INC) x4;
Round 4: (4 sc, INC) x4;
Round 5: 24 sc;
Round 6: 24 sc;
Round 7: 24 sc;
Round 8: 24 sc;
Round 9: 24 sc;
Round 10: 24 sc;
Round 11: 2 sc, sk 12 sc, 10 sc (Note: adjust sc placement if needed for legs to be correctly positioned) (Fig. 41 and (12)
Round 12: 12 sc;
Round 13: (2 sc, inv DEC) x3;
Round 14: 9 sc Change to Yarn Under (x-stitch) Change to 1.5mm hook Change to white yarn;
Round 15: BLO 9 sc;
Round 16: 9 sc;
Round 17: (1 sc, inv DEC) x3 (6)

— Body :

Round 11: Join yarn (color from body) on back of body where you skipped 12 sc on Rnd 11 of the Left Leg. (Fig.

— Ruffle :

Round 45: 12 sc, place marker.

— Tail :

Round 12: 12 sc;
Round 13: (2 sc, inv DEC) x3;
Round 14: 9 sc Change to Yarn Under (x-stitch) Change to 1.5mm hook Fig. 42 Fig. 43 Fig. 44 Fig. 45;
Round 15: BLO 9 sc;
Round 16: 9 sc;
Round 17: (1 sc, inv DEC) x3 Close hole, pull tail through the hole with tapestry needle, and sew in ends. Arms (make 2) Using Yarn Under (x-stitch) Using 1.5mm hook Using White yarn;

— Granny Square Blanket :

Round 1: 8 sc in mr;
Round 2: 8 sc;
Round 3: (2 sc, inv DEC) x2;
Round 4: 6 sc;
Round 5: 6 sc;
Round 6: 6 sc;
Round 7: 6 sc;

— Bedtime Bunny Toy Head :

Round 1: 8 sc in mr (8)

Assembly Instructions

  1. Stuff each piece firmly before closing.
  2. Pin all parts in place and check the proportions against the photos.
  3. Sew parts on securely with matching yarn.
  4. Weave in all ends and shape the finished piece.

Important Notes

  • Use stitch markers to track rounds whenever color changes or subtle shaping occur, and move markers as you progress.

  • Stuff firmly but not so tightly that the fabric becomes dense or distorts the intended silhouette; balance between softness and structure is key.

  • Pin all parts in precise positions before sewing to ensure correct orientation and symmetry when assembling the final scene.

  • Weave in ends as you go to minimize a lengthy finishing session; tidy finishing yields a cleaner overall look.

  • Maintain consistent tension throughout each piece to achieve an even, professional finish across all components.

The Goodnight Set offers a fusion of comfort and whimsy, designed to become a cherished bedtime companion that travels beyond the toy shelf into the realm of storytelling and nightly ritual. Each piece supports a gentle, child-safe display that encourages curation of a tiny world in the nursery. The Bunny Toy, night-cap accessory, Basket Bed with its Pillow, and the Granny Square Blanket together create a scene that invites touch, exploration, and quiet moments before lights out. May the stitches you weave bring warmth to evenings and a sense of security during nighttime routines, turning a simple crochet project into a treasured family keepsake that endures through growing years and changing décor. May your workshop be steady, your yarns soft, and your evenings calm as you weave this cozy bedtime world.

Good to know

You ask, we answer

The Bunny Toy head and body measure roughly 12–15 cm in height, with a compact overall display size that remains manageable for a nursery shelf. Size can vary slightly based on yarn weight and chosen gauge, but the proportions stay consistent across the set so the pieces align visually when arranged together.

Yes, you can use different yarn weights, but this will alter the final scale. Choose a hook size that suits your yarn and adjust the number of rounds accordingly so the pieces maintain their intended shapes and fit together cleanly.

This pattern is suitable for crocheters who are comfortable working in the round, making color changes, and performing basic shaping and seaming. It is not a beginner project, but the construction relies on familiar techniques rather than advanced stitches.

Most crocheters plan for roughly 12 to 14 hours to complete the full Goodnight Set, though total time depends on pace, how many pieces are tackled in one sitting, and how thoroughly finishing is approached.

Night cap close-up showing ridge detail
Join 100k+ crocheters

Get new free patterns, stitch tips and exclusive content in your inbox.