Crochetologist
Free Crochet Pattern
Beautiful Detailed Adorable

Garden Snails Amigurumi Pattern

Three small Garden Snails with contrasting shells on a soft grey surface, finished amigurumi shells and frilled bases visible
4.0Rating
2-4 HoursTime
IntermediateSkill
Highlights

What makes it special

Made with Love

Small, sweet, and gift-worthy creations that fit perfectly in the palm of your hand with detailed charm.

Bite-Sized Project

This pattern typically finishes in 2-4 hours, making it ideal for an afternoon project that yields several small snails perfect for gifting or display.

Intermediate Level

This intermediate-level amigurumi suits makers comfortable with continuous rounds, basic increases and decreases, working into back loops and subtle shaping techniques like gathering and seaming to produce a tidy finished toy.

There is something quietly joyful about making a tiny, characterful creature in a single sitting; these Garden Snails are designed to capture that small delight. They are perfect for crafters who love quick wins, tiny gifts, and tactile projects that fit neatly into an afternoon of stitching without demanding a huge time investment.

Each snail has a sculptural curl and a ruffled base that gives it personality, and the scale makes them ideal as pocket-sized presents or as a playful row on a shelf. This pattern is intended for makers who enjoy texture and subtle shaping and who appreciate a compact project that still feels handcrafted and special.

About This Garden Snails Amigurumi Pattern

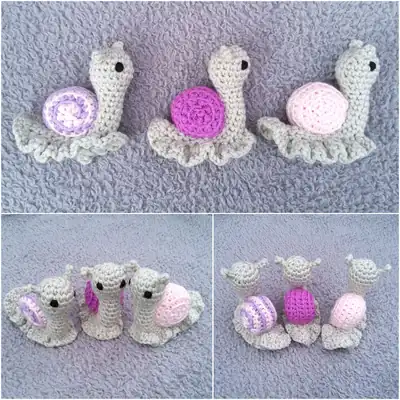
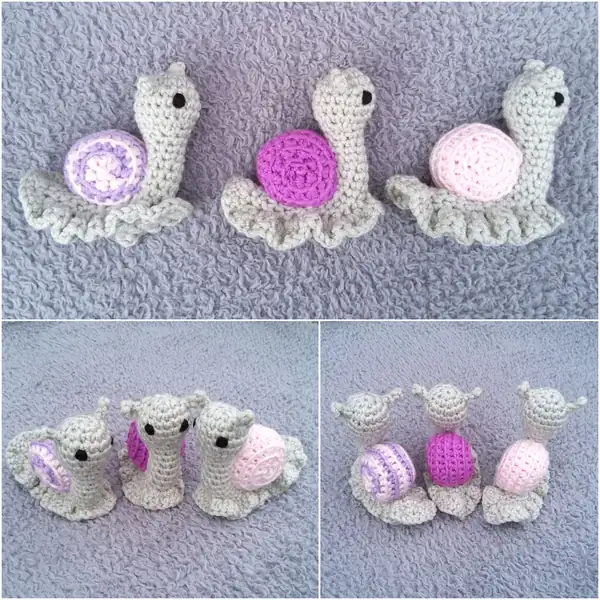
These Garden Snails are a tiny, tactile amigurumi set worked in Chunky weight yarn that finishes small and delightfully squishy. The design is made from simple components: shell, body, body skirt (frill), antennae and embroidered eyes, assembled to create the characteristic curled shell and ruffled base. Materials used in the original sample are Scheepjes Chunky Monkey Main (Stone 2017) – 20g, Scheepjes Chunky Monkey Contrast (Wild Orchid/Amethyst/Baby Pink) – 10g, and a small black oddment for eyes, with Hi-Loft toy stuffing for a soft, plump finish.

The pattern is worked with a 4.5mm crochet hook and sewn with a wool needle for neat joins. This project produces petite, gift-sized snails that look charming in single colours or in contrasting swirls, and the striping option lets you craft a lollipop-style shell when you swap colours after each round.

This pattern walks you through making a compact decorative snail that is pleasantly tactile and quick to assemble. The instructions guide you through shaping a rounded shell with a raised ridge texture, forming a tall, curved body with a frilled base, and securing antennae that sit neatly at the head. Construction emphasises working in continuous rounds, careful stuffing to avoid lumps, and a final running stitch gather to close each piece cleanly. As you stitch, you’ll focus on maintaining even tension so the chunky yarn sits smoothly without showing stuffing through the fabric.

Assembly is simple but precise: the shell is threaded and anchored through a central ridge to create the iconic silhouette, then the skirt is added to frame the base and stabilise the toy for display. The result is a small, finished object with a pleasing silhouette and soft hand that’s satisfying to make and suitable for gifting or decorative use.

Close-up group shot of three finished Garden Snails showing shell ridge texture and embroidered eyes on chunky yarn amigurumi

The pattern is deliberately compact so you can make multiple snails quickly, experimenting with contrasting shell colours or tonal shells that spiral quietly.

It includes clear notes about working into back loops for the shell ridge and using running stitches to gather ends, which helps you finish with a polished edge without heavy sewing work.

Stitches & Skills You'll Use

This pattern uses a small set of stitches to achieve distinctive texture: working into the BLO plus the third loop of the stitch below forms the shell ridge and gives a raised spiral effect that defines the design. You will also use standard increases and decreases to shape curves, and a running stitch gather to pull the shell into its final curled shape.

The construction alternates between taller stitches (half treble/half double in UK/US terminology) for the shell rounds and more compact stitches for the body to create contrast in scale and silhouette. Back loop only work and selective decreases create structured edges that hold their shape without heavy sewing.

Skills reinforced here include counting in continuous rounds, making clean colour changes without bulky joins, and using surface threading to anchor parts securely. These are approachable techniques that expand small-amigurumi skills while remaining accessible for an intermediate maker.

Why You'll Love This Garden Snails Amigurumi Pattern

I absolutely love this pattern because it combines a small, satisfying stitch count with a lot of personality in the finished toy. I enjoy how a few rounds produce a recognisable silhouette, and the ridge detail on the shell gives every snail a handcrafted texture that photographs beautifully. Working this design feels forgiving — mistakes are easy to correct — and the frilly skirt adds playful movement that delights both makers and recipients.

Making several in an afternoon is immensely rewarding, and I find their compact scale perfect for experimenting with bright contrast colours or gentle pastels.

Colour & Yarn Inspiration

Choose a bold contrast shell paired with a neutral body to make the shell the visual star, or pick two adjacent pastel shades for a soft, harmonious spiral that feels delicate and sweet. Variegated or self-striping contrast yarns create an unpredictable swirl that reads particularly well when swapping colours every round.

If you want a more vintage look, use muted, dusty tones and a slightly looser tension so the texture feels relaxed; for contemporary, playful versions pick bright, saturated contrast shades and consider a tonal body that still complements the shell. Substituting natural fibres adds a matte, grown-up finish while acrylic options make the toys more washable and budget-friendly.

Detail of a single snail on its side showing the ruffled body skirt and antennae of the crochet amigurumi

Switch Things Up

I like to change the shell look by working alternating rounds in different contrast colours to create a spiral stripe effect that feels playful.

If I want a more subdued look I use tonal variations of the same hue, picking two nearby shades and working them in alternating rounds for a gentle spiral.

I sometimes crochet the shell in a continuous lollipop swirl by changing colour every round and carrying the yarn loosely up the back to avoid extra joins.

For a larger version I swap to a bulkier yarn and a larger hook, increasing initial stitch counts slightly so the proportions remain balanced and the curl still forms neatly.

I often add a tiny felt leaf or a crocheted flower hot-glued to the shell for seasonal decorations and to personalise the piece as a keepsake.

To make a keyring version I reduce the hook size and use a thinner yarn to get a palm-friendly miniature, then attach a small split ring through a reinforced loop at the shell centre.

Sometimes I embroider a smile or different eye shapes to create distinct personalities between snails without altering construction.

I will occasionally add a little weighted bead inside the base to help the snail sit upright if I want it to be display-stable for a shelf scene.

Try using variegated yarn for the shell to get an unpredictable colour range that looks especially charming when the rounds are worked in the ridge technique.

Finally, swapping the skirt frill for a flatter base creates a different silhouette that’s better for sewing onto soft furnishings as a tiny accent piece.

Ways to Use & Gift It

These tiny snails are lovely as single small gifts tucked into a card or paired in sets for baby shower favours or seasonal bundles. I often stitch three complementary snails in different shell contrasts, package them in a little organza bag, and add a handwritten tag; the result looks curated and handcrafted even when made quickly.

They also work well as decorative touches on wrapped presents, as shelf accents in a nursery or craft room, or grouped in a shallow bowl as a small, whimsical display. For craft markets, making sets of matching colours or themed palettes helps sell them as collectable keepsakes that appeal to shoppers seeking affordable, handmade items.

Common Mistakes & How to Fix Them

Failing to mark the end of rounds when working continuously; place a stitch marker on the last stitch of each round to avoid accidental increases or missed stitches. Overstuffing the shell or body which causes stuffing to show through the stitches; add small amounts of fibrefill gradually, shaping as you go to maintain a neat surface. Pulling colour change tails too tight when swapping contrast yarns; leave a small loop and weave the tail through the back of the work rather than tightening hard to prevent distortion. Skipping the running stitch gather at the shell centre which flattens the shell shape; thread through the front loops of the last six stitches and pull firmly to form the correct curve. Neglecting to position antennae symmetrically on the head which looks unbalanced; pin the antennae in place and check alignment before stitching them fully. Using a large crochet hook with chunky yarn and not adjusting tension causes loose fabric and visible stuffing; use the recommended hook and maintain slightly tighter tension for toy-making.

Maker's Notes

When I made the sample I used Scheepjes Chunky Monkey in Stone for the body and a 4.5 mm hook, and it took me about three hours to complete one snail while photographing each step. I worked the shell through the back loops and the third loop as instructed to get the distinctive ridge, and I found stuffing little and often produced the smoothest curve without lumps. Beginners typically stumble when changing colour between rounds and when gathering the last six stitches of the shell, so I worked slowly through those rounds and double-checked stitch counts after each increase or decrease to prevent errors.

Sewing the shell to the body requires small, neat stitches; I pinned everything first and used short lengths of yarn to avoid bulky joins.

I tried a substitution: I tested a version in DK weight with a 3.5 mm hook and the finished snail became noticeably smaller and firmer; the proportions remained pleasing but the shell ridge appeared tighter and less pronounced, making the DK version excellent for tiny keychain-sized versions instead of display snails.

Garden Snails Amigurumi Pattern

Make tiny Garden Snails with this free crochet pattern; full materials, row-by-row instructions and assembly notes included so you can start stitching today.

Intermediate 2-4 Hours
Pattern at a glance
Skill level
Intermediate
Time to make
2-4 Hours
Hook size
4.5 mm (G/7)
Yarn weight
Chunky / #5
Finished size
Approx. 9 cm / 3.5 in tall
Gauge
Approx. 10 sc x 8 rows = 5 cm (worked tightly in single/double crochet equivalents so no stuffing shows)
Yarn used
Main colour: 20g / ~40 m (44 yd)

Materials Needed

Main Fabric
  • 01
    Scheepjes Chunky Monkey Main (Stone 2017) - 20g for body and skirt
  • 02
    Scheepjes Chunky Monkey Contrast (Wild Orchid / Amethyst / Baby Pink) - 10g for shell accents
  • 03
    Scheepjes Chunky Monkey Black 1002 - small oddment for embroidered eyes
  • 04
    Hi-Loft quality toy stuffing - small amount to fill shell and body
Tools Required
  • 01
    4.5mm crochet hook (G/7)
  • 02
    Wool sewing needle for joining and weaving ends
  • 03
    Stitch marker to mark the end of rounds
  • 04
    Scissors
  • 05
    Tapestry needle for finishing
  • 06
    Pins for assembly alignment (optional)

— Shell :

Round 1: ch2, htr6 into 2nd st from hook (alternatively htr 6sts into magic ring) (6)
Round 2: htrinc x6 (12)
Round 3: (htr into next st, htrinc) x6 (18)
Round 4: (htr into next 2sts, htrinc) x6 (24)
Round 5: dc (24)
Round 6: dc (24)
Round 7: (htr into next 2sts, htrdec) x6 (18)
Round 8: (htr into next st, htrdec) x6 (12)
Round 9: htrdec x6 (6)

— Body :

Round 1: ch2, dc6 into 2nd st from hook (alternatively dc 6sts into magic ring) (6)
Round 2: inc x2, 1st Antennae: ch6, sl st into 5th and 6th ch from hook, inc x3, 2nd Antennae: ch6, sl st into 5th and 6th ch from hook, inc into last st (12)
Round 3: (dc into next st, inc) x6 (18)
Round 4: dc (18)
Round 5: dc (18)
Round 6: dc (18)
Round 7: (dc into next st, dec) x6 (12)
Round 8: (dc into next 2sts, dec) x3 (9)
Round 9: dc (9)
Round 10: dc (9)
Round 11: dc (9)
Round 12: dc (9)
Round 13: dc (9)
Round 14: dc (9)
Round 15: dc (9)
Round 16: dc (9)
Round 17: dc (9)
Round 18: dc (9)
Round 19: dc (9)
Round 20: dc (9)
Round 21: dc (9)
Round 22: dc (9)
Round 23: dc (9)
Round 24: dc (9)
Round 25: dc (9)
Round 26: dc (9)
Round 27: (dc into next st, dec) x3 (6)
Round 28: dc (6)

— Body Skirt :

Round 1: leaving a 10cm end, sl st into the base of body 1 row down from bottom of shell on the furthest side from you, the base should be facing towards you and the head should be facing left, 1st Side: ch3 and then 3trinc into 1st in every row up to the stitch marker, 2nd Side: turn so you are working down the opposite side and 3trinc into every row, keeping in line with the 1st st down from shell 3trinc until you get to point of tail, 1st Side: turn and 3trinc in every row down 1st side until you are back at the start, sl st to join at top of ch3 to finish. F/O leaving a 10cm end. Secure both ends with a couple of small sts before weaving through frill and body. Cut flush to finish.

— Shell :

Round 1: ch2, hdc6 into 2nd st from hook (alternatively hdc 6sts into magic ring) (6)
Round 2: hdcinc x6 (12)
Round 3: (hdc into next st, hdcinc) x6 (18)
Round 4: (hdc into next 2sts, hdcinc) x6 (24)
Round 5: sc (24)
Round 6: sc (24)
Round 7: (hdc into next 2sts, hdcdec) x6 (18)
Round 8: (hdc into next st, hdcdec) x6 (12)
Round 9: hdcdec x6 (6)

— Body :

Round 1: ch2, sc6 into 2nd st from hook (alternatively sc 6sts into magic ring) (6)
Round 2: inc x2, 1st Antennae: ch6, sl st into 5th and 6th ch from hook, inc x3, 2nd Antennae: ch6, sl st into 5th and 6th ch from hook, inc into last st (12)
Round 3: (sc into next st, inc) x6 (18)
Round 4: sc (18)
Round 5: sc (18)
Round 6: sc (18)
Round 7: (sc into next st, dec) x6 (12)
Round 8: (sc into next 2sts, dec) x3 (9)
Round 9: sc (9)
Round 10: sc (9)
Round 11: sc (9)
Round 12: sc (9)
Round 13: sc (9)
Round 14: sc (9)
Round 15: sc (9)
Round 16: sc (9)
Round 17: sc (9)
Round 18: sc (9)
Round 19: sc (9)
Round 20: sc (9)
Round 21: sc (9)
Round 22: sc (9)
Round 23: sc (9)
Round 24: sc (9)
Round 25: sc (9)
Round 26: sc (9)
Round 27: (sc into next st, dec) x3 (6)
Round 28: sc (6)

— Body Skirt :

Round 1: leaving a 10cm end, sl st into the base of body 1 row down from bottom of shell on the furthest side from you, the base should be facing towards you and the head should be facing left, 1st Side: ch3 and then 3dcinc into 1st in every row up to the stitch marker, 2nd Side: turn so you are working down the opposite side and 3dcinc into every row, keeping in line with the 1st st down from shell 3dcinc until you get to point of tail, 1st Side: turn and 3dcinc in every row down 1st side until you are back at the start, sl st to join at top of ch3 to finish. F/O leaving a 10cm end. Secure both ends with a couple of small sts before weaving through frill and body. Cut flush to finish.

Assembly Instructions

  1. Thread the long tail from the shell through the central ridges, passing from one side to the opposite and remaining on the same ridge, then pull into the centre back of the neck and secure with a couple of small stitches.
  2. Position the antennae centrally at the top of the head and thread their running ends through the body, bringing them out four rows in front of the tail end before securing to stabilise and keep them upright.
  3. Pick up the shell and sew it to the body along the BLO ridge, approximately one row out from the centre, using small whip or mattress stitches so the attachment lies flat.
  4. Gather the final six stitches of the shell with the long tail to form a neat curl, secure the gathered thread with a couple of small stitches and weave the end through the shell and body before trimming flush.
  5. Attach the body skirt by joining at the base with a slip stitch and working the frill evenly around the body seam; secure the starting and ending tails with small stitches and weave them into the fabric for a tidy finish.

Important Notes

  • Work in continuous rounds and mark the end stitch of each row with a stitch marker to keep counts accurate.
  • Stuff parts gently and evenly so stuffing does not show through; add fibrefill incrementally for best shaping.
  • When changing colours, slip stitch to join and swap yarns behind the work without changing colour mid-stitch for a clean finish.
  • Pin and check the placement of attachment points before sewing to maintain symmetry across assembled parts.
  • Use consistent tension throughout; chunky yarn with a tight, even tension produces the best shape and hides stuffing well.

This small collection of handmade snails is designed to bring a handcrafted smile to everyday corners and gift boxes. The pattern rewards quick stitching sessions with a charming result that sits happily on a bookshelf, in a planter tray, or wrapped as a tiny, thoughtful present. It makes a lovely make-ahead item for craft fairs, party favours, or to leave as a surprise on a friend’s desk; the finished toys are light, gentle, and full of personality.

Good to know

You ask, we answer

The finished snail measures approximately 9 cm tall when made with the recommended chunky yarn and a 4.5 mm hook, making it a compact, palm-sized decorative item ideal for shelves and gift bundles.

Yes, you can change yarn weight but expect a different finished size and texture; using lighter yarn with a smaller hook will produce a much smaller, denser snail while bulkier yarn yields a chunkier, softer toy.

This pattern is rated intermediate because it uses continuous rounds, back loop work to create texture, and simple decreases and increases; familiarity with these techniques and with counting rounds will make the make smoother and more accurate.

Most makers finish a single snail in approximately two to four hours, depending on experience and whether you make single-colour shells or change colours for a striping effect between rounds.

Fasten off leaving the long tail, thread it through the front loops of the last six stitches, gather tightly to form the curled shell centre, then secure with a couple of small stitches and weave the tail through the shell and body before trimming for a tidy finish.

The pattern uses a small embroidered eye technique with a black oddment to create subtle, child-safe features; if choosing safety eyes, ensure they are appropriate for the age group and securely fastened following manufacturer's guidelines.

Rear view of the assembled snails showing threaded shell attachment and gathered shell centre on amigurumi snails
Join 100k+ crocheters

Get new free patterns, stitch tips and exclusive content in your inbox.