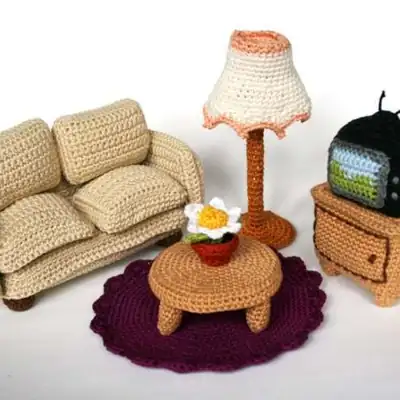
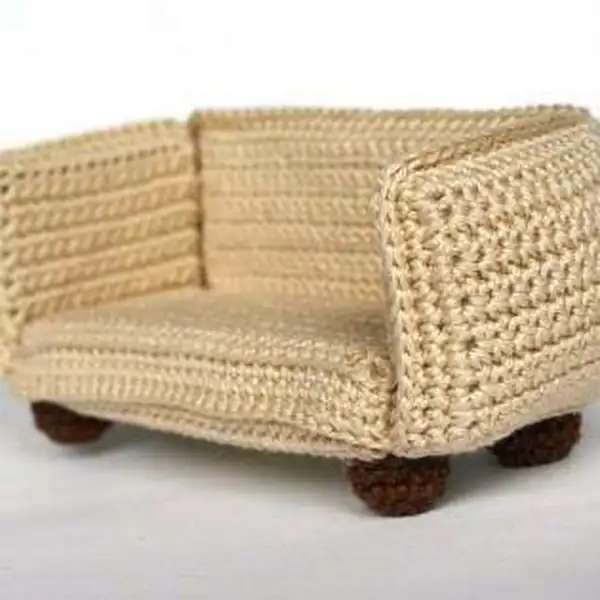
From the first loop of the MR to the last slip stitch, this Furniture Living Room Amigurumi Pattern is a fully realized micro-scene designed to test your technique while rewarding your patience. The complete set includes a sofa, a coffee table, a lamp, a rug, and a few tiny accessories, all built on internal supports fashioned from cardboard for stiffness and standing height. I chose DK / #3 weight yarn in sand or beige as the main shell to mimic warm wood tones, with olive green for cushions and accent pieces, light brown for legs and table tops, and small touches of black, white, gold, and purple to bring the room to life. Each piece is worked in clear rounds with the MR, then shaped with careful INCs and DECs to achieve rounded arms, a plump cushion, and a polished tabletop edge. The finished scene is compact enough to sit on a shelf yet expressive enough to invite close study of the stitches, such as BLO for the sofa’s seams and FLO for the rug’s texture. Take time to stuff evenly and pin while sewing, because the magic lies in balance between firmness and softness across all the little parts.
— Bottom :
Round 1: 14 sc;
Round 2: 14 sc;
Round 3: 14 sc;
Round 4: 14 sc;
Round 5: 14 sc;
Round 6: 14 sc;
Round 7: 14 sc;
Round 8: 14 sc;
Round 9: 14 sc;
Round 10: 14 sc;
Round 11: 14 sc;
Round 12: 14 sc;
Round 13: 14 sc;
Round 14: 14 sc;
Round 15: Continue crocheting a row of sc along the work;
Round 16: 60 sc, into the back loops only.
Round 17: 60 sc;
— Back :
Round 1: 15 sc;
Round 2: 15 sc;
Round 3: 15 sc;
Round 4: 15 sc;
Round 5: 15 sc;
Round 6: 15 sc;
Round 7: 15 sc;
Round 8: 15 sc;
Round 9: 15 sc;
Round 10: 15 sc;
Round 11: 15 sc;
Round 12: 15 sc;
Round 13: 15 sc;
Round 14: 15 sc;
Round 15: 15 sc;
Round 16: 15 sc;
Round 17: 15 sc;
Round 18: 15 sc;
Round 19: 15 sc;
Round 20: 15 sc;
Round 21: 15 sc;
Round 22: 15 sc;
Round 23: 15 sc;
Round 24: 15 sc;
Round 25: 15 sc;
Round 26: 15 sc;
Round 27: 15 sc;
Round 28: 15 sc;
Round 29: 15 sc;
Round 30: 15 sc;
Round 31: Continue crocheting a row of sc along the work as follows: 28 sc along the side down, 3 sc at;
Round 32: 94 sc, into the back loops only.
Round 33: 94 sc;
— Side :
Round 1: 14 sc;
Round 2: 14 sc;
Round 3: 14 sc;
Round 4: 14 sc;
Round 5: 14 sc;
Round 6: 14 sc;
Round 7: 14 sc;
Round 8: 14 sc;
Round 9: 14 sc;
Round 10: 14 sc;
Round 11: 14 sc;
Round 12: 14 sc;
Round 13: 4 sc, leave the rest of the st unworked.
Round 14: 4 sc;
Round 15: 4 sc;
Round 16: 4 sc;
Round 17: 4 sc;
Round 18: 4 sc;
Round 19: 3 sc, 2 sc into the last sc (= 5 sc)
Round 20: 5 sc;
Round 21: 4 sc, 2 sc into the last sc (= 6 sc)
Round 22: 2 sc into the 1st sc, 5 sc (= 7 sc)
Round 23: 6 sc, 2 sc into the last sc (= 8 sc)
Round 24: 8 sc;
Round 25: 8 sc;
Round 26: 8 sc;
Round 27: 8 sc;
Round 28: 8 sc;
Round 29: 6 sc, sc 2 st together (= 7 sc)
Round 30: sc 2 st together, 5 sc (= 6 sc)
Round 31: Continue crocheting a row of sc along the work as follows: 28 sc along the back down, 3 sc at;
Round 32: 97 sc;
— Legs :
Round 1: 6 sc into the 1st ch or into the magic ring, 1 sl into the;
Round 2: 2 sc in every sc (= 12 sc)
— Bottom :
Round 1: 30 sc;
Round 2: 30 sc;
Round 3: 30 sc;
Round 4: 30 sc;
Round 5: 30 sc;
Round 6: 30 sc;
Round 7: 30 sc;
Round 8: 30 sc;
Round 9: 30 sc;
Round 10: 30 sc;
Round 11: 30 sc;
Round 12: 30 sc;
Round 13: 30 sc;
Round 14: 30 sc;
Round 15: Continue crocheting a row of sc along the work as follows: 12 sc along the side, 3 sc at the;
Round 16: 92 sc, into the back loops only.
Round 17: 92 sc;
— Back :
Round 1: 30 sc;
Round 2: 30 sc;
Round 3: 30 sc;
Round 4: 30 sc;
Round 5: 30 sc;
Round 6: 30 sc;
Round 7: 30 sc;
Round 8: 30 sc;
Round 9: 30 sc;
Round 10: 30 sc;
Round 11: 30 sc;
Round 12: 30 sc;
Round 13: 30 sc;
Round 14: 30 sc;
Round 15: Continue crocheting a row of sc along the work as follows: 12 sc along the side, 3 sc at the;
— Side :
Round 1: 14 sc;
Round 2: 14 sc;
Round 3: 14 sc;
Round 4: 14 sc;
Round 5: 14 sc;
Round 6: 14 sc;
Round 7: 14 sc;
Round 8: 14 sc;
Round 9: 14 sc;
Round 10: 14 sc;
Round 11: 14 sc;
Round 12: 14 sc;
Round 13: Continue crocheting a row of sc along the work as follows: 10 sc along the side, 3 sc at the;
Round 14: 56 sc;
— Back Cushion (2 times) :
Round 1: 14 sc;
Round 2: 14 sc;
Round 3: 14 sc;
Round 4: 14 sc;
Round 5: 14 sc;
Round 6: 14 sc;
Round 7: 14 sc;
Round 8: 14 sc;
Round 9: 14 sc;
Round 10: 14 sc;
Round 11: Continue crocheting a row of sc along the work as follows: 8 sc along the side, 3 sc at the;
Round 12: 52 sc, into the back loops only.
Round 13: 52 sc;
— Table top :
Round 1: 6 sc into the 1st ch or into the magic ring, 1 sl;
Round 2: 2 sc in every sc (= 12 sc)
Round 3: 2 sc in every 2nd sc (= 18 sc)
Round 4: 6 times (1 sc, 2 sc into the next sc, 1 sc) (= 24 sc)
Round 5: 2 sc in every 4th sc (= 30 sc)
Round 6: 6 times (2 sc, 2 sc into the next sc, 2 sc) (= 36 sc)
Round 7: 2 sc in every 6th sc (= 42 sc)
Round 8: 6 times (3 sc, 2 sc into the next sc, 3 sc) (= 48 sc)
Round 9: 2 sc in every 8th sc (= 54 sc)
Round 10: 6 times (4 sc, 2 sc into the next sc, 4 sc) (= 60 sc)
Round 11: 60 sc, into the back loops only.
— Legs :
Round 1: 6 sc into the 1st ch or into the magic ring, 1 sl into the 1st sc (= 6 sc)
Round 2: 2 sc in every 3rd sc (= 8 sc)
Round 3: 8 sc;
Round 4: 8 sc;
Round 5: 8 sc;
Round 6: 8 sc;
Round 7: 8 sc;
— Flower :
Round 1: 6 sc into the 1st ch or into the magic ring, 1 sl into the 1st sc (= 6 sc)
Round 2: 2 sc in every sc (= 12 sc)
Round 3: 12 sc, into the back loops only.
Round 4: 12 sc;
Round 5: 2 sc in every 2nd sc (= 18 sc)
Round 6: 18 sc, into the front loops only.
Round 9: Sc the st together with the remaining loops of round 6;
Round 10: Sc every 2nd and 3rd st together (= 12 sc)
Round 11: 6 times (sc 2 st together) (= 6 sc)
Round 12: 6 sc;
Round 13: 6 sc, into the back loops only.
Round 14: 6 sc;
Round 15: 2 sc in every sc (= 12 sc)
Round 16: 12 sc, into the back loops only.
Round 17: 6 times (sc 2 st together) (= 6 sc)
— Leaves :
Round 1: 2 sc into the loops, leave the remaining ch 4oops unworked.
Round 2: 2 times (2 sc into the next sc) (= 4 sc)
Round 3: 2 times (sc 2 st together) (= 2 sc)
Round 4: sc 2 st together (= 1 sc)
— Petals :
Round 1: * 1 sc, ch 3, (1 sc, 1 hdc) into this ch, 1 sc, repeat from * another 5 times, end with 1 sl instead of;
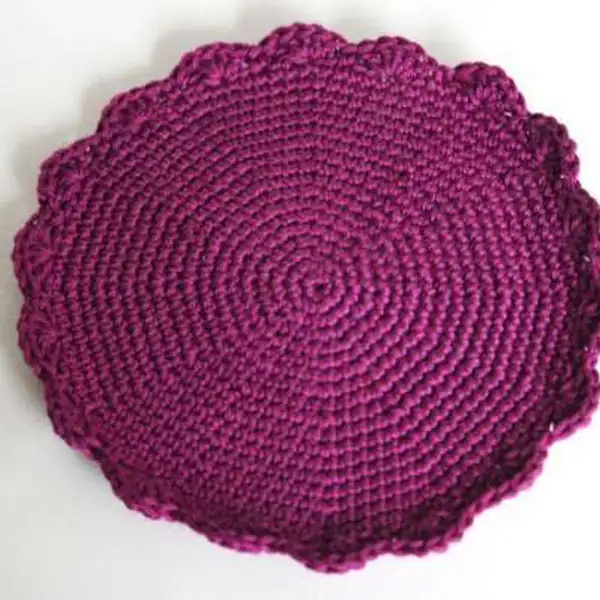
— Carpet :
Round 1: 6 sc into the 1st ch or into the magic ring, 1 sl into the 1st sc (= 6 sc)
Round 2: 2 sc in every sc (= 12 sc)
Round 3: 2 sc in every 2nd sc (= 18 sc)
Round 4: 6 times (1 sc, 2 sc into the next sc, 1 sc) (= 24 sc)
Round 5: 2 sc in every 4th sc (= 30 sc)
Round 6: 6 times (2 sc, 2 sc into the next sc, 2 sc)
Round 7: 2 sc in every 6th sc (= 42 sc)
Round 8: 6 times (3 sc, 2 sc into the next sc, 3 sc)
Round 9: 2 sc in every 8th sc (= 54 sc)
Round 10: 6 times (4 sc, 2 sc into the next sc, 4 sc)
Round 11: 2 sc in every 10th sc (= 66 sc)
Round 12: 6 times (5 sc, 2 sc into the next sc, 5 sc)
Round 13: 2 sc in every 12th sc (= 78 sc)
Round 14: 6 times (6 sc, 2 sc into the next sc, 6 sc) (= 84 sc)
Round 15: 2 sc in every 14th sc (= 90 sc)
Round 16: 6 times (7 sc, 2 sc into the next sc, 7 sc) (= 96 sc)
Round 17: 2 sc in every 16th sc (= 102 sc)
Round 18: 6 times (8 sc, 2 sc into the next sc, 8 sc) (= 108 sc)
Round 19: 18 times (1 sc, skip 2 sc, 5 dc into the 3rd sc, skip 2 sc)
— Bottom :
Round 1: 6 sc into the 1st ch or into the magic ring, 1 sl into the;
Round 2: 2 sc in every sc (= 12 sc)
Round 3: 2 sc in every 2nd sc (= 18 sc)
Round 4: 6 times (1 sc, 2 sc into the next sc, 1 sc) (= 24 sc)
Round 5: 2 sc in every 4th sc (= 30 sc)
Round 6: 6 times (2 sc, 2 sc into the next sc, 2 sc) (= 36 sc)
Round 1: 30 sc;
Round 2: Sc every 4th and 5th st together (= 24 sc)
Round 5: 6 times (1 sc, sc 2 st together, 1 sc) (= 18 sc)
Round 8: Sc every 2nd and 3rd st together (= 12 sc)
Round 11: 6 times (sc 2 st together) (= 6 sc)
Round 12: 6 sc, into the back loops only.
— Part 17 :
Round 1: 6 sc into the loops.
Round 2: 6 sc, stuff while crocheting.
Round 3: 6 sc, stuff while crocheting.
Round 4: 6 sc, stuff while crocheting.
Round 5: 6 sc, stuff while crocheting.
Round 6: 6 sc, stuff while crocheting.
Round 7: 6 sc, stuff while crocheting.
Round 8: 6 sc, stuff while crocheting.
Round 9: 6 sc, stuff while crocheting.
Round 10: 6 sc, stuff while crocheting.
Round 11: 6 sc, stuff while crocheting.
Round 12: 6 sc, stuff while crocheting.
Round 13: 6 sc, stuff while crocheting.
Round 14: 6 sc, stuff while crocheting.
Round 15: 6 sc, stuff while crocheting.
Round 16: 6 sc, stuff while crocheting.
Round 17: 6 sc, stuff while crocheting.
Round 18: 6 sc, stuff while crocheting.
Round 19: 6 sc, stuff while crocheting.
Round 20: 6 sc, stuff while crocheting.
Round 21: 6 sc, stuff while crocheting.
Round 22: 6 sc, stuff while crocheting.
Round 23: 2 sc in every sc (= 12 sc)
Round 24: 2 sc in every 2nd sc (= 18 sc)
Round 25: 6 times (1 sc, 2 sc into the next sc, 1 sc) (= 24 sc)
Round 26: 2 sc into the 4th sc (= 30 sc)
Round 27: 6 times (2 sc, 2 sc into the next sc, 2 sc) (= 36 sc)
Round 28: Place the bottom against the work and sc the st together with a row of sc, making 2 sc in every;
— Lampshade :
Round 1: Make 30 sc along the loops.
Round 2: 30 sc, into the back loops only.
Round 3: 30 sc, into the back loops only.
Round 4: 30 sc;
Round 5: 30 sc;
Round 6: 30 sc;
Round 7: 30 sc;
Round 8: 30 sc;
Round 9: 6 times (2 sc, 2 sc into the next sc, 2 sc) (= 36 sc)
Round 12: 2 sc in every 6th sc (= 42 sc)
Round 15: 7 times (1 sc, skip 2 sc, 5 dc into the 3rd sc, skip 2 sc)
Round 16: 1 sc into the 3rd sc from the needle, 1 sc, * (1 sc, ch 4, 1 sc into the 4th ch from the needle, 1 sc)
— Tv :
Round 1: 12 sc;
Round 2: 12 sc;
Round 3: 12 sc;
Round 4: 12 sc;
Round 5: 12 sc;
Round 6: 12 sc;
Round 7: 12 sc;
Round 8: 12 sc;
Round 9: Make a row of sc around the work as follows: 6 sc along the side, 3 sc at the corner, 10 sc along the;
Round 10: 44 sc, into the back loops only.
Round 11: 44 sc;
Round 12: 44 sc;
Round 13: 44 sc;
Round 14: 44 sc;
Round 15: 44 sc;
Round 16: 44 sc;
Round 17: 44 sc;
Round 18: 44 sc;
Round 19: 42 sc, leave the last 2 st unworked. This is now the beginning of the round.
Round 20: Sc into the back loops only: sc 3 st together, 6 sc, sc 3 st together, 10 sc, sc 3 st together,;
Round 21: sc 3 st together, 4 sc, sc 3 st together, 8 sc, sc 3 st together, 4 sc, sc 3 st together, 8 sc (= 28 sc)
Round 22: sc 3 st together, 2 sc, sc 3 st together, 6 sc, sc 3 st together, 2 sc, sc 3 st together, 6 sc (= 20 sc)
Round 23: 2 times (sc 3 st together), 4 sc, 2 times (sc 3 st together), 4 sc (= 12 sc)
Round 24: 6 times (sc 2 st together) (= 6 sc)
— Part 20 :
Round 3: 4 sc, continue with light blue; 2 sc, continue with green; 3 sc, continue with light blue; 1 sc;
Round 4: 7 sc, continue with green; 2 sc, continue with light blue; 1 sc;
Round 6: Make a row of sc around the work as follows: 5 sc;
— Antenna :
Round 1: 6 sc into the 1st ch or into the magic ring, 1 sl into;
Round 2: 2 sc in every sc (= 12 sc)
Round 3: 12 sc;
— Top :
Round 1: 16 sc;
Round 2: 16 sc;
Round 3: 16 sc;
Round 4: 16 sc;
Round 5: 16 sc;
Round 6: 16 sc;
Round 7: 16 sc;
Round 8: 16 sc;
Round 9: 16 sc;
Round 10: 16 sc;
Round 11: 16 sc;
Round 12: 16 sc;
Round 13: Make a row of sc around the work as follows: 10 sc;
Round 14: 60 sc, into the back loops only.
Round 15: 60 sc;
Round 16: 60 sc;
Round 17: 60 sc;
Round 18: 60 sc;
Round 19: 60 sc;
Round 20: 60 sc;
Round 21: 60 sc;
Round 22: 60 sc;
Round 23: 60 sc;
Round 24: 60 sc;
Round 25: 60 sc;
Round 26: 60 sc;
— Legs :
Round 1: 6 sc into the 1st ch or into the magic ring, 1 sl into the 1st sc (= 6 sc)
Round 2: 2 sc in every 2nd sc (= 9 sc)
Round 3: 9 sc;
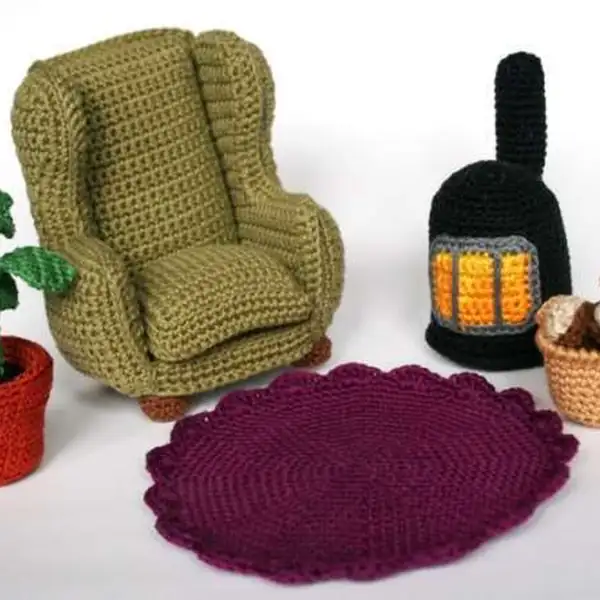
— Plant in pot :
Round 1: 6 sc into the 1st ch or into the magic ring, 1 sl into the 1st sc;
Round 2: 2 sc in every sc (= 12 sc)
Round 3: 2 sc in every 2nd sc (= 18 sc)
Round 4: 6 times (1 sc, 2 sc into the next sc, 1 sc) (= 24 sc)
Round 5: 24 sc, into the back loops only.
Round 6: 24 sc;
Round 7: 24 sc;
Round 8: 24 sc;
Round 9: 2 sc in every 4th sc (= 30 sc)
Round 10: 30 sc;
Round 11: 30 sc;
Round 12: 30 sc;
Round 13: 6 times (2 sc, 2 sc into the next sc, 2 sc) (= 36 sc)
Round 14: 36 sc, into the front loops only.
Round 19: 36 sc;
Round 20: Sc the st together with the remaining loops of round 13 at the inside of the flowerpot (= 36 sc)
Round 21: 6 times (2 sc, sc 2 st together, 2 sc) (= 30 sc)
Round 22: Sc every 4th and 5th st together (= 24 sc)
Round 23: 6 times (1 sc, sc 2 st together, 1 sc) (= 18 sc)
Round 24: Sc every 2nd and 3rd st together (= 12 sc)
Round 25: 6 times (sc 2 st together) (= 6 sc)
Round 26: Sc every 2nd and 3rd st together (= 4 sc)
Round 27: 4 sc;
Round 28: 4 sc;
Round 29: 4 sc;
Round 30: 4 sc;
Round 31: 4 sc;
Round 32: 4 sc, into the back loops only.
Round 33: 4 sc;
Round 34: 4 sc;
Round 35: 4 sc;
Round 36: 4 sc, into the back loops only.
Round 37: 4 sc;
Round 38: 4 sc;
Round 39: 4 sc;
Round 40: 4 sc, into the back loops only.
— Part 25 :
Round 1: Make 2 sc into the loops, leave the other 2 loops unworked.
Round 2: Ch 1, turn around, 2 sc;
Round 3: Ch 1, turn around, 2 times (2 sc into the next sc) (= 4 sc)
Round 4: Ch 1, turn around, 2 sc into the 1st sc, 2 sc, 2 sc into the last sc (= 6 sc)
Round 7: Ch 1, turn around, sc 2 st together, 2 sc, sc 2 st together (= 4 sc)
Round 8: Ch 1, turn around, 2 times (sc 2 st together) (= 2 sc)
Round 9: Ch 1, turn around, sc 2 st together (= 1 sc)
— Wood stove :
Round 1: 6 sc into the 1st ch or into the magic ring, 1 sl into the 1st sc (= 6 sc)
Round 2: 2 sc in every sc (= 12 sc)
Round 3: 2 sc in every 2nd sc (= 18 sc)
Round 4: 6 times (1 sc, 2 sc into the next sc, 1 sc) (= 24 sc)
Round 5: 2 sc in every 4th sc (= 30 sc)
Round 6: 6 times (2 sc, 2 sc into the next sc, 2 sc) (= 36 sc)
Round 7: 2 sc in every 6th sc (= 42 sc)
Round 8: 6 times (3 sc, 2 sc into the next sc, 3 sc) (= 48 sc)
Round 9: 6 times (3 sc, sc 2 st together, 3 sc), into the back loops only (= 42 sc)
Round 10: Sc every 6th and 7th st together (= 36 sc)
Round 11: 36 sc, into the back loops only.
Round 12: 36 sc;
Round 13: 36 sc;
Round 14: 36 sc;
Round 15: 36 sc;
Round 16: 36 sc;
Round 17: 36 sc;
Round 18: 36 sc;
Round 19: 36 sc;
Round 20: 36 sc;
Round 21: 36 sc;
Round 22: 36 sc;
Round 23: 36 sc;
Round 24: 36 sc;
Round 25: 6 times (2 sc, sc 2 st together, 2 sc), into the back loops only (= 30 sc)
Round 26: 30 sc;
Round 27: Sc every 4th and 5th st together (= 24 sc)
Round 28: 6 times (1 sc, sc 2 st together, 1 sc) (= 18 sc)
Round 29: Sc every 2nd and 3rd st together (= 12 sc)
Round 30: 6 times (sc 2 st together) (= 6 sc)
— Part 27 :
Round 1: 9 sc;
Round 2: 5 sc with orange, 1 sc with yellow, 3 sc with orange.
Round 3: 3 sc with orange, 1 sc with yellow, 5 sc with orange.
Round 4: 1 sc with yellow, 3 sc with orange, 3 sc with yellow, 2 sc with orange.
Round 5: 2 sc with orange, 4 sc with yellow, 1 sc with orange, 2 sc with yellow.
Round 6: 9 sc with yellow.
Round 7: Make with orange a row of sc around the work as follows: 5 sc along the side down, 3 sc at the;
Round 8: 3 sc into the 1st yellow sc of round 6, 7 sc, 3 sc into the last yellow sc of round 6, 6 sc, 2 sc into the;
— Stove pipe :
Round 1: 6 sc into the 1st ch or into the magic ring, 1 sl into;
Round 2: 2 sc in every sc (= 12 sc)
Round 3: 12 sc into the back loops.
Round 4: 12 sc;
Round 5: 12 sc;
Round 6: 12 sc;
Round 7: 12 sc;
Round 8: 12 sc;
Round 9: 12 sc;
Round 10: 12 sc;
Round 11: 12 sc;
Round 12: 12 sc;
Round 13: 12 sc;
Round 14: 12 sc;
Round 15: 2 sc, 4 sl, 2 sc, 4 dc;
Round 16: 2 sc, 4 sl, 2 sc, 4 dc;
Round 17: 2 sc, 4 sl, 2 sc, 4 dc;
Round 18: 2 sc, 4 sl, 2 sc, 4 dc;
— Basket :
Round 1: 6 sc into the 1st ch or into the magic ring, 1 sl into the 1st sc (= 6 sc)
Round 2: 2 sc in every sc (= 12 sc)
Round 3: 2 sc in every 2nd sc (= 18 sc)
Round 4: 6 times (1 sc, 2 sc into the next sc, 1 sc) (= 24 sc)
Round 5: 2 sc in every 4th sc (= 30 sc)
Round 6: 30 sc, into the back loops only.
Round 9: 6 times (2 sc, 2 sc into the next sc, 2 sc) (= 36 sc)
Round 12: 2 sc in every 6th sc (= 42 sc)
Round 13: 42 sc in Crab stitch: instead of working from right to;
— Large log :
Round 1: 6 sc into the 1st ch or into the magic ring, 1 sl into the 1st sc (= 6 sc)
Round 2: * (1 sc, 1 dc) into the next sc, (1 dc, 1 sc) into the next sc, repeat from * another 2 times (= 12 sc)
Round 3: 12 sc, into the back loops only.
Round 4: 12 sc;
Round 5: 12 sc;
Round 6: 12 sc;
Round 7: 12 sc;
Round 8: 12 sc;
Round 9: 12 sc;
Round 10: 12 sc;
Round 11: 12 sc;
Round 12: 1 sc, don’t complete the round. From now on this is the beginning of the round.
Round 13: Sc into the back loops only: 1 sc, sc 3 st together, 1 sc, sc 3 st together, 1 sc, sc 3 st together;
— Bark :
Round 1: 9 sc;
Round 2: ch 1, turn around, 9 sc;
Round 3: ch 1, turn around, 9 sc;
Round 4: ch 1, turn around, 9 sc;
Round 5: Make a row of sc around the work as follows: 3 sc along the side, 3 sc at the corner, 7 sc along the;
— Small log (2 times) :
Round 1: 6 sc into the 1st ch or into the magic ring, 1 sl into the 1st sc (= 6 sc)
Round 2: 6 sc, into the back loops only.
Round 3: 6 sc, stuff while crocheting the log.
Round 4: 6 sc, stuff while crocheting the log.
Round 5: 6 sc, stuff while crocheting the log.
Round 6: 6 sc, stuff while crocheting the log.
Round 7: 6 sc, stuff while crocheting the log.
Round 8: 6 sc, stuff while crocheting the log.
Round 9: 6 sc, stuff while crocheting the log.
Round 10: 6 sc, stuff while crocheting the log.
Round 11: 6 sc, stuff while crocheting the log.
— Bark :
Round 1: 9 sc;
Round 2: ch 1, turn around, 9 sc;
Round 3: ch 1, turn around, 9 sc;
Round 4: ch 1, turn around, 9 sc;
Round 5: ch 1, turn around, 9 sc;
Round 6: ch 1, turn around, 9 sc;
Round 7: ch 1, turn around, 9 sc;
Round 8: ch 1, turn around, 9 sc;
Round 9: ch 1, turn around, 9 sc;
To close, imagine placing your finished mini living room on a small shelf and stepping back to admire the balance of form and color. The sofa stands about 9 cm tall, the coffee table 7 cm high, and the lamp 8 cm tall, with the rug’s purple accents grounding the scene. I’ve designed the pieces to be structurally sound, using internal cardboard supports and careful stuffing so they hold their shape when you adjust the arrangement. Begin with the sofa and table placed on a shared base, then add the lamp and rug; you’ll appreciate how the color blocking and stitch textures read as real furniture from a few feet away.