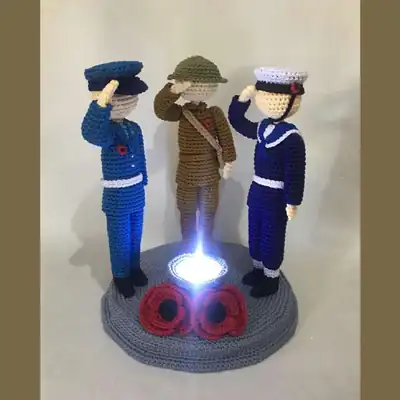
Free round-by-round crochet pattern for Fallen Armed Forces, with full stitch counts.
— Basic pattern head and upper body :
Round 1: 6sc in a magic ring with skin color;
Round 2: inc in every stitch (12)
Round 3: *1sc, inc* repeat till end (18)
Round 4: *1sc, inc, 1sc* repeat till end (24)
Round 5: *3sc, inc* repeat till end (30)
Round 6: 1sc in every stitch (30)
Round 7: 1sc in every stitch (30)
Round 8: 1sc in every stitch (30)
Round 9: 1sc in every stitch (30)
Round 10: 1sc in every stitch (30)
Round 11: *3sc, dec* repeat till end (24)
Round 12: *1sc, dec, 1sc* repeat till end (18)
Round 13: *1sc, dec* repeat till end (12)
Round 14: dec 6 times (6)
Round 15: 1sc in every stitch (6)
Round 16: 1sc in every stitch (6)
Round 17: inc in every back loop (12)
Round 18: *1sc, inc* repeat till end (18)
Round 19: *1sc, inc, 1sc* repeat till end (24)
Round 20: *3sc, inc* repeat till end (30)
Round 21: 5sc, dec twice, 11sc, dec twice, 6sc (26)
Round 22: 1sc in every stitch (26)
Round 23: 1sc in every stitch (26)
Round 24: 1sc in every stitch (26)
Round 25: 1sc in every stitch (26)
Round 26: 1sc in every stitch (26)
Round 27: 1sc in every stitch (26)
Round 28: 1sc in every stitch (26)
Round 29: 1sc in every stitch (26)
Round 30: 1sc, 4 times *2sc, dec, 2sc*, 1sc (22)
Round 31: in front loops only: 1sc, 4 times *2sc, inc, 2sc*, 1sc (26)
Round 32: 25sc, inc (27)
Round 33: 1sc in every stitch (27)
Round 34: 26sc, inc (28)
Round 35: 1sc in every stitch (28)
Round 36: 27sc, inc (29)
Round 37: 1sc in every stitch (29)
— Sleeves (make 2) :
Round 1: 6sc in a magic ring (6)
Round 2: inc in every stitch (12)
Round 3: 1sc in every stitch (12)
Round 4: 1sc in every stitch (12)
Round 5: 1sc in every stitch (12)
Round 6: 1sc in every stitch (12)
Round 7: 1sc in every stitch (12)
Round 8: 1sc in every stitch (12)
Round 9: 1sc in every stitch (12)
Round 10: 1sc in every stitch (12)
Round 11: 1sc in every stitch (12)
Round 12: 1sc in every stitch (12)
Round 13: 1sc in every stitch (12)
Round 14: 1sc in every stitch (12)
Round 15: 1sc in every stitch (12)
Round 16: 1sc in every stitch (12)
— Arms (make 2) :
Round 1: 6sc in a magic ring with skin color;
Round 2: 1sc in every stitch (6)
Round 3: 1sc in every stitch (6)
Round 4: 1sc in every stitch (6)
Round 5: 1sc in every stitch (6)
Round 6: 1sc in every stitch (6)
Round 7: 1sc in every stitch (6)
Round 8: 1sc in every stitch (6)
Round 9: 1sc in every stitch (6)
Round 10: 1sc in every stitch (6)
Round 11: 1sc in every stitch (6)
Round 12: 1sc in every stitch (6)
Round 13: 1sc in every stitch (6)
Round 14: 1sc in every stitch (6)
Round 15: 1sc in every stitch (6)
Round 16: *1sc, inc, 1sc* repeat till end (8)
Round 17: 1sc in every stitch (8)
Round 18: dec 4 times (4)
— Boots and legs :
Round 2: start in the second ch from the hook: inc, 5sc, inc twice it the last ch, 5sc, inc (18)
Round 3: 1sc in every back loop (18)
Round 4: ; 6sc, dec 3 times, 6sc (15)
Round 5: 5sc, dec 3 times, 4sc (12)
Round 6: 5sc, dec twcie, 3sc (10)
Round 7: 1 in every stitch (10)
Round 8: 1 in every stitch (10)
Round 9: 1sc, inc, 8sc (11)
Round 10: 1sc in every stitch (11)
Round 11: 1sc, inc, 9sc (12)
Round 12: 1sc in every stitch (12)
Round 13: 1sc in every stitch (12)
Round 14: 1sc, dec twice, 7sc (10)
Round 15: in front loops: *1sc, inc* repeat till end (15) with uniform brown;
Round 16: 1sc in every stitch (15)
Round 17: 1sc in every stitch (15)
Round 18: 1sc in every stitch (15)
Round 19: 1sc in every stitch (15)
Round 20: 1sc in every stitch (15)
Round 21: 1sc in every stitch (15)
Round 22: 1sc in every stitch (15)
Round 23: 1sc in every stitch (15)
Round 24: Step 1: 8sc in the SECOND leg, Step 2: 15sc in the FIRST leg (start in the marked stitch) Step 3: 7sc in the remaining stitches of the SECOND LEG (30sc in total)
Round 25: *3sc, dec* repeat till end (24)
Round 26: 1sc in every stitch (24)
Round 27: *5sc, dec, 5sc* repeat till end (22)
Round 28: 1sc in every stitch (22)
Round 29: 1sc in every stitch (22)
Round 30: 1sc in every stitch (22)
— Belt :
Round 2: start in the second ch from the hook: 1sc in every ch (25)
— Collar :
Round 1: Ch 11 with uniform brown;
Round 2: start in the second ch from the hook: *1sc, inc* repeat till end (15)
— Helmet :
Round 1: 6sc in a magic ring (6) with brodie helmet color;
Round 2: inc in every stitch (12)
Round 3: *1sc, inc* repeat till end (18)
Round 4: *1sc, inc, 1sc* repeat till end (24)
Round 5: *3sc, inc* repeat till end (30)
Round 6: 1sc in every stitch (30)
Round 7: *2sc, inc, 2sc* repeat till end (36)
Round 8: in front loops only *5sc, inc* repeat till end (42)
— Bag :
Round 1: Ch 9 with beige;
Round 2: start in the second ch from the hook: 7sc, inc, 7sc (16)
Round 3: 1sc in every stitch (16)
Round 4: 1sc in every stitch (16)
Round 5: 1sc in every stitch (16)
Round 6: 1sc in every stitch (16)
Round 7: 8sc, ch1 and turn (8) leave the rest;
Round 8: 8sc, ch1 and turn (8) leave the rest of;
Round 9: dec, 4sc, dec, ch1 and turn (6)
Round 10: dec, 2sc, dec (4)
— Do the following now :
Round 1: Ch 31 with beige;
Round 2: start in the second ch from the hook: 1sc in every L (30)
— Shoes and legs :
Round 1: Ch 8 with black Work around the chs now;
Round 2: start in the second ch from the hook: inc, 5sc, inc twice in the last ch, 5sc, inc (18)
Round 3: in back loops only 1sc in every stitch (18)
Round 4: ; 6sc, dec 3 times, 6sc (15)
Round 5: 5sc, dec 3 times, 4sc (12)
Round 6: 5sc, dec twice, 3sc (10)
Round 7: 1 in every stitch (10)
Round 8: in front loops: 1sc in every stitch (10) with white;
Round 9: 1sc in every stitch (10)
Round 10: 1sc in every stitch (10)
Round 11: in front loops: *1sc, inc* repeat till end (15) with navy blue;
Round 12: 1sc in every stitch (15)
Round 13: 1sc in every stitch (15)
Round 14: 1sc in every stitch (15)
Round 15: 1sc in every stitch (15)
Round 16: 1sc in every stitch (15)
Round 17: 1sc in every stitch (15)
Round 18: 1sc in every stitch (15)
Round 19: 1sc in every stitch (15)
Round 20: 1sc in every stitch (15)
Round 21: 1sc in every stitch (15)
Round 22: 1sc in every stitch (15)
Round 23: 1sc in every stitch (15)
Round 24: Step 1: 8sc in the SECOND leg, Step 2: 15sc in the FIRST leg (start in the marked stitch) Step 3: 7sc in the remaining stitches of the SECOND LEG (30sc in total)
Round 25: *3sc, dec* repeat till end (24)
Round 26: 1sc in every stitch (24)
Round 27: *5sc, dec, 5sc* repeat till end (22)
Round 28: 1sc in every stitch (22)
Round 29: 1sc in every stitch (22)
Round 30: 1sc in every stitch (22)
— Belt :
Round 1: Ch 26 with white;
Round 2: start in the second ch from the hook: 1sc in every ch (25)
Round 4: start in the second ch from the hook: 1sc in every ch (8)
— Collar :
Round 2: start in the second ch from the hook: 1sc in every ch, ch1 and turn (9)
Round 3: 1sc in every stitch, ch1 and turn (9)
Round 4: 1sc in every stitch, ch1 and turn (9)
Round 5: 1sc in every stitch, ch1 and turn (9)
Round 6: 1sc in every stitch, ch1 and turn (9)
Round 7: 3sc, ch1 and turn (3)
Round 8: 1sc in every stitch, ch1 and turn (3)
Round 9: 1sc in every stitch, ch1 and turn (3)
Round 10: 1sc in every stitch, ch1 and turn (3)
Round 11: dec, 1sc, ch1 and turn (2)
Round 12: 1sc in every stitch, ch1 and turn (2)
Round 13: 1sc in every stitch, ch1 and turn (2)
Round 14: 1sc in every stitch, ch1 and turn (2)
Round 15: dec (1)
— Shirt piece :
Round 1: Ch 3 with white;
Round 2: start in the second ch from the hook: 1sc in every L, ch1 and turn (2)
Round 3: 1sc in every stitch, ch1 and turn (2)
Round 4: dec (1)
— Hat :
Round 1: 6sc in a magic ring with white;
Round 2: inc in every stitch (12)
Round 3: *1sc, inc* repeat till end (18)
Round 4: *1sc, inc, 1sc* repeat till end (24)
Round 5: *3sc, inc* repeat till end (30)
Round 6: *2sc, inc, 2sc* repeat till end (36)
Round 7: 1sc in every back loop (36)
Round 8: *2sc, dec, 2sc* repeat till end (30)
Round 9: 1sc in every stitch (30)
Round 10: 1sc in every front loop (30) with black;
Round 11: 1sc in every stitch (30)
— Shoes and legs :
Round 1: Ch 8 with black Work around the chs now;
Round 2: start in the second ch from the hook: inc, 5sc, inc twice in the last ch, 5sc, inc (18)
Round 3: 1sc in every back loop (18)
Round 4: ; 6sc, dec 3 times, 6sc (15)
Round 5: 5sc, dec 3 times, 4sc (12)
Round 6: 5sc, dec twice, 3sc (10)
Round 7: in front loops: 9sc, inc (11) with blue grey;
Round 8: 1sc in every stitch (11)
Round 9: 1sc in every stitch (11)
Round 10: 10sc, inc (12)
Round 11: 1sc in every stitch (12)
Round 12: 1sc in every stitch (12)
Round 13: 11sc, inc (13)
Round 14: 1sc in every stitch (13)
Round 15: 1sc in every stitch (13)
Round 16: 1sc in every stitch (13)
Round 17: 12sc, inc (14)
Round 18: 1sc in every stitch (14)
Round 19: 1sc in every stitch (14)
Round 20: 1sc in every stitch (14)
Round 21: 1sc in every stitch (14)
Round 22: 13sc, inc (15)
Round 23: 1sc in every stitch (15)
Round 24: Step 1: 14sc in the SECOND leg Step 2: 15sc in the FIRST leg (start in the marked stitch 6) Step 3: 1sc in the last stitch of the SECOND LEG ((30) in total)
Round 25: *3sc, dec* repeat till end (24)
Round 26: 1sc in every stitch (24)
Round 27: *5sc, dec, 5sc* repeat till end (22)
Round 28: 1sc in every stitch (22)
Round 29: 1sc in every stitch (22)
Round 30: 1sc in every stitch (22)
— Belt :
Round 1: Ch 26 with white;
Round 2: start in the second ch from the hook: 1sc in every ch (25)
Round 4: start in the second ch from the hook: 1sc in every ch (8)
— Shirt piece :
Round 1: Ch 4 with light blue;
Round 2: start in the second ch from the hook: 1sc in every ch, ch1;
Round 3: 1sc in every stitch, ch1 and turn (3)
Round 4: 1sc, dec, ch1 and turn (2)
Round 5: 1sc in every stitch, ch1 and turn (2)
Round 6: dec (1)
— Collar :
Round 1: Ch 12 with blue-grey;
Round 2: start in the second ch from the hook: 4sc, 1 dc, ch2, make 1sl st in the first ch, 1sl st in the next ch of row 1, ch1, 1;
— Hat :
Round 1: 6sc in a magic ring with blue-grey;
Round 2: inc in every stitch (12)
Round 3: *1sc, inc* repeat till end (18)
Round 4: *1sc, inc, 1sc* repeat till end (24)
Round 5: *3sc, inc* repeat till end (30)
Round 6: *2sc, inc, 2sc* repeat till end (36)
Round 7: 1sc in every back loop (36)
Round 8: Step 1: 2sc, dec, 2sc, Step 2: 2hdc, hdc dec, 2hdc, Step 3: 2times: *2dc, dc dec, 2dc*, Step 4: 2hdc, hdc dec, 2hdc, Step 5: 2sc, dec, 2sc (= 30 in total)
Round 9: 1sc in every front loop (30) with navy blue;
Round 10: 1sc in every stitch (30)
— Part 20 :
Round 1: only in front loops: 1sl st, 1sc, 1hdc, dc inc, 2dc, dc inc, 1hdc, 1sc, 2sl st and turn Do not make a ch1 before turning. This time you only need to turn, no ch1;
Round 2: Step 1: skip that last sl st of row 1;
— Piece A :
Round 1: 6sc in a magic ring (6) with grey;
Round 2: inc in every stitch (12)
Round 3: *1sc, inc* repeat till end (18)
Round 4: *1sc, inc, 1sc* repeat till end (24)
Round 5: *3sc, inc* repeat till end (30)
Round 6: *2sc, inc, 2sc* repeat till end (36)
Round 7: *5sc, inc* repeat till end (42)
Round 8: *3sc, inc, 3sc* repeat till end (48)
Round 9: *7sc, inc* repeat till end (54)
Round 10: *4sc, inc, 4sc* repeat till end (60)
Round 11: *9sc, inc* repeat till end (66)
Round 12: *5sc, inc, 5sc* repeat till end (72)
— Piece B :
Round 1: 6sc in a magic ring (6) with grey;
Round 2: inc in every stitch (12)
Round 3: *1sc, inc* repeat till end (18)
Round 4: *1sc, inc, 1sc* repeat till end (24)
Round 5: *3sc, inc* repeat till end (30)
Round 6: *2sc, inc, 2sc* repeat till end (36)
Round 7: *5sc, inc* repeat till end (42)
Round 8: *3sc, inc, 3sc* repeat till end (48)
Round 9: *7sc, inc* repeat till end (54)
Round 10: *4sc, inc, 4sc* repeat till end (60)
Round 11: *9sc, inc* repeat till end (66)
Round 12: *5sc, inc, 5sc* repeat till end (72)
Round 13: in back loops only: 1sc in every stitch (72)
Round 14: 1sc in every stitch (72)
Round 15: 1sc in every stitch (72)
— Petals 1 and 2 :
Round 1: 6sc in a magic ring (6) with red;
Round 2: in front loops: inc 3 times, ch2 and turn (6)
Round 3: 3times *1hdc, hdc inc*, ch2 and turn (9)
Round 4: 1hdc, hdc inc, 1hdc, 1 dc, dc inc, 1 dc, 1hdc, hdc inc, 1hdc (12)
— Do the following now :
Round 1: in back loops only: inc 3 times, ch2 and turn (6)
Round 2: hdc inc 6 times, ch2 and turn (12)
Round 3: *1 dc, dc inc* repeat till the end, ch1 and turn (18)
Round 4: 1sc in every stitch (18)
— Middle of the poppy :
Round 1: 6sc in a magic ring (6) with black;
Round 2: inc in every stitch (12)
Round 1: 6sc in a magic ring (6) with grey;
Round 2: inc in every stitch (12)
Round 3: *1sc, inc* repeat till end (18)
Round 4: *1sc, inc 1sc* repeat till end (24)
Round 5: *3sc, inc* repeat till end (30)
Round 6: *2sc, inc, 2sc* repeat till end (36)
Round 7: *5sc, inc* repeat till end (42)
Round 8: *3sc, inc, 3sc* repeat till end (48)
Round 9: *7sc, inc* repeat till end (54)
Round 10: *4sc, inc, 4sc* repeat till end (60)
Round 11: *9sc, inc* repeat till end (66)
Round 12: *5sc, inc, 5sc* repeat till end (72)
Round 13: *11sc, inc* repeat till end (78)
Round 14: *6sc, inc, 6sc* repeat till end (84)
Round 15: *13sc, inc* repeat till end (90)
Round 16: *7sc, inc, 7sc* repeat till end (96)
Round 17: *15sc, inc* repeat till end (102)
Round 18: *8sc, inc, 8sc* repeat till end (108)
Round 19: *17sc, inc* repeat till end (114)
Round 20: *9sc, inc, 9sc* repeat till end (120)
Round 21: *19sc, inc* repeat till end (126)
Round 22: *10sc, inc, 10sc* repeat till end (132)
Round 23: *21sc, inc* repeat till end (138)
Round 24: *11sc, inc, 11sc* repeat till end (144)
Round 25: in front loops: *23sc, inc* repeat till end (150)
Round 26: *12sc, inc, 12sc* repeat till end (156)
Round 27: 1sc in every stitch (156)
Round 28: *12sc, dec, 12sc* repeat till end (150)
Round 29: *23sc, dec* repeat till end (144)
Round 30: 1sc in every stitch and sc this row together with the back loops of 24 ((144) in total)
Round 31: 1sc in every stitch (144)
Round 32: 1sc in every stitch (144)
Round 33: 1sc in every stitch (144)
Round 1: 6sc in a magic ring (6) with grey;
Round 2: inc in every stitch (12)
Round 3: *1sc, inc* repeat till end (18)
Round 4: *1sc, inc 1sc* repeat till end (24)
Round 5: *3sc, inc* repeat till end (30)
Round 6: *2sc, inc, 2sc* repeat till end (36)
Round 7: *5sc, inc* repeat till end (42)
Round 8: *3sc, inc, 3sc* repeat till end (48)
Round 9: *7sc, inc* repeat till end (54)
Round 10: *4sc, inc, 4sc* repeat till end (60)
Round 11: *9sc, inc* repeat till end (66)
Round 12: *5sc, inc, 5sc* repeat till end (72)
Round 13: *11sc, inc* repeat till end (78)
Round 14: *6sc, inc, 6sc* repeat till end (84)
Round 15: *13sc, inc* repeat till end (90)
Round 16: *7sc, inc, 7sc* repeat till end (96)
Round 17: *15sc, inc* repeat till end (102)
Round 18: *8sc, inc, 8sc* repeat till end (108)
Round 19: *17sc, inc* repeat till end (114)
Round 20: *9sc, inc, 9sc* repeat till end (120)
Round 21: *19sc, inc* repeat till end (126)
Round 22: *10sc, inc, 10sc* repeat till end (132)
Round 23: *21sc, inc* repeat till end (138)
Round 24: *11sc, inc, 11sc* repeat till end (144)
— Make the candle holder now :
Round 1: 6sc in a magic ring with grey;
Round 2: inc in every stitch (12)
Round 3: *1sc, inc* repeat till end (18)
Round 4: *1sc, inc, 1sc* repeat till end (24)
Round 5: *3sc, inc* repeat till end (30)
Round 6: *2sc, inc, 2sc* repeat till end (36)
Round 7: 1sc in every back loop (36)
Round 8: 1sc in every stitch (36)
Round 9: 1sc in every stitch (36)
Round 10: 1sc in every stitch (36)
Round 11: 1sc in every stitch (36)
Round 12: 1sc in every stitch (36)
Round 13: 1sc in every stitch (36)
Round 14: 1sc in every stitch (36)
Round 15: 1sc in every stitch (36)
Round 16: in front loops: *5sc, inc* repeat till end (42)
Round 17: *3sc, inc, 3sc* repeat till end (48)
Round 18: *3sc, dec, 3sc* repeat till end (42)
Round 19: *5sc, dec* repeat till end (36)
This pattern set was designed as a quiet tribute to service and to the small, handmade gestures that remember them. It brings three uniformed figures together on a reinforced platform with a soft, crocheted finish and carefully placed poppy details. The included LED centrepiece is optional but gives the display a solemn focal point and a handcrafted presence on any mantel or table.