Crochetologist
Free Crochet Pattern
Beautiful Detailed Adorable

Festive Lights Amigurumi Pattern

A colourful string of Festive Lights crochet bulbs in multiple colours forming an amigurumi garland
4.4Rating
5-7 HoursTime
IntermediateSkill
Highlights

What makes it special

Made with Love

Small, giftable crochet bulbs that hang as a charming garland in bright or muted colours; each bulb is palm-size and makes a perfect handmade present or accent.

Weekend Treat

This project takes about 5-7 hours depending on how many bulbs you make and how much finishing and facial embroidery you add, ideal for a relaxed weekend.

Intermediate Level

This intermediate amigurumi pattern requires working in continuous rounds with magic rings, invisible decreases, back-loop-only stitches, colour changes, and basic seaming skills.

The Festive Lights pattern is a whimsical crochet project that turns bulky Bernat Blanket yarn into a string of plush lightbulbs perfect for seasonal decor or year-round charm. These palm-friendly bulbs are designed to tuck into crocheted sockets and hang as a garland across mantels, shelves, or bedrooms, bringing a handmade glow to any space.

This pattern is ideal for makers who enjoy textured stitches and modular pieces: each bulb is worked in continuous rounds, the cap is made using back-loop-only stitches to create a screw coil, and sockets are chained together to form the cord. If you love tactile projects with a playful outcome, this garland is a bright and satisfying weekend make.

About This Festive Lights Amigurumi Pattern

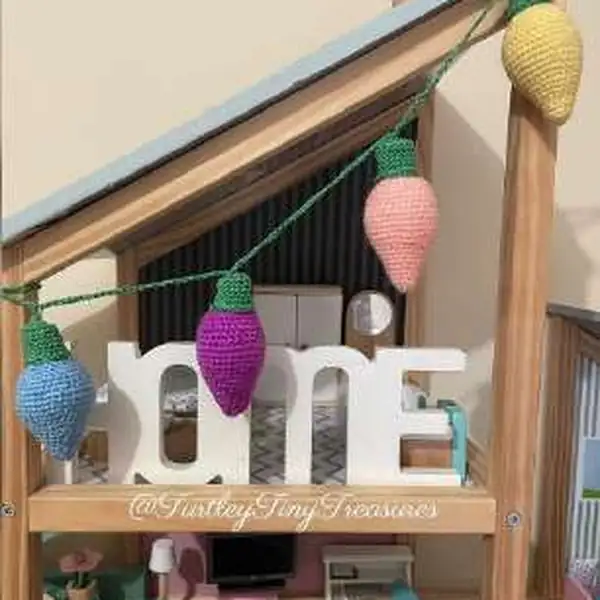
Make a string of plush, squishy amigurumi lightbulbs with this cheerful Festive Lights pattern. Using bulky Bernat Blanket yarn and a 6 mm hook, you will crochet bulb bodies, caps, and sockets, then chain them into a garland. The design is playful and forgiving, perfect for bright seasonal decor or a handmade gift to hang across a mantle or bedroom.

The Festive Lights pattern teaches you how to crochet a palm-sized lightbulb amigurumi using Bernat Blanket size 6 yarn, a 6 mm hook, and a few basic supplies; you will make the bulb body, a cap with a spiral screw effect, and a little socket that chains together into a garland. The pattern walks through increases and decreases in continuous rounds and guides you through back-loop-only work to build the screw detail for the cap. You will also learn where to place safety eyes and how to stuff the bulb so that the tip is shaped cleanly and the body keeps a smooth, plump silhouette.

You will make several identical pieces when assembling your string of lights, and instructions include a simple method for chaining sockets together with a chain spacing method (CH 30 at the start and CH 20 between sockets) so your bulbs hang evenly. The pattern includes specific stitch counts at each round, advice for placing a secondary stitch marker to mark the start and end of the front loop coil, and a short finishing routine to SLST along the marked front loops to create a tidy screw coil that looks like a bulb base. There are also friendly notes about adjusting tension to ensure bulbs twist into sockets snugly.

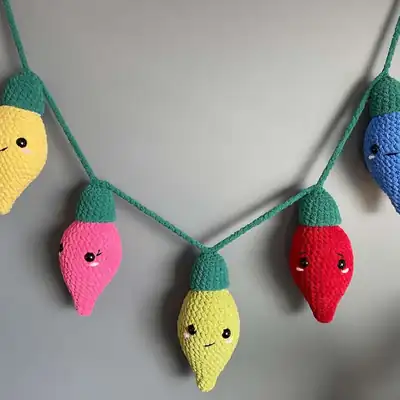
This pattern is approachable and encourages creativity: once you have the basic bulb and socket made, you can mix bright festive colours or keep a tonal set, add tiny embroidered faces, or leave the bulbs plain. The pattern is written for Bernat Blanket yarn to produce a dense, plush bulb that holds shape without showing stuffing; making all pieces with the same yarn and hook is emphasised to keep an even look across every light.

Close up of a single crocheted lightbulb amigurumi showing texture and a sewn-on face

This second description highlights the finished garland: each bulb sits in a crocheted socket that keeps it secure while allowing you to twist the bulb, giving a playful motion to the decoration. The instructions include clear placement notes for safety eyes and advice on stuffing to avoid lumps, plus guidance on weaving in tails and fastening off so your garland looks neat when hung.

The pattern is deliberately modular so you can make any number of bulbs; the socket and cord section explains how to chain sockets, attach them to the string, and leave extra length on each end for hanging or for looping around hooks, perfect for draping over mantels or across a nursery wall in colourful clusters.

Stitches & Skills You'll Use

This pattern uses a handful of approachable stitches and techniques that together create the bulb, cap, and socket. The magic ring (MR) starts the bulb for a neat, closed tip; single crochet (SC) is the primary stitch used for shaping the bulb and socket; and increases (INC) and invisible decreases (DEC) sculpt the tapered silhouette. The cap uses back loop only (BLO) work to set up a visible ridge, and slip stitches (SLST) across the front loops form the screw coil that gives the cap its distinctive look.

Working in continuous rounds is central to the pattern and helps the textured Bernat Blanket yarn sit smoothly without visible joins; I recommend using stitch markers to mark your round starts and the special front loop markers that define the coil area. Safety eye placement is noted between specific rounds for balanced faces if you choose to add eyes, and simple embroidered features require only a yarn needle and a bit of patience to place cheeks, mouths, or brows.

Beginners will find that the stitches themselves are basic, but the way they are combined—particularly the controlled decreases and the front-loop coil technique—produces a clever, finished look. If you are new to invisible decreases or BLO work, try a small practice swatch first to see how the fabric behaves with the bulky yarn; once you get a feel for the tension, the rest of the bulb flows quickly and the techniques become reliably repeatable across several bulbs.

Why You'll Love This Festive Lights Amigurumi Pattern

Colour & Yarn Inspiration

Colour choices dramatically change the mood of the garland: a palette of bright, saturated bulbs (ruby red, lemon yellow, kelly green, and sky blue) creates a classic holiday feeling that pops against neutral walls, while muted tones (pale blush, soft sage, oatmeal) turn the same shapes into a more modern, subdued decor piece. For a vintage-inspired set I choose mustard, dusty rose, and teal with a dark cap colour to ground the bulbs and suggest a retro look.

Yarn fibre also affects the finish: Bernat Blanket gives a plush, faux-fur texture that reads soft and cosy; substituting a chunky acrylic or boucle will change surface detail and make the bulbs feel more rustic or handmade. If you swap to a smooth bulky wool, the stitch definition improves and the screw coil becomes more pronounced—perfect if you want a sculptural, highly defined cap on each bulb.

Five finished plush lightbulb amigurumi laid out together showing different colour bulbs and caps

Switch Things Up

I love to change yarn and colour choices to give the garland a new mood; try using neutral greys and creams for an understated, modern look rather than the bright Christmas palette shown in the photos.

I often make a mini version by substituting a DK weight yarn and a 3.5 mm hook to create a set of tiny keychain bulbs that are perfect little pocket pals or zipper charms.

I sometimes replace safety eyes with embroidered eyes and tiny French-knot highlights when I want a completely soft and child-safe version for a baby mobile.

To make a chunky, statement garland I will use a super-bulky yarn and a 9 mm hook; the larger stitches give the bulbs a very cozy, squishy texture that works well over a fireplace or as party decor.

If I want a more structured bulb I tighten my tension by dropping one hook size or carry a thinner filler like poly-pellets in the tip for weight while keeping polyfill elsewhere for shape.

I also experiment with adding tiny crocheted accessories, such as miniature hats or scarves on each bulb, attaching them before placing bulbs in sockets to personalise each light.

For themed sets I select a 3-colour palette and alternate bulbs in a repeating colourway so the finished string has rhythm and looks intentional rather than random.

I like to swap the cap colour for metallic or sparkly yarn to mimic brass or aluminium socket finishes, which adds a playful mixed-material effect to the craft.

When I want to hang the garland outdoors for a short event I use an acrylic or weather-resistant bulky yarn and secure the ends with extra knots and a dab of clear glue to help the cord resist moisture temporarily.

If I make the string longer, I sometimes double the cord strand for strength by chaining with a second yarn held together, which also gives a braided appearance and reduces sagging between sockets.

Ways to Use & Gift It

These Festive Lights bulbs make thoughtful, tactile gifts that pack personality: make a short string as a housewarming present for a friend who loves colour, or produce several single bulbs as small gifts for co-workers to hang at their desks. For baby showers, create a soft, fully-embroidered mobile version with embroidered eyes instead of safety eyes and hang three bulbs over a nursery for a gentle handmade accent that becomes a keepsake.

Another idea is to personalise each bulb for birthdays or holidays by choosing colourways that match the recipient’s preferences, adding tiny tags with embroidered initials, or arranging the bulbs into seasonal palettes—pastel spring tones for Easter, warm oranges and browns for autumn, or bright primary colours for a child’s room. Because the pattern is modular, you can build a gift set of individual bulbs tied with a ribbon, or make a longer garland for a bundled holiday present that looks spectacular on display.

Common Mistakes & How to Fix Them

Skipping stitch markers on the front loop when marking the start of the screw coil; solution: insert a secondary coloured stitch marker in the first front loop and another at the last front loop so you can SLST across the exact coil area later. Stuffing too early or too much at once which leads to lumps at the tip of the bulb; solution: stuff gradually and concentrate fibre into the tip before adding bulk to the body, checking shape every few rounds. Using a different yarn weight for some parts which causes sockets and bulbs not to fit together properly; solution: make all pieces with the same Bernat Blanket yarn or adjust hook size consistently across every component. Failing to work in continuous rounds and instead joining each round which creates visible seams; solution: work continuously with a stitch marker and keep track of rounds, rotating the marker each round if you need to reposition. Placing safety eyes too low or too close together and getting an odd facial expression; solution: follow the eye placement note and insert safety eyes between rounds 15 and 16 approximately five stitches apart for balanced faces. Not SLSTing through only front loops when creating the screw coil which flattens the texture; solution: return to the first marked front loop and SLST in each front loop only until you reach the end marker, then fasten off and weave in tails.

Maker's Notes

When I tested this pattern I used Bernat Blanket yarn (Size 6 bulky) with a 6.0 mm (J) hook and found one bulb plus its cap and socket took about 40-50 minutes to complete once I had the rhythm down. I made five bulbs for the sample garland across two evenings, and I spent an extra hour embroidering faces and weaving tails. Learners often struggle at the front-loop marking and SLST coil for the cap around rounds 23-26; practicing SLST in front loops on a short tube before attempting the coil helps a lot.

Stuff gradually and keep the tip firm first to maintain the tapered shape; test-fit bulbs into sockets as you work to ensure your tension produces a snug twist fit.

I tried a substitution: I tried the pattern with DK yarn on a 3.5 mm hook to create a mini ornament version and the bulbs measured about 8.5 cm tall instead of the original 12 cm, which required shortening the socket and tightening chain spacing to keep fit; the DK result was delicate and cute, but needed careful stuffing and slight stitch count adjustments to maintain the tapered profile.

Festive Lights Amigurumi Pattern

Free round-by-round crochet pattern for Festive Lights, with full stitch counts.

Intermediate 5-7 Hours
Pattern at a glance
Skill level
Intermediate
Time to make
5-7 Hours
Hook size
6.0 mm (J)
Yarn weight
Bulky / #6
Finished size
Approx. 12 cm / 4.7 in tall per bulb
Gauge
Approximate gauge: 8 SC x 8 rounds = 5 cm square when using Bernat Blanket yarn and 6.0 mm hook; tight tension recommended so stuffing does not show.
Yarn used
Approx. 71 g per bulb (48g bulb + 10g cap + 13g socket) ≈ 71 g (~78 yards / ~71 metres) per bulb

Materials Needed

Main Fabric
  • 01
    Bernat Blanket Yarn (Size 6, Bulky) - Main part of bulb approx. 48g per bulb
  • 02
    Bernat Blanket Yarn (Size 6, Bulky) - Top of bulb (cap colour) approx. 10g per bulb
  • 03
    Bernat Blanket Yarn (Size 6, Bulky) - Socket colour approx. 13g per socket
  • 04
    Extra scrap yarn for small embroidered facial details (approx. 5g per bulb as needed)
Tools Required
  • 01
    Crochet hook size 6.0 mm (J)
  • 02
    Scissors
  • 03
    Yarn needle for sewing and weaving in ends
  • 04
    Stitch markers (several colours recommended)
  • 05
    16 mm safety eyes (2 per bulb, optional)
  • 06
    Polyester stuffing (polyfill)
  • 07
    Pins for assembly (optional)
  • 08
    Tape measure or ruler

— Part 1 :

Round 13: (4 Rounds) - SC around [36];
Round 14: (4 Rounds) - SC around [36];
Round 15: (4 Rounds) - SC around [36];
Round 16: (4 Rounds) - SC around [36];
Round 18: (2 Rounds) - SC around [30];
Round 19: (2 Rounds) - SC around [30];

— Using the socket and cord colour :

Round 4: (5 Rounds) - SC around [18];
Round 5: (5 Rounds) - SC around [18];
Round 6: (5 Rounds) - SC around [18];
Round 7: (5 Rounds) - SC around [18];
Round 8: (5 Rounds) - SC around [18];

Assembly Instructions

  1. Place each fully stuffed bulb into a matching socket by aligning the bulb base with the socket opening and twisting gently until the bulb fits snugly; the fit should be tight enough that the bulb does not fall out when the garland is lifted.
  2. Chain the sockets together by CHing 30 to start the cord, then attach the first socket by SC through the top on one side of the initial MR, move to the opposite side of the MR and SC through the top there to anchor the socket evenly.
  3. After anchoring each socket, CH 20 between sockets to space bulbs evenly along the cord; when you reach the final socket, CH 30 for extra length on the ends and FO, leaving tails to weave in or to use for hanging loops.
  4. Position safety eyes and any embroidered faces before closing the final opening of the bulb; sew facial details with extra yarn and a yarn needle, testing placement on the stuffed bulb so eyes and blush are symmetrical.
  5. Weave in all tails securely after closing openings, and use a yarn needle to firmly stitch the socket bases if you want to lock bulbs into place more permanently for high-traffic displays.
  6. If desired, pin sockets along the cord while arranging spacing before final stitching so you can adjust distances easily; once satisfied, remove pins and secure with a few whipstitches through the socket top and cord.

Important Notes

  • Work in a continuous spiral unless a round says otherwise.
  • Stitch counts are given at the end of each round — check them as you go.
  • Stuff firmly and evenly for a smooth finish.
  • Use a stitch marker to track the beginning of each round.

These Festive Lights bulbs were designed to bring a handmade, cosy glow to your home during celebrations and everyday moments. Each palm-sized bulb is plush and squeezable, perfect for draping across mantels, windows, or nursery walls. Add a handful of these cheerful bulbs to gift a friend a tiny, long-lasting reminder of care and craft.

Good to know

You ask, we answer

The finished bulb measures approximately 12 cm tall and about 6 cm at the widest point when worked with Bernat Blanket yarn (size 6) and a 6 mm hook; variations in tension and yarn will change final dimensions slightly.

Yes, you can substitute yarn weights, but the bulb-to-socket fit will change; use a lighter yarn with a smaller hook for mini bulbs and a heavier yarn or larger hook for chunkier bulbs, and adjust stitch counts or test one bulb first.

No advanced stitches are required; the screw effect is made by working in the back loops only and then slip stitching across the front loops between two marked stitches, which creates the coil texture using basic SLST and BLO techniques.

Safety eyes are optional; the pattern suggests 16 mm eyes for a cute look, but you can embroider eyes with yarn or thread for a softer, child-safe finish especially if the garland will be handled by young children.

Chain the sockets following the pattern's spacing instructions: start with CH 30 for the lead, attach sockets by SC through the top on either side of the MR, and use CH 20 between each socket for even distances; pin and adjust spacing before finalising.

Absolutely; the pattern is modular and written so you can make any number of bulbs and sockets; simply continue the chain and attach sockets at regular CH 20 intervals until you reach your desired garland length, leaving CH 30 on the ends.

Green socket pieces and cord segments crocheted from bulky yarn ready to join into a garland amigurumi
Join 100k+ crocheters

Get new free patterns, stitch tips and exclusive content in your inbox.