Crochetologist
Free Crochet Pattern
Beautiful Detailed Adorable

Christmas Hoop Embroidery Pattern

Finished Christmas hoop showing satin-stitched roses and fishbone leaves in a 15 cm hoop
4.0Rating
2-4 HoursTime
Beginner FriendlySkill
Highlights

What makes it special

Festive fun for the season, bringing handmade magic to celebrations and creating new family traditions.

Bite-Sized Project

Perfect for an afternoon project, this single-hoop design finishes in two to four hours depending on stitch experience and the amount of decorative detail you add.

Beginner Friendly Level

Designed for beginners and confident novices, this pattern teaches satin stitch, backstitch, chain stitch, fishbone stitch, woven wheel and French knots while working in a 15 cm hoop and transferring designs accurately.

Create a cozy pocket of seasonal cheer with a 15 cm Christmas hoop that fits easily on a mantel, gallery wall, or as a thoughtful hand-made gift. This compact embroidery design combines classic stitches like satin and fishbone with playful woven-wheel flowers and tiny French-knot berries to produce an intricate-looking result that stitches up quickly.

This project is ideal for crafters who want a finished festive decoration after an afternoon of stitching; you'll practice line work and surface fills while learning how to transfer a printed scheme, choose DMC colors, and finish the back of the hoop to gallery standards. The instructions include clear photos and a color key so you can confidently make a polished holiday accent.

About This Christmas Hoop Embroidery Pattern

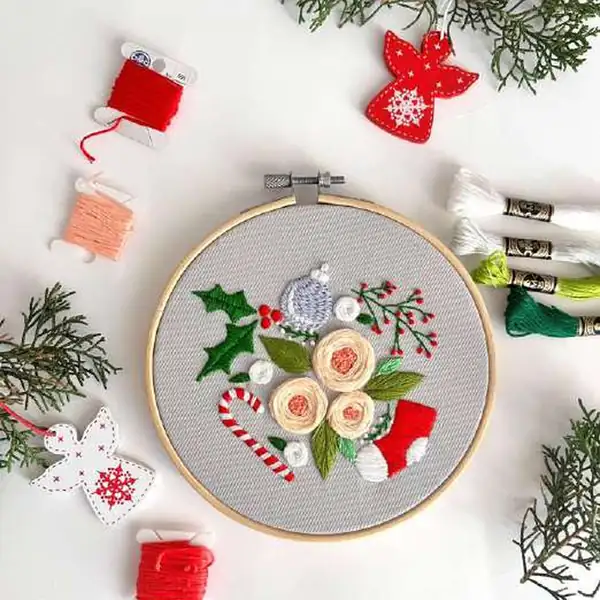
Make a festive 15 cm embroidery hoop decorated with satin-stitched roses, holly leaves, candy cane stripes and woven-wheel flowers using simple stitches and clear step-by-step photos. This pattern walks you through transferring the design, choosing DMC colors, and finishing the hoop so you can create a holiday-ready piece to hang or gift. Friendly for beginners who want to practice satin stitch, French knots and fishbone leaves with guidance on tension and layering.

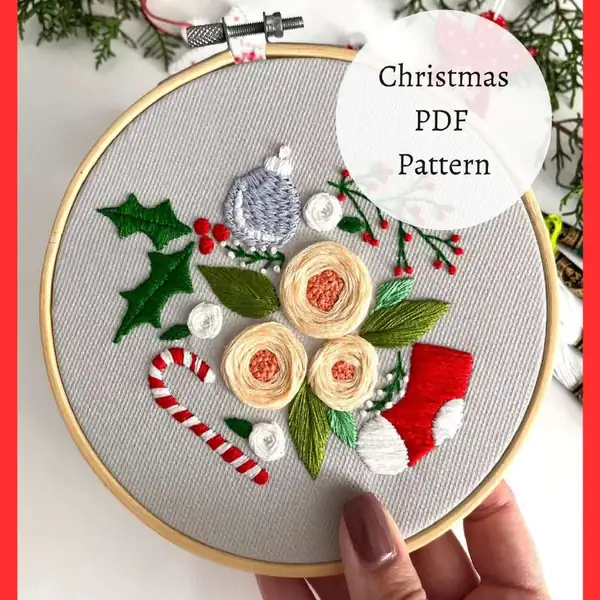
This pattern produces a single, framed 15 cm embroidery hoop featuring a small Christmas composition of three satin-stitched roses, holly leaves worked in fishbone stitch, a candy cane striped with satin stitch, a tiny stocking and several woven-wheel and French-knot berries and accents. You will learn how to transfer a printed scheme onto cotton canvas, layer stitches for depth, and finish the back of the hoop professionally with felt or craft cardboard. The included color map lists DMC shades used in the sample so you can match the warm ivory roses, bright red berries, and deep green leaves for a cohesive holiday palette.

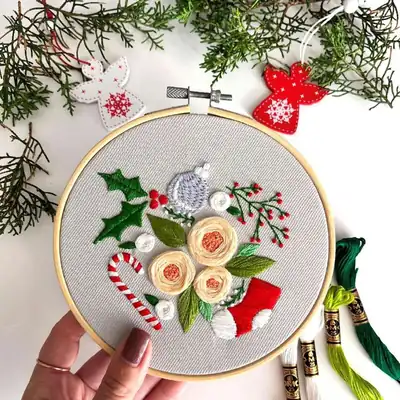
The instructions are written to guide you step by step through stitch construction: clear photographs show progress at key stages and concise written descriptions explain entry and exit points for satin, backstitch, chain and fishbone techniques. I recommend working with two layers of cotton canvas in a 15 cm hoop to get the taut, secure surface shown in the photos; that fabric choice makes satin fills lay smoothly while woven wheel flowers maintain their round shape. There are helpful notes about needle size, floss strand counts and how to keep tension consistent so the finished piece is neat and flat.

Finishing instructions explain cutting a felt or craft-cardboard circle to fit the inner hoop, gathering the fabric, and overstitching the edge for a tidy back that hides threads and knot ends; this leaves the front crisp and gallery-ready. The pattern also suggests small variations in color and stitch direction that let you personalize the wreath-like arrangement while retaining the same overall layout and hoop size. Whether you hang this in a hallway, use it as a tree ornament alternative, or gift it as a seasonal keepsake, the final hoop is compact, decorative and balanced.

Close-up of satin stitch progress and chain stitch stems on the holiday embroidery hoop

This second description highlights practical benefits: the pattern is compact and uses commonly available DMC stranded cotton colors, making it easy to purchase materials locally or online. The stitch choices are specifically selected to build texture within a small area so you practice both line stitches and surface fills without committing to a large embroidery project.

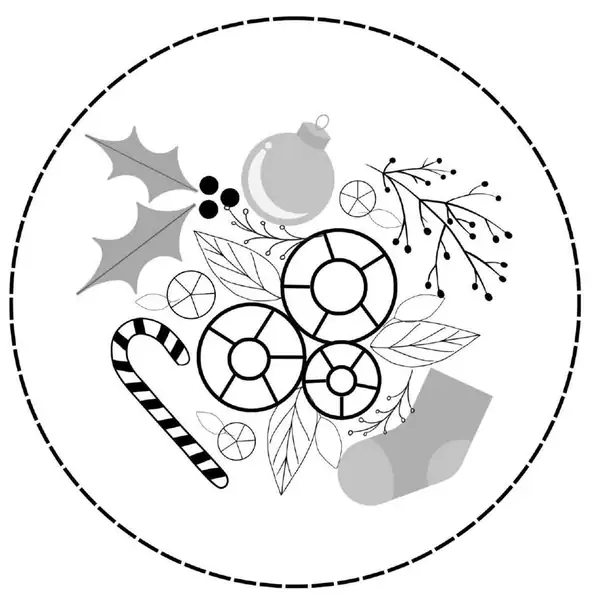
You will get a printable scheme to transfer with carbon paper or by using a lightbox or window, plus a concise stitch key and color callout so you always know which stitch to use for each motif element. The project is ideal for someone who wants a finished seasonal decoration after a single focused session or as a warm, handmade gift for a holiday swap.

Stitches & Skills You'll Use

The first stitch you will use extensively in this pattern is the satin stitch, a filler stitch that creates smooth areas of color for the rose petals and stocking body. Satin stitch requires consistent, parallel passes of thread across the shape, and I show how to approach edges cleanly to avoid visible gaps; practicing on a scrap square is a helpful warm-up. You will also use the backstitch for stems and fine outlines because its strength and simplicity allow crisp lines that hold shape over time.

Fishbone stitch is employed for the holly leaves; this technique builds a central vein with alternating diagonal stitches that stack into a dense, veined surface. Work slowly around the leaf shape so stitches lie flat and taper neatly at the tip. The woven wheel stitch fills small circular flowers; it combines spokes and an under-over weaving step that creates a rosette with a secure center and lovely texture when pulled evenly.

Smaller accents use the French knot and chain stitch: French knots provide the tiny red berries and seed-like highlights, while chain stitch forms delicate tendrils and looping stems. You will learn how many strands to use for each stitch, where to enter and exit the needle for clean joins, and how to tension thread so that knots are firm without pulling fabric. These stitches together teach you both outline control and surface filling techniques that translate to many future embroidery projects.

Why You'll Love This Christmas Hoop Embroidery Pattern

Colour & Yarn Inspiration

The sample palette in this pattern uses DMC 666 for bright berry red and BLANC for highlights paired with deep greens like DMC 700 for holly leaves and mid-tones like DMC 3841 for softer leaf accents; this classic combination reads unmistakably festive in a 15 cm hoop. For a vintage-inspired variation, substitute muted golds and dusty rose tones for the bright reds, replacing DMC 666 with a warmer terracotta and using a soft cream in place of stark white. This shift creates a cozy, heirloom look that pairs well with wooden hoops and natural linen backgrounds.

If you prefer modern or Scandinavian aesthetics, switch the palette to teal and blush with a pop of coral for berries and keep the leaves in cool sage tones; using tonal variations of a single hue for the roses (lighter to darker shades) produces depth without relying on strong contrast. To make a sparkling holiday version, add a single strand of metallic thread blended with one strand of DMC in the satin fill for a subtle gleam, but test metallics on scrap first to check tension and avoid shredding. Different fibers also change the effect: perlé cotton makes stitches crisp and raised while stranded floss blends smoothly, so choose based on whether you want sculptural texture or soft shading.

Flatlay of finished hoop with DMC strands and embroidery needle, illustrating materials used

Switch Things Up

I often change the color story of this small hoop so the piece fits different seasonal palettes, swapping the classic red and green for soft pastels or metallic floss for a more elegant mantelpiece version.

I also make size adjustments by moving to a 20 cm hoop and increasing petal counts or stitch density; this requires slightly more floss but gives a bolder wall display effect.

I sometimes replace the woven wheel centers with small appliqued circles cut from felt, which adds a mixed-media texture and speeds up completion for gift deadlines.

I like to experiment with metallic or variegated threads for the candy cane stripes to add shine and tonal variation that reads beautifully in photos.

For a tactile children-friendly ornament I make a mini version in a 7.5 cm hoop using thinner fabric and fewer petals; this makes a playful stocking stuffer that still showcases satin stitch practice.

I occasionally embroider the same design onto linen napkins instead of a hoop to create a coordinating tabletop set for holiday dinners, stitching the same motifs in corner placements.

I recommend trying contrasting background fabric to change the whole mood: a deep charcoal backdrop creates drama while pale linen gives a classic handmade look.

I sometimes swap the satin roses for detached leaf motifs worked in Portuguese raised stem; the result is more sculptural and very satisfying to touch.

When I want a quick alternative, I substitute French knots for some woven-wheel flowers to create a dotted texture that is faster for gifting multiple pieces.

I also personalize each hoop by adding small embroidered initials or a date tucked discreetly among the leaves, creating a memento for a special holiday memory.

Ways to Use & Gift It

This finished 15 cm hoop makes a wonderful small gift that feels personal and handcrafted; make a matching set of two or three hoops in complementary color stories to present as a coordinated holiday set for a friend or family member. Because the piece is compact and lightweight it ships well and slips easily into a wrapped box with a simple ribbon; include a small handwritten note describing the stitches used to make the present extra-special. For teacher gifts or hostess thanks, stitch a single hoop in neutral colors so it fits into any home decor and pair it with a small sachet of holiday tea or candles.

Another lovely gifting option is to personalize the design by swapping one rose for an embroidered initial or tiny date tucked among the leaves, creating a keepsake that commemorates a first holiday in a new home or the year of a new baby. Make a trio of tiny hoops with variations of the same composition to create an advent calendar display that the recipient can hang or rotate through the season. If you prefer practical gifts, consider stitching the motif onto a set of napkins or a linen table runner for a festive tablescape that families will enjoy all season long.

Common Mistakes & How to Fix Them

Failing to transfer the pattern accurately; retrace faint printed lines using carbon paper or a removable fabric pen to ensure motifs are in the correct positions before you stitch. Using too many strands of floss for satin fills which creates bulging stitches; use the recommended strand count and keep tension gentle to achieve a smooth surface. Pulling stitches too tightly on the fishbone leaves; allow a small relaxed tension so the leaf curves naturally rather than puckering the fabric. Skipping practice swatches for woven wheel flowers leads to uneven centers; try the woven wheel on scrap fabric first to learn the under-and-over weaving rhythm. Not securing thread tails properly when changing colors; weave thread ends under several stitches on the back and trim to prevent bulk and slippage. Overstuffing the hoop by tightening the outer screw too forcefully and warping the fabric; tighten gradually and even the tension around the hoop for a flat work surface.

Maker's Notes

I stitched the sample using DMC floss, two layers of cotton canvas and a wooden 15 cm hoop, spending roughly three hours from trace to finished backing. I recommend practicing satin stitch and the woven wheel on scrap fabric because beginners often misjudge tension and weaving rhythm; these two techniques most commonly slow people down. Use the strand counts I note in the pattern, adjust hoop tension carefully, and photograph your progress if you need to double-check stitch placement while the piece is in progress.

I tried a substitution: When I swapped stranded cotton for a silk-blend thread the roses achieved a subtle sheen and required fewer passes to cover the satin areas, delivering a glossier result but demanding more careful removal of transfer marks. The silk produced a refined finish but required gentler handling and slightly altered tension control.

Christmas Hoop Embroidery Pattern

Download this free crochet pattern for a Christmas hoop embroidery design — full stitch guide, DMC color list and finishing tips to start your seasonal project today.

Beginner Friendly 2-4 Hours
Pattern at a glance
Skill level
Beginner Friendly
Time to make
2-4 Hours
Hook size
N/A - No crochet hook required
Yarn weight
Stranded cotton embroidery floss (DMC), use recommended split strands per stitch instructions
Finished size
Approx. 15 cm / 6 in diameter
Gauge
Not applicable for embroidery; design sized to fit a 15 cm hoop and will vary with tension and thread selection.
Yarn used
Approx. 35 g / 80 m total DMC stranded cotton across all colours used.

Materials Needed

Main Fabric
  • 01
    15 cm embroidery hoop (wooden hoop recommended for natural aesthetic)
  • 02
    Two layers of natural cotton canvas fabric sized for a 15 cm hoop
  • 03
    DMC stranded cotton embroidery floss - Color DMC 666 (red), approximately 8 m
  • 04
    DMC BLANC (white) stranded floss, approximately 8 m
  • 05
    DMC 700 (green) stranded floss, approximately 8 m
  • 06
    DMC 3841 (leaf green) stranded floss, approximately 8 m
  • 07
    DMC 353 (woven wheel green) stranded floss, approximately 8 m
  • 08
    DMC 352 (pale highlight) stranded floss, approximately 8 m
  • 09
    DMC 954 and DMC 702 (leaf accents) stranded floss, small amounts
  • 10
    Felt or craft cardboard circle for backing (one circle, 15 cm diameter)
Tools Required
  • 01
    15 cm embroidery hoop (wooden preferred)
  • 02
    Embroidery needle size 7 or 8 (sharp, long-eye)
  • 03
    DMC stranded cotton embroidery floss in listed colors
  • 04
    Scissors for handcrafts
  • 05
    Carbon transfer paper or lightbox/window for pattern transfer
  • 06
    Water-soluble or removable fabric marker for tracing
  • 07
    Pins (optional) to hold felt backing while finishing
  • 08
    Craft cardboard or felt for hoop backing
  • 09
    Thimble (optional) for pushing needle through layered fabric
  • 10
    Tape to secure printed scheme to window while tracing

— Part 1 :

Round 1: Back Stitch;
Round 2: Satin Stitch.
Round 3: Fishbone Stitch;
Round 4: Chain Stitch;

— Part 2 :

Round 1: Stitch up through the fabric where you want;
Round 2: Stitch back down into the exact same hole;
Round 3: Stitch up at point B, making sure the needle;
Round 5: Stitch down at point B, continuing the same;

— Part 3 :

Round 5: French Knot Stitch;
Round 6: Woven wheel embroidery stitch;
Round 7: And I use Woven wheel stitch +;

Assembly Instructions

  1. Trim the fabric to leave a generous allowance around the hoop, then tighten the outer hoop so the fabric is taut but not distorted before you begin stitching.
  2. After completing the embroidery, cut a felt or craft-cardboard circle to the size of the inner hoop and pin it to the gathered fabric on the inside of the hoop to conceal threads.
  3. Gather the excess fabric evenly around the inner hoop, then overstitch through both fabric layers around the perimeter using running stitch to secure and tidy the edge.
  4. Pass the needle through the gathered fabric and felt backing several times and tie securely; trim thread tails and press the finished hoop lightly from the back.
  5. If desired, glue or stitch the felt edge to the inner hoop for extra hold and to prevent shifting when the outer hoop is tightened for display.

Important Notes

  • Use a wooden 15 cm hoop if you prefer a natural look that photographs well, but plastic hoops will also work for practice pieces.
  • Transfer the printed scheme firmly and double-check placement before stitching to avoid moving motifs once embroidery begins.
  • Work with consistent floss strand counts and practice satin stitch on scrap to tune your tension so fills look smooth and even.
  • Stitch the woven wheel and French knots with a loose wrist motion to prevent over-twisting and to maintain rounded, tidy elements.
  • Secure color changes by weaving thread tails on the back under several stitches to prevent slipping and bulk at the center.

This little Christmas hoop is designed to bring the warmth of handmade decorations to your home and to become a cherished seasonal accent that you can display year after year. The balanced combination of satin roses, holly leaves and tiny cherry-like French knots creates cheerful texture and movement in a compact 15 cm frame. Whether you make one for yourself or give several as heartfelt gifts, this pattern offers a satisfying weekend project full of tactile, colorful stitches.

Good to know

You ask, we answer

The finished hoop measures approximately 15 cm (6 in) in diameter when mounted in the recommended 15 cm embroidery hoop; the embroidered motif fits comfortably within that visible area.

Yes, you can substitute other cotton canvas or even linen as long as the fabric supports a neat satin stitch; similarly, other stranded cotton brands will work but compare strand thickness and color matching before stitching.

The stitch list includes basic techniques like backstitch and chain stitch plus slightly advanced surface fills such as satin stitch, fishbone and woven wheel; beginners can follow the step-by-step guides and photos, practicing each stitch on scrap first.

You can use carbon transfer paper, a lightbox, or tape the printed scheme to a window and trace with a removable fabric pen; ensure the fabric is taut and that you test the pen for removability on a scrap.

Cut a felt or craft-cardboard circle to the size of the inner hoop, pin it over the gathered fabric edge and overstitch around the perimeter to secure the fabric neatly and conceal thread tails.

Most stitchers complete this 15 cm hoop in two to four hours depending on familiarity with satin and woven wheel techniques and the level of detail you choose to include.

Woven wheel flower and French knot berry details in the finished Christmas hoop
Join 100k+ crocheters

Get new free patterns, stitch tips and exclusive content in your inbox.