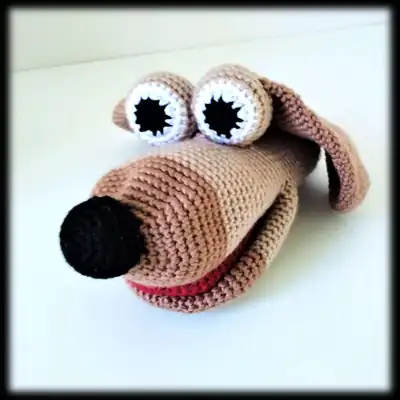
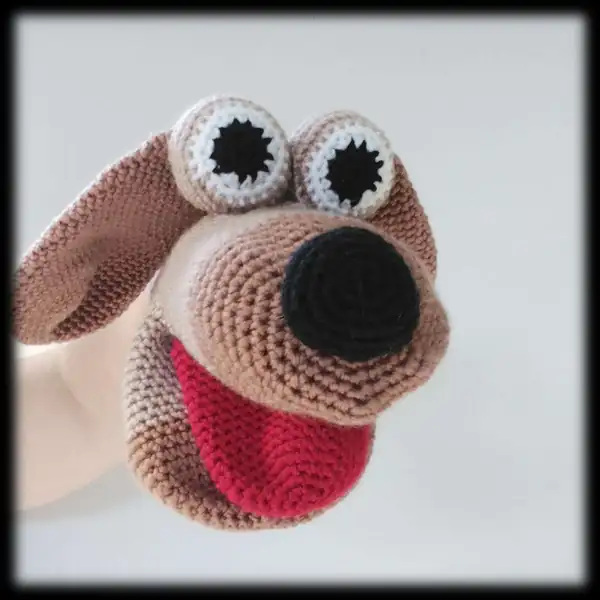
Make this cute Dog Hand Puppet with our free crochet amigurumi pattern—complete instructions, materials, and assembly tips included. Start today!
— Tongue :
Round 1: 6 sts;
Round 2: 12 sts;
Round 3: 18 sts;
Round 4: 24 sts;
Round 5: 6 sc in 2nd ch from hook inc in all 6 sts (1 sc, inc in next st) x6 (2 sc, inc in next st) x6 (3 sc, inc in next st) x6 30 sts;
Round 6: 30 sc 30 sts Insert your squeak into the tongue if you are adding one. 15sc through both sides of the tongue to close. Sl last st and finish. Top of Mouth Using Gingerbread yarn Ch 2;
Round 7: 30 sc 30 sts Insert your squeak into the tongue if you are adding one. 15sc through both sides of the tongue to close. Sl last st and finish. Top of Mouth Using Gingerbread yarn Ch 2;
Round 8: 30 sc 30 sts Insert your squeak into the tongue if you are adding one. 15sc through both sides of the tongue to close. Sl last st and finish. Top of Mouth Using Gingerbread yarn Ch 2;
Round 9: 30 sc 30 sts Insert your squeak into the tongue if you are adding one. 15sc through both sides of the tongue to close. Sl last st and finish. Top of Mouth Using Gingerbread yarn Ch 2;
Round 10: 30 sc 30 sts Insert your squeak into the tongue if you are adding one. 15sc through both sides of the tongue to close. Sl last st and finish. Top of Mouth Using Gingerbread yarn Ch 2;
Round 11: 30 sc 30 sts Insert your squeak into the tongue if you are adding one. 15sc through both sides of the tongue to close. Sl last st and finish. Top of Mouth Using Gingerbread yarn Ch 2;
Round 12: 30 sc 30 sts Insert your squeak into the tongue if you are adding one. 15sc through both sides of the tongue to close. Sl last st and finish. Top of Mouth Using Gingerbread yarn Ch 2;
Round 13: 30 sc 30 sts Insert your squeak into the tongue if you are adding one. 15sc through both sides of the tongue to close. Sl last st and finish. Top of Mouth Using Gingerbread yarn Ch 2;
Round 14: 30 sc 30 sts Insert your squeak into the tongue if you are adding one. 15sc through both sides of the tongue to close. Sl last st and finish. Top of Mouth Using Gingerbread yarn Ch 2;
Round 15: 30 sc 30 sts Insert your squeak into the tongue if you are adding one. 15sc through both sides of the tongue to close. Sl last st and finish. Top of Mouth Using Gingerbread yarn Ch 2;
Round 16: 30 sc 30 sts Insert your squeak into the tongue if you are adding one. 15sc through both sides of the tongue to close. Sl last st and finish. Top of Mouth Using Gingerbread yarn Ch 2;
Round 17: 30 sc 30 sts Insert your squeak into the tongue if you are adding one. 15sc through both sides of the tongue to close. Sl last st and finish. Top of Mouth Using Gingerbread yarn Ch 2;
Round 18: 30 sc 30 sts Insert your squeak into the tongue if you are adding one. 15sc through both sides of the tongue to close. Sl last st and finish. Top of Mouth Using Gingerbread yarn Ch 2;
Round 19: 30 sc 30 sts Insert your squeak into the tongue if you are adding one. 15sc through both sides of the tongue to close. Sl last st and finish. Top of Mouth Using Gingerbread yarn Ch 2;
Round 20: 30 sc 30 sts Insert your squeak into the tongue if you are adding one. 15sc through both sides of the tongue to close. Sl last st and finish. Top of Mouth Using Gingerbread yarn Ch 2;
— Top Of Mouth :
Round 1: 6 sts;
Round 2: 12 sts;
Round 3: 18 sts;
Round 4: 24 sts;
Round 5: 30 sts;
Round 6: 36 sts;
Round 7: 42 sts;
Round 8: 48 sts;
Round 9: 6 sc in 2nd ch from hook inc in all 6 sts (1 sc, inc in next st) x6 (2 sc, inc in next st) x6 (3 sc, inc in next st) x6 (4 sc, inc in next st) x6 (5 sc, inc in next st) x6 (6 sc, inc in next st) x6 48 sc 48 sts 48 sts Change to Oatmeal yarn;
Round 10: 6 sc in 2nd ch from hook inc in all 6 sts (1 sc, inc in next st) x6 (2 sc, inc in next st) x6 (3 sc, inc in next st) x6 (4 sc, inc in next st) x6 (5 sc, inc in next st) x6 (6 sc, inc in next st) x6 48 sc 48 sts 48 sts Change to Oatmeal yarn;
Round 11: 6 sc in 2nd ch from hook inc in all 6 sts (1 sc, inc in next st) x6 (2 sc, inc in next st) x6 (3 sc, inc in next st) x6 (4 sc, inc in next st) x6 (5 sc, inc in next st) x6 (6 sc, inc in next st) x6 48 sc 48 sts 48 sts Change to Oatmeal yarn;
Round 12: 6 sc in 2nd ch from hook inc in all 6 sts (1 sc, inc in next st) x6 (2 sc, inc in next st) x6 (3 sc, inc in next st) x6 (4 sc, inc in next st) x6 (5 sc, inc in next st) x6 (6 sc, inc in next st) x6 48 sc 48 sts 48 sts Change to Oatmeal yarn;
Round 13: 48 sc Sl last st, cut yarn.
Round 14: 48 sc Sl last st, cut yarn.
Round 15: 48 sc Sl last st, cut yarn.
Round 16: 48 sc Sl last st, cut yarn.
Round 17: 48 sc Sl last st, cut yarn.
Round 18: 48 sc Sl last st, cut yarn.
Round 19: 48 sc Sl last st, cut yarn.
Round 20: 48 sc Sl last st, cut yarn.
Round 21: 48 sc Sl last st, cut yarn.
Round 22: 48 sc Sl last st, cut yarn.
Round 23: 48 sc Sl last st, cut yarn.
Round 24: 48 sc Sl last st, cut yarn.
Round 25: 48 sc Sl last st, cut yarn.
Round 26: 48 sc Sl last st, cut yarn.
— Bottom Of Mouth :
Round 1: 6 sts;
Round 2: 12 sts;
Round 3: 18 sts;
Round 4: 24 sts;
Round 5: 30 sts;
Round 6: 36 sts;
Round 7: 42 sts;
Round 8: 6 sc in 2nd ch from hook inc in all 6 sts (1 sc, inc in next st) x6 (2 sc, inc in next st) x6 (3 sc, inc in next st) x6 (4 sc, inc in next st) x6 (5 sc, inc in next st) x6 (6 sc, inc in next st) x6 48 sts;
Round 9: 48 sts Change to Oatmeal yarn;
Round 10: 48 sts Change to Oatmeal yarn;
Round 11: 48 sts Change to Oatmeal yarn;
Round 12: 48 sts Change to Oatmeal yarn;
Round 13: 48 sc;
Round 14: 48 sc;
Round 15: 48 sc;
Round 16: 48 sc;
Round 17: 48 sc;
Round 18: 48 sc;
Round 19: 48 sc;
Round 20: 48 sc;
Round 21: 48 sc;
Round 22: 48 sc;
Round 23: 48 sc;
Round 24: 54 sc;
Round 25: (7 sc, dec) x6;
Round 26: 48 sc 48 sts If you would like to make your puppet longer of shorter adjust the amount of rows worked here. Sl last st, tie off and finish. Eyes (Make 2) Using Ebony yarn Ch 2;
Round 27: 48 sc 48 sts If you would like to make your puppet longer of shorter adjust the amount of rows worked here. Sl last st, tie off and finish. Eyes (Make 2) Using Ebony yarn Ch 2;
Round 28: 48 sc 48 sts If you would like to make your puppet longer of shorter adjust the amount of rows worked here. Sl last st, tie off and finish. Eyes (Make 2) Using Ebony yarn Ch 2;
Round 29: 48 sc 48 sts If you would like to make your puppet longer of shorter adjust the amount of rows worked here. Sl last st, tie off and finish. Eyes (Make 2) Using Ebony yarn Ch 2;
Round 30: 48 sc 48 sts If you would like to make your puppet longer of shorter adjust the amount of rows worked here. Sl last st, tie off and finish. Eyes (Make 2) Using Ebony yarn Ch 2;
Round 31: 48 sc 48 sts If you would like to make your puppet longer of shorter adjust the amount of rows worked here. Sl last st, tie off and finish. Eyes (Make 2) Using Ebony yarn Ch 2;
Round 32: 48 sc 48 sts If you would like to make your puppet longer of shorter adjust the amount of rows worked here. Sl last st, tie off and finish. Eyes (Make 2) Using Ebony yarn Ch 2;
Round 33: 48 sc 48 sts If you would like to make your puppet longer of shorter adjust the amount of rows worked here. Sl last st, tie off and finish. Eyes (Make 2) Using Ebony yarn Ch 2;
Round 34: 48 sc 48 sts If you would like to make your puppet longer of shorter adjust the amount of rows worked here. Sl last st, tie off and finish. Eyes (Make 2) Using Ebony yarn Ch 2;
Round 35: 48 sc 48 sts If you would like to make your puppet longer of shorter adjust the amount of rows worked here. Sl last st, tie off and finish. Eyes (Make 2) Using Ebony yarn Ch 2;
Round 36: 48 sc 48 sts If you would like to make your puppet longer of shorter adjust the amount of rows worked here. Sl last st, tie off and finish. Eyes (Make 2) Using Ebony yarn Ch 2;
Round 37: 48 sc 48 sts If you would like to make your puppet longer of shorter adjust the amount of rows worked here. Sl last st, tie off and finish. Eyes (Make 2) Using Ebony yarn Ch 2;
Round 38: 48 sc 48 sts If you would like to make your puppet longer of shorter adjust the amount of rows worked here. Sl last st, tie off and finish. Eyes (Make 2) Using Ebony yarn Ch 2;
Round 39: 48 sc 48 sts If you would like to make your puppet longer of shorter adjust the amount of rows worked here. Sl last st, tie off and finish. Eyes (Make 2) Using Ebony yarn Ch 2;
Round 40: 48 sc 48 sts If you would like to make your puppet longer of shorter adjust the amount of rows worked here. Sl last st, tie off and finish. Eyes (Make 2) Using Ebony yarn Ch 2;
Round 41: 48 sc 48 sts If you would like to make your puppet longer of shorter adjust the amount of rows worked here. Sl last st, tie off and finish. Eyes (Make 2) Using Ebony yarn Ch 2;
Round 42: 48 sc 48 sts If you would like to make your puppet longer of shorter adjust the amount of rows worked here. Sl last st, tie off and finish. Eyes (Make 2) Using Ebony yarn Ch 2;
Round 43: 48 sc 48 sts If you would like to make your puppet longer of shorter adjust the amount of rows worked here. Sl last st, tie off and finish. Eyes (Make 2) Using Ebony yarn Ch 2;
Round 44: 48 sc 48 sts If you would like to make your puppet longer of shorter adjust the amount of rows worked here. Sl last st, tie off and finish. Eyes (Make 2) Using Ebony yarn Ch 2;
Round 45: 48 sc 48 sts If you would like to make your puppet longer of shorter adjust the amount of rows worked here. Sl last st, tie off and finish. Eyes (Make 2) Using Ebony yarn Ch 2;
Round 46: 48 sc 48 sts If you would like to make your puppet longer of shorter adjust the amount of rows worked here. Sl last st, tie off and finish. Eyes (Make 2) Using Ebony yarn Ch 2;
Round 47: 48 sc 48 sts If you would like to make your puppet longer of shorter adjust the amount of rows worked here. Sl last st, tie off and finish. Eyes (Make 2) Using Ebony yarn Ch 2;
Round 48: 48 sc 48 sts If you would like to make your puppet longer of shorter adjust the amount of rows worked here. Sl last st, tie off and finish. Eyes (Make 2) Using Ebony yarn Ch 2;
Round 49: 48 sc 48 sts If you would like to make your puppet longer of shorter adjust the amount of rows worked here. Sl last st, tie off and finish. Eyes (Make 2) Using Ebony yarn Ch 2;
Round 50: 48 sc 48 sts If you would like to make your puppet longer of shorter adjust the amount of rows worked here. Sl last st, tie off and finish. Eyes (Make 2) Using Ebony yarn Ch 2;
— Eyes (Make 2) :
Round 1: 6 sts;
Round 2: 6 sc in 2nd ch from hook inc in all 6 sts 12 sts Change to Frost yarn;
Round 3: 18 sts;
Round 4: (1 sc, inc in next st) x6 (2 sc, inc in next st) x6 24 sts Change to Oatmeal yarn;
Round 5: 30 sts;
Round 6: 30 sts;
Round 7: 30 sts;
Round 8: 30 sts;
Round 9: 30 sts;
Round 10: 24 sts;
Round 11: (3 sc, inc in next st) x6 30 sc (3 sc, dec) x6 (2 sc, dec) x6 18 sts 12 sts Start to stuff;
Round 12: (1 sc, dec) x 6;
Round 13: dec x6 6 sts Finish stuffing and close hole, leave enough yarn to sew to puppet later.
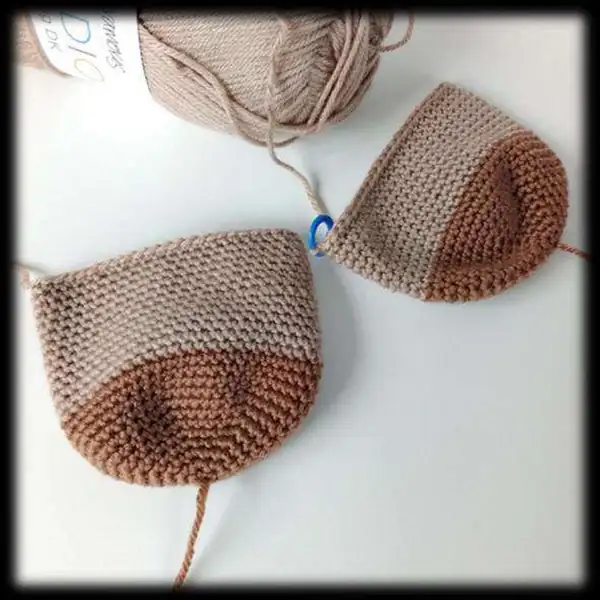
— Ears :
Round 1: 6 sts;
Round 2: 12 sts;
Round 3: 18 sts;
Round 4: 24 sts;
Round 5: 30 sts;
Round 6: 36 sts;
Round 7: 42 sts;
Round 8: 42 sts;
Round 9: 42 sts;
Round 10: 42 sts;
Round 11: 42 sts;
Round 12: 42 sts;
Round 13: Start 6 sc in a magic ring inc in all 6 sts (1 sc, inc in next st) x6 (2 sc, inc in next st) x6 (3 sc, inc in next st) x6 (4 sc, inc in next st) x6 (5 sc, inc in next st) x6 42 sc (5 sc, dec in next st) x6 36 sts;
Round 14: 36 sts;
Round 15: 36 sts;
Round 16: 36 sts;
Round 17: 36 sts;
Round 18: 36 sts;
Round 19: 36 sc (sc 4, dec in next st) x6 30 sts;
Round 20: 30 sc 30 sts;
Round 21: 30 sc 30 sts;
Round 22: 30 sc 30 sts;
Round 23: 30 sc 30 sts;
Round 24: 30 sc 30 sts;
Round 25: 30 sc 30 sts;
Round 26: 30 sc 30 sts;
Round 27: (sc 3, dec in next st) x6 24 sts;
Round 28: 24 sc 24 sts Push both sides of the ears together, sc through both sides to close the top of the ear. Sl last stitch, cut yarn leaving enough thread to sew to head later. Nose Using Ebony yarn;
Round 29: 24 sc 24 sts Push both sides of the ears together, sc through both sides to close the top of the ear. Sl last stitch, cut yarn leaving enough thread to sew to head later. Nose Using Ebony yarn;
Round 30: 24 sc 24 sts Push both sides of the ears together, sc through both sides to close the top of the ear. Sl last stitch, cut yarn leaving enough thread to sew to head later. Nose Using Ebony yarn;
Round 31: 24 sc 24 sts Push both sides of the ears together, sc through both sides to close the top of the ear. Sl last stitch, cut yarn leaving enough thread to sew to head later. Nose Using Ebony yarn;
Round 32: 24 sc 24 sts Push both sides of the ears together, sc through both sides to close the top of the ear. Sl last stitch, cut yarn leaving enough thread to sew to head later. Nose Using Ebony yarn;
— Ears (Make 2) :
Round 1: 6 sts;
Round 2: 12 sts;
Round 3: 18 sts;
Round 4: 24 sts;
Round 5: 30 sts;
Round 6: 30 sts;
Round 7: 24 sts;
Round 8: 18 sts;
Round 9: Start 6 sc in a magic ring inc in all 6 sts (2 sc, 2 inc) x3 3 sc, 2 inc, (4 sc, 2 inc) x2, 1 sc 4 sc, 2 inc, (6 sc, 2 inc) x2, 2 sc 30 sc 5 sc, 2 dec, (6 sc, 2 dec) x2, 1 sc (2 sc, dec) x6 (1 sc, dec) X6 12 sts Stuff lightly;
Round 10: (1 dec) x6 6 sts Stuff a little more if needed. Close leaving a really long thread, this will be used to sew on to top of mouth later.
This little dog puppet is perfect for gifting or family playtime. It blends approachable techniques with a charming result that will spark stories and smiles.
With careful assembly and steady patience, you’ll produce a durable toy ready for hours of imaginative adventures. Thank you for choosing this pattern and happy crocheting!
Enjoy the process, and may your puppet bring joy to many pretend-play moments.
Warm wishes for your crochet journey!