Crochetologist
Free Crochet Pattern
Beautiful Detailed Adorable

Dog Buddies Amigurumi Pattern

Dog amigurumi head and torso in soft browns
4.2Rating
4-6 HoursTime
Beginner FriendlySkill
Highlights

What makes it special

Made with Love

An adorable friend to cherish, handcrafted with love to bring comfort and joy for years to come.

Weekend Treat

Takes about 4 to 6 hours, a relaxed weekend project that builds confidence with basic stitches and precise finishing.

Beginner Friendly Level

This pattern is accessible to crafters new to amigurumi while still offering challenges for seasoned crocheters through clean colorwork, simple increases, precise seaming, and deliberate stuffing. Practicing basic in-the-round construction, straightforward color changes, and clear assembly helps build confidence while delivering a sturdy, endearing buddy. The project emphasizes consistent tension, symmetrical shaping, and efficient finishing to produce a resilient toy that remains enjoyable to make and to share.

A friendly amigurumi dog designed for clear progress and lasting smiles. This project unfolds with simple rounds and seamless joins, yielding a cuddly companion that’s sturdy enough for play and soft enough for display. The pattern emphasizes proportional balance, gentle curves, and a compact footprint that sits happily on a shelf or in a child’s lap. Whether you’re new to crocheting or returning to a beloved craft, the journey from starter tail to finished face is inviting, organized, and rewarding.

About This Dog Buddies Amigurumi Pattern

The pattern opens with a compact head assembly that blends into the body in a single, cohesive unit. From there, two simple legs and two arms extend from the torso, followed by ears worked separately and attached toward the top of the head to preserve a clean, toy-like silhouette. A snout is added as a gentle accent to bring character without complicating construction. All color changes are gradual, designed to be forgiving for beginners, and the stitching density remains even to keep the surface smooth. The finished piece balances proportion and playability, yielding a cuddly buddy that’s sturdy enough for daily handling yet soft enough for bedtime hugs. The design favors clean lines, straightforward assembly, and a friendly, child-ready finish that can be completed with standard amigurumi techniques.

Dog ears and snout detail close-up

What makes this dog stand out is the balance between simplicity and charm. The color-blocking approach uses a light brown as the main hue, complemented by gentle accent tones that echo classic canine markings. The limbs and ears attach in a way that preserves the toy’s smooth, sculpted form, with seams aligned to read as natural joints rather than visible breaks. Assembly emphasizes symmetry—matching limbs, aligning eyes, and centering features prove worthwhile for a balanced result. Stuffing is added gradually to hold shape without overfilling, and ends are woven in as progress is made to keep the finish neat. The pattern is designed to be forgiving: each change in color occurs at a natural row boundary, so the transitions look intentional rather than hurried. When complete, the dog stands or sits with an affectionate, approachable presence suitable for play or display and makes a dependable gift or companion for a child on any adventure.

Stitches & Skills You'll Use

Stitch technique focuses on standard amigurumi methods. Begin with a foundation chain to establish the starting point for the head, then form the assembled rounds using single crochet worked in the round. Increase in a controlled manner to shape the head and limbs, and decrease to taper areas without creating bulky lumps. The eyes and nose are secured with precise placement before closing the final surface, and the mouth line is added with careful back-and-forth stitching on the face rather than attempting a specialized texture. After assembling the main pieces, join them with neat mattress stitching-like seams that sit flush to the surface, then weave in beginnings and ends along the interior to avoid visible thread tails on the exterior. Color changes occur at clean boundaries, with the working yarn carried along the inside of the piece when possible to reduce pucker. The finishing steps include verifying symmetry, nudging stuffing into corners, and tucking away any trailing ends for a polished appearance. Throughout, the project remains within the scope of ordinary crocheting techniques and does not tout any single stitch beyond basic increases, decreases, and standard color-change practices.

Why You'll Love This Dog Buddies Amigurumi Pattern

The design aims to deliver an amigurumi that feels special despite its simplicity. The gentle curves, clear color blocks, and tidy construction create a toy that is as satisfying to stitch as it is to cuddle. Watching color blocks align and ears settle into a precise angle brings a sense of accomplishment, reinforcing why crocheters enjoy turning yarn into character. The process remains accessible—basic rounds, minimal shaping, and straightforward assembly—yet the outcome is durable, with a soft, squeezable body that travels well and holds up to ordinary play. This pattern functions as a warm, tangible expression of care: a handmade friend that can be made quickly enough to gift, yet with enough character to become a cherished keepsake. The finished dog embodies the dual pleasures of speed and charm, making it a reliable pattern for expanding a crochet repertoire.

Colour & Yarn Inspiration

Color ideas celebrate personality and memory. Start with Soft Brown as the main hue to anchor the dog’s friendly vibe, then choose accent colors like yellow, white, or a pale tan for facial highlights. Consider a two-tone approach: switch the body to a cool blue with a warm tan head for a playful, modern look, or go classic with browns and creams for a traditional canine feel. For a festive twist, swap in red and green for a Christmas pup, or soft pastel blocks for a springtime companion. The key is to keep the shading gentle and the transitions clean, so the character remains approachable and huggable. Substituting colors affects the mood; experiment with a single color family or multiple contrasting shades to pick a look that resonates with the recipient.

If using variegated yarn, test a small sample to see how color changes appear when worked in rounds. Maintain the main body color for consistency and reserve variegated yarn for accents like ears or the snout. Ensure the ears and snout have adequate contrast to make facial features pop. Adjust the color count and order so changes occur at stable boundaries, preserving a recognizable silhouette while expressing personal style. A thoughtful palette enhances the finished toy’s cohesion, regardless of the chosen color path.

Finished dog amigurumi pose with friend line-up

Switch Things Up

I keep a few simple tweaks ready to customize this design for different folks and spaces. I often swap in soft pastels for a gentler vibe or switch to brighter primaries for a playful look. When I want a larger cuddle buddy, I increase the yarn weight and adjust the hook size accordingly, ensuring the density remains comfortable to hug. For a gift with personality, I add subtle embroidery on the head or a tiny collar accessory crocheted in a contrasting color. I also enjoy experimenting with different facial expressions by repositioning the eyes slightly and adjusting the mouth line for a smile or a curious look. If you want a mini version for a keychain, use finer yarn and a smaller hook and keep the stuffing lighter to preserve portability.

Ways to Use & Gift It

Gifting a handcrafted dog amigurumi is a heartfelt gesture that says you’ve put time, care, and skill into someone’s happiness. This little pup makes a perfect present for birthdays, new babies, or as a comforting grow-with-me companion for kids starting school. It also doubles as a desk buddy for adults seeking a touch of whimsy in their workspace. For a family gift, assemble a small ‘dog family’ set in different colors, so each member receives a unique friend while maintaining a cohesive collection. If you’re the crafty type, pair the amigurumi with a lightweight backpack charm or keychain, turning the toy into a portable reminder of home. The act of giving becomes part of the joy when the recipient experiences the tactile warmth of yarn and a handmade smile.

Additionally, this design is ideal for class bonding; you can organize a small crochet circle to create a few pups for a local charity drive or hospital outreach. The process is accessible enough for beginners to join, while still offering room for seasoned crocheters to add their signature styling with color tweaks or accessory details. When you gift, you’re not just handing over a toy; you’re sharing a companion and a story woven in yarn and time. The result is a treasure that grows with the recipient and the maker alike, a symbol of care that lasts beyond the moment of giving.

Common Mistakes & How to Fix Them

Not marking the start of each round can lead to miscounted rounds; use a locking stitch marker at the beginning of every round and verify counts after each increase or decrease. Overstuffing the head or limbs creates a stiff, less cuddly toy; stuffing gradually and testing firmness as you go helps preserve the intended squish. Tension changes during color transitions can produce visible joins; maintain a steady tension and weave in ends as you switch colors. Skipping safety features or misplacing facial details can reduce expression; place eyes and nose before closing the final seam and compare symmetry against the reference plan.

Maker's Notes

When constructing this dog, use a worsted-weight yarn and a hook size that yields a fabric density comfortable for hugging. A unit-efficient approach helps maintain even tension and consistent shape across the body. A typical time estimate ranges from several hours to a full afternoon for beginners, with longer durations when adding color changes or experimenting with different facial expressions. Label each color transition with a marker or sticky note to maintain the sequence and prevent confusion. Achieving symmetry relies on careful seam placement and balanced stuffing; allocate extra attention to the head and torso junctions. It is normal to adjust rounds during assembly as you refine proportions; patience with these refinements yields a more polished end result.

I tried a substitution: Substituting the main body color with a lighter beige while keeping the same hook size produced a softer appearance without altering the overall silhouette. The proportions and head balance remained intact, as did the density and feel of the stuffed areas. Gauge consistency was preserved, so the limbs still aligned with the torso and the seams remained neat. When performing color substitutions, it is crucial to maintain consistent yarn thickness; otherwise, adjust the stuffing to preserve the intended squish and weight. The substituted version reads clearly as a dog buddy and offers a fresh look that remains faithful to the original design’s character.

Dog Buddies Amigurumi Pattern

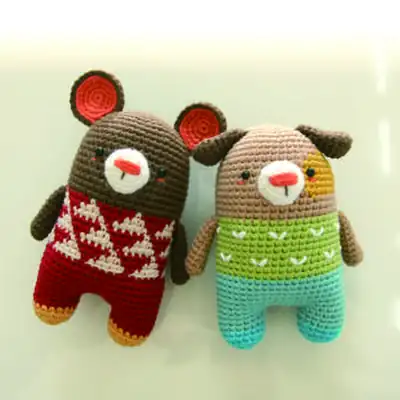
A cozy dog amigurumi pattern with simple rounds, color changes, and a cuddly finish. Free crochet pattern with clear instructions and playful results. Start today!

Beginner Friendly 4-6 Hours
Pattern at a glance
Skill level
Beginner Friendly
Time to make
4-6 Hours
Hook size
3.0 mm (C/2)
Yarn weight
Worsted / #4
Finished size
Approx. 15 cm tall
Gauge
Not critical; aim for uniform single-stitch density across rounds
Yarn used
Main color approx. 120-150 g; accents ~20-30 g total

Materials Needed

Main Fabric
  • 01
    Worsted weight yarn (#4), approx. 100 g main color in Soft Brown
  • 02
    Soft Brown yarn for head and limbs
  • 03
    Yellow yarn for accents
  • 04
    White yarn for snout details
  • 05
    Brown yarn for ears and shading
  • 06
    Orange/yellow for facial highlight (optional)
  • 07
    5mm Black plastic eyes x2
  • 08
    Polyester stuffing
Tools Required
  • 01
    Crochet hook size 3.0 mm (C/2)
  • 02
    Yarn needle for weaving in ends
  • 03
    Stitch markers
  • 04
    Polyester stuffing
  • 05
    Scissors
  • 06
    Safety eyes 5 mm (2 pieces)

— Head :

Round 20: Rnd 37~42 1st;
Round 21: Rnd 37~42 1st;
Round 22: Rnd 37~42 1st;
Round 23: Rnd 37~42 1st;
Round 24: Rnd 37~42 1st;
Round 25: Rnd 37~42 1st;
Round 26: Rnd 37~42 1st;
Round 27: Rnd 37~42 1st;
Round 28: Rnd 37~42 1st;
Round 29: Rnd 37~42 1st;
Round 30: Rnd 37~42 1st;
Round 31: Rnd 37~42 1st;
Round 32: Rnd 37~42 1st;
Round 33: Rnd 37~42 1st;
Round 34: Rnd 37~42 1st;
Round 35: Rnd 37~42 1st;
Round 36: Rnd 37~42 1st;

— Body :

Round 20: (Body) Rnd 37~42(Leg) 01 Page single stitch *Use single stitch method in the squared area unless there is no notice symbol. Head / Body / Legs SYMBOL PATTERN 1;
Round 21: (Body) Rnd 37~42(Leg) 01 Page single stitch *Use single stitch method in the squared area unless there is no notice symbol. Head / Body / Legs SYMBOL PATTERN 1;
Round 22: (Body) Rnd 37~42(Leg) 01 Page single stitch *Use single stitch method in the squared area unless there is no notice symbol. Head / Body / Legs SYMBOL PATTERN 1;
Round 23: (Body) Rnd 37~42(Leg) 01 Page single stitch *Use single stitch method in the squared area unless there is no notice symbol. Head / Body / Legs SYMBOL PATTERN 1;
Round 24: (Body) Rnd 37~42(Leg) 01 Page single stitch *Use single stitch method in the squared area unless there is no notice symbol. Head / Body / Legs SYMBOL PATTERN 1;
Round 25: (Body) Rnd 37~42(Leg) 01 Page single stitch *Use single stitch method in the squared area unless there is no notice symbol. Head / Body / Legs SYMBOL PATTERN 1;
Round 26: (Body) Rnd 37~42(Leg) 01 Page single stitch *Use single stitch method in the squared area unless there is no notice symbol. Head / Body / Legs SYMBOL PATTERN 1;
Round 27: (Body) Rnd 37~42(Leg) 01 Page single stitch *Use single stitch method in the squared area unless there is no notice symbol. Head / Body / Legs SYMBOL PATTERN 1;
Round 28: (Body) Rnd 37~42(Leg) 01 Page single stitch *Use single stitch method in the squared area unless there is no notice symbol. Head / Body / Legs SYMBOL PATTERN 1;
Round 29: (Body) Rnd 37~42(Leg) 01 Page single stitch *Use single stitch method in the squared area unless there is no notice symbol. Head / Body / Legs SYMBOL PATTERN 1;
Round 30: (Body) Rnd 37~42(Leg) 01 Page single stitch *Use single stitch method in the squared area unless there is no notice symbol. Head / Body / Legs SYMBOL PATTERN 1;
Round 31: (Body) Rnd 37~42(Leg) 01 Page single stitch *Use single stitch method in the squared area unless there is no notice symbol. Head / Body / Legs SYMBOL PATTERN 1;
Round 32: (Body) Rnd 37~42(Leg) 01 Page single stitch *Use single stitch method in the squared area unless there is no notice symbol. Head / Body / Legs SYMBOL PATTERN 1;
Round 33: (Body) Rnd 37~42(Leg) 01 Page single stitch *Use single stitch method in the squared area unless there is no notice symbol. Head / Body / Legs SYMBOL PATTERN 1;
Round 34: (Body) Rnd 37~42(Leg) 01 Page single stitch *Use single stitch method in the squared area unless there is no notice symbol. Head / Body / Legs SYMBOL PATTERN 1;
Round 35: (Body) Rnd 37~42(Leg) 01 Page single stitch *Use single stitch method in the squared area unless there is no notice symbol. Head / Body / Legs SYMBOL PATTERN 1;
Round 36: (Body) Rnd 37~42(Leg) 01 Page single stitch *Use single stitch method in the squared area unless there is no notice symbol. Head / Body / Legs SYMBOL PATTERN 1;

— Legs X2 :

Round 1: scx6 in the yarn loop, tighten the loop [6 sts];
Round 2: (2-sc inc) x 6 [12];
Round 3: (scx1, 2-sc inc) x 6 [18];
Round 4: (scx2, 2-sc inc) x 6 [24];
Round 5: (scx3, 2-sc inc) x 6 [30];
Round 6: (scx4, 2-sc inc) x 6 [36];
Round 7: (scx5, 2-sc inc) x 6 [42];
Round 8: (scx6, 2-sc inc) x 6 [48];
Round 9: sc in all 48 st [48];
Round 10: sc in all 48 st [48];
Round 11: sc in all 48 st [48];
Round 12: sc in all 48 st [48];
Round 13: sc in all 48 st [48];
Round 14: sc in all 48 st [48];
Round 15: sc in all 48 st [48];
Round 16: sc in all 48 st [48];
Round 17: sc in all 48 st [48];
Round 18: sc in all 48 st [48];
Round 19: sc in all 48 st [48];
Round 20: sc in all 48 st [48];
Round 21: sc in all 48 st [48];
Round 22: sc in all 48 st [48];
Round 23: sc in all 48 st [48];
Round 24: sc in all 48 st [48];
Round 25: sc in all 48 st [48];
Round 26: sc in all 48 st [48];
Round 27: sc in all 48 st [48];
Round 28: sc in all 48 st [48];
Round 29: sc in all 48 st [48];
Round 30: sc in all 48 st [48];
Round 31: sc in all 48 st [48];
Round 32: sc in all 48 st [48];
Round 33: sc in all 48 st [48];
Round 34: sc in all 48 st [48];
Round 35: sc in all 48 st [48];
Round 36: sc in all 48 st [48];
Round 37: sc in all 18 st [18];
Round 38: sc in all 18 st [18];
Round 39: sc in all 18 st [18];
Round 40: sc in all 18 st [18];
Round 41: (scx1, sc2tog) x 6 [12];
Round 42: (sc2tog) x 6 [6];

— Tail :

Round 1: scx5 in the yarn loop, tighten the loop [5 sts];
Round 2: (2-sc inc) x 5 [10];
Round 3: sc in all 10 st [10];
Round 4: sc in all 10 st [10];
Round 5: sc in all 10 st [10];
Round 6: sc in all 10 st [10];
Round 7: sc in all 10 st [10];
Round 8: sc in all 10 st [10];
Round 9: sc in all 10 st [10];
Round 10: sc in all 10 st [10];
Round 11: sc in all 10 st [10];
Round 13: and 14. Eyes Location Fasten off, Leaving a long tail for sewing. Fill in some stuffing to the snout. And then make a nose and mouth on the snout. Snout Use the White yarn to make 4 chains. Rnd Snout symbol pattern. top bottom ② ③ ④ Section for the snout stitching on the face.

— Arms X2 :

Round 1: scx1 in second ch from hook,scx1 in the next chain, scx3 in the bottom chain, Working up the other side-scx1, scx2 in the next chain, slst [8 sts];
Round 2: ch 1, 2-sc inc, scx1, (2-sc inc) x 3, scx1, (2-sc inc) x 2, slst [14];
Round 3: ch 1, 2-sc inc, scx3, 2-sc inc, scx2, sc2tog, scx1, sc2tog, scx2, slst [14];
Round 4: ch 1, sc in all 14 st, slst [14];

— How to straighten a doll :

Round 1: scx5 in the yarn loop, tighten the loop [5 sts];
Round 2: (2-sc inc) x 5 [10];
Round 3: (scx1, 2-sc inc) x 5 [15];
Round 4: sc in all 15 st [15];
Round 5: scx6, sc2tog, scx5, sc2tog [13];
Round 6: scx6, sc2tog, scx5 [12];
Round 7: sc in all 12 st [12];
Round 8: (scx4, sc2tog) x 2 [10];
Round 9: sc in all 10 st [10];
Round 10: sc in all 10 st [10];

— Ear :

Round 26: (Repeat to the back) Fix Ear. Arms Location Clothes pattern Between Rnd 14 and 15. Cheek Location stitch *Complete face details and doll assemblies by referring to illustrations showing location for each part and pictures in the following description. Thank you.

Assembly Instructions

  1. Attach head to body by aligning the neck opening with the top of the body and whipstitch around the seam. Stuff lightly before final seam to ensure a neat shape.
  2. Sew each arm to the sides of the body between rounds 12–14, with the flat edge facing outward to resemble natural arms.
  3. Position legs between the body’s center and bottom edge, securing with several whipstitches in a straight line for stability.
  4. Attach ears to the top of the head, spacing them evenly, between rounds 3–6 from the crown, and align them to sit slightly forward.
  5. Embroider subtle facial features with black yarn or use safety eyes, then finish by weaving in all ends and smoothing yarn tails for a clean look.

Important Notes

  • Mark the start of each round to maintain precision, especially around the head and limb areas where increases and decreases occur.
  • Stuff firmly but avoid over-packing; a resilient toy should compress slightly when squeezed without losing shape.
  • Weave in all loose ends as you go to prevent stray threads from showing through the surface.
  • Check for symmetry by comparing the left and right sides of each limb; small deviations are more noticeable on amigurumi surfaces.

This cuddly dog is a cozy companion designed for gentle play and display. Its compact size makes it perfect for nursery shelves and gift baskets; it also travels well as a comforting friend. May your stitching be steady and your joy plentiful as you bring this cheerful pup to life.

Good to know

You ask, we answer

The finished amigurumi measures approximately 15 cm tall when using the recommended yarn and hook size. This height accommodates a child’s reach and a comfortable grip for hugging, while remaining compact enough for display on shelves or desks.

Yes, you can use different yarn weights, but the final size will shift accordingly. To maintain proportional scale, adjust the hook size in tandem with any change in yarn weight and test a small swatch to confirm density and stiffness before starting the full project.

This pattern is designed to be beginner-friendly, focusing on basic stitches, a simple assembly sequence, and forgiving color changes, while still delivering a charming final toy that shows careful shaping and tidy finishing.

Most crocheters complete the project in roughly four to six hours, depending on speed, familiarity with color changes, and how thoroughly the finishing steps are performed. Beginners may take longer, particularly during head shaping and seam alignment.

Top-down view of assembled dog with limbs
Join 100k+ crocheters

Get new free patterns, stitch tips and exclusive content in your inbox.